![]()
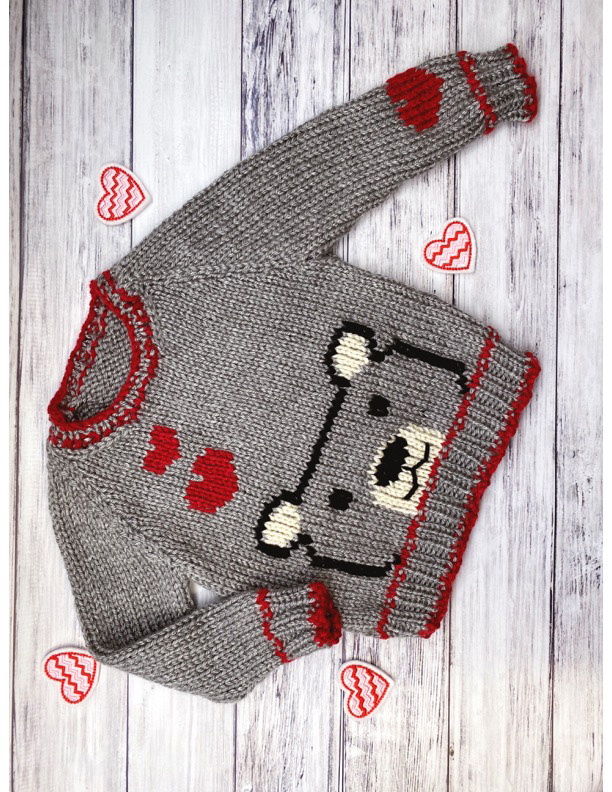
LION BRAND BEARY IN LOVE SWEATER User Manual

Pattern Number: M20357 BSAP
©2021 Lion Brand Yarn Company, all rights reserved.
SKILL LEVEL – INTERMEDIATE
SIZES
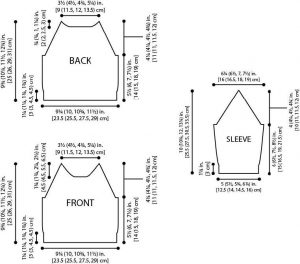
6 months (12 months, 18 months, 24 months)Finished Bust: 18 1/2 (20, 21 1/2, 23) in. (47 (51, 54.5, 58.5) cm)Finished Length: 9 3/4 (10 1/4, 11 1/2, 12 1/4) in. (25 (26, 29, 31) cm)
Note: Pattern is written for smallest size with changes for larger sizes in parentheses. When only one number is given, it applies to all sizes. To follow pattern more easily, circle all numbers pertaining to your size before beginning.
MATERIALS
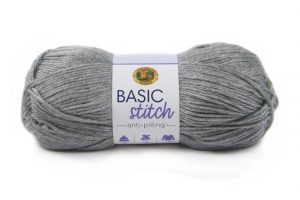
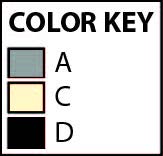
- LION BRAND® BASIC STITCH ANTI-PILLING™ (Art. #202)#404 Silver Heather 2 (2, 3, 4) balls (A)#400 Red Heather 1 ball (B)#098 Ecru 1 ball (C)#153 Black 1 ball (D)
- LION BRAND® knitting needles size 6 (4 mm)
- LION BRAND® knitting needles size 8 (5 mm)
- LION BRAND® stitch markers
- LION BRAND® stitch holders
- LION BRAND® large-eyed blunt needle
GAUGE
20 sts + 30 rows = about 4 in. (10 cm) in St st (k on RS, p on WS) with larger needles.BE SURE TO CHECK YOUR GAUGE.
PATTERN STITCH
K2, p2 Rib (worked over a multiple of 4 sts)Row 1: *K2, p2; rep from * to end of row.Row 2: K the knit sts and p the purl sts.Rep Row 2 for K2, p2 Rib.
NOTES
- Sweater is made in 4 pieces: Back, Front, and 2 Sleeves.
- All pieces are worked in St st (k on RS, p on WS).
- Yarn color is changed following Bear Chart for Bear on Front. When working from chart, read RS rows from right to left and WS rows from left to right.
- Bear Chart is worked in in tarsia color work. Wind yarn into smaller balls and use a separate ball of yarn for each color. Do not carry unused colors across WS of work.
- Hearts are embroidered on Sleeves in duplicate st, following Heart Charts.
- When you see ‘work in pattern as established’ in the instructions, this means to work the next row of the pattern, lining up sts as in previous rows.
- When you see work ‘even’ in the instructions, this means to continue on in the pattern st you have established without changing the st count by increasing, decreasing, or binding off.
BACK
With smaller needles and B, cast on 44 (48, 52, 56) sts.
Lower Ribbed BandChange to A.Work in K2, p2 Rib for 8 (8, 12, 12) rows.Change to B.Increase Row: K1, k into front and back of next st (inc made), work in rib as established to last 2 sts, p intofront and back of next st, p last st– you will have 46 (50, 54, 58) sts in this row.,Change to larger needles and A.Cut B.Beg with a RS (knit) row, work in St st (k on RS, p on WS) for 32 (36, 40, 44) rows.
Shape Raglan ArmholesNext 2 Rows: Bind off 2 (2, 2, 3) sts, work in St st to end of row – 42 (46, 50, 52) sts.Work even in St st for 2 rows.Next Row (Decrease Row): Work in St st and decrease 1 st at each edge – 40 (44, 48, 50) sts.Rep last 3 rows 7 more times – 26 (30, 34, 36) sts when all decreases have been completed.Work even in St st for 0 (1, 1, 1) row(s). Note: When you see ‘0’ repeats in an instruction, this means that for that size, you should not perform that particular instruction, just skip to the next instruction.
Shape NeckRow 1: Work in St st over first 6 (6, 8, 8) sts for first side of neck, place next 14 (18, 18, 20) sts on a holder for back neck, join a 2nd ball of yarn and work in St st to end of row for second side of neck – 6 (6, 8, 8) sts for each side of neck.You will now work both sides of neck AT THE SAME TIME using separate balls of yarn.Row 2: On each side, work in St st and decrease 1 st at each armhole and neck edge – 4 (4, 6, 6) sts for each side of neck.Row 3: On each side, work in St st and decrease 1 st at neck edge – 3 (3, 5, 5) sts for each side of neck.Row 4: On each side, work even in St st.Row 5: On each side, work in St st and decrease 1 st at armhole edge – 2 (2, 4, 4) sts for each side of neck.
Sizes 6 months (12 months) ONLYBind off.
Sizes 18 months (24 months) ONLYWork even in St st for 1 (3) row(s).
Next Row: On each side, work in St st and decrease 1 st at each edge – 2 sts for each side of neck.Bind off.
FRONT
Cast on and work Lower Ribbed Band as for Back – 46 (50, 54, 58) sts.Change to larger needles and A.Cut B.
Begin ChartRow 1 (RS): With A, k9 (11, 13, 15), place marker (pm), work Row 1 of Bear Chart over next 28 sts, pm; with A, k to end of row.Row 2: With A, p to first marker, slip marker (sm), work Row 2 of Bear Chart to next marker, sm; with A, p to end of row. Continue to slip markers as you come to them.Continue to work in St st, changing yarn color following Bear Chart between markers, until all 25 rows of Chart have been completed.Cut C and D.With A only, work in St st for 7 (11, 15, 19) rows.
Shape Raglan ArmholesNext 2 Rows: Bind off 2 (2, 2, 3) sts, work in St st to end of row – 42 (46, 50, 52) sts when all bind offs have been completed.Work even in St st for 2 rows.Next Row (Decrease Row): Work in St st and decrease 1 st at each edge – 40 (44, 48, 50) sts.Rep last 3 rows 4 more times – 32 (36, 40, 42) sts when all decreases have been completed.Work even in St st for 0 (1, 1, 1) row(s).
Shape NeckRow 1: Work in St st over first 13 (13, 15, 15) sts for first side of neck, place next 6 (10, 10, 12) sts on a holder for front neck, join a 2nd ball of yarn and work in St st to end or row for second side of neck – 13 (13, 15, 15) sts for each side of neck.
You will now work both sides of neck AT THE SAME TIME using separate balls of yarn.Row 2: On each side, work in St st and decrease 1 st at each neck and armhole edge – 11 (11, 13, 13) sts for each side of neck.Rows 3 and 4: On each side, work in St st and decrease 1 st at neck edge – 9 (9, 11, 11) sts for each side of neck in Row 4.Row 5: On each side, work in St st and decrease 1 st at each edge – 7 (7, 9, 9) sts for each side of neck.Rows 6 and 7: On each side, work in St st and decrease 1 st at neck edge – 5 (5, 7, 7) sts for each side of neck in Row 7.Row 8: On each side, work in St st and decrease 1 st at armhole edge – 4 (4, 6, 6) sts for each side of neck.Rows 9 and 10: One each side, work even in St st.Row 11: On each side, work in St st and decrease 1 st at armhole edge – 3 (3, 5, 5) sts for each side of neck.Rows 12-14: Rep Rows 9-11 – 2 (2, 4, 4) sts for each side of neck in Row 14.
Sizes 6 months (12 months) ONLYBind off.
Sizes 18 months (24 months) ONLYWork even in St st for 1 (3) row(s).Next Row: On each side, work in St st and decrease 1 st at each edge – 2 sts for each side of neck.Bind off.
SLEEVES
(make 2)
With smaller needles and B, cast on 24 (24, 28, 28) sts.Change to A.
Lower Ribbed EdgeChange to A.Work in K2, p2 Rib for 8 rows.Change to B.
Increase Row: Work in K2, p2 Rib as established and increase 1 (3, 1, 3) sts evenly spaced across row – 25 (27, 29, 31) sts. Note: For sizes with a single increase, increase at the center of the row; for sizes with 3 increases, increase at the beginning and the end of the row (just as for Back Lower Ribbed Band) and at center of row.
Change to larger needles and A.Cut B.Beg with a RS (knit) row, work even in St st for 9 (9, 11, 13) rows.
Next Row (Increase Row): Work in St st and increase 1 st at each edge – 27 (29, 31, 33) sts.Rep last 10 (10, 12, 14) rows for 2 more times – 31 (33, 35, 37) sts when all increases have been completed.
Work even in St st for 6 (9, 11, 12) rows.
Shape CapNext 2 Rows: Bind off 2 (2, 2, 3) sts, work in St st to end of row – 27 (29, 31, 31) sts.Work even in St st for 2 rows.
Next Row (Decrease Row): Work in St st and decrease 1 st at each edge – 25 (27, 29, 29) sts.Rep last 3 rows for 1 (1, 1, 3) more times – 23 (25, 27, 23) sts after all decreases are completed.Work even in St st for 1 row.
Next Row (Decrease Row): Work in St st and decrease 1 st at each edge – 21 (23, 25, 21) sts.Rep last 2 rows for 10 (11, 12, 10) more times – 1 st remains after all decreases are completed.Bind off.
FINISHING
Sew raglan seams of Front, Back and Sleeves, leaving right back raglan seam unsewn for now.
EmbroideryHearts on Front and Sleeves are worked in duplicate st (sometimes called Swiss Darning). Duplicate st works over top of your original st, ‘duplicating’ the st in a new color.
Using photo as guide for placement, and following charts, embroider duplicate st hearts. Embroider one large heart and one small heart on Front and one large heart on left Sleeve.
Here’s how to duplicate st:
- Thread your blunt needle with a 24 in. (61 cm) length of yarn B.
- Find the column of sts on your Sweater where you’d like to embroider the lower tip of the heart. You’ll see that the sts in the column look like V’s.
- Bring your threaded needle through the fabric of the Sweater, from the wrong side out to the right side at the point of the V.
- Now slide the needle under the stitch ABOVE the one you’re duplicating.
- Now insert the needle from front to back at the same point you began. You will have made a V in yarn color B over the V in yarn color A!
- Continue in this same way to embroider all the sts on the chart.
- When you’re finished, bring the yarn through to the wrong side of the Sweater and knot.
NeckbandFrom RS with smaller needles and B, beg at unsewn raglan, pick up and k2 sts along right back neck edge, k14 (18, 18, 20) sts from back neck holder, pick up and k2 sts along left back neck edge, pick up and k11 (11, 11, 13) sts along left front neck edge, k6 (10, 10, 12) sts from front neck holder, pick up and k11 (11, 11, 13) sts along right front neck edge – 46 (54, 54, 62) sts.Change to A.Work in K2, P2 Rib for 4 (4, 6, 6) rows.Change to B.Bind off in rib.Sew right back raglan seam and neckband.Sew side and Sleeve seams.Weave in ends.
ABBREVIATIONS
beg = begin(ning)(s)k = knitp = purlrep = repeatRS = right sidest(s) = stitch(es)St st = Stockinette stitchWS = wrong side
Every effort has been made to produce accurate and complete instructions. We cannot be responsible for variance of individual knitters or crocheters, human error, or typographical mistakes.©2021 Lion Brand Yarn Company, all rights reserved.


For thousands of free patterns, visit our website www.LionBrand.comTo order visit our website www.lionbrand.com or call: (800) 258-YARN (9276) any time!
Copyright ©1998-2021 Lion Brand Yarn Company, all rights reserved. No pattern or other material may be reproduced — mechanically, electronically, or by any other means, including photocopying – without written permission of Lion Brand Yarn Company.
References
[xyz-ips snippet=”download-snippet”]