![]()
Free Knitting PatternLION BRAND® BASIC STITCH ANTI-PILLINGTMEMELIO CARDIGANPattern Number: M20406 BSAP

SKILL LEVEL INTERMEDIATE
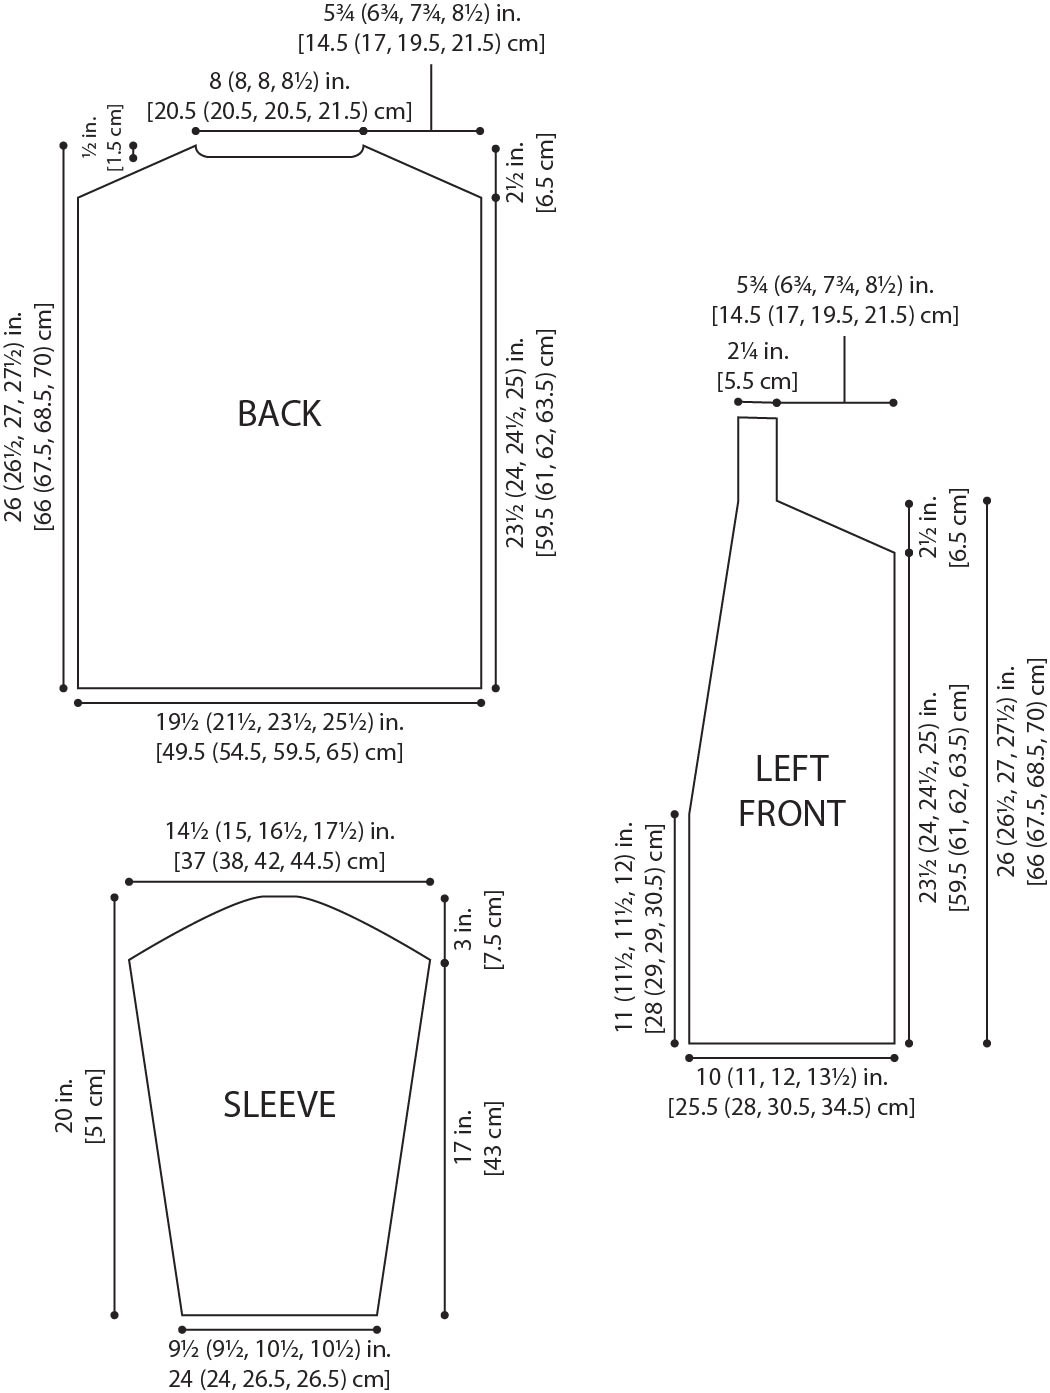
SIZESS (M, L,1X)Finished Bust: 39 (43, 47, 51) in. (99 (109, 119.5, 129.5) cm)Finished Length: 26 (26 1/2, 27, 27 1/2) in. (66 (67.5, 68.5, 70) cm)Note: Pattern is written for smallest size with changes for larger sizes in parentheses. When only one number is given, it applies to all sizes. To follow patterns more easily, circle all numbers pertaining to your size before beginning.MATERIALS
- LION BRAND® BASIC STITCH ANTI-PILLINGTM (Art. #202) #123 Cedarwood 6 (7, 8, 9) balls
- LION BRAND® knitting needles size 7 (4.5 mm)
- LION BRAND® stitch markers
- LION BRAND® large-eyed blunt needle
 GAUGE22 sts + 24 rows = about 4 in. (10 cm) in Sailor Rib pattern.BE SURE TO CHECK YOUR GAUGE.STITCH EXPLANATIONM1 (make 1) An increase worked by lifting the horizontal strand lying between needles and placing it onto the left needle. Knit this new stitch through the back loop 1 st increased.ssk (slip, slip, knit) Slip next 2 sts as if to knit, one at a time, to right needle; insert left needle into fronts of these 2 sts and knit them tog 1 st decreased.PATTERN STITCHESK1, p1 Rib (worked over an even number of sts)Row 1: *K1, p1; rep from * to end.Row 2: K the knit sts and p the purl sts.Rep Row 2 for K1, p1 Rib.K1, p1 Rib (worked over an odd number of sts)Row 1: K1, *p1, k1; rep from * to end.Row 2: K the knit sts and p the purl sts.Rep Row 2 for K1, p1 Rib.Lower Band PatternRow 1 (RS): Purl.Rows 2 and 3: Knit.Rows 4-6: Work in K1, p1 Rib for 3 rows.Rows 7 and 8: Knit.
Sailor Rib (Worked over a multiple of 5 sts + 1 additional st)Row 1: (RS): K1 tbl, *p1, k2, p1, k1 tbl; rep from * to end.Row 2: P1, *k1, p2, k1, p1; rep from * to end.Row 3: K1 tbl, *p4, k1 tbl; rep from * to end. Row 4: P1, *k4, p1; rep from * to end. Rep Rows 1-4 for Sailor Rib pattern.Slip Stitch Rib (worked over 12 sts) Row 1 (RS): (P2, k1, sl 1 wyib, k1) twice, p2. Row 2: (K2, p3) twice, k2. Rep Rows 1 and 2 for Slip Stitch Rib pattern.
NOTES1. Cardigan is made in 5 pieces: Back, 2 Fronts, and 2 Sleeves.2. With yarn in the back (wyib) refers to the side of the work that is away from you as you work the row. To move the yarn from front to back or back to front, bring yarn between needles. Take care not to wrap the yarn over a needle, this could create an additional st.3. When you see `work in pattern as established in the instructions, this means to work the next row of the pattern(s), lining up sts as in previous rows.4. When you see work `even’ in the instructions, this means to continue on in the pattern st you have established without changing the st count by increasing, decreasing, or binding off.5. Selvedge sts will be hidden in the seams when pieces are sewn together.
Note:The following corrections have been incorporated into the pattern below. We are highlighting the corrections separately here so that if you have printed out an earlier version of the pattern you’ll know what was changed.CORRECTIONS (applied March 22th, 2021)… Sailor Rib (Worked over a multiple of 5 sts + 1 additional st) .. Row 2: P1, *k1, p2, k1, p2 p1; rep from * to end. ..
Note:The following corrections have been incorporated into the pattern below. We are highlighting the corrections separately here so that if you have printed out an earlier version of the pattern you’ll know what was changed.CORRECTIONS (applied May 6th, 2021) BACK Cast on 108 (118, 130, 140 128, 138) sts. … Shape Shoulders Next 10 (6, 2, 8) Rows: Bind off 3 (4, 4, 5) sts, work in pattern to end of row you will have 78 (94, 122, 100 120, 98) sts when all bind-offs have been completed. Next 2 (6, 10, 4) Rows: Bind off 4 (4, 5, 6) sts, work in pattern to end of row 70 (70, 72, 76 70, 74) sts when all bind-offs have been completed.Shape Neck and Continue to Shape ShouldersPlace a marker on each side of center 40 (40, 40, 42 38, 40) sts. …
BACKCast on 108 (118, 128, 138) sts.
Beg with Row 1 of pattern, work Rows 1-8 of Lower Band pattern.Row 1 (RS): Sl 1 (selvage st), work Row 1 of Sailor Rib pattern to last st, p1 (selvage st).Row 2: Sl 1, work next row of Sailor Rib pattern to last st, p1.Continue in Sailor Rib pattern as established, slipping first st and purling last st for selvages, until piece measures about 23 1/2 (24, 24 1/2, 25) in. (59.5 (61, 62, 63.5) cm) from beg, end with a WS row as the last row you work.
Shape ShouldersNext 10 (6, 2, 8) Rows: Bind off 3 (4, 4, 5) sts, work in pattern to end of row you will have 78 (94, 120, 98) sts when all bind-offs have been completed. Next 2 (6, 10, 4) Rows: Bind off 4 (4, 5, 6) sts, work in pattern to end of row 70 (70, 70, 74) sts when all bind-offs have been completed.
Shape Neck and Continue to Shape ShouldersPlace a marker on each side of center 40 (40, 38, 40) sts.Row 1 (RS): Bind off 4 (4, 5, 6) sts, work in pattern to the first marker for the right side of neck, join 2nd ball of yarn and bind off sts between markers for back neck and remove markers, work in pattern to end of the row for the left side of neck 11 sts for the right side and 15 (15, 16, 17) sts for the left side.You will now work both sides of the neck AT THE SAME TIME using separate balls of yarn.Row 2: On the left side, bind off 4 (4, 5, 6) sts, work in pattern to end of side; on the right side, bind off 2 sts, work in pattern to end of side 9 sts for the right side and 11 sts for the left side.Row 3: On the right side, bind off rem 9 sts; on the left side, bind off 2 sts, work in pattern to end of side 9 sts rem on the left side. Bind off rem 9 sts of the left side
left side.Cast on 55 (60, 65, 75) sts.Row 1 (RS): Work Row 1 of Lower Band pattern to last 13 sts, place marker (pm), work Row 1 of Slip Stitch Rib pattern over next 12 sts (for the front band), p1 (selvage st).Row 2: Sl 1 (selvage st), work next row of Slip Stitch Rib pattern to marker, sm, work next row of Lower Band pattern to end of row. Continue in patterns as established, slipping marker as you come to it, until all 8 rows of Lower Band pattern have been worked.
BodyRow 1 (RS): Sl 1, work Row 1 of Sailor Rib pattern to marker, sm, work in Slip Stitch Rib pattern as established to last st, p1. Row 2: Sl 1, work in Slip Stitch Rib pattern as established to marker, sm, work next row of Sailor Rib pattern to last st, p1.
Continue in pattern as established, slipping first st and purling last st for selvages, until piece measures about 11 (11 1/2, 11 1/2, 12) in. (28 (29, 29, 30.5) cm) from beg, end with a WS row as the last row you work.
Shape Neck
Row 1 (Decrease Row – RS): Sl 1, work in Slip Stitch Rib pattern as established to marker, sm, ssk, work in Sailor Rib pattern as established to last st, p1 – 54 (59, 64, 74, 79, 84) sts.Work in pattern as established for 7 (7, 7, 5) rows.Rep last 8 (8, 8, 6) rows 9 (9, 8, 14) more times and AT THE SAME TIME when piece measures about 23 1/2 (24, 24 1/2, 25) in. (59.5 (61, 62, 63.5) cm) from beg, end with a WS row and beg Shape Shoulder.(following instructions below) and continue to work any remaining neck decreases.
Shape ShoulderRow 1 (RS): Sl 1, work in Slip Stitch Rib pattern to marker, sm, (if not all neck decreases have been completed, work ssk here), work in Sailor Rib pattern to last st, p1.Row 2: Bind off 3 (4, 4, 5) sts, work in Sailor Rib pattern to marker, sm, work in Slip Stitch Rib pattern to last st, p1.Rep Rows 1 and 2 for 4 (2, 0, 3) more times.Next Row (RS): Sl 1, work in Slip Stitch Rib pattern to marker, sm, (if not all neck decreases have been completed, work ssk here), work in Sailor Rib pattern to last st, p1.Next Row: Bind off 4 (4, 5, 6) sts, work in Sailor Rib pattern to marker, sm, work in Slip Stitch Rib pattern to last st, p1.Rep last 2 rows for 1 (3, 5, 2) more times, removing marker as you work the last bind off-row.Next Row: Sl 1, work in Slip Stitch Rib pattern to marker, sm, (if not all neck decreases have been completed, work ssk here), work in Sailor Rib pattern to last st, p1.Next Row: Bind off 9 sts, remove marker, work in Slip Stitch Rib pattern to last st, p1 – 13 sts.
Collar ExtensionRow 1 (RS): Sl 1, work in Slip Stitch Rib pattern to end of row.Row 2: Work in Slip Stitch Rib pattern to last st, p1.Continue even in Slip Stitch Rib pattern until collar extension measures long enough to reach the center of back neck. Bind off.
SLEEVES (make 2)
Cast on 53 (53, 58, 58) sts.Beg with Row 1 of pattern, work 8 rows of Lower Band pattern.Row 1 (RS): Sl 1 (selvage st), work Row 1 of Sailor Rib pattern to last st, p1 (selvage st).Row 2: Sl 1, work next row of Sailor Rib pattern to last st, p1.Increase Row (RS): Sl 1, M1, work in Sailor Rib pattern as established to last st, M1, p1 – 55 (55, 60, 60) sts.Continue in Sailor Rib pattern as established, slipping first st and purling last st for selvages and working new sts into a pattern for 5 (5, 5, 3) more row(s).Rep Increase Row – 57 (57, 62, 62) sts.Rep last 6 (6, 6, 4) rows for 11 (13, 14, 17) more times – 79 (83, 90, 96) sts when all increases have been completed.Work even in Sailor Rib pattern as established, slipping first st and purling last st for selvages, until piece measures about 17 in. (43 cm) from beg.
Shape CapNext 4 (10, 12, 6) Rows: Bind off 3 (4, 4, 4) sts, work in Sailor Rib pattern to end of row – 67 (43, 42, 72) sts.Next 14 (8, 6, 12) Rows: Bind off 4 (4, 5, 5) sts, work in Sailor Rib pattern to end of row – 11 (11, 12, 12) sts.Bind off.
FINISHING
Sew shoulder seams.Sew short ends of collar extensions together. Sew the edge of collar extensions to the back neck edge.Place markers on side edges of the Back and Fronts, about 7 1/2 (8, 8 1/2, 9) in. (19, 20.5, 21.5, 23) cm) from shoulder seam. Sew Sleeves between markers.Sew side and Sleeve seams.Weave in ends. Block to measurements.
ABBREVIATIONS
beg = begin(ning)(s)k = knitk2tog = knit 2 stitches togetherp = purlrep = repeatRS = right sidesl = slipst(s) = stitch(es)tbl = through the back loopWS = wrong side
Every effort has been made to produce accurate and complete instructions. We cannot be responsible for variance of individual knitters or crocheters, human error, or typographical mistakes.©2021 Lion Brand Yarn Company, all rights reserved.
References
[xyz-ips snippet=”download-snippet”]