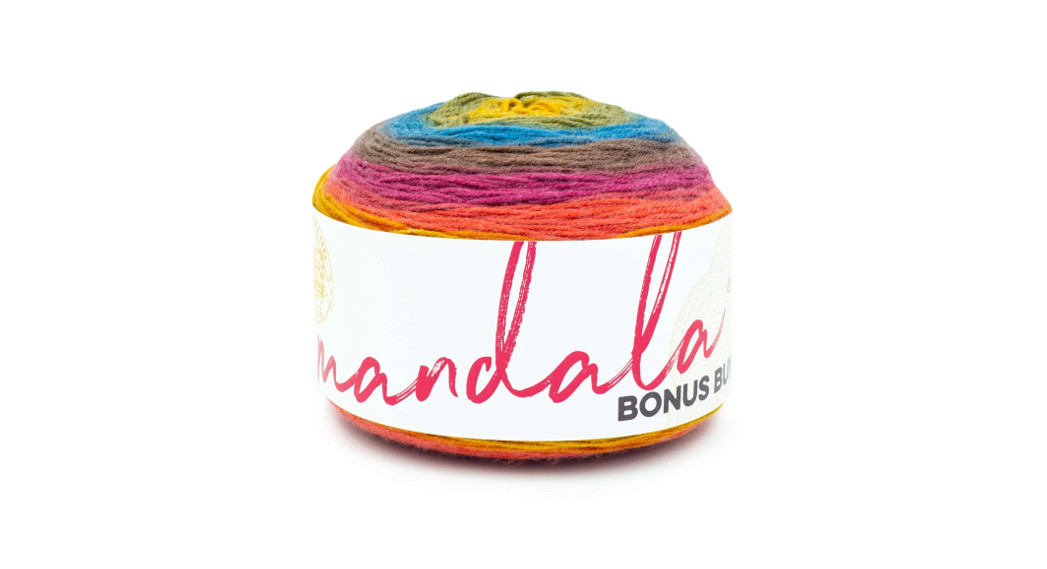
Free Knitting PatternLION BRAND® MANDALA® BONUS BUNDLE®
MAPLEWOOD CARDIGANPattern Number: M21098 MDBB

©2021 Lion Brand Yarn Company, all rights reserved.
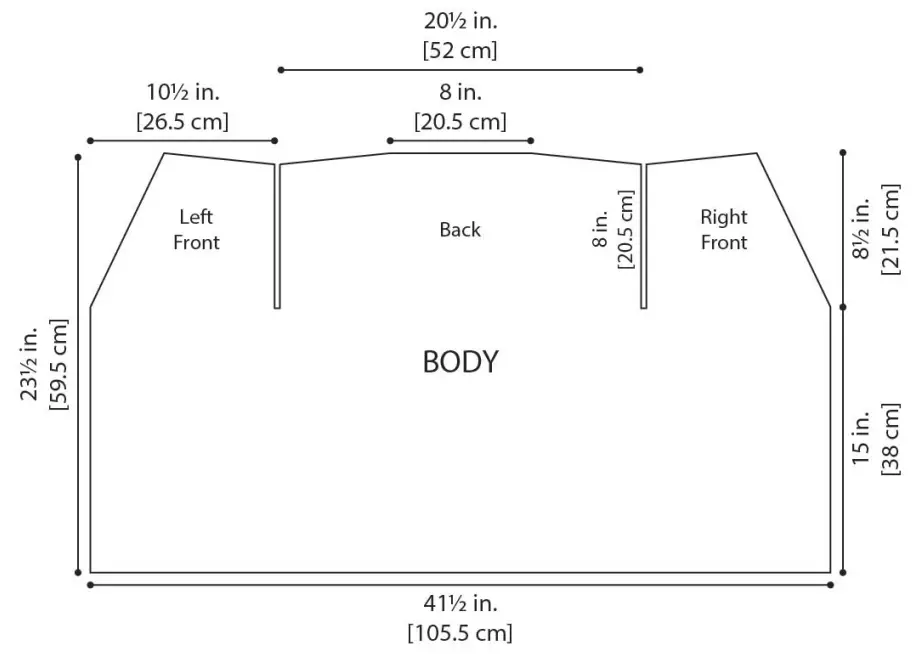
SKILL LEVEL – INTERMEDIATESIZESOne SizeFinished Bust 41 1/2 in. (105.5 cm)Finished Length 23 1/2 in. (59.5 cm)Note: Pattern is written for smaller size with changes for larger size in parentheses. When only one numberis given, it applies to both sizes. To follow patterns more easily, circle all numbers pertaining to your size before beginning.
MATERIALS
ADDITIONAL MATERIALSCircular knitting needle size 7 (4.5 mm), 36 in. (91.5 cm) longCircular knitting needle size 8 (5 mm), 36 in. (91.5 cm) long5 buttons, 1 in. (13 mm) diameter
GAUGE22 sts + 36 rows = about 4 in. (10 cm) in 2-Color Slip St pattern with larger needles. BE SURE TO CHECK YOUR GAUGE.
STITCH EXPLANATIONSM1 (make 1) An increase worked by lifting the horizontal strand lying between needles and placing it onto the left needle. Knit this new stitch through the back loop – 1 st increased.ssk (slip, slip, knit) Slip next 2 sts as if to knit, one at a time, to right needle; insert left needle into fronts of these 2 sts and knit them tog – 1 st decreased.
PATTERN STITCHES2-Color Slip Stitch Pattern (Worked over a multiple of 8 sts + 2 additional sts)Note: The contrast color will be specified within the pattern.
Row 1 (RS): With contrast color, * Sl 2 wyib, k6; rep from * to last 2 sts, sl 2 wyib.Row 2: With contrast color, * sl 2 wyif, p6; rep from * to last 2 sts, sl 2 wyif.Rows 3 and 4: With contrast color, rep Rows 1 and 2.Row 5: With contrast color, * sl 2 wyif, k6; rep from * to last 2 sts, sl 2 wyif.Row 6: With contrast color, * sl 2 wyib, p6; rep from * to last 2 sts, sl 2 wyib.Row 7: With A, * k4, sl 2 wyib, k2; rep from * to last 2 sts, k2.Row 8: With A, * p4, sl 2 wyif, p2; rep from * to last 2 sts, p2.Rows 9 and 10: With A, rep Rows 7 and 8.Row 11: With A, * k4, sl 2 wyif, k2; rep from * to last 2 sts, k2.Row 12: With A, * p4, sl 2 wyib, p2; rep from * to last 2 sts, p2.Rep Rows 1-12 for 2-Color Slip St pattern.
NOTES
- Cardigan is worked in 3 pieces: The body and 2 Sleeves.
- Before beginning, cut the 2 balls of yarn into 4 different color groups: yellow/beige, pinks, purple/blue, and light blue/grey. Will they separate colors into balls. The instructions refer to the yellow/beige as A, pinks as B, purple/blue as C, and light blue/grey as D.
- Each piece is worked from the lower ribbed band upwards. After the ribbed band is worked, the remainder of each piece is worked in a 2-Color Slip St pattern.
- The body is divided at underarms and fronts and back are then worked separately up to shoulders. Sleeves are worked separately and sewn into armholes.
- With yarn in front (wyif) refers to the side of the work facing you as you work the row; with yarn in back (wyib) refers to the side of the work that is away from you as you work the row. To move the yarn from front to back or back to front, bring yarn between needles. Take care not to wrap the yarn over a needle, this could create an additional st.
- Circular needles are used to accommodate the number of sts. Work back and forth in rows on circular needles as if working with straight needles.
- When you see ‘as established’ in the instructions, this means to continue in the current pattern st, lining up sts as in previous rows.
- When you see work ‘even’ in the instructions, this means to continue on in the pattern st you have established without changing the st count by increasing, decreasing, or binding off.
BODY
With smaller needles and B, cast on 228 sts.Row 1: Sl 1 as if to purl (selvedge st), * k2, p2; rep from * to last 3 sts, k2, p1 (selvedge st).Rep Row 1 until piece measures about 2 1/2 in. (6.5 cm) from beg. Change to larger needles.Note: 2-Color Slip St pattern uses yarn color A and one contrast color (B, C, or D). Use B for the contrast color until the piece measures about 8 in. (20.5 cm) from begging then use C for the contrast color for about another 8 in. (20.5 cm) and D for the contrast color until the piece is complete.Next Row (RS): Sl 1 as if to purl, work Row 1 of 2-Color Slip St pattern to last st, p1.Slipping first st and purling last st for selvages, work in 2-Color Slip St pattern as established until piece measures about 15 in. (38 cm) from beg, end with an RS row as the last row you work.
Divide for Back and FrontsRight FrontRow 1 (RS): Sl 1 as if to purl, ssk, work in 2-Color Slip St pattern as established over next 54 sts, p1; place next 112 sts on a holder for back and following 58 sts on a holder for left front – you will have 57 sts rem on the needle for right front.
Shape right neckSlipping first st and purling last st for selvages, work even in 2-Color Slip St pattern as established for 3 rows.Decrease Row (RS): Sl 1 as if to purl, ssk, work in 2-Color Slip St pattern as established to last st, p1 – 56 sts.Slipping first st and purling last st for selvages, work even in 2-Color Slip St pattern as established for 1 row.Rep Decrease Row – 55 sts Rep last 6 rows for 10 more times – 35 sts.Slipping first st and purling last st for selvages, work even in 2-Color Slip St pattern as established for 3 rowsRep Decrease Row – 34 sts.Work even in pattern as established until piece measures about 8 in. (20.5 cm) from divide, end with a RS row as the last row you work.Shape shoulderNext Row (WS): Bind off 11 sts, work in pattern as established to end of row – 23 sts.Next Row: Work even in pattern as established.Next Row (WS): Bind off 11 sts, work in pattern as established to end of row – 12 sts.Next Row: Work even in pattern as established.Bind off rem 12 sts.BackReturn the 112 back sts to the needle so that you are ready to work an RS row.Slipping first st and purling last st for selvages, work even in 2-Color Slip St pattern as established until piece measures about 8 in. (20.5 cm) from the divide.Shape shoulderNext 4 Rows: Bind off 11 sts, work in pattern as established to end of row – 68 sts when all bind-offs have been completed.Next 2 Rows: Bind off 12 sts, work in pattern as established to end of row – 44 sts when all bind-offs have been completed.Bind off rem 44 sts.Left FrontReturn the 58 left front sts to the needle so that you are ready to work an RS row.Shape left neckDecrease Row (RS): Sl 1 as if to purl, work in 2-Color Slip St pattern as established to last 3 sts, k2tog, p1 – 57 sts.Slipping first st and purling last st for selvages, work even in 2-Color Slip St pattern as established for 3 rows.Rep Decrease Row – 56 sts.Slipping first st and purling last st for selvages, work even in 2-Color Slip St pattern as established for 1 row.Rep last 6 rows for 11 more times – 34 sts when all decreases have been completed.Work even in pattern as established until piece measures about 8 in. (20.5 cm) from the divide. end with a WS row as the last row you work.Shape shoulderNext Row (RS): Bind off 11 sts, work in pattern as established to end of row – 23 sts.Next Row: Work even in pattern as established.Next Row (RS): Bind off 11 sts, work in pattern as established to end of row – 12 sts.Next Row: Work even in pattern as established. Bind off rem 12 sts.
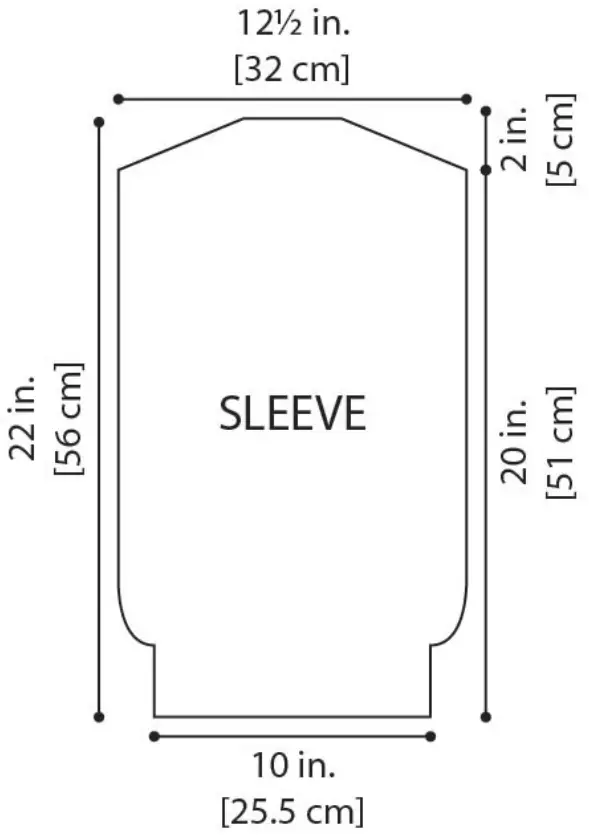
SLEEVES (make 2)
With smaller needles and B, cast on 54 sts.Row 1: Sl 1 as if to purl (selvage st), * p2, k2; rep from * to last st, p1.Rep Row 1 until piece measures about 2 1/2 in. (6.5 cm) from beg.Change to larger needles.Note: 2-Color Slip St pattern uses yarn color A and one contrast color (B, C, or D). Use B for the contrast color until the piece measures about 8 in. (20.5 cm) from begging then use C for the contrast color for about another 8 in. (20.5 cm) and D for the contrast color until the piece is complete.
Increase Row (RS): Sl 1 as if to purl, (k3, M1, k4, M1) 7 times, k to last st, p1 – 68 sts.Next Row (WS): Purl.Slipping first st and purling last st for selvages, beg with Row 1 of pattern, work in 2-Color Slip St pattern until piece measures about 20 in. (51 cm) from beg.
Shape top of the sleeveNext 16 Rows: Bind off 3 sts, work in pattern as established to end of row – 20 sts rem when all bind-offs have been completed. Bind off rem 20 sts. Rep to make the second Sleeve.
FINISHING
Sew shoulder seams.
Front BandsRow 1 (RS): From RS with yarn color of your choice, beg at the lower right front corner, pick up and k78 sts evenly spaced along the right front edge to beg of neck shaping, 54 sts along right neck edge, 44 sts along back neck edge, 54 sts along left neck edge, and 78 sts along left front edge – 308 sts.Row 2 (WS): Sl 1 as if to purl, * p2, k2; rep from * to last 3 sts, p3.Rows 3 and 4: Slipping first st and purling last st for selvages, k the knit sts, and p the purl sts between selvages.Row 5 (Buttonhole Row 1 – RS): Sl 1 as if to purl, work in rib pattern as established over next 6 sts, (bind off 2 sts, work in rib pattern as established over 14 sts) 4 times, bind off 2 sts, work in rib pattern as established to last st, p1.Row 6 (Buttonhole Row 2 – WS): Sl 1 as if to purl, (work in rib pattern as established to next set of bound-off sts, cast on 2 sts) 5 times, work in rib pattern as established to last st, p1.Rows 7-10: Slipping first st and purling last st for selvages, work in rib pattern as established. Bind off.Sew Sleeve seams. Sew in Sleeves. Sew buttons opposite buttonholes. Block piece to finished measurements.Weave in ends.
ABBREVIATIONS
| beg = begin(ning)k = knitk2tog = knit 2 stitches togetherp = purlrem = remain(ing) | rep = repeatRS = right sidesl = slipst(s) = stitch(es)WS = wrong side |
For thousands of free patterns, visit our website www.LionBrand.comTo order visit our website www.lionbrand.com or call (800) 258-YARN (9276) any time!Copyright ©1998-2021 Lion Brand Yarn Company, all rights reserved. No pattern or other material may be reproduced — mechanically, electronically, or by any other means, including photocopying – without written permission of Lion Brand Yarn Company.
References
[xyz-ips snippet=”download-snippet”]