LIPPERT Level-Up Motorhome Leveling
Introduction
The Level-Up® Motorhome Leveling is a 4-point automatic leveling system. Jacks work in like-side pairs to safely and quickly level the coach.
Components
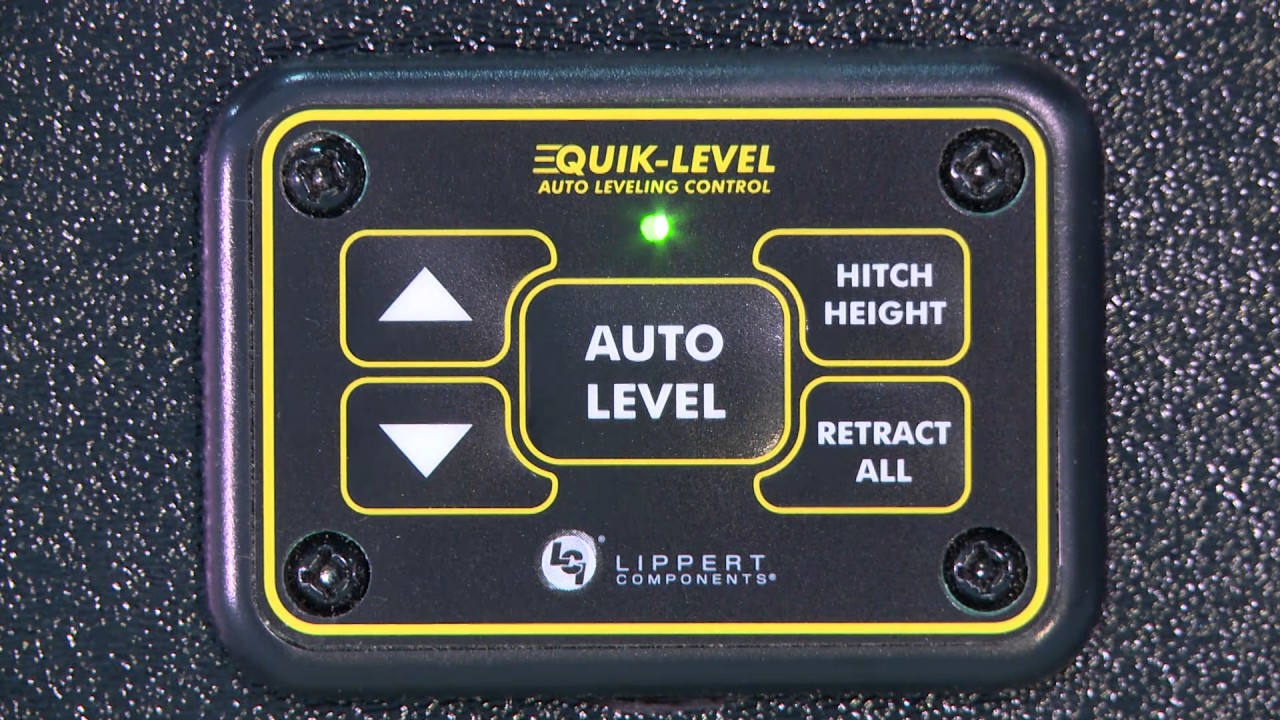
| Callout | Description |
| A | Up Arrow – Scrolls up through the menu on LCD. |
| B | Down Arrow – Scrolls down through the menu on LCD. |
| C | Enter – Activates modes and procedures indicated on LCD. |
| D | Retract – Places leveling system into retract mode. |
| E | LCD Display – Displays procedures and results. |
| F | Auto Level – Places leveling system into auto level mode. |
| G | Front Button – Extends only both front jacks in manual mode. |
| H | Left Button – Extends only both left leveling jacks in manual mode. |
| I | Right Button – Extends only both right leveling jacks in manual mode. |
| J | Rear Button – Extends only both rear leveling jacks in manual mode. |
| K | Power Button – Turns leveling system on and off. |
Menu selections include (Only accessible using Up and Down Arrows):
- Manual Mode – Allows for manual control.
- Auto Retract – All hydraulic jacks.Note: Auto Retract can also be engaged by pressing and holding the Retract button for 3 seconds.
- Slope:
- Front to back in degrees
- Left to right in degrees
- Battery Voltage
Note: Orientation is imperative for proper operation of the system. The controller and rear sensor must be aligned with the vehicle in the way that is shown on their labels.
Operation
Selecting a SiteWhen the coach is parked on an excessive slope, the leveling requirements may exceed the jack lift stroke capability. If the coach is parked on an excessive slope, the coach should be moved to a more level surface before the leveling system is deployed. EXCESSIVE SLOPE will appear on the LCD screen if the coach is 3.5 degrees out of level front to rear or side to side.
Automatic Leveling ProcedureNote: Coach requires 12.7V DC to commence auto leveling function. Coach MUST be running and parking brake MUST be engaged for Level-Up® Motorhome Leveling to operate.
- Push ON/OFF button on Control Panel. The system is now operational and the electronic level lights will become active.
- Push the AUTO LEVEL button to begin the automatic leveling cycle.Note: Once the automatic leveling cycle has been started, it is important that there is no movement in the coach until the unit has completed the leveling process. Failure to remain still during the leveling cycle could have an effect on the performance of the leveling system.
Automatic Leveling Descriptive LogicGrounding: Steps 1-3 describe the process of how the AUTO LEVEL LOGIC extends the jacks to the ground:
- Depending on which end of the coach is lowest to the ground, the level sensor in the brain will activate the jacks, one at a time on the lowest end first, either front or rear.A. Ground lowest side jack first.B. Ground remaining side jack next.
- Together, both jacks will lift lowest end until level.
- The system will then ground remaining jacks, one at a time.A. Ground lowest side jack first.B. Ground remaining side jack next.Leveling: Steps 4-5 describe the process of how the AUTO LEVEL LOGIC levels the coach once the jacks have been grounded. This process may repeat several times until level.
- Level fore-aft
- Level side/side
WARNING: Never lift any of the wheels off the ground to level the coach! Lifting all wheels off the ground may result in death or serious personal injury.
Safety Features
Automatic Safety ShutoffIf the control panel is left on and inactive for four minutes it will shut off automatically. To reset the system, the coach ignition must be turned off, then back on, and the ON/OFF button must again be pushed.
Drive Away Protection SystemIf the ignition is in the “RUN” position, jacks are down, and the operator releases the parking brake, “Emergency Retract” appears in the readout window and the alarm beeper will activate. The system will then automatically retract the jacks until the jacks are fully retracted or a button is pressed on the touch pad to abort the auto retract.The power unit will also operate to keep the jacks retracted in the event the leveling system loses pressure as the coach is being driven, see “Emergency Retract” alarm below for pressure loss conditions.
“Emergency Retract” AlarmThe Dual Sensor Leveling System is designed to sound an alarm and display “EMERGENCY RETRACT” on the LCD display in the event of a significant pressure loss indicated by the pressure switch (Fig. 4). The pressure switch is a pressure indicator. Once the pump reaches 2150 psi, the pressure switch opens, disconnecting the circuit indicating the jacks have been retracted. The following items can indicate pressure loss triggering the emergency retract function:
- Hose leak – external fluid leak through the hose or at the fittings. Inspect the hose and fittings for a failed crimp or swage. Tighten any loose fittings. Replace any damaged hose.
- Leveling jack external leak – fluid is leaking outside of the jack cylinder. Jack must be replaced.
- Leveling jack internal bypass – a seal has failed within the jack. Jack must be replaced.
- Power unit manifold leak – check all hose fittings and valves for leaks; tighten all loose connections. Manifold may bypass internally due to a machining issue or cracked block. Replace power unit.
- Internal power unit failure – the pump or direction valve has failed and can no longer hold pressure. Replace power unit.
Note: All of the above will cause an open pressure switch to close due to loss of pressure. In turn, the controller will engage the emergency retract when the pressure switch is closed, the ignition is in the run position and the parking brake is disengaged.
Calibration and Programming
Level Zero Point CalibrationBefore auto leveling features are available, the Level Zero Point must be set. This is the point to which the system will return when an auto leveling cycle is initiated.To set the zero point (controller module must be fully secured in production-intent location) activate the Level Zero Point configuration mode.
This mode is enabled by performing the following sequence:
- Turn panel off.
- Press the FRONT switch 10 times (On Winnebago units, press FRONT 5 times).
- Press the REAR switch 10 times (On Winnebago units, press REAR 5 times).
- At this point, a beep will sound and the display reads ZERO POINT CALIBRATION. Do NOT press Enter.
- Perform a manual leveling sequence on the coach.
- Press ENTER to set the zero point.
- Screen will then display Zero Point Stability Check and PLEASE WAIT.
- Beep will sound and the screen will display ZERO POINT SUCCESSFUL.
- Control will then turn off.
For Diesel Units with Air Bag Suspensions ONLYThe leveling control will automatically detect an air bag system. If the unit does not use air bags, the display will read “NO” for air bag control. If the display reads “NO”, but an air bag system is present on the unit:
- Confirm harness is connected properly.
- Run Auto-Level function.
- Recalibrate the Zero Point.
- If the air bag system is still not being detected, contact the OEM for more information.
Troubleshooting
Error ModeA. If an error occurs before or during operation, the error will be displayed in the LCD and an alarm will sound. To reset all error or service displays, push ENTER.B. All normal functions will be disabled when the system is in Error Mode.
| LCD Display | What is Happening? | What Should Be Done? |
|
****ERROR**** Excess Angle |
Coach not parked on level ground.
Zero point incorrectly calibrated. |
Move coach to level ground prior to starting auto level sequence.
Recalibrate Zero Point. |
| ****ERROR**** External Sensor | Rear sensor shorted out or disconnected. | Check wire connection or replace sensor. |
| Out of Stroke | Jack has insufficient length to complete the leveling procedure. | Check the disposition of the jack. |
| Low Voltage | Battery voltage dropped below 9.5V DC during operation. | Turn engine on, check battery voltage under load. |
| Function Aborted | A button was pressed on touch pad during Auto Level operation. | Hit enter to acknowledge. Restart procedure. |
| Unable to Finish Leveling | Excessive movement inside coach during auto level sequence. | Discontinue movement inside coach during auto level sequence. |
| Engage Park Brake | Parking brake not set prior to starting auto level sequence. | Set parking brake prior to starting auto level sequence. |
| Comm Error Check Wiring
NOTE: Screen will not back light. |
Wiring connections loose or faulty between touch pad and controller. |
Check connections, replace communication harness if necessary. |
| ****ERROR**** Retract Timeout
Return Levelers for Service |
Parking Brake not engaged.
Engine is not running prior to starting auto retract sequence. Leaking hose or fitting. |
Press Enter and Retract. Engage parking brake.
Press Enter and Retract at the same time to clear error. Turn engine on and restart auto retract sequence. Check for leaks, repair if necessary. Press enter and retract to clear error. |
| Excessive Angle | Occurs only in manual mode when the angle of the unit is too severe. | Use the manual functions to return coach to a more level condition. |
Wiring Diagram
The contents of this manual are proprietary and copyright protected by Lippert Components, Inc. (“LCI”).LCI prohibits the copying or dissemination of portions of this manual unless prior written consent from an authorized LCI representative has been provided. Any unauthorized use shall void any applicable warranty.The information contained in this manual is subject to change without notice and at the sole discretion of LCI.Revised editions are available for free download from lci1.com
For all concerns or questions, please contactLippert Components, Inc.Ph: (574) 537-8900 Web: lci1.com Email: [email protected]
References
[xyz-ips snippet=”download-snippet”]