LIPPERT Power Tongue Jack Owner’s Manual

System Information
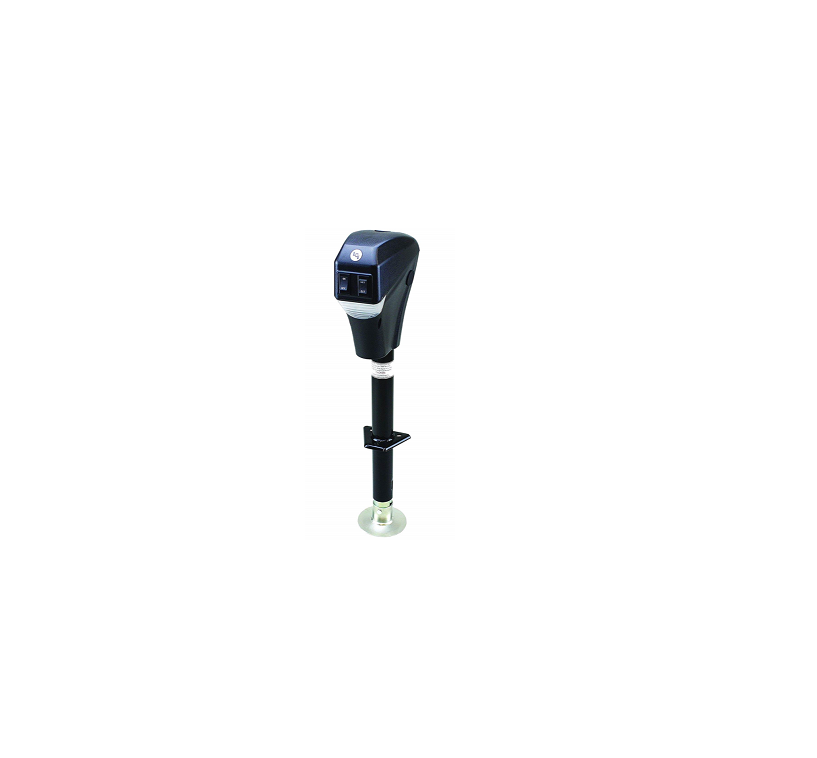
The Lippert 3,500-pound capacity Power Tongue Jacks make lifting and lowering a trailer so easy. With just the flip of the switch, the Power Tongue Jack lifts a trailer with ease. Helical cut gears reduce noise and improve operating efficiencies and the LED lights makes setting up camp simple, day or night.Note: The Power Tongue Jack is for travel trailer applications only.
Safety Information
The “WARNING” symbol above is a sign that a service or maintenance procedure has a safety risk involved and may cause death or serious injury if not performed safely and within the parameters set forth in this manual.Always wear eye protection when performing service or maintenance to the vehicle. Other safety equipment to consider would be hearing protection, gloves and possibly a full face shield, depending on the nature of the service.This manual provides general service and maintenance procedures. Many variables can change the circumstances of the service procedure, i.e., the degree of difficulty involved in the service operation and the ability level of the individual performing the operation. This manual cannot begin to plot out procedures for every possibility, but will provide the general instructions for effectively servicing the vehicle. In the event the skill level required is too high or the procedure too difficult, a certified technician should be consulted before performing the necessary service. Failure to correctly service the vehicle may result in death, serious injury or property damage.
The owner’s manual for the trailer may have more procedures for service and maintenance.
- Never allow anyone unfamiliar with this product to install, operate or service this product.
- Never lift or level the trailer without a properly installed footpad.
- Never crank the jack or couple the trailer without preventing the trailer from rolling.
- Never exert excessive side forces to the Power Tongue Jack.
- Never allow anyone, including the operator, to put any body parts under the Power Tongue Jack or the supported load during jack operation.
- Never drop the trailer off the hitch ball.
- Never exceed the load capacity.
- Never use the Power Tongue Jack to lift the trailer for service or tire change.
- Never move the trailer before the Power Tongue Jack is fully retracted.
- Never use the Power Tongue Jack unless the footpad retaining pin is fully inserted through both sides of the jack’s inner tube.
Resources Required
- 1/6″ Phillips screw driver
- Pliers
- Crimper
- Jack stands
Operation
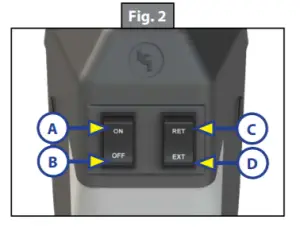
Note: The “ON” and “OFF” switch (Fig. 2) controls the Power Tongue Jack’s light only. If left on for an extended period of time, the light will drain the trailer’s battery.Note: The Power Tongue Jack is designed for vertical movement of the trailer only.
Unhitching From Tow Vehicle
- Chock the tires of the trailer.
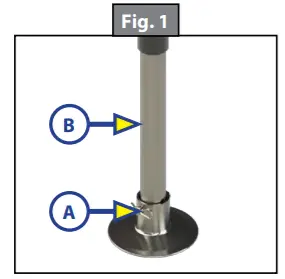
- Be sure the footpad of the Power Tongue Jack is pinned securely in place with the clevis pin and hairpin cotter pin (Fig. 1A).
- Make sure the ground surface under the Power Tongue Jack is firm and level.
- Push “EXT” (Fig. 2B) to extend the Power Tongue Jack until the footpad touches the ground and the coupler clears the hitch ball.
- Disconnect any wires, chains, or sway control that may be equipped between the tow vehicle and the trailer.
- Move the tow vehicle away from the trailer.
- Push “RET” (Fig. 2A) as needed to return the front of the trailer to level.
Reconnecting to Tow Vehicle
- Chock the tires of the trailer.
- Back the tow vehicle towards the trailer.
- Press “EXT” (Fig. 2B) if needed to allow the coupler to clear the hitch ball.
- Push “RET” (Fig. 2C) to retract the Power Tongue Jack until the coupler properly mounts the hitch ball and the leg of the Power Tongue Jack is fully retracted.
- Latch the tow vehicle hitch and connect any wires, chains or sway control that may be equipped between the tow vehicle and trailer.
Note: Be sure the leg of the Power Tongue Jack (Fig. 1B) is fully retracted prior to moving the tow vehicle.
Manual Operation and Troubleshooting
Note: If 12V DC power is unavailable to operate the Power Tongue Jack, use the following directions to manually operate the Power Tongue Jack.
Manually Unhitching From Tow Vehicle
- Chock the tires of the trailer.
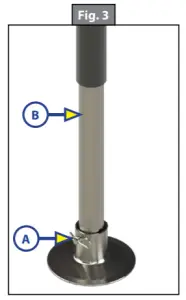
- Be sure the footpad of the Power Tongue Jack is pinned securely in place with the clevis pin and hairpin cotter pin (Fig. 3A).
- Make sure the ground surface under the Power Tongue Jack is firm and level.
- Open the rubber plug (Fig. 4E) on top of the Power Tongue Jack’s gearbox to expose the manual drive shaft.
- Insert the manual crank handle (Fig. 5).
- Turn the handle clockwise until the trailer is supported and the coupler clears the hitch ball.
- Move the tow vehicle away from the trailer.
- Lower the trailer until it is level by turning the crank handle counterclockwise.
- Remove the crank handle (Fig. 5).
- Replace the rubber plug (Fig. 4E).
Manually Reconnecting to Tow Vehicle
- Chock the tires of the trailer.
- Be sure the footpad of the Power Tongue Jack is pinned securely in place with the clevis pin and hairpin cotter pin (Fig. 3A).
- Open the rubber plug (Fig. 4E) on top of the Power Tongue Jack’s gearbox to expose the manual drive shaft.
- Insert the manual crank handle (Fig. 5).Note: If necessary, turn the crank handle clockwise to raise the trailer to clear the hitch ball before lowering on the hitch ball.
- Turn the crank handle counterclockwise until the coupler properly mounts the hitch ball and the leg of the Power Tongue Jack is fully retracted.
- Remove the crank handle (Fig. 5).
- Replace the rubber plug (Fig. 4E).

Note: Be sure the leg (Fig. 3B) of the Power Tongue Jack is fully retracted prior to moving the tow vehicle.
Fuse
- The Power Tongue Jack has a motor, clutch and a 30A fuse. The 30A fuse will be located in-line and will need to be replaced with a 30A ATO-type fuse if it blows.
- The battery must be fully charged prior to operating the Power Tongue Jack. Low voltage from the battery will cause the fuse to blow prematurely.
- The “ON” and “OFF” switch (Fig. 2) controls the Power Tongue Jack’s light only. If left on for an extended period of time, the light will drain the trailer’s battery.
Clutch
The clutch will slip under two conditions:
- The Power Tongue Jack has reached its extend or retract limit.
- The tongue weight of the trailer has exceeded the capacity limits of the Power Tongue Jack.A. Items stored in the trailer can vastly influence the weight distribution of the Power Tongue Jack. Reorganize stored items if the Power Tongue Jack motor clutch continues to slip.B. Release the switch immediately when the clutch noise occurs. The clutch is the overload protection for the motor. The clutch should not slip during normal operation. This will cause excessive wear on the clutch and the motor.
Component Replacement
Power Tongue Jack Switch Replacement
- Turn the power off by removing the fuse.
- Remove the rubber plug on top of the Power Tongue Jack.
- Remove the 2 screws next to the manual override nut.
- Remove the 4 screws on the bottom cover.
- Remove the top cover.
- Remove the wires connecting to the switch.
- Pinch each end of the switch lock and push the switch out.
- Replace the switch.
- Reconnect the wires to the new switch.
- Replace the cover.
- Replace the 4 screws on the bottom cover.
- Replace the 2 screws next to the manual override nut.
- Replace the rubber plug.
- Replace the fuse.
Power Tongue Jack Light Replacement
- Turn the power off by removing the fuse.
- Remove the rubber plug on top of the Power Tongue Jack.
- Remove the 2 screws next to the manual override nut.
- Remove the 4 screws on the bottom cover.
- Remove the top cover.
- Remove screw and disconnect the black wire.
- Remove 2 screws from the LED light plate.
- Disconnect the 2 wires going the switches.
- Remove the LED light plate and replace with the new LED light plate.
- Replace the 2 screws into the LED light plate.
- Reconnect the 2 wires going to the switches.
- Replace the black wire and screw.
- Replace the cover.
- Replace the 4 screws on the bottom cover.
- Replace the 2 screws next to the manual override nut.
- Replace the rubber plug.
- Replace the fuse.
Power Tongue Jack Footpad Replacement
- Support the trailer with jack stands.
- Retract the jack far enough to be able to remove the footpad.
- Release the hairpin cotter pin and clevis pin, replace the Footpad and reinsert the clevis pin and hairpin cotter pin.
- Extend the jack.
- Remove the jack stands.
Power Tongue Jack Complete Replacement
- Support the trailer with jack stands.
- Retract the jack far enough to be able to remove the footpad.
- Release the hairpin cotter pin and clevis pin.
- Remove the footpad.
- Disconnect the 12 volt supply from the power source.
- Remove the 3 mounting bolts.
- Remove the Power Tongue Jack and replace with the new Power Tongue Jack.
- Secure the Power Tongue Jack with the 3 mounting bolts.
- Crimp eyelet onto red power wire.
- Reconnect the red power wire to the power source.
- Attach the footpad to the jack and insert the clevis pin and hairpin cotter pin.
- Extend the jack.
- Remove the jack stands.
Maintenance
- Before each use, inspect the Power Tongue Jack and replace if bent or damaged.
- If wiring is connected to battery terminal, inspect at least twice each year for corrosion. Clean with asolution of baking soda and water, then apply a thin coat of grease.
- To avoid ground continuity concerns check the mounting bolts for secure contact and keep mounting bolts free of corrosion.
- Once each year, extend the jack as far as possible and clean leg. Coat the leg with a light coat of silicone spray lubricant.
POWER TONGUE JACK ASSEMBLY
LEVELING AND STABILIZATION
POWER TONGUE JACK COMPONENTS
LEVELING AND STABILIZATION
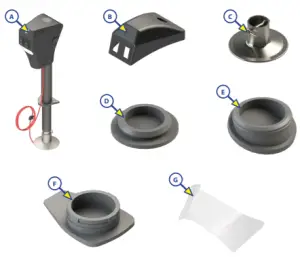
| Callout | Part # | Description |
| A | 285318 | Power Tongue Jack |
| B | 285160 | Cover |
| C | 165253 | Footpad Kit |
| D | 225875 | Side Plug |
| E | 225876 | Original Manual Override Plug (Replace with 321807) |
| F | 321807 | Current Manual Override Plug |
| G | 225885 | Lens |
POWER TONGUE JACK COMPONENTS
LEVELING AND STABILIZATION
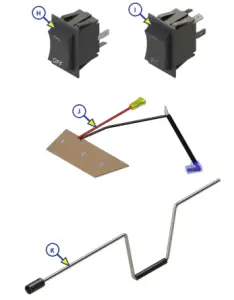
| Callout | Part # | Description |
| H | 226018 | On/Off Switch |
| I | 226023 | Extend/Retract Switch |
| J | 226027 | Light |
| K | 116112 | Crank |
LIPPERT COMPONENT

 report this ad
The contents of this manual are proprietary and copyright protected by Lippert Components, Inc. (“LCI”).LCI prohibits the copying or dissemination of portions of this manual unless prior written consent from an authorized LCI representative has been provided. Any unauthorized use shall void any applicable warranty.The information contained in this manual is subject to change without notice and at the sole discretion of LCI. Revised editions are available for free download from lci1.com.Please recycle all obsolete materials.For all concerns or questions, please contactLippert Components, Inc.Ph: (574) 537-8900 | Web: lci1.com | Email:
Read More About This Manual & Download PDF:
References
[xyz-ips snippet=”download-snippet”]