
158-01 plugwise Lisa Thermostaat Installation Guide
This document contains the installation procedure and functional description of this product.
More information about the Plugwise zone thermostat can be found on our website plugwise.com.
Copyright 2018, Plugwise.All rights reseverd.
EU declaration of Conformity
Plugwise B.V. hereby declares that this product is in compliance with the applicable essential requirements of the appropriate EC-Directives, including 1999/5/EC (R&TTE). A copy of the EU declaration of Conformity is available at www.plugwise.com/product-conformity
Old electrical and electronic appliances very often contain valuable materials.Therefore, never dispose discarded appliances with normal household waste.Always hand in your old appliances at the municipal collection points for electrical and electronic equipment.
In the package
- Lisa
- Desk stand
- Wall mount
- Adapter cable
- USB adapter

- 4 AAA batteries

Before you start
Lisa is a zone thermostat that measures the room temperature and can communicate this temperature and the desired temperature to other products in the network. Lisa can be added to your existing Zigbee network (Home Automation 1.2). In this manual we shortly describe how to install Lisa.
In addition we briefly explain how you can add Lisa to the Plugwise Home Automation (HA) system. Do you want to add Lisa to another system? Please consult the manual of the system you want to connect Lisa to, in order to find the right procedure.
Symbols:![]() Warning, be aware!
Warning, be aware!![]() Advice• You must carry out this step
Advice• You must carry out this step
Precautions and safety
![]() Do not install Lisa with the USB adapter if you want to use Lisa together with batteries. The battery lifetime will reduce dramatically in case you have installed Lisa with the USB adapter and then change to battery power supply.Do you want to switch the power supply later? Remove Lisa from the network and add Lisa again to the network connected to the right power supply.
Do not install Lisa with the USB adapter if you want to use Lisa together with batteries. The battery lifetime will reduce dramatically in case you have installed Lisa with the USB adapter and then change to battery power supply.Do you want to switch the power supply later? Remove Lisa from the network and add Lisa again to the network connected to the right power supply.
![]() Never install Lisa with batteries and USB adapter at the same time!
Never install Lisa with batteries and USB adapter at the same time!
More information
More information about Lisa can be found on our website plugwise.com/lisa.
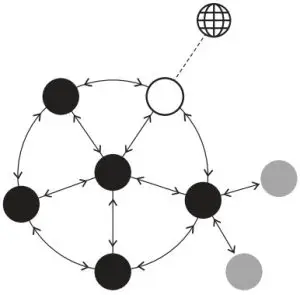
Zigbee network
Lisa can be powered with batteries or an USB adapter. Depending on which power supply you choose, Lisa will automatically adapt its behaviour when joining a new network.
If you install Lisa with an USB adapter, Lisa will behave like a “Zigbee router” (ZR). As such Lisa has the advantage that it is always reachable for other Zigbee modules and will improve the mesh quality of the Zigbee network.
Do you want to install Lisa with batteries?That is also possible. Lisa then operates in a power saving “sleep” mode, allowing longer battery life. Lisa will behave like a “Sleepy end device” (SED).
![]() Zigbee router
Zigbee router![]() Sleepy end device
Sleepy end device![]() Zigbee gateway
Zigbee gateway![]() Internet
Internet
Installation
Connect the power supply
Please decide if you want to power up Lisa using an USB adapter or batteries.
![]() Do you want to switch the power supply later?Remove Lisa from the network and add Lisa again to the network connected to the right power supply.
Do you want to switch the power supply later?Remove Lisa from the network and add Lisa again to the network connected to the right power supply.
Batteries
- Remove the back cover of Lisa to place the batteries: hold Lisa and remove the back cover by pulling at the bottom of the opening as shown in the image.
- Make sure the batteries are placed as indicated in the battery compartment of Lisa.
- Place the back cover on Lisa.
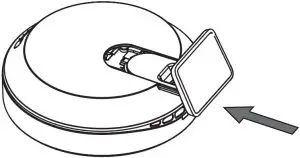
USB adapter
![]() Do you prefer to use Lisa with the USB adapter?This is only possible when using the supplied desk stand to place Lisa in the room.
Do you prefer to use Lisa with the USB adapter?This is only possible when using the supplied desk stand to place Lisa in the room.
- Place the adapter cable into Lisa as shown in the image. The back cover does not need to be removed.
- Connect the adapter cable to the USB adapter and plug the adapter into the wall socket.
![]() Add to the ZigBee network
Add to the ZigBee network
For a good reception, make sure Lisa is nearby Adam HA when you add Lisa to the Zigbee network.
- Log into the local web interface (HTML interface) of Adam HA. Make sure that your device is connected to the same network as to which Adam is connected:
- open the HTML interface in the app,
- or go to connect.plugwise.net and log in with the ID of Adam.
- Go via the menu to Setup to add an appliance.
- Use the option to add a new appliance (the + sign in the right bottom corner).
- Press any button briefly on Lisa when instructed in the web interface, so Lisa becomes visible in the network.
- The LED is slowly blinking green if the radiator valve is searching for a new network to join.
- The LED is solid green if the radiator valve is (already) added to the network.
Not successful in adding Lisa to the network?First remove Lisa from the network (see also page 19) and try again.
Do you want to add Lisa to another system?Please consult the manual of the Zigbee gateway you want Lisa to connect to.

Position Lisa
Position Lisa in the room that corresponds with the zone to which you have added Lisa.
![]() Make sure Lisa is added to a zone. Only if Lisa is added to a zone with radiator valves, the radiator valves can be controlled by Lisa.
Make sure Lisa is added to a zone. Only if Lisa is added to a zone with radiator valves, the radiator valves can be controlled by Lisa.
![]() Position Lisa in a room that receives heat from the central heat supply to which you have connected Adam HA to, like the central heating boiler.
Position Lisa in a room that receives heat from the central heat supply to which you have connected Adam HA to, like the central heating boiler.
![]() For reliable temperature measurements position Lisa:
For reliable temperature measurements position Lisa:
- at eye level and free from the ground
- free from heat sources:
- Not near a window or door opening
- Not in direct sunlight
- Not next to a radiator
- Not in the kitchen (near the oven)
- Not near to electrical appliances that heat up, like the television
![]() Do you prefer to use Lisa with the USB adapter?This is only possible when using the supplied desk stand to place Lisa in the room.
Do you prefer to use Lisa with the USB adapter?This is only possible when using the supplied desk stand to place Lisa in the room.
Desk stand
Use the supplied desk stand to place Lisa in the room wherever you want.
- Place the desk stand in the opening on the back cover as shown in the image.
![]() Do you install Lisa in combination with the desk stand? Make sure that you keep Lisa at the same spot in the room.Only then the Plugwise regulation of Adam is able to regulate the roomtemperature well, based on the temperature changes in the room measured by Lisa.
Do you install Lisa in combination with the desk stand? Make sure that you keep Lisa at the same spot in the room.Only then the Plugwise regulation of Adam is able to regulate the roomtemperature well, based on the temperature changes in the room measured by Lisa.
Position Lisa
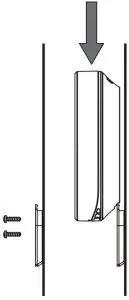
Wall mountDo you prefer to place Lisa on the wall? Use the wall mount.
- Screw the wall mount on the wall.
- Slide Lisa from above on the wall mount.
Controls
Lisa has three buttons on the front to change the setpoint temperature and the active preset.
With the left- and right button you can decrease or increase the setpoint temperature in steps of 0,5°C.
With the button in the middle on top of the screen you can switch presets.

The push button on the backside can be used for multiple actions. The LED above the push button shows the feedback.An overview of the different LED behaviors is provided at the end of this manual. The LED will flash red every second while the button is pressed. This helps you counting the seconds.

Remove Lisa from the network
- Press and hold the button on the backside for 3 seconds and release.
- Within 1 second, press and hold the button for 3 seconds again and release.
- Within 1 second, press and hold the button for 10 seconds and release.
After you have released the button, the LED will burn solid red for 5 seconds: Lisa has left the network.
Button sequence not recognizedWhen Lisa does not understand the button pattern, the LED will flash red for 0,5 seconds.
DisplayThe display shows you the measured temperature above the line (big), together with a small thermometer icon. The setpoint temperature is shown below the line (small).
When changing the setpoint temperature, the set temperature will temporarily be shown above the line, and the thermometer icon will be hidden. Depending on the situation one or more of the following icons will be shown.
- Battery is almost empty
- No connection
- Measured temperature
- The shown value is the measured temperature
- Set point temperature
- Presets: home, night, away, vacation and frost protection
LED behavior
The LED is located on the backside above the pushbutton.
Batteries vs. USB adapter
If Lisa is configured with batteries it behaves like an “end device” (SED).The LED indications described as “solid” will now blink shortly every second.
| Colour | Pattern | Description |
| Green | ZR: 5 seconds | Lisa has successfully joined the network or has already joined the network. |
| SED: 5x quickly blinking (on: 1 second/second) | ||
| Green | Slowly blinking | Lisa is joining a network (in progress) |
| Red | 5 seconds | Joining the network has failed or the network settings have been erased. |
| Red | Quickly blinking (3 seconds) | The batteries are almost empty |
| Red | 1 Blink (0,5 second) | Lisa does not understand the pattern that has been pressed. |
| Red | Quickly blinking (on: 0,1 second/second) | The button is pressed. |
Support
report this adNeed supportplugwise.com/support
Plugwise B.V.Wattstraat 562171 TR SassenheimThe Netherlandswww.plugwise.com
References
[xyz-ips snippet=”download-snippet”]