little tikes 657771 First Bathroom Sink User Manual
STORING THE UNIT
- After playing, an adult should empty all water from the unit.
- Drain the pump by placing a bowl under the sink and pulling off the plug located under the pump.
- Dry the unit thoroughly.
- Store contents under the sink and close cabinet doors.
- Store the unit in a cool, dry place away from sunlight.
CONTENTS
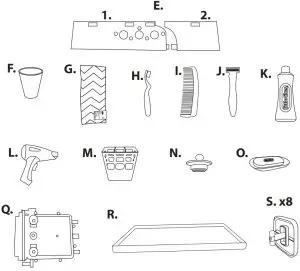
- A. Little Tikes® First Bathroom Sink
- B. Faucet
- C. Mirror
- D. 2 Back Walls
- E. 2 Back Counter Pieces (1. & 2.)
- F. Cup
- G. Hand Towel
- H. Toothbrush
- I. Comb
- J. Razor
- K. Toothpaste
- L. Hair Dryer
- M. Storage Bin
- N. Sink Stopper
- O. Soap & Dish
- P. 2 Cabinet Doors
- Q. Pump
- R. Sink Shelf
- S. 8 Clips
REPLACING & INSTALLING BATTERIES
The batteries included are for in-store demonstration. It is recommended that, prior to playing, an adult install fresh alkaline batteries in both the pump and hair dryer. Here’s how:
- Using a Phillips screwdriver (not included) remove the screws and battery compartment covers on top of the pump and hair dryer.
- Install four (4) 1.5V AA (LR6) alkaline batteries (not included) in the pump and two (2) 1.5V AAA (LR03) alkaline batteries (not included) in the hair dryer. Make sure the (+) and (-) ends face the proper direction as indicated inside the battery compartments.
- Replace the compartment covers and tighten the screws.

ASSEMBLY
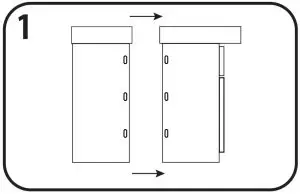
- Separate both sink pieces and remove all contents from inside.
- Place the water pump with the battery box facing the rear housing of the sink. Once placed, water pump will look as pictured.
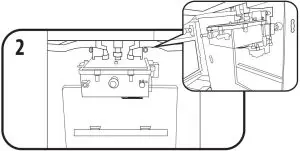
- Bring both sink pieces together while lining up the water tubes and posts appropriately to the front housing of the sink.Place clip into openings. Use gentle force to push in and turn 90 degrees to lock into position.NOTE: Openings for clips are located on the left, right and bottom of the sink.
- Take both pieces used to create the back counter (E.- 1. & 2.) and slide together to create one piece. Align the posts and holes then push down to snap onto the top of the rear housing of the sink.
- Turn both faucet handles outward and keep them in that position as the faucet fixture is pushed down. Once snapped into position turn handles inward to ensure proper assembly.
- Locate the under the sink shelf (R.). Slide shelf under the sink, at an angle to allow for the shelf to be adjusted and laid onto the rear ledge and the two ledges located near the cabinet door frame.
- Line up the hinges on the top and bottom corner of the door. Place top end into its relative opening, then push in. Repeat for bottom end. Door handle should face out when doors are closed.
- Align the longest edge of both back wall pieces and snap into place as pictured. Slide mirror down and snap into place as pictured. Note: All three pieces will stand on their own when properly assembled.
HAIR DRYER USAGE
- To use hair dryer, press button and hold.
WATER USAGE
Before playing, cover the area to prevent possible water damage.
To begin water play, place sink stopper in sink basin. Make sure pump cap is closed before filing sink with water. Fill the sink with one cup of water. Once done pouring, remove sink stopper to allow water to fill pump. Turn one or both faucet handles towards you for water play. Water will cycle continuously until both faucet handles are turned to the outward position. Note: Using more water then recommended may cause water to spill. Do not use soap of any type with this product.
IMPORTANT NOTE: Before filling with water, make sure the plug under the pump is plugged in and tightly secured.
STORING THE UNIT
- After playing, an adult should empty all water from the unit.
- Drain the pump by placing a bowl under the sink and pulling off the plug located under the pump.
- Dry the unit thoroughly.
- Store contents under the sink and close cabinet doors.
- Store the unit in a cool, dry place away from sunlight.
WARNING:
- Constant competent adult supervision must be present when children are playing around water.
- Use ONLY clean water (other liquids may damage the pump) and discard water after playing. Dry thoroughly
- Do not use soap of any type with this procduct.
- Keep unit away from electrical outlets, cords, and kitchen appliances such as toasters, mixers, etc.
- Wash accessories thoroughly before use and do not use with real bathroom toiletries.
- Sink and accessories are for pretend play only
LIMITED WARRANTY
The Little Tikes Company makes fun, high quality toys. We warrant to the original purchaser that this product is free of defects in materials or workmanship for one year * from the date of purchase (dated sales receipt is required for proof of purchase). At the sole election of The Little Tikes Company, the only remedies available under this warranty will be the replacement of the defective part or replacement of the product. This warranty is valid only if the product has been assembled and maintained per the instructions. This warranty does not cover abuse, accident, cosmetic issues such as fading or scratches from normal wear, or any other cause notarising from defects in material and workmanship. *The warranty period is three (3) months for daycare or commercial purchasers. U.S.A and Canada: For warranty service or replacement part information, please visit our website at www.littletikes.com, call 1-800-321-0183 or write to: Consumer Service, The Little Tikes Company, 2180 Barlow Road, Hudson OH 44236, U.S.A. Some replacement parts may be available for purchase after warranty expires—contact us for details. Outside U.S.A and Canada: Contact place of purchase for warranty service. This warranty gives you specific legal rights, and you may also have other rights, which vary from country/state to country/state. Some countries/states do not allow the exclusion or limitation of incidental or consequential damages, so the above limitation or exclusion may not apply to you.
BATTERY SAFETY INFORMATION
- Use only 4 size “AA” (LR6) and only 2 size “AAA” (LR03) alkaline batteries (6 total batteries required).
- Charging of rechargeable batteries should only be done under adult supervision.
- Remove rechargeable batteries from the product before recharging.
- Do not mix old and new batteries.
- Do not mix alkaline, standard (carbon-zinc), or rechargeable batteries.
- Be sure to insert the batteries correctly and follow the toy and battery manufacturer’s instruction.
- Always remove exhausted or dead batteries from the product.
- Dispose of dead batteries properly: do not burn or bury them.Do not attempt to recharge non-rechargeable batteries.
- Avoid short-circuiting battery terminals.
- Remove batteries before placing the unit into storage for a prolonged period of time.
‘Let’s care for the environment!’The wheelie bin symbol indicates that the product must not be disposed of with other household waste. Please use designated collection points or recycling facilities when disposing of the item. Do not treat old batteries as household waste. Take them to a designated recycling facility.
Please keep this manual as it contains important information.
© The Little Tikes Company, an MGA Entertainment company.LITTLE TIKES® is a trademark of Little Tikes in the U.S. and other countries. All logos, names, characters, likenesses, images, slogans, and packaging appearance are the property of Little Tikes.Printed in China0321-0-E/INT
Little Tikes Consumer Service2180 Barlow RoadHudson, Ohio 44236 U.S.A.1-800-321-0183
MGA Entertainment UK Ltd.50 Presley Way, Crownhill, MiltonKeynes, MK8 0ES, Bucks, UK[email protected]Tel: +0 800 521 558
MGA Entertainment (Netherlands) B.V.Baronie 68-70, 2404XG Alphen a/d RijnThe NetherlandsTel: +31 (0) 172 758038
 report this ad
Imported by MGA Entertainment Australia Pty LtdSuite 2.02, 32 Delhi RoadMacquarie Park NSW 21131300 059 676
References
[xyz-ips snippet=”download-snippet”]