User Manual
![]()
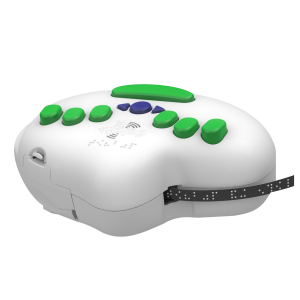
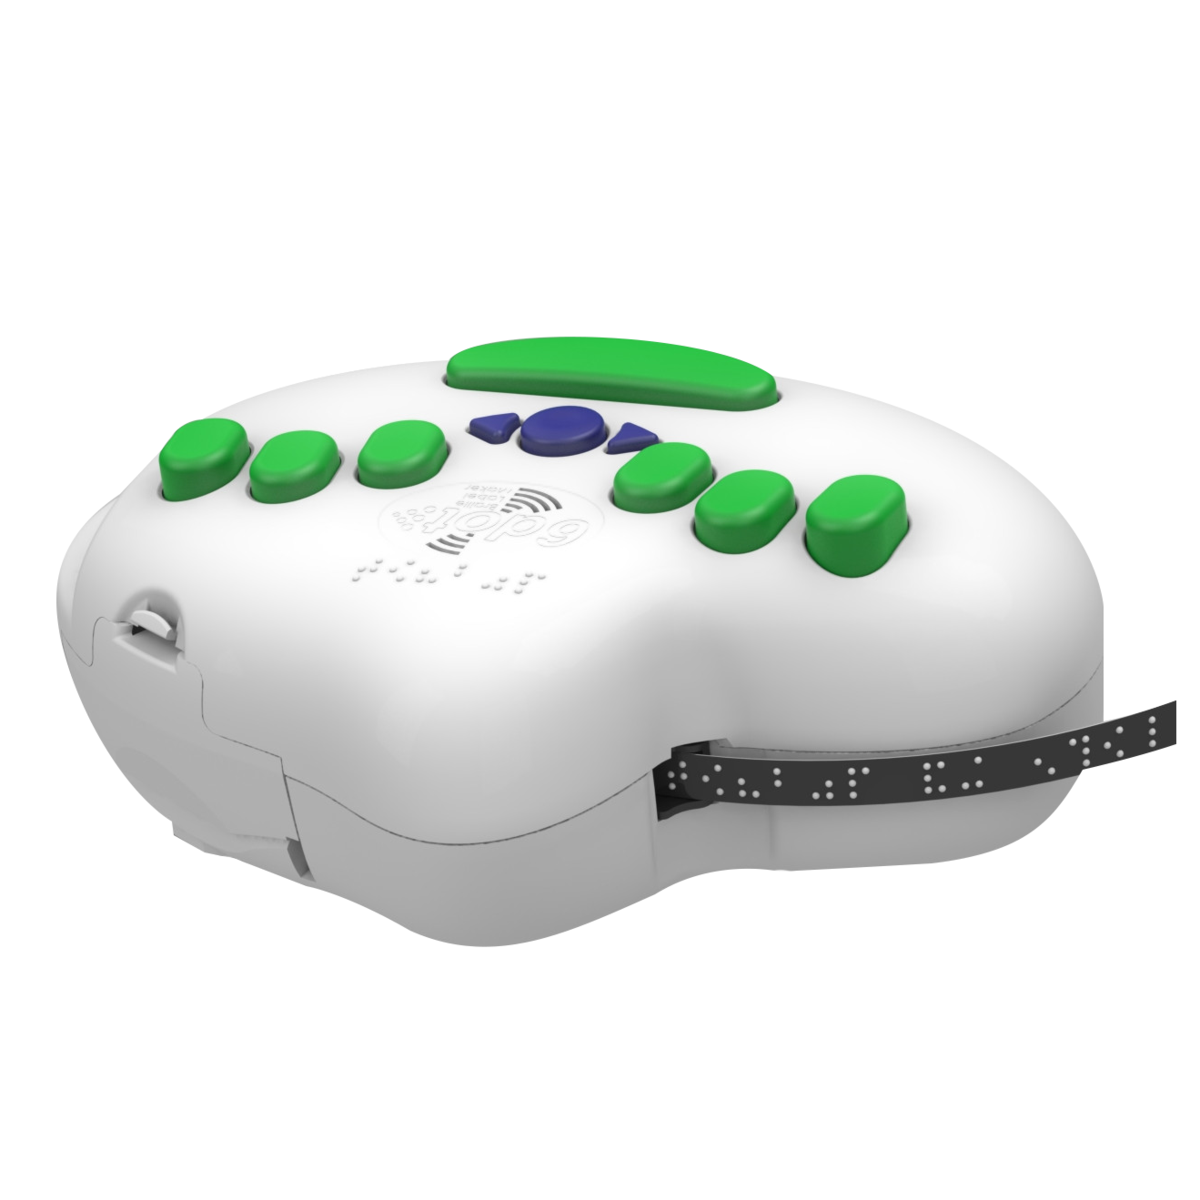
LoganTech 6dot Braille Label Maker
Edition 1, 5/2015© 2015 Copyright LoganTech / ProxTalker.com, LLC
1. Introduction
Thank You
Congratulations on your purchase of the Braille Label Maker. We thank you very much and hope you thoroughly enjoy the product.
What’s in the Box?
To let you start labeling right away, the standard package includes:
- (1) Braille Label Maker
- (2) Rolls of 3/8″ (9mm) Embossing Label Tape (1 pre-installed + 1 extra)
- (6) AA Batteries (pre-installed)
- (1) User Guide
Features of your 6dot Braille Label Maker:
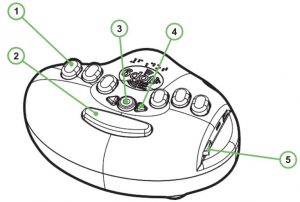
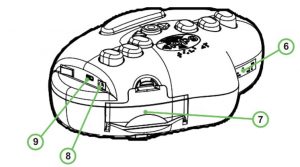
- Braille Keys
- Spacebar
- Enter/Cut Button
- Left & Right Arrow Buttons
- Power Switch
- Label Tape Exit
- Label Tape Loading Door
- Power Jack (for optional wall adapter)
- Micro USB Port
2. Using Your Braille Label Maker
Typing Labels
Before You Type:
- Make sure the label maker is either:a) On a stable and secure horizontal surface, such as a table or desk, at least a few inches away from any edge,– or –b) Securely fastened in an approved case, with the case strap around your neck or shoulder.
- Orient the device so the spacebar is toward you and the edge with the power button is to your right.
- Make sure a roll of 3/8-inch-wide embossing label tape is properly loaded into the area inside the tape door, on the far right side of the device (see “Replacing the Label Tape” for more details).
- Turn on the label maker by flipping the power switch along the right edge away from you.
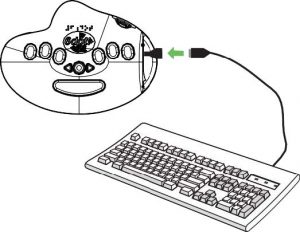
Type a Label:5. There are two ways to type on the 6dot Braille Label Maker:
- Use the built-in Braille keyboard.

- Plug in and type with an external USB keyboard. (Note: This option requires a USB adapter.)

6. A Braille label will start printing as soon as you begin typing.7. The tape moves along the back wall from the middle of the device toward the left. (Note: You will not be able to feel the last 1-2 characters on the label until you finish typing and cut it.)8. When you have finished typing, the system may need a few moments to complete the printing process.
Cutting Labels

- Press the round rubber enter/cut button in the middle of the device, in between the keys and the spacebar. The device will cut your label automatically. (Note: If you are using a QWERTY keyboard, you may also hit the “Enter” key.)
- Remove the cut label from the rear left side of the device.
- The label maker will have scored the tape, creating a loose tab* about half a centimeter from the end.
- Bend the loose tab toward the back side of the label, and use it to peel off the backing from the tape.
- Apply your label.
* If you do not feel a loose tab, bend the tape backward, creasing it along the score line. Any attached plastic will break and the tape will be ready to peel.
Applying Labels
Orienting the label:

The scored end of the label tape, i.e. the end with the tab for peeling, is the right end of the word or phrase you typed. Be careful not to apply your label upside down!
Sticking the label:Most brands of label tape use an adhesive that is designed to strike a good balance between permanence and removability. When it is applied to an appropriate surface, each label will stick permanently if left alone but allow you to peel it off if desired.
Braille labels stick reliably to many common objects and materials, e.g. CD and DVD cases, cereal boxes, lunch boxes, aluminum cans, plastic bottles, light switch plates, appliances, etc.
For best results, the surface should be:
- Clean
- Dry
- Smooth (no bumps or texture)
- Made of one of the following materials:a. Plasticb. Metalc. Paper (stiffer is better)
Renewing the Label Tape
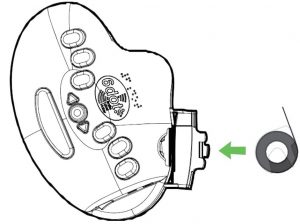
When the label tape has run out, the device will make a distinctive beeping sound and will cease to print any labels. To prevent any pieces of tape from getting stuck inside the device when the end of a tape roll is reached, the tape will either be advanced automatically as far as possible out the exit, or rolled backward toward the beginning for easy removal.
- Place your label maker on a sturdy flat surface, such as a desk or table, turned so the spacebar is on your left.
- Make sure the device is powered on.
- Open the tape loading door on the right. Find the tab/latch at the top of the door and press downward toward the floor with your thumb to open it.
- Remove the empty cartridge from the used tape roll.
- Check the tape exit and the area inside the tape door for any partial labels or pieces of label tape, and remove them.
- Prepare a new roll of label tape* (see note below) by pulling the leading edge of the tape an inch or two out of its plastic cartridge. If your tape does not include a plastic cartridge or frame, just find the end of the tape and continue to the next step.
- Rotate the device so the spacebar is away from you, and the open tape door is facing you.
- With the door still open, load the new roll of label tape into the tape holding area, with the leading edge of the tape pointing right toward the tape exit.
- Make sure the device is still powered on, and press the spacebar once or twice to activate the tape advancing wheel.
- Place the leading edge of the tape against the wall of the track, just to the right of the loading area, and feed it slowly to the right (toward the exit) until the roller wheel “accepts” the tape and starts turning to feed the tape through on its own.
- Release the tape and let the machine load it to the starting position.
- Close the tape loading door, making sure the latch fully catches at the top.
- You are now ready to continue printing labels.
* Note: The 6dot Braille Label Maker is designed to use only standard rolls of vinyl 3/8” (9mm) embossing label tape. Please check our website at www.6dot.com or contact us for sourcing information.
Replacing the Batteries
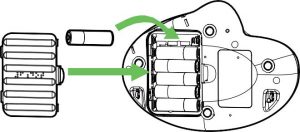
- Place your label maker in the middle of a sturdy flat surface, such as a desk or table.
- Make sure the power switch is in the “off” position.
- Turn the device over and on its base find the battery hatch.
- Right in the middle of the hatch is the latch to open the door. Push the tab toward the Brailled “6dot” and lift the door up and out.
- Set the battery door aside, close by you (you will retrieve it in a minute).
- Use your fingers to remove the six (6) used AA batteries.
- Install six (6) fresh AA batteries*, oriented such that the flat/negative end of each battery is pushed against a spring.
- Retrieve and replace the battery door, making sure it latches as you close it.
- Turn the device back over to its usual upright orientation.
- Turn the power switch to the “on” position. Your 6dot Braille Label Maker is now ready to use.
* Note: Standard (non-recharging) alkaline batteries are recommended for best performance.
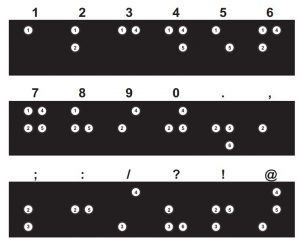
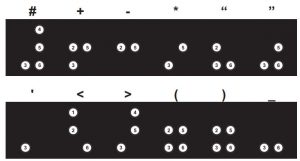
Quick Braille Reference
(Grade 1 English)

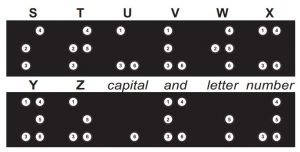
Tip: You may notice that the numbers 1-9 and 0 use the same patterns as the first 10 letters of the alphabet. To type a number, first make the “number” symbol (dots 3, 4, 5, and 6) and then follow it with the number’s digits.
4. Legal Information
Product Warranty
ProxTalker.com, LLC (LoganTech) warrants that any hardware provided is free from defects in materials and workmanship under normal use. ProxTalker.com, LLC warrants that the product will perform substantially in accordance with the specifications set forth in the documentation. However, abusive handling, contamination by immersion in liquids, exposure to extreme temperatures, battery leakage, or modification of the housing may make it difficult or impossible for the product to perform.
The warranties described above are made for a period of one (1) year from the date the products are delivered to you as the first user.
ProxTalker.com, LLC will repair or replace any hardware that proves defective in materials, workmanship, or must be corrected to achieve warranted performance, without additional charge, on an exchange basis, as described below. If ProxTalker.com, LLC is unable to replace defective hardware or is unable to make the product perform to its specifications within a reasonable time, ProxTalker.com, LLC will either replace the entire package with a similar product or refund the purchase price of the product.
ProxTalker.com, LLC does not warrant that the product will meet your requirements or that its operation will be uninterrupted or error free. The warranty does not cover component or part of the product that has been subjected to damage or abuse, or that has been altered or changed in any way by you or others.
ProxTalker.com, LLC is not responsible for problems caused by any user supplied hardware, batteries, or any upgrades or modifications to these items that are made after the delivery of the product to you. Any implied warranties, including any warranties of merchantability or fitness for a particular purpose, are limited to the term of this express warranty. Note: Some states do not allow limitations on how long an implied warranty lasts, so the above limitation may not apply to you.
ProxTalker.com, LLC shall not, in any case, be liable for special, incidental, consequential, indirect or other similar damages arising from any breach of these warranties even if ProxTalker.com, LLC or its agent has been advised of the possibility of such damages. Note: Some states do not allow the exclusion or limitation of incidental or consequential damages, so the above limitation or exclusion may not apply to you.
Patent Information
The 6dot Braille Label Maker is covered by U.S. Patent Number 8,549,998 and/or additional Patent(s) Pending.
FCC Notice
 Note: This equipment has been tested and found to comply with the limits for a Class B digital device, pursuant to part 15 of the FCC Rules. This device complies with part 15 of the FCC Rules. Operation is subject to the following two conditions: (1) This device may not cause harmful interference, and (2) this device must accept any interference received, including interference that may cause undesired operation. These limits are designed to provide reasonable protection against harmful interference in a residential installation. This equipment generates, uses, and can radiate radio frequency energy and, if not installed and used in accordance with the instructions, may cause harmful interference to radio communications. However, there is no guarantee that interference will not occur in a particular installation. If this equipment does cause harmful interference to radio or television reception the user is encouraged to try to correct the interference by one or more of the following measures:
- Reorient or relocate the receiving antenna.
- Increase the separation between the equipment and receiver.
- Consult the dealer or an experienced radio/TV technician for help.
- Modifications not expressly approved by the manufacturer could void the user’s authority to operate the equipment under FCC rules..
“Under Industry Canada regulations, this radio transmitter may only operate using an antenna of a type and maximum (or lesser) gain approved for the transmitter by Industry Canada. To reduce potential radio interference to other users, the antenna type and its gain should be so chosen that the equivalent isotropically radiated power (e.i.r.p.) is not more than that necessary for successful communication.”
“This device complies with Industry Canada licence-exempt RSS standard(s). Operation is subject to the following two conditions:
(1) this device may not cause interference, and (2) this device must accept any interference, including interference that may cause undesired operation of the device.”
RoHS Statement
 All environmentally friendly LoganTech products bearing the proprietary RoHS Compliant Logo are certified to comply with all requirements of the Restriction of Hazardous Substances – EU Directive 2002/95/EC: restriction on the use of certain hazardous substances in electrical or electronic equipment sold or used in the European Union after July 1, 2006. These substances are lead, mercury, cadmium, hexavalent chromium, polybrominated biphenyls, and polybrominated diphenyl ethers.
CE Declaration of Conformity
![]()
- Manufacturer: ProxTalker.com, LLC
- Address: 327 Huntingdon Ave, Waterbury, CT 06708
- Telephone: (203) 721-6074
- Product: 6DOT1
- Serial Number: 1-65,535
The undersigned hereby declares on behalf of ProxTalker.com, LLC that the above-referenced product, to which this declaration relates, is in conformity with the provisions of:
- EN 55024:2010 ITE
- EN 55022:2010/AC:2011 Class B
- ICES-003 Issue 5 Class B
- CFR 47 FCC Part 15 Subpart B Class B
- EN 61000-3-2:2006/A1:2009/A2:2009
- EN 61000-3-3:2008
The Technical Construction File required by this Directive is maintained at the corporate headquarters of ProxTalker.com, LLC.

Glen Dobbs President
5. Contact Us
Mailing Address:LoganTech327 Huntingdon Ave.Waterbury, CT 06708 USAPhone: +1 (866) 962-0966Email: Website: www.logantech.com
LoganTech 6dot Braille Label Maker User Manual – LoganTech 6dot Braille Label Maker User Manual –
Questions about your Manual? Post in the comments!
[xyz-ips snippet=”download-snippet”]