HD video system USB camera microphone speaker
 TABLE HUB
 TABLE HUB
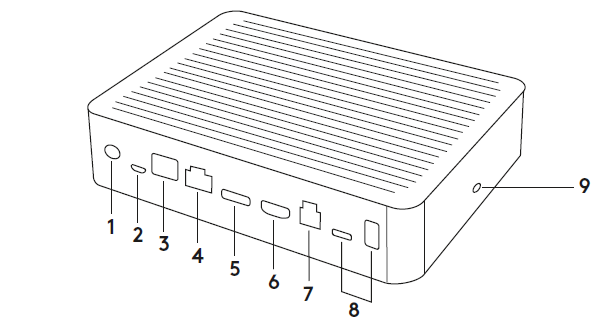

- Power
- Mic Pod
- Future Expansion
- Connection To Display Hub
- HDMI 1 In
- HDMI 2 In
- Meeting Room Computer USB
- Future Expansion
- Security Slot
- Power LED
DISPLAY HUB

- Speaker
- Power
- Connection To Table Hub
- HDMI 1 Out
- HDMI 2 Out
- Meeting Room Computer USB
- Camera
- Security Slot
- Remote Control Pairing
- Power LED
CAMERA

- Remote control pairing button
- USB
- Status LED
- Security slot
- MIPI
- Tripod Thread
- Expansion Slot
REMOTE

- Bluetooth pairing
- Call answer
- Call end
- Microphone mute
- Zoom in/out
- Volume up/down
- Home
- Camera pan/tilt
- Camera presets
After completing the installation, the system can be checked by running the diagnostic application available at Logitech com/support/Rally.
MAKE RALLY THE DEFAULT DEVICE
Ensure that RALLY is chosen as the camera, speaker and microphone in your video conferencing applications Please consult the application documentation for further instructions on how to do this.
STARTING A VIDEO CALL
After installing RALLY and ensuring it is the default device in your video conferencing application, simply start the application in the normal manner and enjoy the benefits of improved audio and video.
PAIRING RALLY TO A BLUETOOTH DEVICE
You can use RALLY for audio calls when paired to a Bluetooth device To pair your Bluetooth device to RALLY, follow these simple step:
- Press and hold the Bluetooth button on the remote control until you see a flashing blue light on the camera and microphones.
- Place your mobile device in Bluetooth pairing mode and select “Logitech Rally”.
- You are now ready to use RALLY for audio calls.
PAIRING A REMOTE CONTROL TO RALLY
RALLY and the remote control are paired at the factory You can pair up to 5 remote controls to RALLY to make it easier to control the system in larger rooms Or, if you need to pair a remote tothe camera, such as when replacing a lost remote, do the following:
- Press and hold the button on the camera until the LED flashes.
- Press and hold the button on the Display Hub until the LED flashes.
- Press and hold the Bluetooth button on the remote control until the LEDs on both the camera and Display Hub stop flashing.
- If the pairing fails, repeat from step 1.
CAMERA SETTINGS APPLICATION
Use this program to control the camera pan, tilt, zoom, focus, and image quality (like brightness and contrast) from your computer The software can be downloaded from www logitech com/ support/Rally
ENHANCING RALLY
There are several optional accessories that ease installation and allow RALLY to be used in larger rooms:
- Rally Mounting Kit: Mounting brackets for the Table Hub, Display Hub, Camera and Speakers
- Extra Mic Pods: RALLY can support up to 7 Mic Pods allowing great flexibility in room size and configuration
- Mic Pod Hub: Used to branch microphone routing and run most of the Mic Pod cabling is below the table The Mic Pod Hub has 3 jacks that can be connected to a combination of Mic Pods or other Mic Pod Hubs.
- TV mount: Works with one of either the Camera or Speaker mounting brackets The TV Mount can be used in pairs to mount the Camera and Speaker above and below the TV.
FOR MORE INFORMATION
You can find additional information on RALLY including:
- FAQs
- Software to enable functions in various application
- How to order replacement parts and more at
![]()
[xyz-ips snippet=”download-snippet”]