
logitech Racing Wheel and Pedals Xbox One and PC

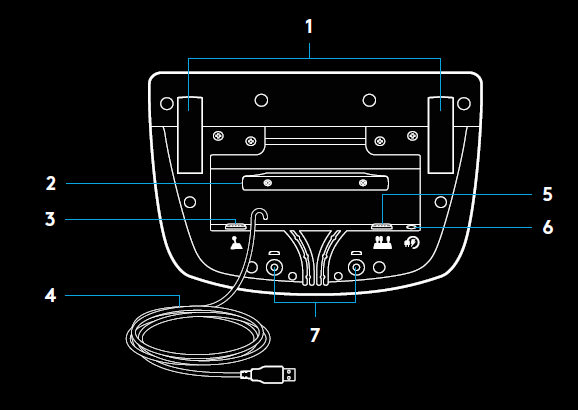
CONNECTIONS AND MOUNT POINTS
- Mounting clamps
- Cable management cleat
- Optional shifter connection (DB-9 male)
- USB cable
- Pedal unit connection (DB-9 female)
- Power connection
- Bolt mounting points (uses M6X1 bolts)

OPTIMAL CABLE ROUTING
- USB and pedal cables (1, 2) should be routed through inner channels.
- Power and optional shifter cables (3, 4) should be routed through outer channels.
- Cables may be wrapped multiple times around cable management cleat to take in slack.

INSTALLATION XBOX ONE PC
Attach power adapter and USB cables as shown. Every time your racing wheel connects with your system, it will rotate fully to each side and then to the center to calibrate. Your wheel will be ready once this calibration is completed. For PC to enable the force feedback and RPM LED features on your G923 Wheel and Pedals you must install the Logitech G HUB software. This can be found at logitechg.com/support/g923-xb1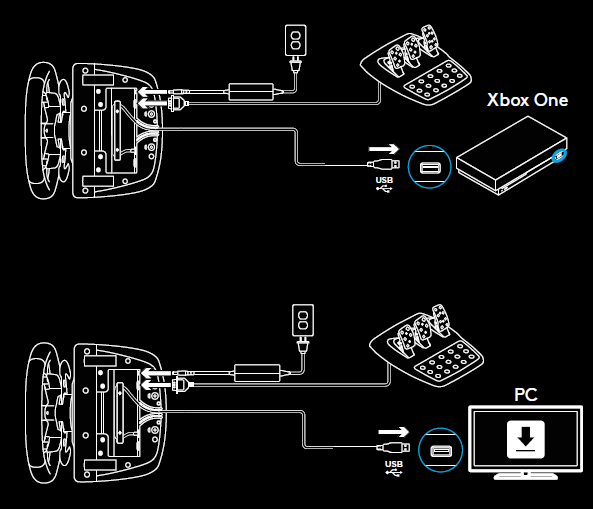
MOUNTING CLAMPS
- G923 Racing Wheel is equipped with a built in clamping system for mounting to a table.
- Push down and rotate clamp knobs to lock or unlock.
- Rotate clamp knobs to tighten or loosen clamps
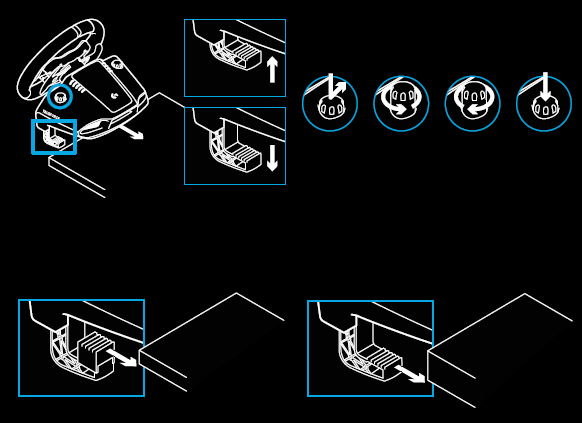
Note: Clamp extenders should be removed for attachment to thicker tables.
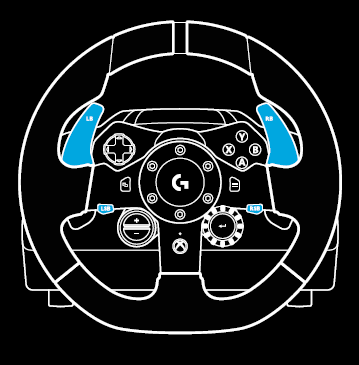
- Left bumper
- Directional pad
- View button
- Left stick button*
- +/- Setting Adjustment buttons*
- Right bumper
- A, B, X, Y buttons
- Menu button
- Right stick button*
- Setting Selection Dial and select button*
- Xbox button
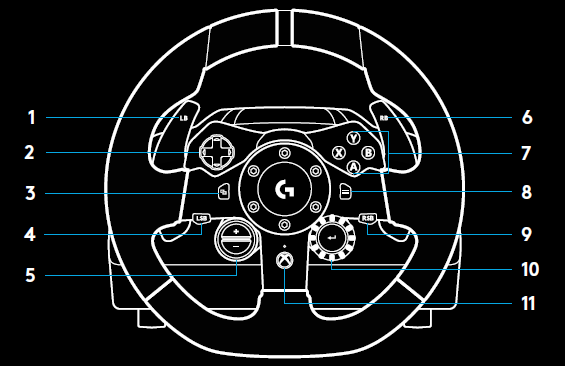
requires supported games on Xbox One. Assignable in any game on PC using either in-game assignment or Logitech G HUB software.
FORCE FEEDBACK
Your Racing Wheel contains dual motors that will provide force feedback with supported games and systems. In supported titles you will also experience our next generation approach to force feedback: TRUEFORCE. TRUEFORCE integrates directly with game physics and audio to unlock high-definition, real-time force feedback. Tire grip, suspension, weight, horsepower—even unique engine sound resonance—are immediately and accurately felt through the wheel. Supported titles on Xbox One and PC may implement TRUEFORCE high-definition force feedback. For a list of supported titles visit logitechg.com/support/g923-xb1
Note:Your Racing Wheel has an overheat protection circuit safeguard to protect it under high-temperature operating conditions. In rare instances, force feedback features may shut down during use while controls continue to operate. If this occurs, allow the wheel to cool down and power it down by unplugging it. If this occurs frequently, contact product support.
FEATURES
- Clutch pedal
- Brake pedal
- Throttle pedal
- Textured heel rest
- Bolt mounting points (uses M6X1 bolts)
- Patented carpet grip system
- Carpet grip release clip Push towards rear of pedal unit to release
- Change pedal face position (requires 2.5mm hex key)


USING THE DUAL CLUTCH IN-GAME
Using a dual clutch system from a grid start in a race enables you to achieve maximum traction without the need to find the bite point of your clutch pedal – this can give you a significant advantage at the start of a race. To use the dual clutch system in-game:
- At race start, fully depress the clutch pedal and the button assigned to the dual clutch function (see next section for setting instructions).
- Select first gear using the Gear Up Paddle and fully depress the gas pedal.
- As soon as you get the green light for race start, immediately release the Dual Clutch button. The car should start moving as the bite point of the clutch is engaged.
- Smoothly release your foot from the clutch pedal in order to achieve maximum traction. It’s worth practicing this last step and modifying the bite point setting several times to find a method that works for you. Once you have it perfected, this feature can help make up several places on the grid.
Note: Support for the dual clutch function is not possible in some games. A list of games that support the dual clutch feature can be found at logitechg.com/support/g923-xb1
SETTING UP THE DUAL CLUTCH SYSTEM
- Press and hold the left and right gear paddle and Left stick button and Right stick button together for two seconds to enter dual clutch setting mode. The RPM LEDs will illuminate blue and flash slowly:Note: Whilst in the Dual Clutch setting mode the RPM LEDs will not respond to the game/SDK.
- Press the button you want to set as the dual clutch button. The only valid buttons for this are the left stick button (LSB) and right stick button (RSB). The RPM LEDs will flash red to show that you’re in clutch position setting mode.
- While in your chosen simulation or game with the car still on a track, fully depress the clutch and gas pedals. Engage first gear and keep pressing the minus button down until the car begins to move in-game. You can adjust the precise bite point of the clutch by using the plus and minus buttons until you are happy with the setting.
- At this point you may test the dual clutch without leaving the setting mode. It is recommended you attempt a race start, stop the car and adjust the bite point and then try again until you are satisfied with the performance of the dual clutch.
- Press the Select button in the middle of the dial on the wheel to exit dual clutch setting mode. The RPM LEDs will flash in a sequence from green to blue to show that the setting is saved. The RPM LEDs will then go out and begin responding again to RPM output from supported games.
 Note: Whilst in the Dual Clutch setting mode the RPM LEDs will not respond to the game/SDK.
RESETTING DUAL CLUTCH SYSTEM
Press and hold the left gear shift, right gear shift, and X button for two seconds. The RPM LEDs will all flash four times and then extinguish to indicate that the Dual Clutch system has been reset. The button assigned to the Dual Clutch system (LSB or RSB) will revert to its normal function.
USING LOGITECH G HUB
Logitech G HUB enables the following features on the G923:
- Button programming with profiles that can be linked to games.
- Adjustment of wheel settings, such as Rotation Angle and TRUEFORCE strength.
- Testing of the various buttons, wheel and pedal functions.
G HUB WHEEL SETTINGS
SensitivityAlters the output response of the wheel to be more or less sensitive. Leaving this slider at 50% will provide a linear 1:1 output. Between 51% and 100% will make the wheel increasingly more sensitive around the centre movement of the wheel. Between 0% and 49% will make the wheel decreasingly sensitive around the centre movement of the Wheel.Operating RangeThe G923 is capable of up to 900 degrees of rotation. Reducing this setting will change the point at which the wheel will reach full steering lock. This is especially useful if you’re driving a car with a smaller actual steering lock angle, such as a Formula 1 or GT3 car.Centering Spring (for games without force feedback)Most games that support force feedback already model the correct return to center function of the G923 based on the virtual car. It is recommended that the Centering Spring option be turned off for these games. Enabling the Centering Spring option will allow you to override the game features and adjust the strength of the return to center force using the provided slider.TorqueOnly available for TRUEFORCE supported games. Torque controls the overall force feedback strength for your G923.
Audio EffectsOnly available for TRUEFORCE supported games. Controls the overall strength of the audio-related effects (engine note, rumble strips etc.) when using True Force compatible titles.If you are using your G923 in older titles that do not support TRUEFORCE then adjustment of the force feedback can be performed from the settings menus of the game title.
G HUB PEDALS SETTINGS
SensitivityAlters the output response of the pedals to be more or less sensitive. Leaving this slider at 50% will provide a linear 1:1 output. Between 51% and 100% will make the pedal increasingly more sensitive around the initial movement of the pedal. Between 0% and 49% will make the pedal decreasingly sensitive around the initial movement of the Pedal.Combined PedalsIf checked, this will set the gas and brake pedals to become two halves of a single axis. This will help the pedals operate correctly in older racing titles that do not support separate axes for pedals.Note: if left checked then the pedals will not behave correctly in modern racing titles. If you find that just one of your pedals is functioning by accelerating when pressed and braking when released then you should make sure that this option is not checked.
TESTING YOUR WHEEL AND PEDALSOn the wheel and pedals screens in G HUB you can check every button and axis on your G923 in order to ensure everything is functioning correctly. For the wheel you can also see the effect of altering the Operating range.
QUESTIONS?logitechg.com/support/g923-xb1![]()
References
[xyz-ips snippet=”download-snippet”]