LOMO’INSTANT WIDE CameraInstructions for Use
LOMO’INSTANT WIDE Camera
Instructions for Use
Welcome to the WIDE world of the Lomo’Instant Wide Camera! With its unparalleled features, the LOMO’INSTANT WIDE o f f e r s you unprecedented creative control over your instant photography. From the fully programmatic shutter and the PC-Sync socket to the remote control lens cap and unlimited long and multiple exposure options, you can take your instant experience to the next level with the LOMO’INSTANT WIDE!
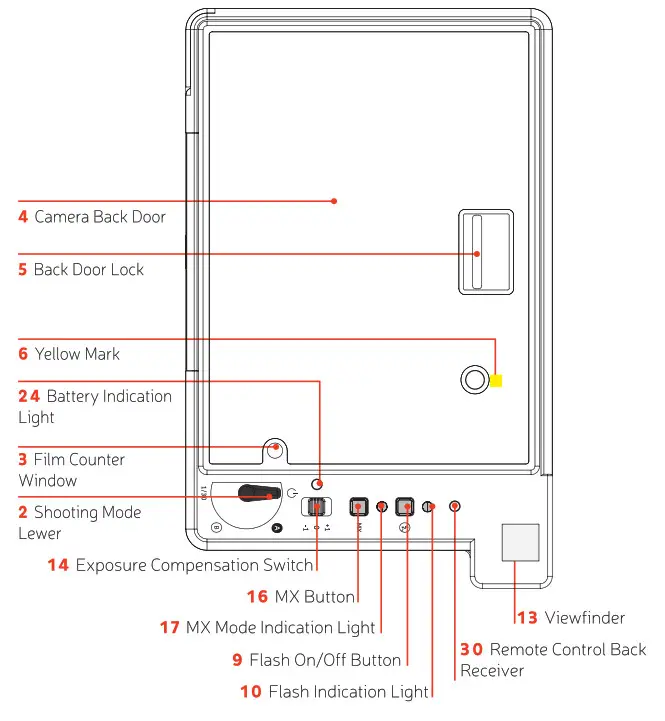
CAMERA COMPONENTS
| 1 Battery Door | 9 Flash On/Off Button | 17 MX mode Indication Light |
| 2 Shooting Mode Lever | 10 Flash Indication Light | 18 Self-Portrait Mirror |
| 3 Film Counter Window | 11 PC-Sync Socket | 19 Filter Thread |
| 4 Camera Back Door | 12 Focusing Ring | 20 Tripod Thread |
| 5 Back Door Lock | 13 Viewfinder | 21 Light Sensor |
| 6 Yellow Mark | 14 Exposure CompensationSwitch | 22 Flash Light Sensor |
| 7 Shutter Release Button | 15 Colored Gel Filter Slot | 23 Close-up Frame |
| 8 Film Ejection Slot | 16 MX Button | 24 Battery Indication Light |
REMOTE CONTROL COMPONENTS
| 25 Infrared Transmitter | 28 Battery Door |
| 26 INSTANT Button | 29 Remote Control Front Receiver |
| 27 TIME Button | 30 Remote Control Back Receiver |
TECHNICAL SPECIFICATIONS
| Film Format: | Fujifilm Instax Wide Film |
| Exposure Area: | 62 mm × 99 mm |
| Lens Focal Length: | 90 mm (35 mm equivalent) |
| Auto Exposure Type: | Programmed Automatic |
| Aperture: | f /8, f/22 |
| Shutter Speed Range: | Bulb (Bulb Mode), 8 s-1/250(Auto Shooting Mode), 1/30(Fixed Shutter Speed Mode) |
| Exposure Compensation: | +1/-1 Exposure Values (Ambient) |
| Ejection Mechanism: | Motorized |
| Multiple Exposures: | Yes |
| Built-in Flash Guide Number: | 13 (m) |
| Built-in Flash: | Automatic Electronic Flash & Flash Off Mode |
| Closet Focusing Distance: | 0.6 m |
| Zone Focusing Setting: | 0.6 m / 1-2 m / infinite |
| Tripod Mount: | Yes |
| Remote Control Transmission: | Infrared |
| Battery Supply: | 4 × AA batteries (4 × 1.5 V) |
| Remote Control Battery Supply: | 1 × 2025 batteries (3 V) |
| Filter Thread: | 49 mm |
INSTALLING THE BATTERIES
- The Battery Door 1 is located at the bottom left of the camera. Openby sliding it.
- Install four AA batteries (1.5 V) into the battery chamber and close the Battery Door 1 .
- Switch on the camera by turning the Shooting Mode Lever 2 to any shooting mode besides “Off”. You will see the battery light turn on in the Film Counter Window 3 .
BATTERY LIGHT INDICATION
Next to the Exposure Compensation Switch 14, there is a Battery Indication Light 24 which will indicate the battery condition:Blue light on: The battery condition is normal and the camera is ready to shoot.Blue light blinking: The batteries are low and need to be changed.
LOADING THE FILM
- Open the Camera Back Door 4 by pressing the Back Door Lock 5 down.
- Install a fresh pack of Fujifilm Instax Wide film into the film chamber. Make sure that the yellow mark 6 inside the film chamber matches the yellow mark on the film pack.
- Close the Camera Back Door 4 .
- Turn on the camera by switching the Shooting Mode Lever 2 to either “Auto Shooting Mode”, “Bulb Mode”, or “Fixed Shutter Speed Mode”. Press the Shutter Release Button 7 once to eject the dark slide of your new film pack. Please make sure not to block the Film Ejection Slot 8 when the dark slide is coming out.
SELECT A SHOOTING MODE
The Lomo’Instant Wide has three different shooting modes to choose between. You can easily select your preferred shooting mode by moving the Shooting Mode Lever 2 .
A. AUTO SHOOTING MODE
When the Auto Shooting Mode is selected, you will get perfectly exposed photos in all situations. The Lomo’Instant Wide determines aperture and shutter speed automatically (and flash output if flash is on) for perfect exposures. This is the perfect mode for shooting all hours of the day and night! The Flash is enabled by default in Auto Shooting Mode.
B. BULB MODE
When the Bulb Mode is selected, the Lomo’Instant Wide will be set at B shutter at all times. The shutter will remain open as long as the Shutter Release Button 7 is held down. As the aperture value default is f/8, Bulb Mode is perfect for shooting fun long exposures, night time shots and light paintings! The Flash is enabled by default under Bulb Mode.
1/30 FIXED SHUTTER SPEED MODE
When the Fixed Shutter Speed Mode is selected, the Lomo’Instant Wide will be set at 1/30 shutter at all times. The default aperture value in this mode is f/8.
1/30 shutter speed is useful in flash photography when you do not want ambient light to affect your exposure too much. A fixed shutter speed of 1/30 is especially useful when an external flash is connected or when photographing with studio lighting. Flash is on as default under Fixed Shutter Speed Mode.
AUTO OFF FUNCTION
When the Lomo’Instant Wide hasn’t been operated for five minutes, regardless of the shooting mode, it will switch off automatically to save battery power. To re-activate the camera, simply press any button on the Lomo’Instant Wide.
In all modes (except “Off”), the Flash is “On” by default. This means every time you switch on your camera, the flash will automatically be “On”. If you want to shoot without the flash, press the Flash On/ Off Button 9 once and the built-in flash will be switched off until the camera is turned off.There is a Flash indication light 10 above the Flash On/Off Button 9 :
Green light on: The Flash is fully charged and ready to shoot.Red light on: The Flash is recharging.No light on: The Flash is off and the camera will automatically expose according to ambient light in Auto Shooting Mode.
PC-SYNC
There is a PC-Sync Socket 11 on Lomo’Instant Wide which allows you to connect external flash with PC connection to your camera. To connect external flash, simply plug the PC-Sync connection of your flash into the PC-Sync Socket 11 on Lomo’Instant Wide.With an external flash connected, there is no interference with the built-in flash on the Lomo’Instant Wide. You can still set the internal flash as “On” or “Off” as normal.
SHOOTING PHOTOS
When your film is properly installed and you have selected your shooting mode, you are ready to shoot! Here’s how to make the instant magic happen:
- Take off the lens cap.
- Determine your subject’s distance and set the suitable Zone Focusing Setting to 0.6 m / 1-2 m / Infinity, by turning the Focusing Ring 12.
- Look through the Viewfinder 13 and compose your photo.
- Press the Shutter Release Button 7 to take a photo. Once you have pressed the Shutter Release Button 7, the film will be automatically ejected.
- Now wait for the photo to develop in your hands!
FRAMING WITH VIEW FINDER
When you look through the Viewfinder, you will see a close-up frame 23 in the bottom left corner, which is for compensating parallax.
- When the Focusing Ring 12 is set to 0.6 m, compose your photo within the close-up frame 23 in order to correct framing.
- When the Focusing Ring 12 is set to 1-2 m or infinity, simply ignore the Close-Up Frame and compose your photo using the entire viewfinder area.
EXPOSURE COMPENSATION
There is an Exposure Compensation Switch 14 above the Shooting Mode Lever 2 , which allows you to override the ambient exposure compensation while the camera is in Auto Shooting Mode. Set the Exposure Compensation Switch 14 to “+1” if a brighter image is required, or set the Exposure Compensation Switch 14 to “-1” if a darker image is required. If the switch is set to “0”, auto exposure will be correct in general situations.
Note: Exposure Compensation Switch 14 is only for Auto ShootingMode, not for Bulb mode, or Fixed Shutter Speed Mode.
COLORED GEL FILTERS
There are four colored gel filters included in the Lomo’Instant Wide package. You can insert a colored gel filter in the Colored Gel Filter Slot 15 in front of the flash to produce different color effects.
MULTIPLE EXPOSURES
With the Lomo’Instant Wide, you can shoot unlimited multiple exposures! To use this cool function, first press the MX Button 16 once to activate the MX Mode. There is an MX Mode Indication Light 17 above the MX Button 16. When the MX Mode is turned on, the MX Mode Indication Light 17 will shine orange. Then take your first exposure or multiple exposures if you desire. When you have finished your last exposure, press the MX Button 16 again to eject the film.
SELF-PORTRAIT MIRROR
The Lomo’Instant Wide includes a little convex Self-Portrait Mirror 18 next to the camera lens to make it easier to compose your self-portrait shots.
FILTER THREAD
The Lomo’Instant Wide includes a 49 mm standard Filter Thread 19 in front of the camera lens for applying any kind of filter or lens attachments.
TRIPOD THREAD
The Lomo’Instant Wide comes with a standard ¼ ” tripod thread. To mount the camera on a tripod, simply screw the tripod screw into the Tripod Thread 20 in the bottom of the camera.
REMOTE CONTROL LENS CAP
The lens cap of Lomo’Instant Wide works as a remote shutter release by infrared transmission. There are two buttons on the remote lens cap functioning for Auto Shooting Mode, Bulb Mode and Fixed Shutter Speed Mode. To use the remote shutter release function, point the Infrared Transmitter 25 of the remote control lens cap toward the Remote Control Front Receiver 29 or Remote Control Back Receiver 30, and simply press the corresponding button on the lens cap.
- INSTANT Button 26: Under Auto Shooting Mode and Fixed Shut- ter Speed Mode, press INSTANT Button 26 for normal shutter release.
- TIME Button 27: under Bulb Mode, press TIME Button 27 once to open the camera shutter for exposure, then press the button once more to close the camera shutter and end of exposure.To change the batteries of the remote control lens cap, simply open the Battery Door 28 at the bottom of the remote control lens cap by sliding it. Then install one 2025 battery (3 V) and close the Battery Door 28 .
TROUBLESHOOTING
report this adQ. The camera is functioning but the film does not eject after the Shutter Release Button 7 is pressed.A . Please check the following:
- Make sure that there is film installed in the camera.
- Check the Film Counter Window 3 to see if your film has come to an end.
- Make sure that the proper shooting mode is enabled and ensure the camera is not set to “Off”.
- Check if the MX Mode Indication Light 17 above the MX Button 16 is on. If it is, that means you are in the MX Mode. Press the MX Button 16 again to switch off the MX Mode.
- Check the battery power by checking the battery light inside the Film Counter Window 3 . If it is blinking green, that means your camera is running out of battery. You should insert fresh batteries.
Q. The Auto exposure seems to be incorrect, my subject is under- or overexposed.A. Firstly check if anything is blocking the Light Sensor 21 and Flash Light Sensor 22, then check if the camera is correctly set to Auto Shooting Mode. The ambient exposure value and auto flash output may also be affected by a very bright or very dark background. Set the Exposure Compensation Switch 14 to “+1” and shoot again if your image is too dark, or if your image is too bright, set the Exposure Compensation Switch 14 to “-1”.
CARE AND WARRANTY
Your Lomo’Instant Wide has a 2-year warranty against any manufacturer defects. In the event of a defect, the Lomographic Society will repair or replace the item at our discretion. For the warranty service, please contact your closest Lomographic Office.
Lomographic Society InternationalKaiserstrasse 34/12, A–1070 Vienna, AustriaTel: +43–1–899 44 0, Fax: +43–1–899 44 22[email protected]www.lomography.comLomography Officeswww.lomography.com/about/contactLomography Storeswww.lomography.com/about/stores
References
[xyz-ips snippet=”download-snippet”]