
![]() 2K QHD Wire-Free Security SystemQuick Start Guidelorex.com
2K QHD Wire-Free Security SystemQuick Start Guidelorex.com

Welcome!Thanks for your purchase of the 2K QHD Wire-Free Security System. Here’s how to get started.
Package Contents
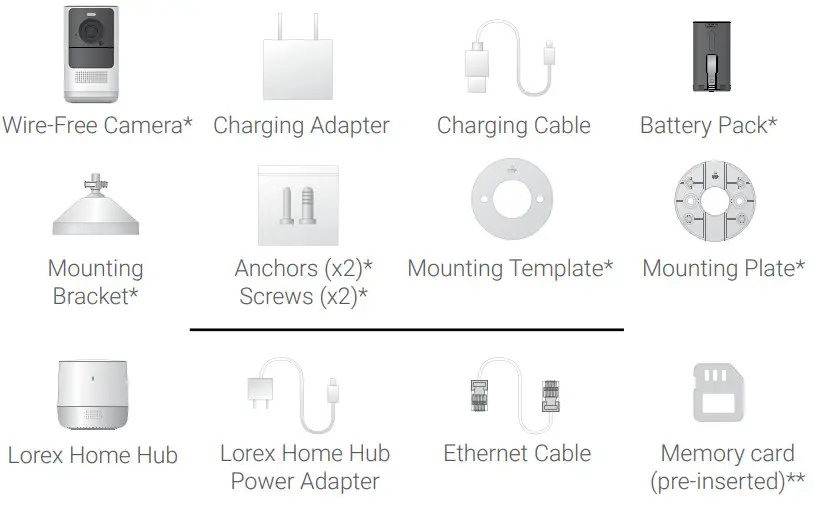
![]() Attention: A REGULATED UL / CSA APPROVED power supply is REQUIRED for use with this camera (included). The use of a non-regulated, non-conforming power supply can damage this product and voids the warranty.*May include one or more, depending on the package purchased.**See product packaging for memory size details.
Attention: A REGULATED UL / CSA APPROVED power supply is REQUIRED for use with this camera (included). The use of a non-regulated, non-conforming power supply can damage this product and voids the warranty.*May include one or more, depending on the package purchased.**See product packaging for memory size details.
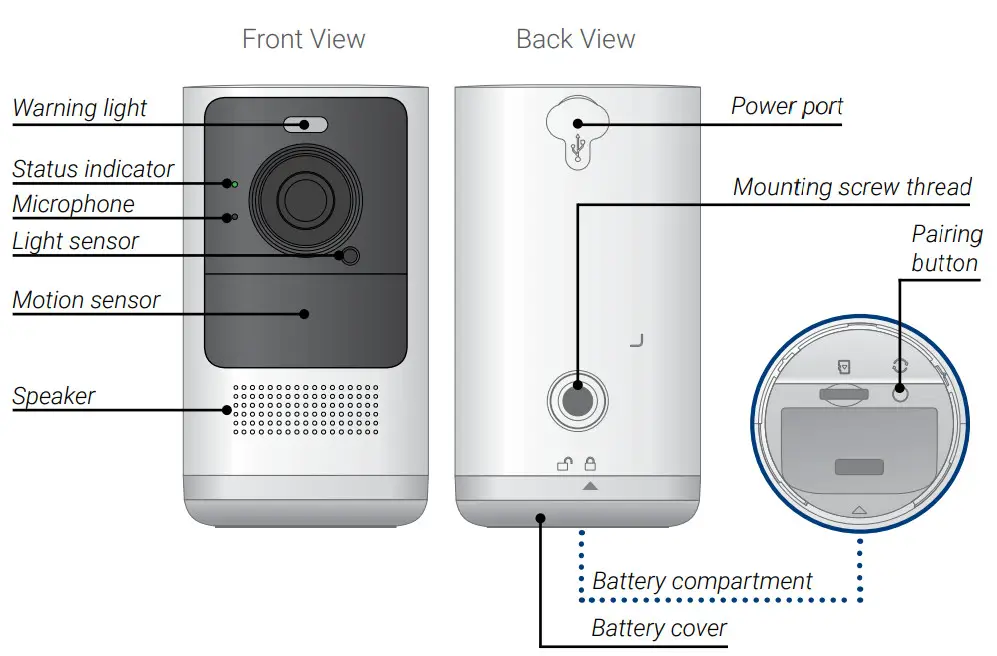
Overview: Camera
Overview: Lorex Home Hub
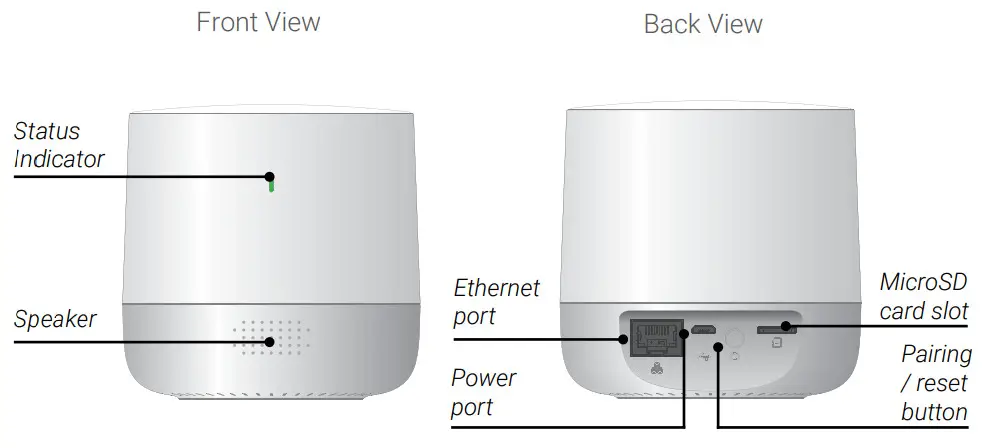
For optimal video streaming performance position the Lorex Home Hub centrally to the cameras.![]() Note: Wireless signal strength can be reduced by other devices that emit frequencies or obstacles such as walls, ceilings, brick, and other major obstructions.
Note: Wireless signal strength can be reduced by other devices that emit frequencies or obstacles such as walls, ceilings, brick, and other major obstructions.
Status Indicator
See the table below for definitions of the camera / Lorex Home Hub status indicator:
| Status | Camera | Lorex Home Hub |
| Off | •Sleep mode•Battery needs recharging | N/A |
| •Waking up•Alarm has been triggered | Operating correctly | |
| Reconnecting to network | Ready to connect to the network | |
| Ready to pair with the hub | N/A | |
| Detecting Wi-Fi signal from the hub | Ready to pair | |
| Factory default successful | Factory default successful | |
| Disconnected from network | Disconnected from network | |
| Firmware update in progress | Firmware update in progress | |
| N/A | The alarm has been triggered by the camera |
Pairing to the App
Start by powering on the Lorex Home Hub and connecting to the app.
- If you already have the app, skip this step. Scan the QR code on the right using your mobile device’s camera. Install the free Lorex Home app from the App Store™ or Google Play Store™.
 https://app.lorex.com/home/download
 - Tap the Lorex Home icon to launch the app.
- If you already have an account, skip this step. Tap Sign up, then follow the on-screen prompts to create an account. Record your account details below:Email:________________________Account Password:______________
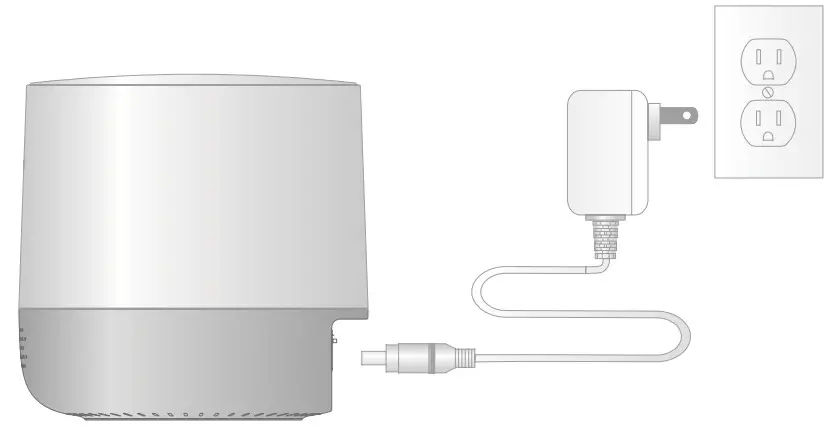
- Plug the hub’s power adapter into the power port of your hub and into a nearby outlet.
- Once the LED indicator on the hub is flashing green, tap + in the app.
- Scan the QR code on the bottom of the hub.Note: If your mobile device cannot scan the QR code, tap Manually enter Device ID.
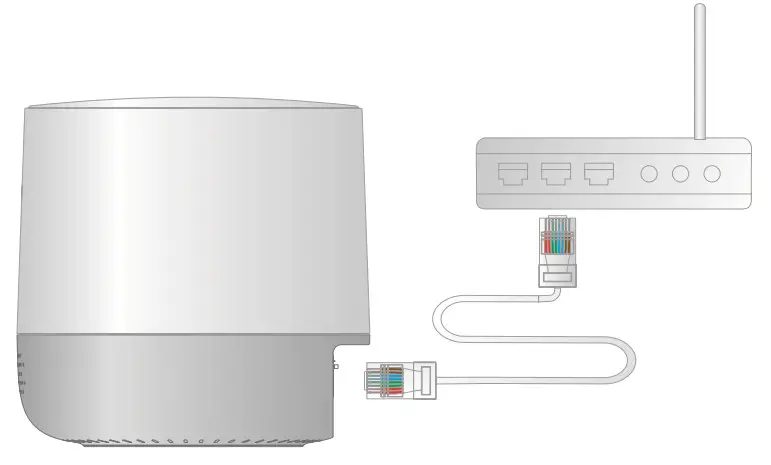
- Choose your preferred connection set up method from Options A or B:Option A – Wired Connection (preferred method): Choose the wired connection and connect the Lorex Home Hub to your home router using the provided Ethernet cable. If your router is not in a central location in your home, then consider using the wireless option to ensure the hub is positioned centrally relative to all the different Lorex devices.Option B – Wireless Connection: Choose the wireless connection, select your Wi-Fi network from the list, then enter the Wi-Fi password of your network to connect. The Lorex Home Hub can be placed wherever there is a good connection to your home router and positioned centrally relative to all the different Lorex devices.
- Create a secure password for your hub. Record your hub’s password below:Hub password:________
- Follow the steps in the Lorex Home app to complete the setup.

Installing the Battery
To install the battery:
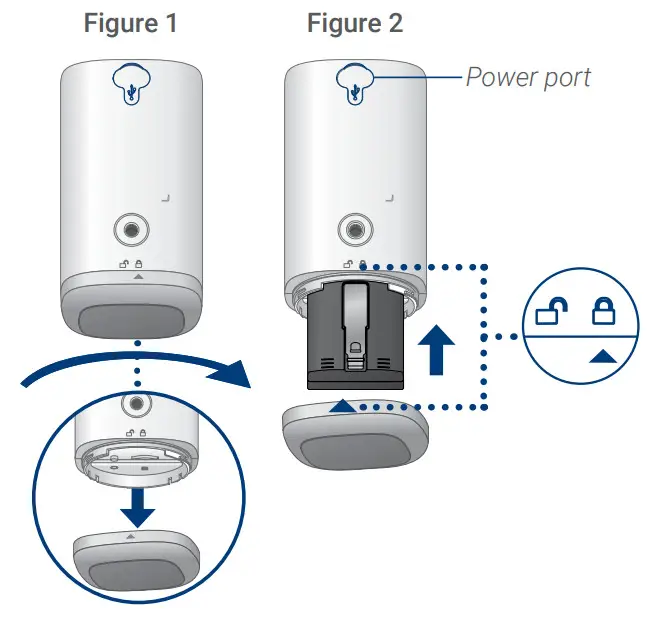
- Twist the battery cover clockwise to remove it from the camera (See Figure 1).
- Insert the battery, following the arrow on the flip side of the battery.
- Carefully align the arrow on the battery cover with the unlock symbol on the camera. Twist the cover counterclockwise to lock (See Figure 2).
To charge the battery:Option A – Charging inside the camera
- Use the charging adapter and cable to connect to the camera’s power port.
- Plug into a power outlet until the camera’s LED indicator is solid green.
Option B – Charging the battery by itself
- Remove the battery from the camera.
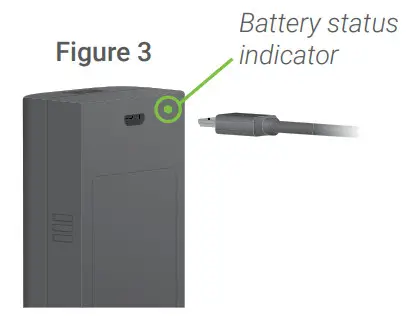
- Use the charging adapter and cable to connect to the battery’s power port.
- Plug into a power outlet until the battery’s status indicator is solid green (See Figure 3).
Placing the Camera
- Place the camera on any flat surface or mount it to a wall.
- Do not place the camera near air conditioners and other b air outlets.
- Install the camera at the recommended angle and height to optimize motion detection accuracy.
To optimize motion detection accuracy when:
| Mounted on a wall | |
| Distance | Optimal accuracy for objects within 6.5ft to 32ft (2~10m). |
| Angle | Angle the camera around 15°-30° down from the level position. |
| Height | Install the camera between 7-10ft (2~3m) off of the ground. |
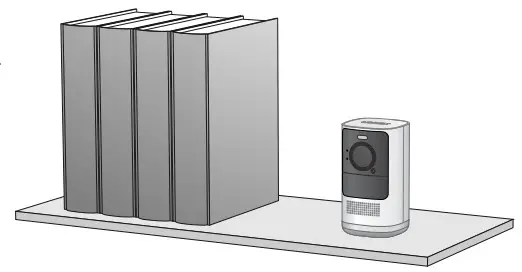
| Placed on a shelf | |
| Distance | Optimal accuracy for objects within 0.5-32ft (2~10m). |
| Angle | Place the camera on a flat surface.Make sure the flat surface/shelf is not obstructing the camera’s field of view. |
| Height | Place the camera between 4.5ft to 6.5ft (1.5~2m) off of the ground. |
![]() Note: Accuracy of person detection will be influenced by multiple factors, such as the person’s distance from the camera, the height of the person, and the height and angle of the camera. Night vision will also impact the accuracy and distance of detection.
Note: Accuracy of person detection will be influenced by multiple factors, such as the person’s distance from the camera, the height of the person, and the height and angle of the camera. Night vision will also impact the accuracy and distance of detection.
Installing the Camera
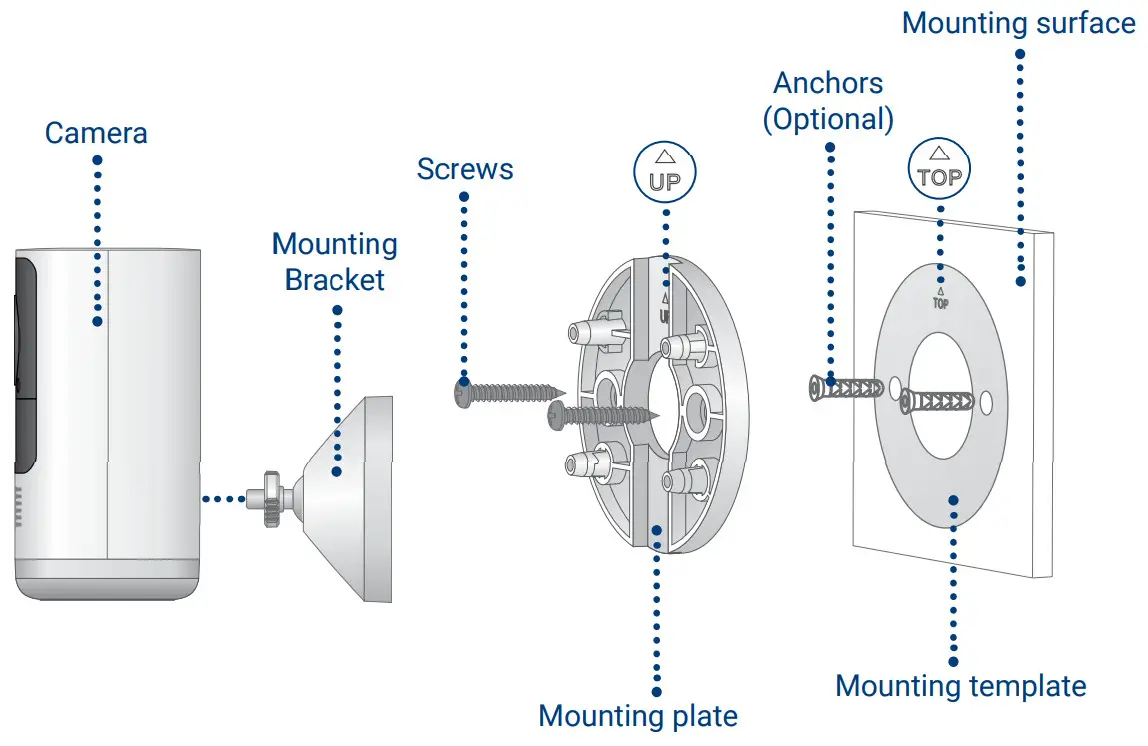
To install the camera:
- Stick the mounting template to the mounting surface or hold it up to mark the holes.Optional: Drill holes for the anchors if installing on concrete, stucco, brick, or any other masonry surface. Use a 7/32” or 15/64” drill bit (5.5 – 6mm).
- Align the mounting plate to the mounting surface and use a Philips head screwdriver to secure the screws.Note: Be sure to follow the “UP”/“TOP” directions on the mounting template and mounting plate.
- Align and push the “UP” side of the mounting bracket to the “UP” side of the mounting plate.
- Slide the mounting bracket down into place. A “click” sound will indicate that the bracket is locked into the mounting plate.
- Screw the camera onto the bracket and adjust the camera’s angle as needed.
Camera Live View
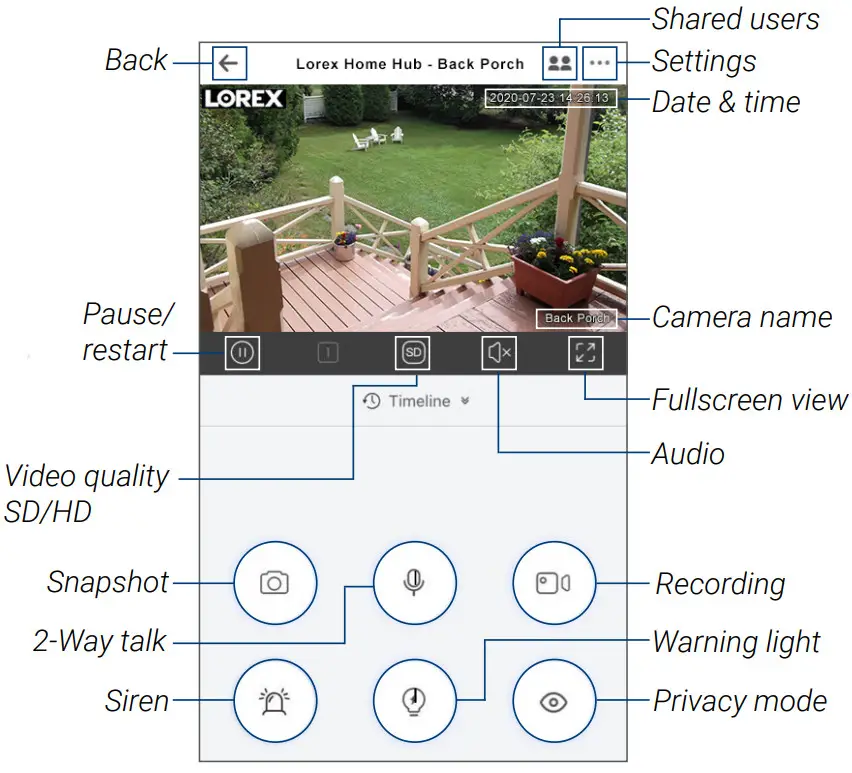
For a complete overview of controls available on the Lorex Home app, scan the QR code below using your mobile device’s camera.

https://www.lorextechnology.com/articles/Lorex-Home-Mobile-App
Troubleshooting
- How to charge the battery.See section 5 “Installing the Battery” for more details.
- The camera runs out of battery too fast.• Check to see if the camera is frequently set off by motion. If so, enable “Person Detection” and decrease the motion and person detection sensitivity.• Change the performance mode of the camera to “Power Saving Mode”.• If the camera is being used in a high traffic area use an optional power adapter, consider obtaining the solar panel accessory, or adjust the angle of the camera to avoid busy areas like roads or sidewalks.• Check to see if the wireless connection between the camera and the Lorex Home Hub is strong.The weaker the signal, the higher the power consumption.• Make sure the camera is not placed near an air conditioner or an air vent.• Cold temperatures affect the battery’s capacity to work. If your camera is outside in cold temperatures, then the battery life might be shorter.
- The camera is offline.• Check to see if the battery has run out of power. Remove the battery and plug it into the charging adapter and cable to check the battery’s status indicator. A solid red status indicator means the battery is nearly empty or empty.• Check to see if the Lorex Home Hub is offline. See section 3 “Status Indicator” for more details.
- The Lorex Home Hub is offline.• See section 3 “Status Indicator” for more details.• Check that the power adapter is securely connected.• Make sure the ethernet cable is properly connected to the Lorex Home Hub and your router (wired connection only).• Try to connect to the Internet from another device that is connected directly to your router to make sure you are getting service.• Power cycle the Lorex Home Hub.• Reset the Lorex Home Hub if necessary. This will not affect recordings stored on the device.
- Failed to pair the camera to the Lorex Home Hub.• Ensure that both the Lorex Home Hub and camera are in pairing mode. Refer to section 3 “Status Indicator”.• The distance between the camera and the Lorex Home Hub is too far. Make sure the camera is no more than 3ft from the hub during the setup process.• Make sure you are only pairing one camera to the Lorex Home Hub at a time.• Reset the camera. Press and hold down on the reset button until you hear the chime then try pairing again.• Make sure that the Lorex Home Hub has been added to the app before pairing.
- The camera is not picking up motion detection and has a strong reflection when recording through glass.The camera’s motion sensor will not work when recording through glass or any other building material.The camera needs to be located outside when trying to monitor motion outdoors.
- How to reset the camera to factory settings.Press and hold down on the reset button until you hear the chime.
Camera safety precautions:
- Read this guide carefully and keep it for future reference.
- Follow all instructions for safe use and handling of the product.
- Use the camera within the given temperature, humidity, and voltage levels noted in the camera’s specifications.
- Do not disassemble the camera.
- Do not point the camera directly at the sun or a source of intense light.
- Periodic cleaning may be required. Use a damp cloth only. Do not use any harsh, chemical-based cleaners.
Battery safety precautions:Refer to the battery’s insert “Safety Rules for Lorex Rechargeable Batteries”.Disclaimers:
- This camera includes an Auto Mechanical IR Cut Filter. When the camera changes between Day/Night viewing modes, an audible clicking noise may be heard from the camera. This clicking is normal and indicates that the camera filter is working.
- Audio recording without consent is illegal in certain jurisdictions. Lorex Corporation assumes no liability for use of its products that does not conform with local laws.
This device complies with Part 15 of the FCC Rules. Operation is subject to the following two conditions: (1) this device may not cause harmful interference, and (2) this device must accept any interference received, including interference that may cause undesired operation.Caution: The user is cautioned that changes or modifications not expressly approved by the party responsible for compliance could void the user’s authority to operate the equipment.Note: This equipment has been tested and found to comply with the limits for a Class B digital device, pursuant to part 15 of the FCC Rules. These limits are designed to provide reasonable protection against harmful interference in a residential installation.This equipment generates uses and can radiate radio frequency energy and, if not installed and used in accordance with the instructions, may cause harmful interference to radio communications. However, there is no guarantee that interference will not occur in a particular installation.If this equipment does cause harmful interference to radio or television reception, which can be determined by turning the equipment off and on, the user is encouraged to try to correct the interference by one or more of the following measures:—Reorient or relocate the receiving antenna.—Increase the separation between the equipment and receiver.—Connect the equipment into an outlet on a circuit different from that to which the receiver is connected.—Consult the dealer or an experienced radio/TV technician for help.FCC RF Radiation Exposure Statement:This equipment complies with FCC radiation exposure limits set forth for an uncontrolled environment. This equipment should be installed and operated with a minimum distance of 20cm between the radiator and any part of your body.This device contains license-exempt transmitter(s)/receiver(s) that comply with Innovation, Science, and Economic Development Canada’s license-exempt RSS(s). Operation is subject to the following two conditions:
- This device may not cause interference.
- This device must accept any interference, including interference that may cause undesired operation of the device.
Copyright © 2020 Lorex CorporationAs our products are subject to continuous improvement, Lorex reserves the right to modify product design, specifications, and prices, without notice and without incurring any obligation. E&OE. All rights reserved.This device complies with part 15 of the FCC Rules. Operation is subject to the following two conditions:
- This device may not cause harmful interference, and
- This device must accept any interference received, including interference that may cause undesired operation.
report this adFor up-to-date information and support please visit: help.lorex.com/series/LHH
References
[xyz-ips snippet=”download-snippet”]