![]() HD Video DoorbellLNWDB1 SeriesQuick Start Guidelorex.com
HD Video DoorbellLNWDB1 SeriesQuick Start Guidelorex.com

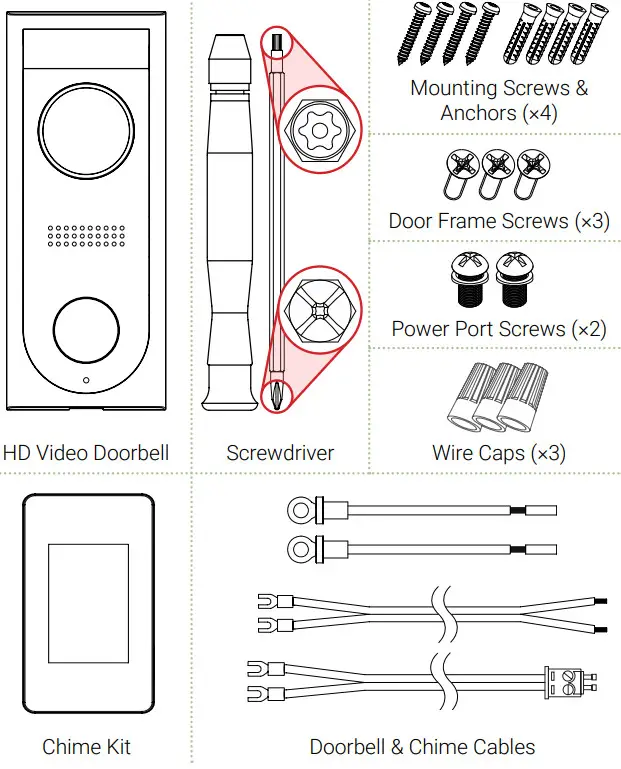
Package Contents
Safety Precautions
- Read this guide carefully and keep it for future reference.
- Follow all instructions for safe use and handling of the product.
- Use the product within the given temperature, humidity, and voltage levels noted in the product’s specifications.
- Do not disassemble the doorbell.
- Periodic cleaning may be required. Use a damp cloth only. Do not use any harsh, chemical-based cleaners.
Disclaimers
- Not intended for submersion in water. Installation in a sheltered location is recommended.
- This doorbell includes an Auto Mechanical IR Cut Filter. When the camera changes between Day/Night viewing modes, an audible clicking noise may be heard from the doorbell. This clicking is normal and indicates that the camera filter is working.
- Audio recording without consent is illegal in certain jurisdictions. Lorex Corporation assumes no liability for use of its products that does not conform with local laws.
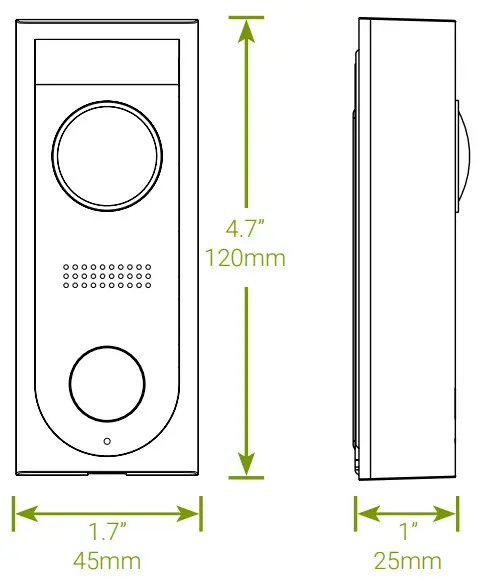
Dimensions
FCC Notice
THIS DEVICE COMPLIES WITH PART 15 OF THE FCC RULES. OPERATION IS SUBJECT TO THE FOLLOWING TWO CONDITIONS:
- THIS DEVICE MAY NOT CAUSE HARMFUL INTERFERENCE, AND
- THIS DEVICE MUST ACCEPT ANY INTERFERENCE RECEIVED, INCLUDING INTERFERENCE THAT MAY CAUSE UNDESIRED OPERATION.
Product Overview
Front Panel

| Indicator LED strip | ||
| Behavior | During Setup | After Setup |
| Behavior Pulsing | Hotspot active | • Calling• Resetting |
| Solid | Power on | Talking |
| Flashing | Ready for setup | Network issues |
Back Panel

STEP 1: Preparation
Before beginning setup, there are some essential preparations to make.To prepare for installation:
- TURN OFF THE POWER RUNNING TO YOUR EXISTING DOORBELL AND CHIME BOX AT THE BREAKER. Test that power has been disconnected for both the doorbell and chime box power by pressing the doorbell. There should be no chime sound.
- Remove your existing doorbell and disconnect wiring.
 TIP: Bend the power cables so they do not fall through the hole in the wall.
 - Remove the metal mounting plate from the back of the doorbell.
 TIP: Bend the power cables so they do not fall through the hole in the wall.
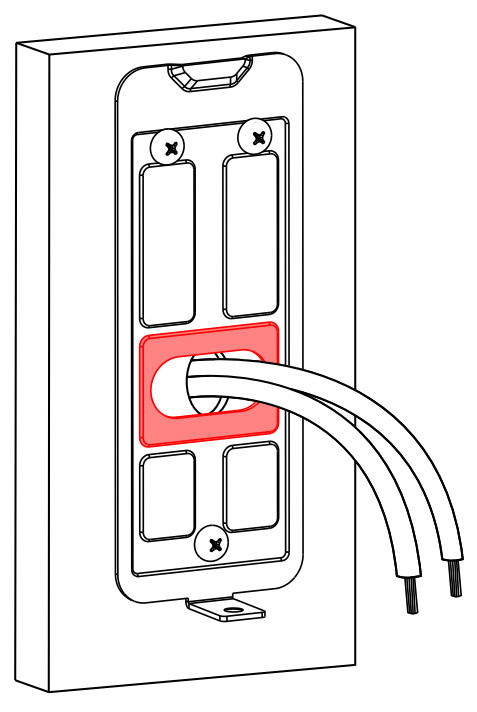
STEP 2: Secure the mounting bracketNext, use the mounting bracket to mark holes for mounting. Use the mounting accessories specified below depending on mounting location.
For installing on brick, stucco, or siding:

Use a 15/64” drill bit to drill holes where marked. Use the included mounting screws and plastic anchors to secure the mounting bracket to the wall.
For installing on a metal door frame:

Use a 3/32” drill bit to drill holes where marked. Use the included door frame screws to secure the mounting bracket to the door frame.
NOTEFor both installations, ensure the power cables from the wall fit comfortably through the hole in the mounting bracket.
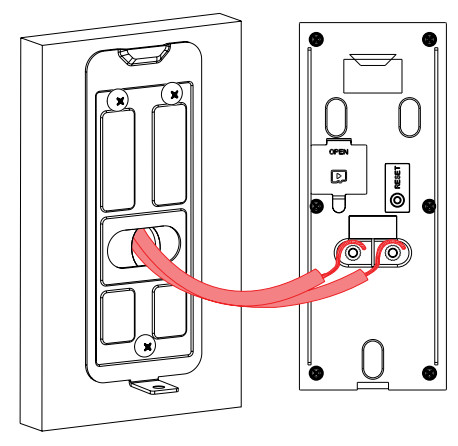
STEP 3: Wiring the doorbellNext, you will complete the wiring for your new doorbell.IMPORTANT: 16-24 VAC is required. If your house does not have this voltage, you will need a 16-24 VAC doorbell transformer or you can consult with a licensed electrician.
- Loop the power cables around the power ports of the doorbell.
- Use the included screws (×2) to secure the power cables.
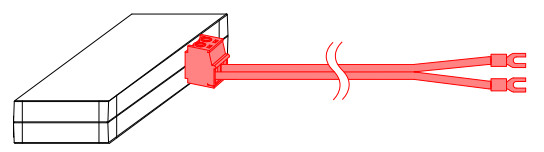
- Push the wiring through the hole in the wall or door frame. Slide the doorbell down so the plastic tab on the doorbell locks into the notch on the mounting bracket.NOTEIf the power cables in the wall are not long enough, use the optional power cable connectors and wire caps.* * Ensure there is enough space to fit the cable connectors and wire caps into the hole in your wall or door frame.
- Insert the included security screw through the mounting bracket and into the screw hole on the bottom of the doorbell. Fasten tightly using the star-shaped end of the included screwdriver to complete the installation.

 NOTEIf the power cables in the wall are not long enough, use the optional power cable connectors and wire caps.*
 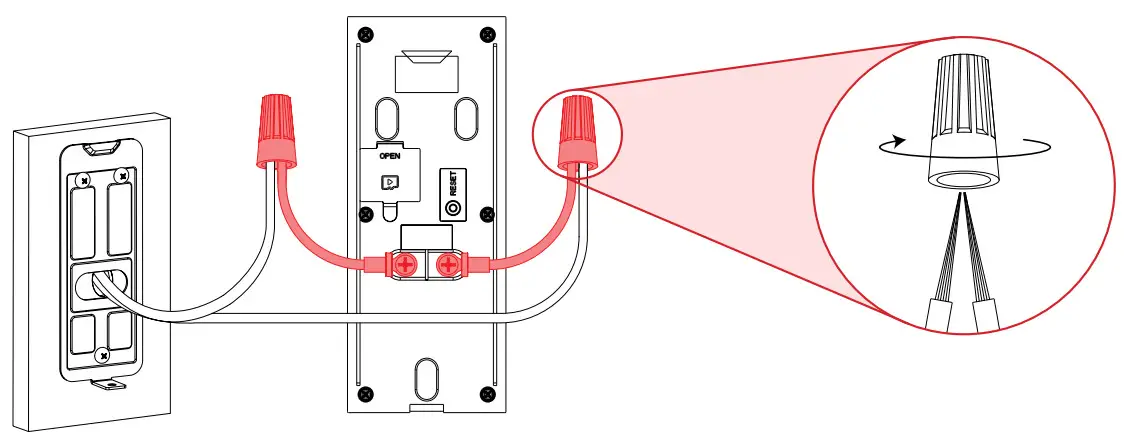 * Ensure there is enough space to fit the cable connectors and wire caps into the hole in your wall or door frame.
STEP 4: Wiring the chimeYou must determine the type of doorbell chime you have in your home: electronic or mechanical.
Not sure? If your doorbell chime is a classic *ding-dong* sound, chances are your chime is mechanical. If you are still not sure, remove the cover panel of your chime box – if you find springloaded levers and a physical metal chime, you have a mechanical chime. For users with a mechanical chime, follow the extra steps below to complete the installation.For mechanical chime owners:
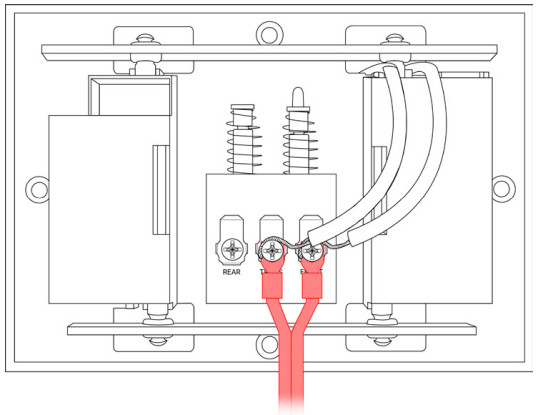
- Remove the cover panel of your doorbell chime box.
- Loosen the screws labeled FRONT and TRANS using the Phillips end of the included screwdriver.Do not remove the screws, and be sure not to detach any connected wiring.
- Connect the included chime kit to the green terminal on the end of the included wiring as shown below.
- Connect the wiring from the chime kit to the FRONT and TRANS connectors in the chime box. Ensure that the existing wiring stays connected as well.NOTE: You may connect either wire to either connector.
- Mount the chime kit to the inside of your chime box, or along with the cover plate, using the included double-sided tape.IMPORTANT: Ensure the chime kit and wires are not touching the chimes or any moving components inside the chime box, or the doorbell chime will not sound correct.
- Reconnect power to the doorbell and chime at the breaker.
STEP 5: Scan the doorbellNext, scan the doorbell using the Lorex Home app.To scan the doorbell:
- Download and install the free Lorex Home app from the App Store or Google Play Store.
- Tap the Lorex Home icon to launch the app. Tap Sign up, then follow the on-screen prompts to create an account. Record your account details below and store in a secure location:Email:Account Password:
- Once the status LED on the doorbell is solid blue, tap + in the Lorex Home app.
- Scan the device’s QR code included inside the package using your mobile device’s camera.NOTE: If your mobile device cannot scan the QR code, tap Manually enter Device ID.

Once you have scanned the doorbell into your Lorex Home app, you can choose to follow along with the in-app setup video, or continue with the printed instructions.
STEP 6: Linking chime and doorbellFinalize the setup by linking the doorbell and chime to the Lorex Home app.
Prerequisite:
- Wait for the doorbell to start up. This may take up to 5 minutes after reconnecting power at the breaker.
To link the doorbell and chime:
- Once the status LED on the doorbell is pulsing blue, tap Next in the Lorex Home app. The app will connect your mobile device to the doorbell’s hotspot.NOTE: If the Wi-Fi connection is weak, try moving your router closer or adding a Wi-Fi extender.
- Create a secure password for the doorbell. Record your doorbell password below and store it in a secure location:Doorbell Password:
- Select your Wi-Fi network from the list, then enter the Wi-Fi password to connect your doorbell to the Internet.
- Once the status LED on the doorbell is solid blue, tap Next to add the doorbell to your Lorex Home account.
- Set a name for the doorbell and configure date & time preferences, then tap Complete.
- Tap Link Third Party Chime.
- Select Electronic Chime or Mechanical Chime based on the type of chime in your home.IMPORTANT: Make sure to select the correct chime box in the app.

Overview of Lorex Home app

Overview of the most common screens and controls in the Lorex Home app. For complete instructions on using the app, see the Lorex Home app manual on your product page at lorex.com.
 Scan for Lorex Home APPhttps://app.lorex.com/home/download
Live viewing screen:
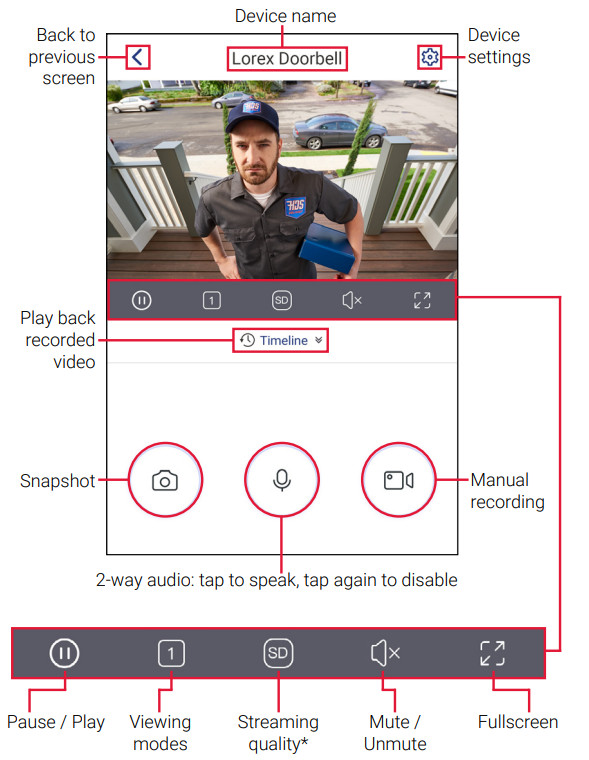
* Change the streaming quality to SD (Standard Definition) to conserve bandwidth while watching live video. This will not impact the quality of the recorded video.Calling screen:

Need Help?Visit us online for up-to-date software and complete instruction manuals
 report this ad
- Visit lorex.com
- Search for the model number of your product
- Click on your product in the search results
- Click on the Downloads tab
Copyright © 2020 Lorex CorporationAs our products are subject to continuous improvement, Lorex reserves the right to modify product design, specifications, and prices, without notice and without incurring any obligation. E&OE. All rights reserved.
References
[xyz-ips snippet=”download-snippet”]