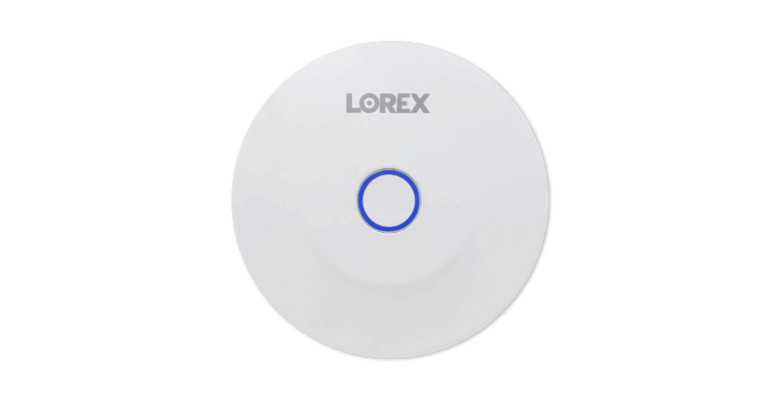

SensorsQuick Start Guidelorex.com
Welcome!Thanks for your purchase of the Lorex sensors. Here’s how to get started.
Package contents – Sensor Hub
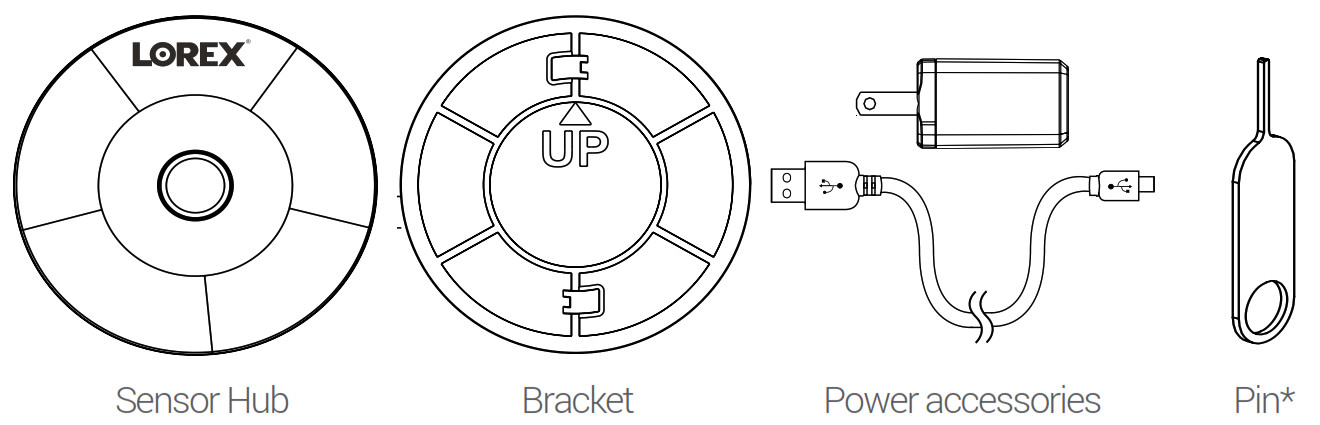
*May include one or more pins, depending on the package purchased.To purchase additional sensors, visit lorex.com and/or authorized resellers.
 WARNING: CHOKING HAZARD KEEP OUT OF REACH OF CHILDREN
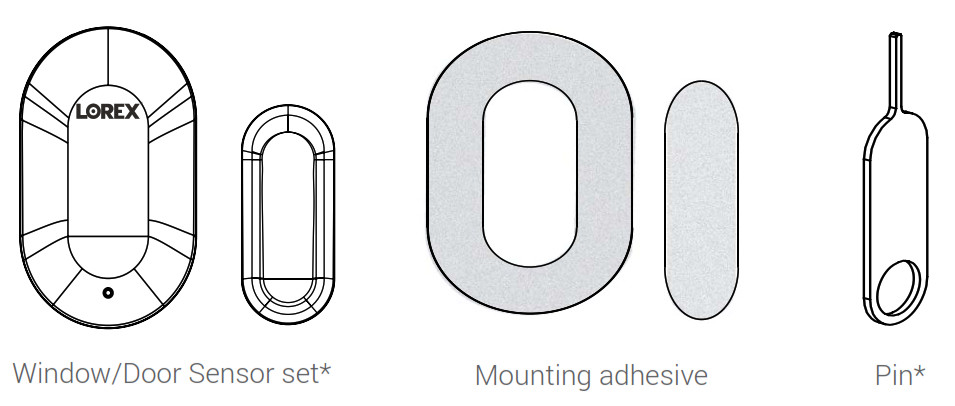
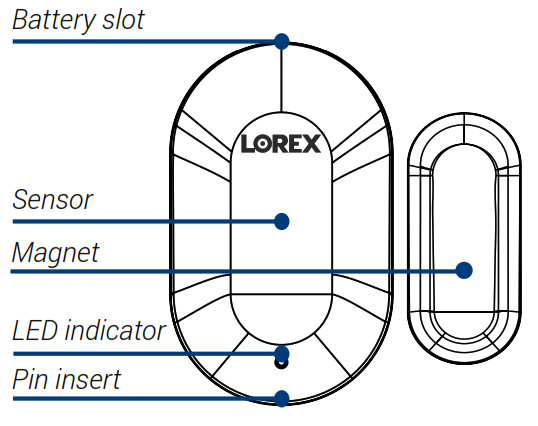
Window/Door Sensor set
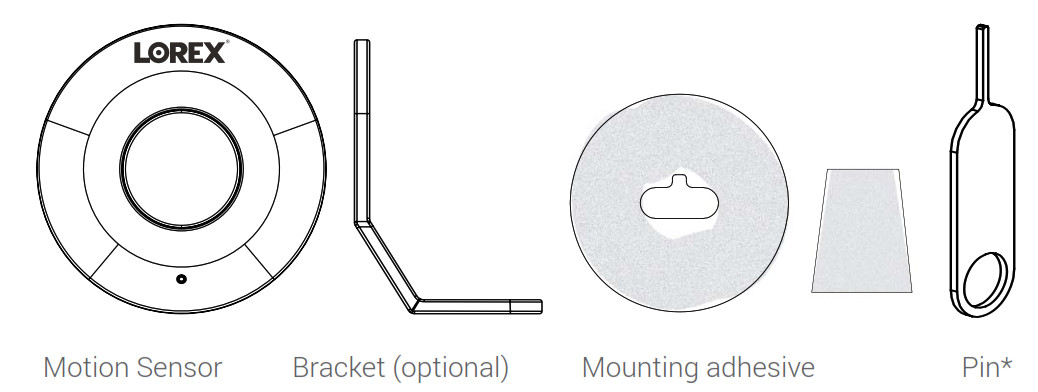
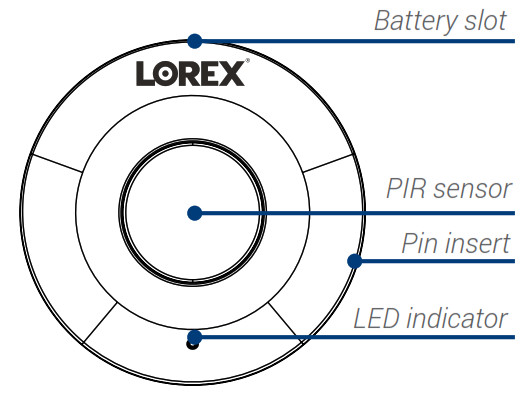
Motion Sensor
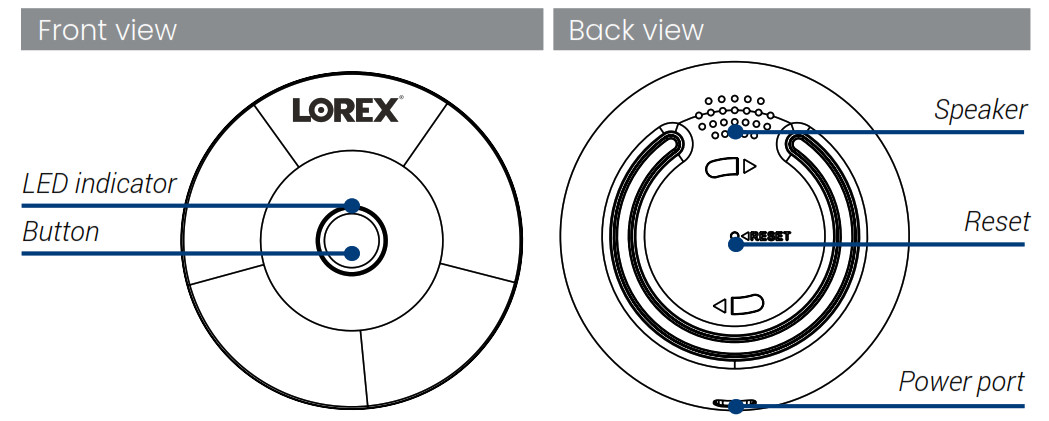
Overview – Sensor Hub
Window/Door Sensor set
Specifications
- Environment: Indoor
- Max detection distance: Less than 3/4”
- Operating temperature: 14°F~113°F
- Operating humidity: 0-95%RH
- Battery: CR1632
- Protocol: Bluetooth 5.0
Motion Sensor
Specifications
- Environment: Indoor
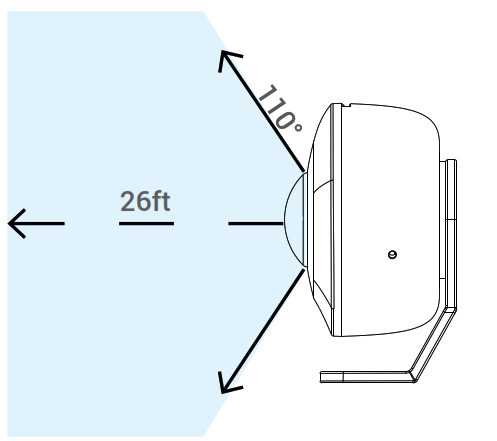
- Maximum detection distance: 26ft
- Maximum detection angle: 110°
- Operating temperature: 14°F~113°F
- Operating humidity: 0-95%RH
- Battery: CR2450
- Protocol: Bluetooth 5.0
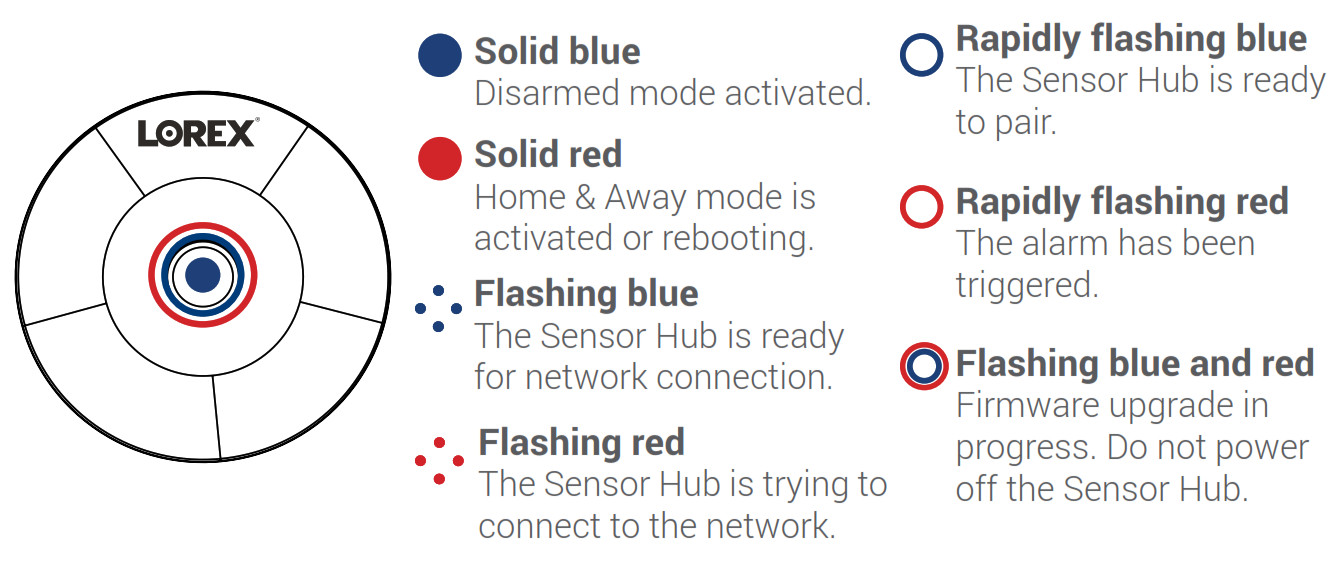
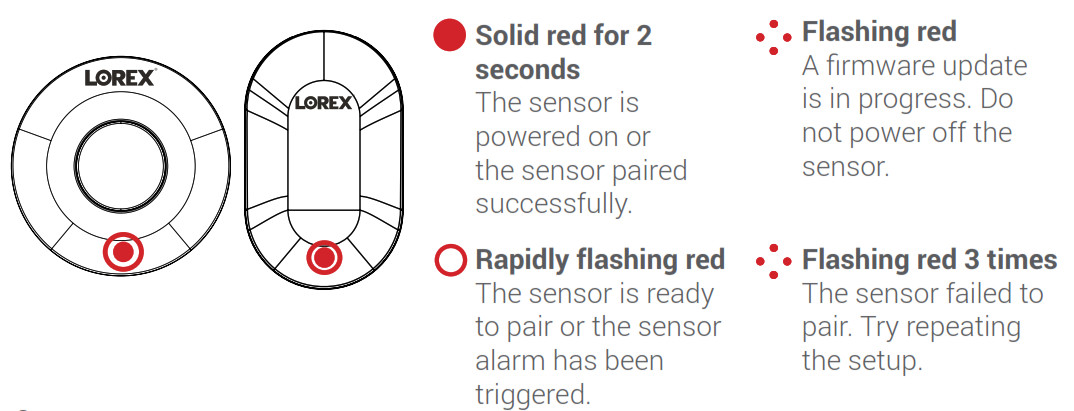
Status indicator – Sensor Hub
Window/Door & Motion Sensor
Setup
First, choose your setup method:A. To set up your Sensor Hub with sensors, see pg.10.B. To set up your sensors with the Lorex Home Center, see pg.13.
Setup the Sensor Hub with sensors
- Connect the Sensor Hub cable to the included USB adapter and plug into a nearby outlet.
- Scan the QR code on the right using your mobile device’s camera to download and install the Lorex Home app from theApp Store or Google Play Store.
 https://app.lorex.com/home/download
 - Tap the Lorex Home icon to launch the app.
- If you already have an account, skip this step. Tap Sign up, then follow the on-screen prompts to create an account. Record your account details below.Email: ______________________Account password: ______________________
- When the Sensor Hub status indicator flashes blue and the startup chime sounds, tap + in the Devices screen.
- Scan the QR code on the bottom of your hub using your mobile device’s camera. If your mobile device cannot scan the QR code, tap Manually enter Device ID.
- Connect to the Device Hotspot.
- Create a secure password for your hub. Record your hub’s password below.Sensor Hub password: ____________________
- Follow the in-app instructions to complete the setup.

 Email: ______________________Account password: ______________________
To add Window/Door and Motion sensors to the Sensor Hub:
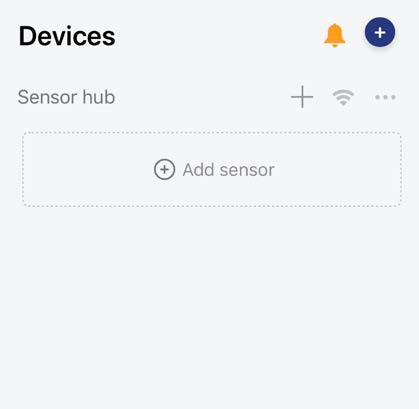
1. Tap the Lorex Home icon to launch the app.2. In the Devices screen, tap + Add sensor to set up a sensor.3. Select the Motion Sensor or Entryway Sensor (Window/Door Sensor).4. Follow the in-app instructions to complete the setup.5. (Optional) Tap the + icon beside the Sensor Hub to add more sensors.
Setup the sensors with the Lorex Home Center
- In the Device Setup screen, select the Sensor icon then tap Next.Note: Make sure your sensor is powered on and near the Lorex Home Center for initial setup. Once set up, you can move the sensor to its final location as long as it is within range of the Lorex Home Center.
- Follow the Lorex Home Center’s on-screen prompts to complete the setup.
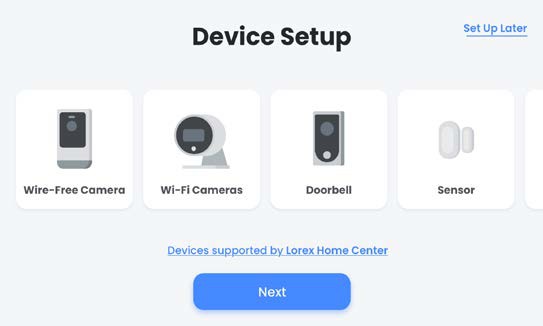
List of compatible Lorex devices:
| Cameras | Add a Wi-Fi indoor or outdoor camera or a floodlight camera. |
| Doorbell | Add a Lorex video doorbell camera. |
| Sensors | Add up to 32 Lorex sensors. |
| Extender | Add a Lorex extender to expad the range of cameras and sensors. |
Linking a sensor to a camera
Before you start:
- Setup your device. Refer to the device documentation.
- Make sure the device supports the sensor linking feature.Visit lorex.com/support and see the article “Lorex Sensor Hub and Sensors – Frequently asked questions.”
- Make sure you’re logged into the same Lorex account on each device.
- Make sure to add the camera in the Lorex Home app or directly to the Lorex Home Center.
- If you are connecting a recorder to a sensor, a camera must be connected to the recorder.
To link a sensor to a camera in the Lorex Home app:
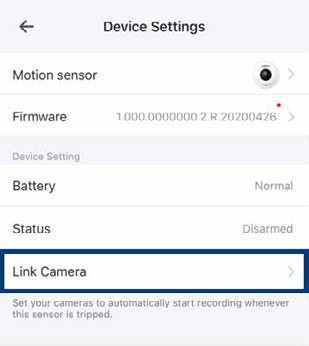
1. Launch the Lorex Home app.2. In the Devices screen, tap the ••• icon beside the Sensor Hub to see a full list of connected sensors.3. Tap the sensor that you want to link to a compatible device.4. Tap Link Camera.5. Tap to select the device you want to link to the sensor.
Note: When the sensor successfully links to a device the display message “Successfully updated” will appear.
To link a sensor to a camera in the Lorex Home Center:
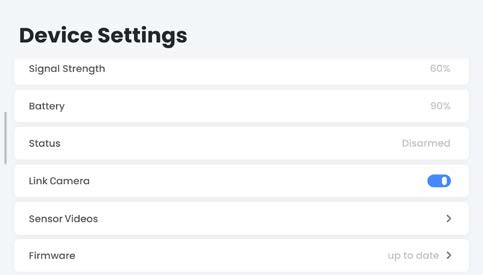 1. In the Lorex Home Center, tap the Sensors tab.2. Tap the ••• icon beside a sensor to access the sensor’s settings.3. In the Link Camera field tap the
 ![]() icon to enable sensor linking.4. Tap Sensor Videos then select the camera that you want to link to the sensor.
icon to enable sensor linking.4. Tap Sensor Videos then select the camera that you want to link to the sensor.
Installation
Choose which sensor to install:A. Installing the Sensor Hub, see the next page.B. Installing the Window/Door Sensor, see pg.21.C. Installing the Motion Sensor, see pg.23.
Installing the Sensor Hub
Location tips:• The hub can be installed indoors on any flat surface.• The hub must always be connected to the power adapter.• The optimal position for the hub is central to where the sensors are installed and within range of the Wi-Fi router.
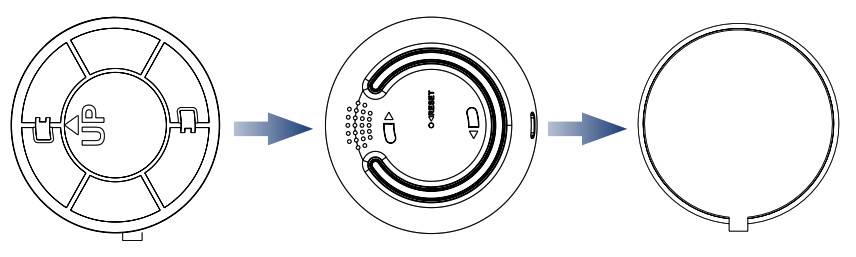
To install the Sensor Hub:1. Pick a central area for the hub to be placed.Note: Install the hub close to an outlet for the power adapter. Make sure the power cable is not strained.2. Pair the sensors to ensure that the connection to the hub is steady based on their designated locations.3. Twist the supplied bracket clockwise to the back of the hub. Be sure to follow the “UP” direction.4. Peel the bracket’s adhesive and stick the hub to the desired surface area.
Installing the Window/Door Sensor
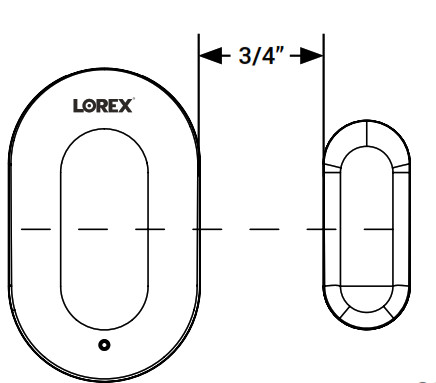
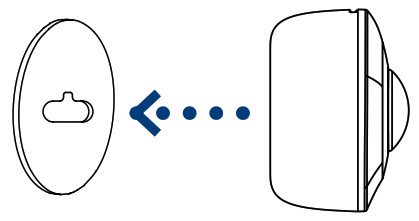
Location tips:• The sensor can be installed indoors on any door or window.• If you’re using a door, place the sensor at the top of your door to keep safe from being bumped and out of reach from children and pets.• The sensor and magnet line up together and must be installed that way.• The sensor and magnet can be no more than 3/4” apart to send a signal to the hub.
To install the Window/Door Sensor:
1. Pick an area for the sensor to be placed.2. Ensure that the bluetooth connection is steady to the hub before mounting.3. Peel the mounting adhesive for the sensor and attach it to the back of the sensor.
Tip: Test by setting the different modes for the sensors in the app.![]() IMPORTANT: Install the magnet to the right of the sensor.
IMPORTANT: Install the magnet to the right of the sensor.
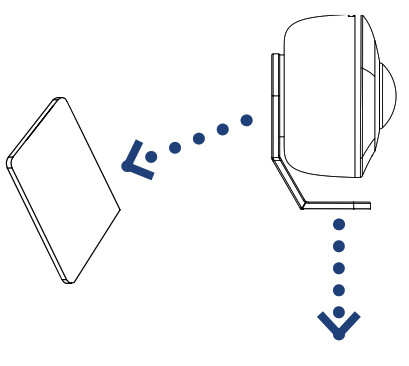
4. Attach the sensor to the window/door.5. Repeat steps 3-4 for the magnet to the window/door frame.6. Open and close your window/door, the sensor should stay in place.
Installing the Motion Sensor
Location tips:• The Motion Sensor can be installed indoors on a wall, ceiling or table with or without the included bracket.• The Motion Sensor works best when it’s placed 6-8ft high, to keep safe from being bumped and out of reach from children and pets.• If you want to detect smaller objects, use one of the angled sides of the bracket. Keep in mind the range and width of the sensor.
Option A1. Pick a flat surface area to stick the sensor.2. Test the sensor’s connectivity.3. Peel the circular mounting adhesive and stick to the back of the sensor. Then stick the other side to the desired area.
Note: The sensor can be mounted on any flat surface using the adhesive. If you prefer to have the sensor on a table or placed in a 45° angle, see Option B for the bracket.
Option B – Bracket
Note: The bracket offers 2 separate angles for the sensor to face.1. Pick a flat surface area to stick the sensor.2. Test the sensor’s connectivity.3. Peel the circular adhesive and stick to the back of the sensor. Then stick the other side to the bracket.4. Peel the other adhesive and stick to the desired bracket angle. Then stick the other side to the chosen flat surface area.
Changing the sensor battery
Choose which sensor battery to change:A. Change the Window/Door Sensor battery, see the next page.B. Change the Motion Sensor battery, see pg.28.
Changing the Window/Door Sensor battery
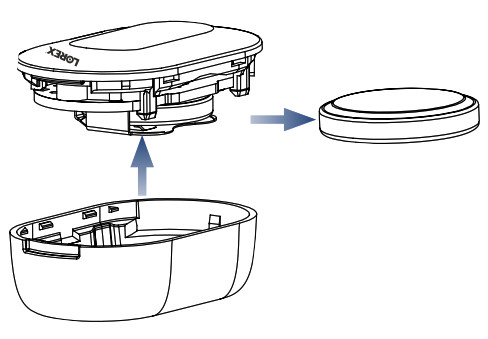
1. Make sure your system is disarmed.2. Use the wide part of the pin to open the sensor from the battery slot.Note: This sensor uses a CR1632 battery.3. Slide the old battery out and replace it with the new one.4. Snap the sensor closed with the battery slot meeting the Lorex logo at the top.
Changing the Motion Sensor battery

1. Make sure your system is disarmed.Note: This motion sensor uses a CR2450 battery pack.2. Use the wide part of the pin to open the sensor from the battery slot.3. Slide the old battery out and replace it with the new one.4. Snap the sensor closed with the battery slot meeting the Lorex logo at the top.
Sensor Hub – Home, Away, and Disarmed mode

The Sensor Hub’s settings will list all of the linked devices. Here, you can tap + to add a sensor or adjust the security mode.Tap the icon to choose between three security modes:![]() Home Mode: Only perimeter sensors will be monitored.
Home Mode: Only perimeter sensors will be monitored.![]() Away Mode: All sensors will be monitored and an alert will be sent if they’re triggered.
Away Mode: All sensors will be monitored and an alert will be sent if they’re triggered.![]() Disarmed Mode: No sensors in your home will be monitored and no alerts will be sent except for the door/window chime.
Disarmed Mode: No sensors in your home will be monitored and no alerts will be sent except for the door/window chime.
Copyright © 2021 Lorex CorporationAs our products are subject to continuous improvement, Lorex reserves the right to modify product design, specifications and prices, without notice and without incurring any obligation. E&OE. All rights reserved.
![]() This device complies with part 15 of the FCC Rules. Operation is subject to the following two conditions: (1) This device may not cause harmful interference, and (2) This device must accept any interference received, including interference that may cause undesired operation.
This device complies with part 15 of the FCC Rules. Operation is subject to the following two conditions: (1) This device may not cause harmful interference, and (2) This device must accept any interference received, including interference that may cause undesired operation.
For up-to-date information and support please visit: help.lorex.com
For more information about Lorex’s warranty policy, visit lorex.com/warranty.
References
[xyz-ips snippet=”download-snippet”]