
Lowes 2694579 Allen + Roth Installation Guide
ATTACH YOUR RECEIPT HERE
Serial Number_________________Purchase Date________________
Questions, problems, missing parts? Before returning to your retailer, call our customer service department at 1-866-439-9800, 8 a.m. – 8 p.m., EST, Monday – Sunday. You could also contact us at [email protected] or visit www.lowespartsplus.com.
PACKAGE CONTENTS
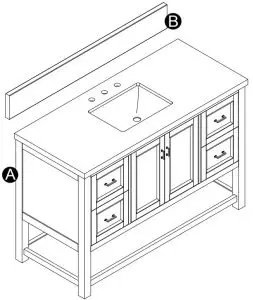
| PART | DESCRIPTION | QUANTITY |
| A | Vanity | 1 |
| B | Backsplash | 1 |
HARDWARE CON TENTS
(NOT SHOWN ACTUAL SIZE)

Touch up penQty. 1
SAFETY INFORMATION
Please read and understand this entire manual before attempting to assemble, operate or install the product.
- It is suggested that this product be installed by a professional.
- It is recommended that this product be permanently attached to a wall – not intended to be free standing
- Hardware may loosen over time. Periodically check that all hardware is tight.
- Do not use power tools unless it is explicitly identified in this manual as required for use during assembly. Power tools can damage the fasteners, hardware and/or components
![]() WARNING
WARNING
- Small parts are a choking hazard.
CAUTION
- To avoid accidentally discarding small components or hardware, do not dispose of any contents or packaging of the shipping carton until assembly and installation is complete.
PREPARATION
Before beginning assembly of product, make sure all parts are present. Compare parts with package contents list and hardware contents list. If any part is missing or damaged, do not attempt to assemble the product.
Estimated Assembly Time: 30 minutes
Tools Required for Assembly (not included): Phillips Screwdriver, Thin-set adhesive for backsplash installation
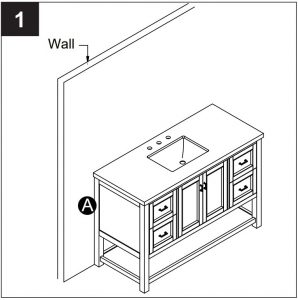
INSTALLATION INSTRUCTIONS
- Place vanity against a wall in intended location.

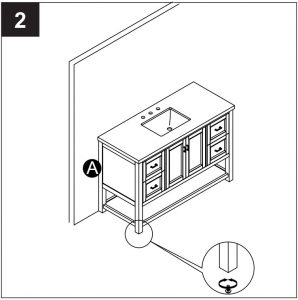
- If necessary, adjust levelers on the bottom of each leg so the vanity is level on the floor.
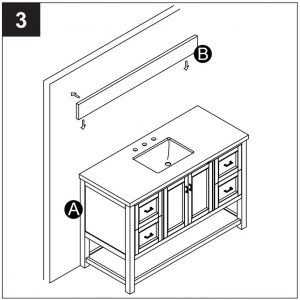
- Place backsplash against the wall and on top of the vanity, securing in place with a thin-set adhesive (not included)
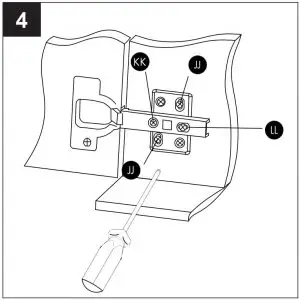
- If necessary, you can adjust the doors with a Philips screwdriver when this adjustable hinge is installed on your product.Hardware Used: Philips Screwdriver (not included)JJ – adjusts door up or downKK – adjusts door left or rightLL – adjusts door forwards or backwards
- Assembly complete.
 Hardware Used: Philips Screwdriver (not included)
 JJ – adjusts door up or downKK – adjusts door left or rightLL – adjusts door forwards or backwards
CARE & CLEANING
- Manufacturer recommends not using any chemicals to clean this product. Use only a soft, damp cloth for cleaning.
- Vanity is for indoor use only. Temperature and humidity should be regulated.
- Avoid direct sunlight and keep vanity at least 60 cm / 2 ft from heat sources to avoid fading.
- Lift and place objects rather than dragging them across the vanity surface.
- Sink should only be cleaned with a non-abrasive cleaner and a soft, damp cloth.
- Countertop spills should be cleaned up immediately with a soft cloth and warm water. Be careful not to spill or use any acidic or caustic substances or any petroleum-based product.
WARRANTY
The manufacturer warrants this item against defects in materials and workmanship for a period of one (1) year from the date of original retail purchase. This warranty applies only to the original purchaser. This warranty does not apply to any damage on the product by accident, misuse, or modified, improper installation or by affixing accessories not produced by the manufacturer. The manufacturer is not accountable whatsoever for product installation during the warranty period.There is no further expressed warranty. The manufacturer shall not be legally responsible for incidental, consequential or special damages arising at or in connection with product use or performance except as may otherwise be accorded by law. The manufacturer disclaims any and all implied warranties.
References
[xyz-ips snippet=”download-snippet”]