
LTC Audio ATM6000BT User Manual
ATM6000BTCode: 10-7051
HIFI STEREO AMPLIFIER 2 x 50W WITH FM, BLUETOOTH & KARAOKE

![]()
![]() Imported from China by LOTRONIC S.A.Avenue Zénobe Gramme 9B-1480 Saintes
Imported from China by LOTRONIC S.A.Avenue Zénobe Gramme 9B-1480 Saintes
HIFI STEREO AMPLIFIER 2 x 50W WITH FM, BLUETOOTH & KARAOKE OPERATING INSTRUCTIONS
WARNINGS

EXPLANATION OF SIGNS
![]() The triangle containing a lightning symbol is used to indicate whenever your health is at risk (due to electrocution, for example).
The triangle containing a lightning symbol is used to indicate whenever your health is at risk (due to electrocution, for example).
![]() An exclamation mark in a triangle indicates particular risks in handling or operating the appliance.
An exclamation mark in a triangle indicates particular risks in handling or operating the appliance.
![]() Accordance with the requirements of CE standard
Accordance with the requirements of CE standard
![]() Class II protection without earth connection
Class II protection without earth connection
![]() The product is for indoor use only
The product is for indoor use only
Important Safety instructions and danger warnings
- Please read these instructions carefully, they include important information about the installation, usage and maintenance of this product.
- Please keep this User Guide for future reference. If you sell the unit to another user, be sure that he also receives this instruction booklet.
- Always make sure that you are connecting to the proper voltage, and that the line voltage you are connecting to is not higher than that stated on the decal or rear panel of the fixture.
- This product is intended for indoor use only!
- To prevent risk of fire or shock, do not expose fixture to rain or moisture. Make sure there are no flammable materials close to the unit while operating.
- The unit must be installed in a location with adequate ventilation, at least 20in (50cm) from adjacent surfaces. Be sure that no ventilation slots are blocked.
- Always disconnect from power source before servicing.
- Maximum ambient temperature (Ta) is 104° F (40°C). Do not operate the fixture at temperatures higher than this.
- In the event of a serious operating problem, stop using the unit immediately. Never try to repair the unit by yourself. Repairs carried out by unskilled people can lead to damage or malfunction. Please contact the nearest authorized technical assistance center. Always use the same type of spare parts.
- Make sure the power cord is never crimped or damaged.
- Avoid direct eye exposure to the light source while it is on.
DISCONNECT DEVICE: Where the MAINS plug or an appliance coupler is used as the disconnect device, the disconnect device shall remain readily operable.
REMOTE CONTROL
 EQ: Press to cycle through the preset equalizer modes
AUDIO: Press to switch the control mode between bass, treble & master volume
INPUT: Press to select the desired input audio source
![]() REPEAT/RANDOM PLAY: Press this button to select the repeat mode between REPEAT ONE, REPEAT ALL, RANDOM. The default setting is repeat all.
REPEAT/RANDOM PLAY: Press this button to select the repeat mode between REPEAT ONE, REPEAT ALL, RANDOM. The default setting is repeat all.
VOL+: Increases the volume
VOL-: Reduces the volume
![]() Play/pause
Play/pause
![]() Skip backwards
Skip backwards
![]() Skip forwards
Skip forwards
Number buttons from 0-9: Press to select directly a title/track number
10-/10+: Press to skip forwards or backwards in steps of 10
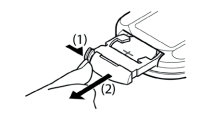
INSTALLING THE BATTERIES IN THE REMOTE CONTROL
 Place the remote face down on a flat surface.
- Push the compartment cover into the direction of the arrow.
- Slide the battery compartment open.
- Remove the old battery and install the new one (CR2032) with the plus (+) symbol facing up.
- Gently slide the battery compartment closed. It locks automatically.
 Place the remote face down on a flat surface.
RECOMMENDATIONS FOR BATTERIES
![]() This symbol indicates that used batteries should not be disposed of with household waste but deposed correctly in accordance with your local regulations. Batteries shall not be exposed to excessive heat such as sunshine, fire or the like. When the internal batteries are not to be used, remove them to avoid damage caused by battery leakage or corrosion.
This symbol indicates that used batteries should not be disposed of with household waste but deposed correctly in accordance with your local regulations. Batteries shall not be exposed to excessive heat such as sunshine, fire or the like. When the internal batteries are not to be used, remove them to avoid damage caused by battery leakage or corrosion.
ATTENTION: Danger of explosion if battery is incorrectly placed. Only replace by the same or equivalent type.
![]()
The supplied remote control contains a button cell. In case of ingestion, it might cause serious internal burns within only 2 hours that might lead to death. Keep new and old batteries out of the reach of children. If you are in doubt whether the batteries have been swallowed or introduced into any other part of the body, contact immediately a doctor.
Features
- USB/SD card input
- Spectrum Screen Display
- 2x microphone inputs with Echo & Volume control
- FM tuner
- Bluetooth function
Front panel
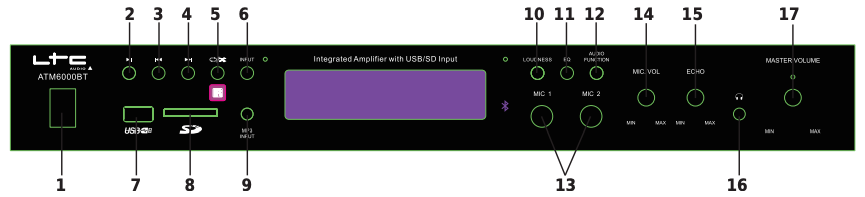
- POWER: Press this button to power ON or OFF the unit
- Play/Pause: Press this button to play the signal from USB/SD, Bluetooth. Press again to pause
- Previous: Press this button to go back to the beginning of the current track or move to the previous track.
- Next: Press this button to move to the next track.
- Repeat/Random : Press this button to select the repeat mode between REPEAT ONE, REPEAT ALL, RANDOM. The default setting is repeat all.
- Input: Press this button to cycle through the various inputs.
- USB: Connect your USB flash drive here
- SD: Connect your SD card here
- MP3 input: Connect your MP3 here
- LOUDNESS: Press this button to adjust the loudness
- EQ MODE: Press this button to cycle through the pre-set equalizer modes.
- Audio Function: Press this button to switch the control mode between bass, treble & master volume
- MIC1 & MIC2: Connect your microphones here
- MIC VOL: Use this knob to adjust the microphone volume
- ECHO: Use this knob to adjust the echo of microphone.
- Headphone Output: Connect your headphone here
- Master Volume: Use this knob to control the master volume
OPERATION
- Select a central location for the amplifier.
- Connect the speaker wires (red & black) to the + and – terminals on the rear panel of the amplifier.
- Connect the audio signal to the relevant sockets with the correct polarity.
- Plug the mains lead in and switch the amplifier on once you have checked all connections.
- Switch the audio sources on and adjust the master volume to the required level.
- Karaoke: Plug a mic into MIC1 or MIC2 socket on the front panel. Before you use the mic, make sure that it is switched off and the MIC volume button is set to the minimum. Connect the microphone, switch it on and adjust slowly the volume and the echo.
- If you don’t use the unit any longer, switch the amplifier off and disconnect it from the mains.
Signal Sources and their Connections:
- Connect a DVD-player or a CD-player to the terminal AUDIO INPUT or a data storage unit to the USB-interface or insert a SD-memory card in the suitable slot or activate the Bluetooth function on your smartphone.
- Select the active signal source by pressing the INPUT button until the desired input source is displayed.
- Use the MP3 CONTROL-function for controlling the files on a connected data storage unit.
- If you wish to use the karaoke function of this device, insert one or two microphones into MIC1 and MIC2. Their signals are going to the signal output too.
BLUETOOTH CONNECTION
The ATM6000BT is only discoverable when the input selected is Bluetooth. After selecting Bluetooth input mode on the ATM6000BT, turn on the Bluetooth function on the cell phone and search the ATM6000BT. Its Bluetooth device name is “ATM6000BT”. Pair and connect after search. There is no pairing code.
REAR PANEL:

- Power supply: Connect the unit to the power outlet.
- Main Speakers Outputs: Connect your speakers here to receive the signal from the ATM6000BT
- LINE OUTPUT: Connect this jack to the input another amplifier or active speaker. The signal coming out from this jack is passive and cannot be connected to another passive speaker.
- DVD Input: Connect your DVD or CD or any other passive signal here.
- AUX Input: Connect your DVD or CD or any other passive signal here.
- FM Antenna: Connect your FM antenna here
SPECIFICATIONS:
Output Power: 2 x 50 WPower supply: 220-240 V~ 50/60 HzFrequency Response: 20-20000 HzInput Sensitivity: 450 mVSignal-Noise-Ratio (S/N): ≥ 76 dBImpedance: 8 ΩMicrophone Input Sensitivity: 20 mVDimensions: 430 x 200 x 65mmNet weight: 2.0kgFM frequency band: 87.5-108MHzBT frequency band: 2402-2480MHzMax. RF power: -2.97dBm
![]() This marking indicates that this product should not be disposed with other household wastes throughout the EU. To prevent possible harm to the environment or human health from uncontrolled waste disposal, recycle it responsibly to promote the sustainable reuse of material resources. To return your used device, please use the return and collection systems or contact the retailer where the product was purchased. They can take this product for environmentally safe recycling.
This marking indicates that this product should not be disposed with other household wastes throughout the EU. To prevent possible harm to the environment or human health from uncontrolled waste disposal, recycle it responsibly to promote the sustainable reuse of material resources. To return your used device, please use the return and collection systems or contact the retailer where the product was purchased. They can take this product for environmentally safe recycling.
© Copyright LOTRONIC 2020
References
[xyz-ips snippet=”download-snippet”]