Lucky Hands 3D Hand Design User Manual
3D Hand Design
for Lucky Hands® Casting Sets for babies and toddlersCongratulations on the purchase of your Lucky Hands® Casting Set which lets you create a lasting memory in just three easy steps.
MOULDING
The high-quality Lucky Hands® 3D Pro Moulding Powder enables easy, fast and clean mould making. The unique colour indicator of our moulding material allows you to recognise the condition of the material by its colour. When hardening, the colour changes from violet to pink to white.
Please note that only distilled water is to be used for the preparation of the moulding mass!
CASTING
The casting can be carried out immediately after the mould has been taken. The finished mould is filled with the pure white Lucky Hands® casting powder.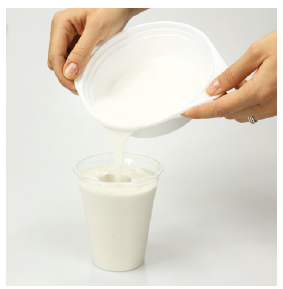
DEMOULDING AND FINISHING
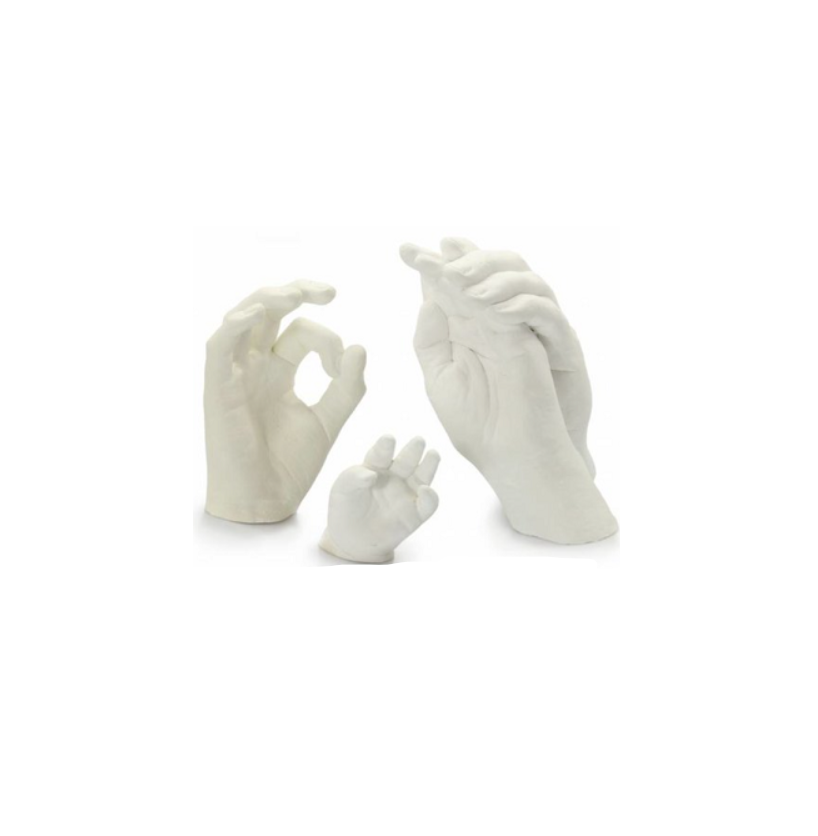
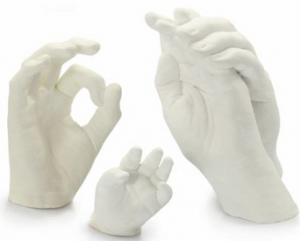
After the sculpture has hardened for at least three hours, the rubber-like moulding compound can be removed easily. The result is a unique, lifelike model that impresses with itsattention to detail.Please read the entire instruction manual carefully before starting.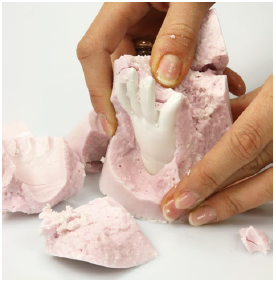
SET CONTENT
Lucky Hands® Casting Sets for babies and toddlers up to 6 months
1 to 3 4 to 6 6 to 10models models models![]()
![]()
![]()
Test set containing 100 ml moulding cup, 20 ml syringe for fine dosing of water, 30 g moulding powder and 80 g casting powder.*Emergency set with spatula and 2 plastic bags for moulding by application – available free of charge on request –
MOULDING
Lucky Hands® 3D Pro moulding powder with colorindicator**180 g 400 g 600 gMoulding cup 0,2 l* 3 6 6Moulding cup 0,3 l* 3 5 5Moulding cup 0,5 l* 4 3 3Moulding cup 0,25 l 2 3 5for footprints*
CASTING
Lucky Hands® casting powder**0,3 l cup for determining the amount of water in thepreparation of the casting compound and spoon for decanting*Plastic forks for mixing the casting compound* Container for mixing the casting compound 0,5 l*
250 g 500 g 750 g1 1 13 6 103 6 102 3 43 3 3
DEMOULDING AND FINISHING
Sandpaper*Wooden sticks to remove the remains of the casting material and unevenness from the finished model** Only part of our Lucky Hands® moulding sets for babies and toddlers with accessories. Not included in the sets without accessories.*Lucky Hands® 3D Pro Moulding Powder and Casting Powder are also available separately in various quantities which can be ordered in our online shop www.3dhanddesign.de.
SET CONTENT
Lucky Hands® Casting Sets for babies and toddlers from 7 to 48 months
1 to 3 4 to 6 6 to 10models models models![]()
![]()
![]()
MOULDING
Lucky Hands® 3D Pro moulding powder with color indicator**
300 g 600 g 900 g
3 5 62 4 52 3 4
Moulding cup 0,3 l*Moulding cup 0,4 l*Moulding cup 0,5 l*
CASTING
Lucky Hands® casting powder**0,3 l cup for determining the amount of water in the preparation of the casting compound and spoon for decanting* Plastic forks for mixing the casting compound*Container for mixing the casting compound 0,5 l*
600 g 1200 g 1800 g
1 1 13 6 103 6 102 3 43 3 3
DEMOULDING AND FINISHING
Sandpaper*Wooden sticks to remove the remains of the casting material and unevenness from the finished model*
* Only part of our Lucky Hands® moulding sets for babies and toddlers with accessories. Not included in the sets without accessories.** Lucky Hands® 3D Pro Moulding Powder and Casting Powder are also available separately in various quantities which can be ordered in our online shop www.3dhanddesign.de.
INSTRUCTIONS FOR THE TEST SET
In order to make yourself acquainted how to use the material, we have created the small test set which is part of the Lucky Hands® casting sets inclusive of accessories.The Lucky Hands® 3D Pro Moulding Powder (30 g) and Lucky Hands® Casting Powder (80 g) are dosed in such a way that you can create a model of your finger.To do this, follow the instructions below.
However, we recommend that you read the instruction manual completely before you carry out the first test in order to familiarise yourself with all work steps and their special features. If the test cannot be completed successfully, please contact us by e-Mail 3dhanddesign.de or phone 0049 202 2995415.
- Prepare the cup (100 ml).
- Fill 100 ml of distilled water (normal room temperature approx. 20 to 23°C ) into a cup. Pour the complete contents of Lucky Hands® 3D Pro Moulding Powder into this cup and stir with a spoon for max. 30 seconds.
- Pour the finished moulding material immediately into the small cup and immerse yourfinger immediately. Do not touch the bottom or the wall of the cup with your finger.
- The moulding material becomes solid after approx. 30 to 45 seconds, but remains elastic and does not stick. When the material has changend its colour into white,you can pull out your finger. The mould is ready!
- Measure 20 ml of water at room temperature with the enclosed syringe and add it to the mixing bowl. Fill the casting powder into the mixing bowl and stir with theplastic fork for approx. 2 minutes until a homogeneous pouring mass free from lumps is produced.
- Then pour the finished casting compound into the mould and let it harden for approx. 45 minutes.
- Remove the finished mould carefully from the cup. If necessary, cut the cup slightly at the top edge. By breaking away piece by piece, you carefully remove the moulding compound from the surface of the hardened casting compound.
- Finally rinse the finished sculpture under water and remove any unevenness with a knife or sandpaper. Done!
Even if you have ordered a Lucky Hands® Set that does not include a Test Set, we strongly recommend that you perform a test prior to moulding to familiarise yourself with the material. Just use a small amount of your Lucky Hands® 3D Pro Moulding Powder and Casting Powder.
1. PREPARATION
Please provide the following items before you start:–– Measuring cup, tablespoon or fork and distilled water for the preparation of the moulding material–– Container for moulding–– Clock or smartphone to stop the time–– Household scale or measuring cup–– Container and plastic forks for the preparation of the casting compound
Attention: The best results for children up to the age of two are achieved when the child is asleep. Find yourself a helping hand to make the mould. It is advantageous if the child is held in the arm of an adult, while another person gently holds the hand or foot to be moulded. In addition, the ambient temperature should not be too warm. If you work in summer at a room temperature that is too warm (> 23°C), this can have a negative effect on the result of the mould.
2. DRY RUN: The correct hand or foot posture
Before making a mould, start with a dry exercise by immersing the child’s hand or foot up to the joint/wrist in the empty moulding container – exactly in the same position that you will take to make your 3D mould afterwards. The distance to the inner wall and to the bottom of the container should be at least 1 cm. The fingers should only point slightly curved towards the bottom of the vessel, since upwardly curved fingertips or toes can cause problems when pouring out and air residues in the negative mould can lead to incorrect 3D models, such as missing fingertips.
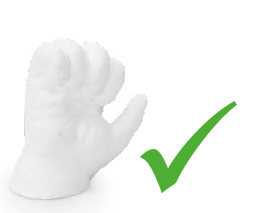
 When taking a mould of hand positions in which fingers are bent – as in the “Little Fist” model– please be very careful in order to ensure that the fingers are pressed firmly against the ball of the thumb during making the mould. This prevents air inclusions in the negative mould.
3. PREPARING THE MOULDING MASS
Refer to the following table to determine which moulding container is best for your child‘s hand or footprint and how much Lucky Hands® 3D Pro moulding Powder you need. Hands are best moulded in round containers, feet in rectangular ones.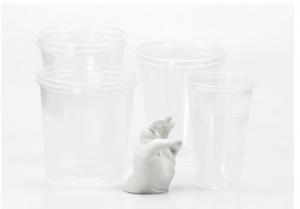
Size of the 0 to 3 4 to 6 7 to 12 13 to 48moulding months months months monthscontainer
round, 200 ml 60 ground, 300 ml 90 g 90 g 90 ground, 400 ml 120 g 120 g 120 ground, 500 mlsquare, 250 ml 75 gsquare, 500 ml 150 g
If you like to mould the feet of older children, we can provide you with the corresponding table on request. In our online shop www.3dhanddesign.de we are offering separate moulding container sets in various sizes for hands and feet.Of course, you can also use your own, clean containers for moulding – such as empty margarine packaging or Tupperware ®. The moulding material can be removed withoutleaving any residue.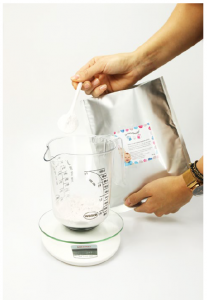 Knead the bag with the Lucky Hands® 3D Pro Moulding Powder well beforehand. First pour the required amount of 3D Pro moulding powder into a measuring cup.Refer to the following table to determine how much distilled water at a temperature of 20 to max. 23°C (normal room temperature) you will need to prepare the moulding material. For boiled, still or condensed water or tap water, the lime content means that there is a risk of clumping. Please also note that the temperature of the water has an effect on the hardening of the moulding material.The warmer the water, the faster the mass hardens. You will
 need 30 g Lucky Hands® 3D Pro Moulding Powder and 100 ml distilled water for 100 ml moulding mass.
Size of the Quantity of Lucky Required amountmoulding cup Hands® 3D Pro of distilled. Moulding Powder water
200 ml 60 g 200 ml250 ml 75 g 250 ml300 ml 90 g 300 ml400 ml 120 g 400 ml500 ml 150 g 500 ml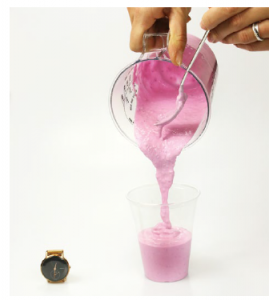
Pour the distilled water onto the moulding powder. Now quickly mix the moulding mass with a tablespoon or fork for approx. 30 seconds with 23°C warm water or approx. 45 seconds with colder water to a homogeneous and bubble-free mass. Make sure that there are no powder residues on the inside of the measuring cup. Smaller lumps are not a problem during taking of the mould. Do not stir too quickly to avoid air bubbles. Slightly tap the measuring cup several times onto the table so that trapped air bubbles can escape.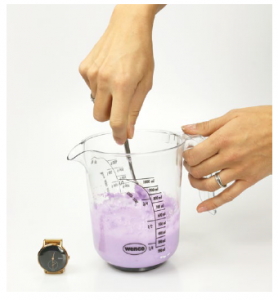 The next step is to follow quickly. Do not lose any time and fill up the entire moulding mass into the moulding container
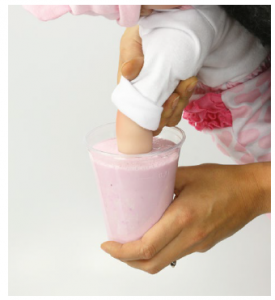 4. MOULDING
Immediately place the child‘s hand or foot into the moulding mass. The desired posture must be adopted before immersion. Immediately dip the child‘s hand or foot over the joint into the moulding mass. The distance to the inner wall and to the bottom of the container should be at least 1 cm.It is advantageous if the child is held in the arm of an adult, while another person gently holds the hand or foot to be moulded. The best results for children up to the age of two are achieved when the child is asleepPay attention to the correct positioning for a successful end result. The child should no longer move the hand or foot.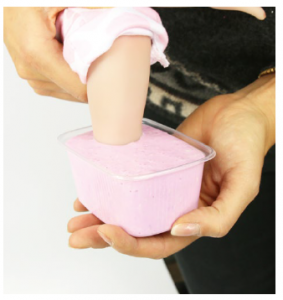
Within approx. 30 to 45 seconds with 23°C warm water or 2 to 4 minutes with colder water, the colour of the moulding material changes from violet to pink to white and solidifies.
5. PULL OUT HAND OR FOOT
Check with a finger whether the material is elastic, firm and no longer sticky. Now you can carefully move the child‘s hand or foot to allow air to enter the mould.Now carefully pull the hand or foot out of the rubber-like mass as if it was a (hand) shoe. There should be no residues of the moulding material on the skin.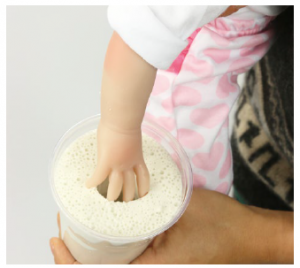
6. DETERMINE WATER QUANTITY
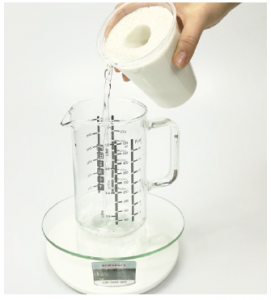
Check the inside of the mould for loose particles and remove them. The mould dries quickly in the air. We recommend that you start casting immediately.Place the mould on a scale and fill it up to the edge with water to determine the volume of the negative mould or the required amount of casting compound. Or fill the water from your mould into a measuring cup and read off the amount of water.
7. PREPARE THE CASTING MASS
Now calculate how much casting compound you need for your hand or footprint by multiplying the measured amount of water by the factor 1.6. Then determine the amount of casting powder and water required to prepare the casting compound.Calculation of material requirements: Capacity of the mould in ml x 1,6 = required quantity of casting powder in g For 100 ml of casting compound you need 160 g casting powder (4 parts) and 40 g water (1 part).Or refer to the following table for the corresponding dimensions.
| Determined quantity of water volume negative mould | Required quantity of casting powder | Required amount of water for castingcompound preparation |
| 50 ml | 80 g | 20 ml |
| 100 ml | 160 g | 40 ml |
| 156,25 ml | 250 g | 62,5 ml |
| 300 ml | 480 g | 120 ml |
| 312,5 ml | 500 g | 125 ml |
| 375 ml | 600 g | 150 ml |
Now 4 parts casting powder have to be mixed with 1 part water to a sticky, slightly creamy and lump-free mass. It is imperative that you pay attention to an exact mixing ratio, otherwise your sculpture will harden unevenly or not at all.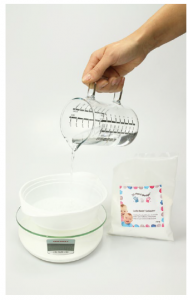 We recommend that you save a small amount of casting powder before preparation so that you still have material for any small improvements to your 3d sculpture that may be necessary. Pour the entire amount of casting powder into the water at once (not the other way round). Make sure that the powder is completely covered with water and can swamp briefly. Using a plastic fork, carefully stir the water with the casting powder for at least 2 minutes until a thin, slightly creamy and lump-free mass is produced. Do not stir too quickly in order to avoid air bubbles. Make sure that no casting powder sticks to the bottom of the container.
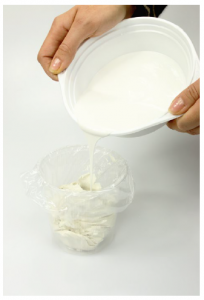
8. CASTING
First pour only 1/3 of the casting compound into the mould. By turning and tilting the mould you make sure that all fingers/ toes are completely filled with casting compound.While pouring the rest of the mass into the mould, slightly tap the mould onto the table and shake a little. This causes air bubbles to rise and prevents air inclusions. Casting compound residues can be disposed of in household waste.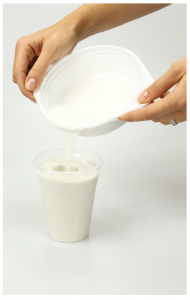
9. DRYING
Allow the casting compound to harden in the mould for at least 3 hours or overnight. If the surface can no longer be pressed in with your fingernail, you can start demoulding.
10. DEMOULDING AND FINISHING
Turn the moulding container over and carefully slide the filled mould out of the beaker. If the mould should not peel off the container immediately, use a knife to gently move it several times along the inside of the moulding container. Now carefully remove the rubber-like moulding compound from the surface of the hardened casting compound piece by piece with your hands. Start at the joint and look for vulnerable structures of the model, such as fine fingernails or similar details. Piece by piece, your Lucky Hands® sculpture becomes visible. The wooden sticks help you to unstick the moulding material from narrow spaces.
If there are small irregularities on the surface, you can scrape them off either with your fingernail or a pointed knife. The surface of your sculpture can be smoothed by means of sandpaper. Rinse the model with water. Done! If parts of your model should break off, you can glue them back together again after several days of drying time with off-theshelf superglue. Small irregularities can be repaired with the small amount of casting powder that you have stored before preparing the casting compound.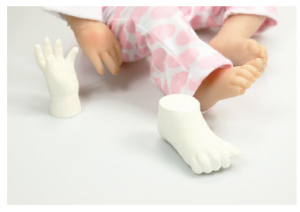 You can also make your own base. Fill a part of the finished casting compound into a suitable cup. Cover the floor approx. 1 to 2 cm with casting compound, depending on how thick you want your base to become. After approx. 60 minutes you can remove the finished base without any problems.
OPTIONAL: DECORATION
You can decorate your Lucky Hands® in many different ways. Well dried 3D sculptures can be decorated and painted with almost all colours, lacquers and glazes. If water-based paints are used, the models must first be thinly coated with paint primer. The fine pored surface is closed hereby. This step is not necessary if you wait at least one week for themodels to completely dry out.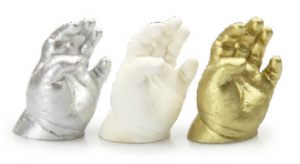
We recommend treating your Lucky Hands® sculptures with transparent, gold or silver acrylic varnish from our online shop. The varnish seals the pores and offers an effective protection against dust and dirt. With a base made of slate, acrylic glass, wood or other materials, you can improve the presentation of your work of art. Acrylic glass showcases and -cubes protect your Lucky Hands® from dusting. Visit our online shop www.3dhanddesign.de to find out more about the various finishing options.

The shop for individual memories
Since 2006 we are offering our service to you and your most beautiful memories. Our satisfied customers from more than 40 countries include young parents, couples, families, but also kindergartens and maternity clinics.
Order via our multilingual online shop www.3dhanddesign.de or international marketplaces›› Lucky Hands® casting sets for every age group, from babies and couples to families›› Magic Footprint products for the magic creation of footand handprints›› Gifts & more such as baby albums or exclusive decoration ideas for young and old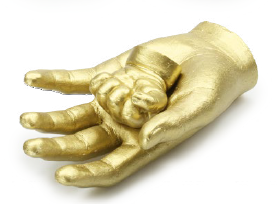
We are making products for discerning customers and are offering a service that leaves nothing to be desired. We are always on the lookout for new ideas and are constantlyexpanding and developing our product range.
We are making products for discerning customers and are offering a service that leaves nothing to be desired. We are always on the lookout for new ideas and are constantlyexpanding and developing our product range.
EMERGENCY PLAN
Maybe the moulding didn‘t work out the way you anticipated? Perhaps the child suddenly moved while taking the mould? Or are the fingertips missing from your sculpture because the child‘s hand was half open when the mould was taken and so the air in the negative mould could not completely escape?Try our emergency plan!On request, we will send you an emergency set – consisting of 2 thin plastic bags and a spatula – free of charge.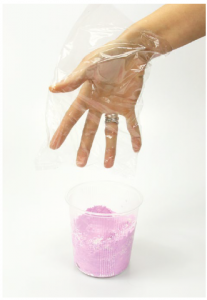
- Mix the Lucky Hands® 3D Pro Moulding Powder as described in detail in the previous instructions for approximately 30 seconds with distilled water at a maximum temperature of 23°C in a suitable cup to form a homogeneous mass. For babies up to 12 months of age, a mixture of 70 g Lucky Hands® 3D Pro Moulding Powder and 150 ml distilled water should be sufficient. Please note that this is a reference value which may vary depending on the actual size of the hand or foot.The prepared moulding material is now in front of you. Now you have to hurry.
- Now slip a thin plastic bag from the emergency set over your hand.
- Take all the moulding material out of the cup so that it lies on the palm of your hand.
- Pull your hand out of the plastic bag. At the same time, place the plastic bag over the moulding material. So you have a plastic bag filled with moulding material.
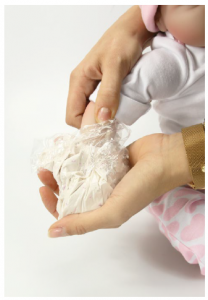
- Place the hand or foot of the child immediately into the plastic bag with the moulding mass.The desired posture must be taken before the hand enters the bag. Immediately dip the child‘s hand or foot into the moulding mass up to over the joint. You can spread the moulding mass around the child‘s hand or foot by gently pressing the plastic bag from the outside. Make sure that the child‘s hand or foot does not touch the moulding bag and that no holes are formed in the moulding material.Pay attention to the correct positioning for a successful end result. The child should now no longer move his or her hand or foot. Within approx. 30 seconds at 23°C warm water or a little longer at colder temperatures the colour of the moulding mass changes from violet to pink to white and becomes solid.
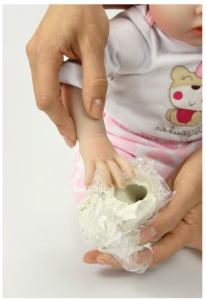
- Check with one finger, that the impression material is elastic, firm and no longer sticky. Now you can move the child‘s hand or foot slightly to allow air to enter the mould.Now carefully pull the hand or foot out of the rubber-like mass like taking off a glove. There should be no residue of the moulding material on the skin.
- Follow steps 6 to 10 of the previous detailed instructions. When pouring, place the plastic bag with the negative mould in a cup so that the mould cannot tip over and thecasting compound hardens evenly.

STORAGE AND DURABILITY
Store Lucky Hands® 3D Pro and Lucky Hands® casting powders dry and cool at 10 to 20°C in their original packaging. The minimum shelf life under the specified storageconditions is 12 months in unopened condition. Seal all powder bags when not in use. 3D Hand Design® products are no toys. They are not suitable for children under theage of 14. Use only under adult supervision! Keep out of reach of children!
DISPOSAL
Do not pour any liquid casting compound into the drain. Allow excess material to harden before disposing of in household waste. The same applies to the remains ofthe moulding material, which can easily be disposed of in the household waste. Dried moulding mass can be difficult to remove from garments. If the moulding materialgets onto a garment, let it harden and brush out the dried moulding material until only powder residues are visible. Then rinse with warm water.
MOULDING POWDER (ALGINATE)
Our moulding powder is completely safe for direct contact with the skin – it is the same material used for dental casting and has been used for many years inthe medical sector. Lucky Hands® 3D Pro is particularly kind to the skin and can be removed from the skin effortlessly. It is non-toxic, non-allergenic and made asa natural product from algae. However, do not swallow the powder. Do not inhale the dust. Wash hands after use. If skin or eye irritation occurs, rinse with water for15 minutes and seek medical advice immediately.
CASTING POWDER
Our casting powder does not contain any hazardous ingredients. Do not inhale the powder and swallow. In general, the product is not skin irritant. After eye contact,rinse the eyes under running water for several minutes with the lid open. After swallowing, rinse mouth and drink plenty ofwater (approx. 500 ml). Consult a doctor if symptoms persist.

A SMALL COMPANY WITH HEART
We are a small company with the goal to bring joy and lasting memories into your life. Our small team works on it wholeheartedly. Therefore we are pleased about any kind of feedback, wish you a lot of fun with our product and are always available for questions by e-mail de or phone 0049 202 2995415!
DISAPPOINTED BECAUSE IT DID NOT WORK?
The moulding material has become hard or lumpy too quickly? The amount of material was not sufficient or you had expected something different?Anyway, it is very important for us that you are satisfied with our product and are having a great end result! Please write a message to and tell us what went wrong. In any case we will try to find a solution.
RATE US!
You like your artwork?Then we would be very pleased about a product rating. It would greatly support us as a small company.
Read More About This Manual & Download PDF:
References
[xyz-ips snippet=”download-snippet”]