
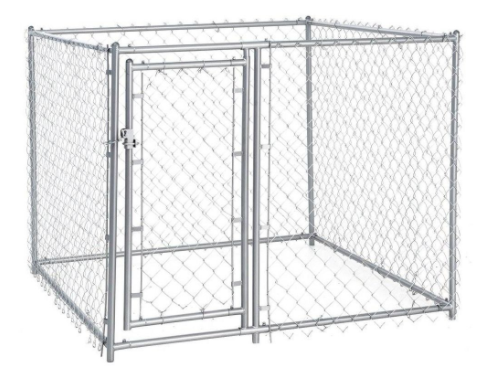
LuckyDog Chainlink Outdoor Kennels Assembly Instructions

Scan QR code for video
MODEL CL40528
5ft. Wide x 5ft. Long x 4ft. High
IMPORTANT NOTICE!
PLEASE READ INSTRUCTIONS COMPLETELY PRIOR TO ASSEMBLING YOUR LUCKY DOG™ CHAIN LINK OUTDOOR KENNEL.
Watch for helpful “HINTS” when following these instructions.
Approximate assembly time with 2 people: 1-2 hours
STEP 1 PARTS LIST
Separate and identify all parts A-K, as shown below
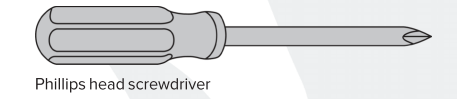
TOOLS NEEDED
STEP 2 SITE PREPARATION
Choosing your kennel location is very important to the well being and safety of your pet companion. The site should be flat and clear of foreign objects and should be protected from sun and other weather elements that may be harmful to your pet.
PARTS IDENTIFIER, A – K
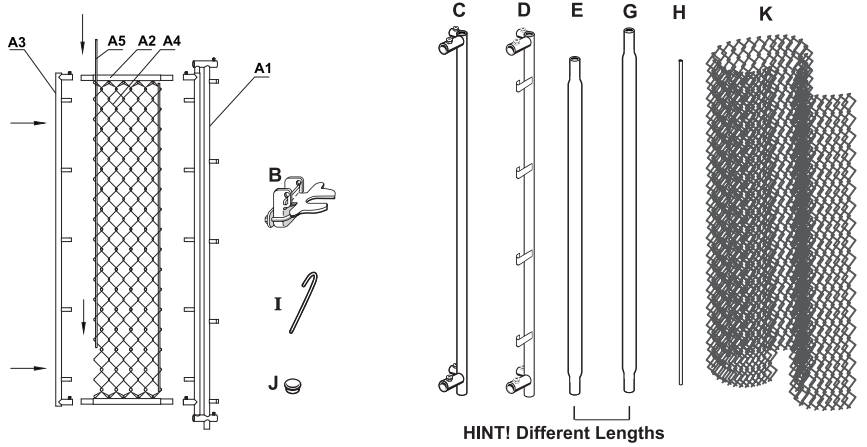
Parts A1-A5 combine to make Part A – SWINGING GATE
A1: Gate Stand – Swinging side (1)A2: Upper & Lower Spreader bars (2)A3: Gate Stand – Latch side (1)A4: Chain Link piece for Gate (1)A5: Round Tension Rods (for gate, shorter ones) (2)B: Lockable Gate Latch 1C: Corner Stands NO Rod Clips 3D: Corner Stand WITH Rod Clips 1E: Upper & Lower END Railings 4G: Upper & Lower SIDE Railings 4H: Round Tension Rods (for kennel) 2I: Steel Wire Ties 30J: Pole Caps 5K: Chain link Roll for kennel 1
STEP 3 ASSEMBLING THE SWINGING GATE
HINT! Assemble the gate first and set it aside before assembling the kennel frame.
A1: Gate Stand – Swinging side (1)A2: Upper & Lower Spreader bars (2)A3: Gate Stand – Latch side (1)A4: Chain Link piece for Gate (1)A5: Round Tension Rods (for gate, shorter ones) (2)

HINT! It is easier to assemble the gate with the parts laying flat on the ground
- Begin by laying out the parts A1-A5 as shown in the diagram above.NOTE: Part A1 has a 1 inch extended leg piece at the bottom, make sure you position this as the bottom.
- Insert parts A2 (UPPER & LOWER SPREADER BARS) into the receiving tube pieces on part A1. Make sure tubes are fully inserted, then tighten set screws.
- Now attach part A3 (GATE STAND, LATCH SIDE) to the upper and lower spreader bars, make sure it is fully inserted, tighten set screws.
- Attaching the chain link mesh – Run TENSION RODS, Part A5 through the sides of the CHAIN LINK MESH, Part A4. Now attach the tension rods to the clips on the gate stands, as shown.
- Secure the chain link to the gate frame with STEEL WIRE TIES, Part I. 2-3 on the top, 2-3 on the bottom.
HINT! Ensure the ends of the steel wire ties are pointing away from the inside of the kennel, to avoid injury to your pet.
STEP 4 ASSEMBLING THE KENNEL FRAMEWORK
Begin by laying your assembled gate (A) mesh side (face) down. Loosen the set-screws on the top and bottom of the RECEIVER TUBES of the gate (see illustration below) and slide top and bottom END RAILS (E) through the receiver tubes. DO NOT TIGHTEN THE SET SCREWS YET, they will need to be loose in a later step to adjust the gate.
STEP 5
(Still laying face down) Attach CORNER STAND WITH ROD CLIPS (D) to the upper and lower end rails, on the latch side of the gate (figure 1). Tighten set screws. Be careful not to over-tighten, as this may cause damage to the welded nut.
STEP 6
Attach CORNER STAND WITHOUT ROD CLIPS (C) to the other side of the upper and lower end rails. Tighten set screws. Do not over-tighten.
STEP 7
Now insert 2 BOTTOM SIDE RAILS (G) into the bottoms of the corner stands. Tighten set screws. You can now carefully stand this side upright.
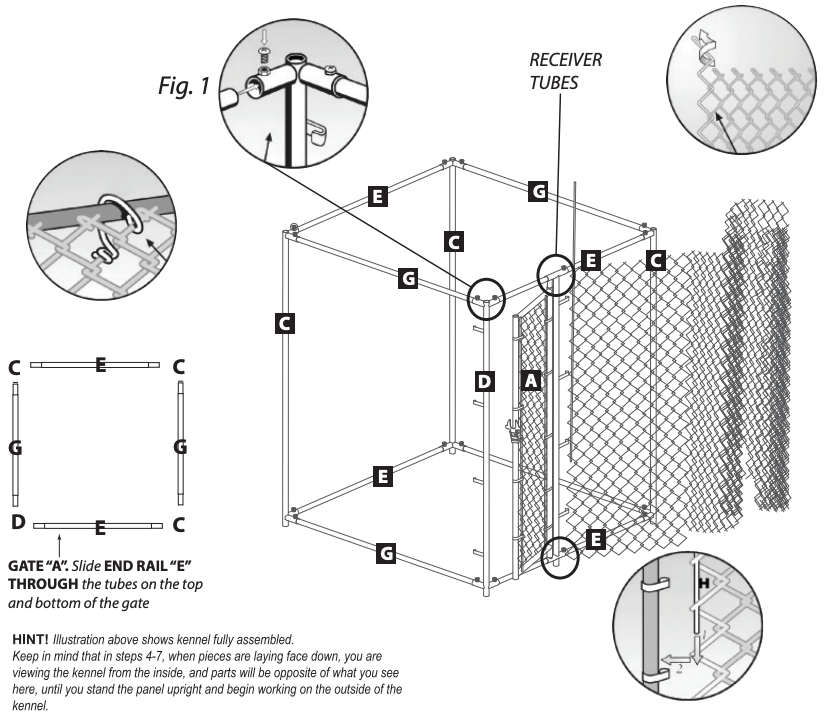
STEP 8
Now insert 2 SIDE RAILS (G) into the tops of the corner stands. Tighten set screws.
STEP 9
Continue installation with CORNER STANDS WITHOUT ROD CLIPS (C), finish with END RAILS (E) along the back of the kennel. Tightening set screws as you go. Your frame should now be complete.
STEP 10 – CHAIN LINK MESH INSTALLATION
For ease of shipping, the roll of chain link is folded versus rolled. The recommended handling of this mesh is to unfold it onto a flat surface, checking along the top and bottom for any pickets that may have come unhooked, from each other or that need to be twisted back into place.
After checking, roll the chain link back up like you would a carpet. This will allow ease of handling when you attach it to the frame.
STEP 11
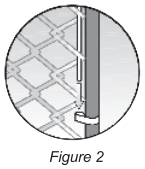 Working on the OUTSIDE of the kennel, stand the chain link next to the CORNER STAND WITH ROD CLIPS (D), insert a ROUND TENSION ROD (H) through the edge of the chain link, hook the tension rod onto the clips. (figure 2)
STEP 12
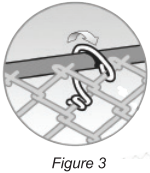 Unroll the chain link mesh around the outside of the kennel frame, pull the chain link tight at each CENTER AND CORNER STAND, as you work your way around the kennel and secure the chain link to the top and bottom rails, Using STEEL WIRE TIES (I) to keep it from sliding back and becoming loose. (figure 3)
STEP 13 – GATE LATCH
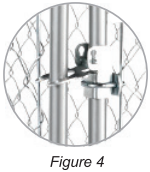 Attach LOCKABLE GATE LATCH (B) to the latch side of the gate frame, at the desired height. Tighten bolts until latch is firmly attached to frame. Slide the gate into position leaving approximately 2 inches between the gate and the corner stand, (figure 4) Make sure the latch opens and closes easily.
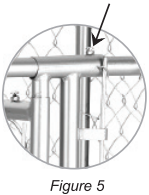 Now you can tighten the set screws on the gate, that were left loose in step 4. (figure 5)
STEP 14
 Once you have completely unrolled the chain link mesh around the entire kennel frame, install the remaining TENSION ROD (H) through the edge of the chain link and clip it to the rod clips on the gate frame. (figure 6)
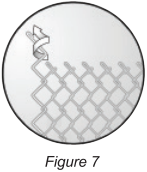 HINT! The chain link mesh is pre-cut to easily fit the kennel size, however exact length is not always possible. Therefore, one or more chain link pickets may need to be removed to insure proper tension on the mesh. If pickets need to be removed, straighten out the ends of as many pickets as necessary at top and bottom and twist out the picket. (figure 7)
STEP 15
Using the remaining wire ties (I), secure the mesh to the top and bottom rails (figure 3). The top wire ties should be approximately 18 inches apart, the bottoms 12 inches. If you have any wire ties left over, use them at the center and corner stands.
HINT! Remember to keep the tail ends of the wire ties pointing toward the outside of the kennel to keep your pet from coming in contact with them.
CONGRATULATIONS! You now have a quality kennel product for your pet companion, that will provide you with many years of use when cared for properly.
HINT! Optional kennel covers for the protection of your pet are available. Please visit www.jewettcameron.com for more details.
EXTREMELY IMPORTANT!
Pet companions are very comfortable in the safety enclosure: however, it is suggested that there be a brief introduction period to acclimate your pet companion. To begin this process, place your pet in the kennel for short periods of time (10-20 minutes) throughout the day while you are able to observe their behavior. If your pet begins to show signs of discomfort or nervousness (e.g., barking or whining) administer verbal correction from a distance. As the training continues, gradually increase the duration of stays inside the kennel until the pet has become completely comfortable with their new surroundings. Providing play things for your pet companion will also comfort them. Also, insure that clean and adequate water and food is available at all times.
REMEMBER, verbal and physical affection will aid your pet companion to be completely satisfied with their new safety enclosure.
LIMITED EXPRESS WARRANTY
Jewett-Cameron Company warrants your product to be free of defects in workmanship and further warrants that under normal use will be free of problems for one full year from date of purchase by original purchaser. JEWETT-CAMERON COMPANY WILL NOT HAVE OTHER OR GREATER LIABILITY FOR DEFECTS, NOR WILL JEWETT-CAMERON COMPANY HAVE ANY LIABILITIES FOR INCIDENTAL OR CONSEQUENTIAL DAMAGES. Some states do not allow the exclusion or limitation of incidental or consequential damages, so the above limitation or exclusion may not apply to you. If you discover a defect in the product during the warranty period and wish to obtain replacement parts or have questions, send notice of claim to: Jewett-Cameron Company • PO Box 1010 • North Plains, Oregon 97133
Include your return address, a copy of the original invoice or proof of purchase date, plus a description of claimed defect. All implied warranties of merchantability and fitness for particular purpose are limited to a duration of one (1) year from date of purchcase. Some states do not allow limitations on how long an Implied warranty may last, so the above limitations may not apply to you. This warranty gives you specific legal rights and you may also have other rights, which may vary from state to state.
©2014 Jewett-Cameron Company · jewettcameron.com · CUSTOMER SERVICE 1-800-955-2879
References
[xyz-ips snippet=”download-snippet”]