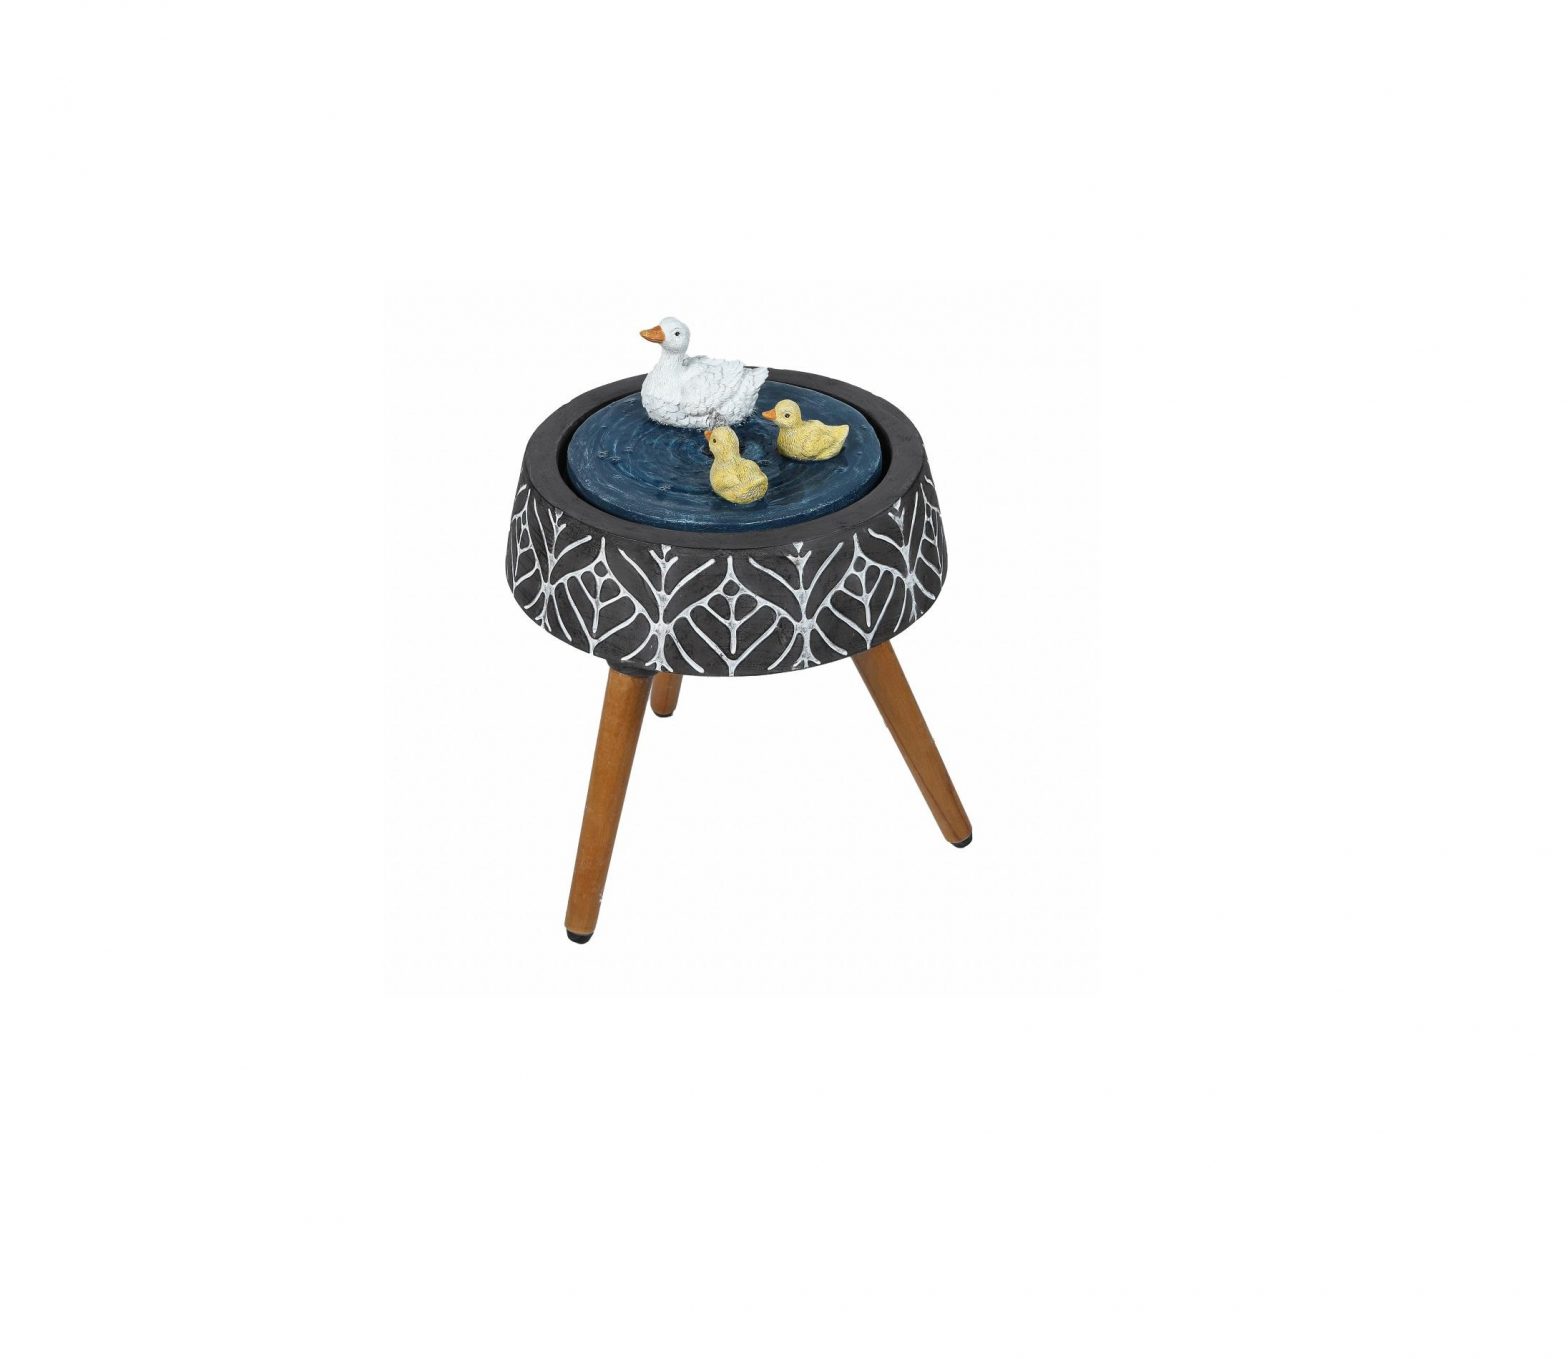
Luxen Home WHF1293 Cement Duck Family Pond Outdoor Fountain with LED Light

Thank you for purchasing this Luxen Home product. This product has been manufactured with the highest standards of safety and quality.
PLEASE READ ALL INSTRUCTIONS BEFORE ASSEMBLY
Unpack all parts from Styrofoam and bubble wrap inside the carton to ensure there are no missing or damaged parts. If any parts are missing or damaged, do not attempt to assemble or use the product.
CARTON CONTENTS:
| Description | Quantity |
| Fountain Top | 1 |
| Fountain Base | 1 |
| Legs | 3 |
| Pump | 1 |
Compatible Pumps for this fountain
| Pump Model No. |
| JR350/LED |
| JB350/LED |
| YH400/LED |
| YH-LV90T |
Tools required for assembly: No tools required for assembly.
Assembly Instructions
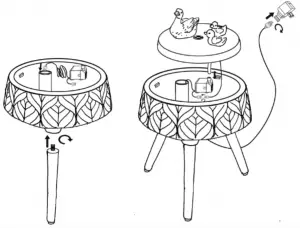
- Unpack the contents of the box and check to make sure that all items are accounted for and in good condition.
- Select a flat, level surface for the assembly and final location of your fountain.
- Screw the legs onto the bottom of the fountain base. Do not overtighten to avoid stripping the thread.
- Pump goes into the fountain base. Thread the pump cord through the tube in the fountain base.
- The water tube is located at the base of the fountain of the fountain top. First insert the LED connector into the pump connector, and twist to tighten. Insert the water tube into the pump, and place the fountain top securely on the fountain base. Be sure to draw out the pump cord from the base.
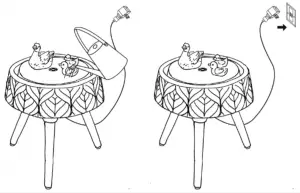
- Add clean water to the fountain. The water level should be approximately 30mm lower than the edge of the basin.
- Connect the power cable to outlet. If installed properly, water flow in the fountain will begin shortly.
- Please do not use the electrical plug in wet weather conditions. Please note: On first use, there may be air in the pump. It may take several minutes until all the air escapes.
- To eliminate the possibility of water damage around your fountain, check for leaks and excessive splashing after the initial setup of your fountain. It is highly recommended that this fountain be placed in an area where it cannot be damaged.
- Do not leave your fountain running for extended periods of time when no one is present to observe the performance.
- Check the area around your fountain on a regular basis to ensure that there is no leakage.
- Please refresh the fountain with water each week to ensure it in good condition.
- Do not add any harmful chemicals to the water as it may alter the finish.
Pump Instructions
![]() Special Warnings and Cautions:
Special Warnings and Cautions:
CAUTION:
- The pump has been evaluated for use with water only.
- Risk of electric shock. Do not remove cord and strain relief. Do not connect conduit to pump.
- Do not use the pump in water exceeding 30ºC / 86ºF.
- Do not use the pump in flammable liquids.
- Do not use the pump for industrial purposes.
- Do not use the pump in vehicles or on ships or aircraft or swimming pools.
- Do not use the pump in location where special conditions prevail, such as the presence of a corrosive or explosive atmosphere (dust, vapor or gas).
- Do not let the pump run dry. Pump must be completely submerged for proper operation and cooling.
- Do not lift the pump by its power cord.
- Keep the plug dry. Do not expose the plug to water or steam.
- Before connecting to the power source, make sure that the pump is assembled and completely submerged in water.
- Always disconnect the pump from the power source before performing any maintenance on the pump, lights (if equipped), or fountain.
- Do not exceed the voltage shown on the pump.
- Check the water level regularly to ensure the pump is completely submerged during operation. The pump should be fully submerged during operation. Do not add water while operating the product. Always disconnect the pump from the power source before adding water.
MAINTENANCE OF YOUR FOUNTAIN
- Keep water clean – using clean water will reduce mineral deposits and improve water clarity.
- Clean the fountain periodically to prevent mineral deposits and contamination. Use warm soapy water and a stiff brush for heavily stained surfaces. Do not use harsh chemicals as this will damage the finished surface and void the warranty.
- Add clean water periodically to ensure that the pump is fully submersed in water.
- Disconnect the power and empty the basin if the fountain will not be used for an extended time.
- If installed outdoors and in a freeze-area of the country, ensure that all water is removed and the unit is completely dry. This product is NOT to be operated below 41℉ (5℃) freeze damage may occur
WARNINGS:
- To reduce the risk of electric shock, connect only to a properly grounded, grounding type receptacle.
- To reduce the risk of electric shock, use only on portable self-contained fountains no larger than 5 feet in any dimension.
- Do not exceed the voltage shown on the pump.
- Always disconnect the pump from the power source prior to beginning any maintenance or work on the pump or fountain.
- Inspect the power cord for damage before installation and/or maintenance. Replace the entire pump if damage is found.
- For pumps with a 3-prong, grounded type plug, do not remove the grounding pin from the plug on the power cord
PUMP ASSEMBLY INSTRUCTIONS
Remove the pump from the package and untie the power cord
- Place the pump in the desired location in your pond or fountain ensuring that it is completely submerged in the water. If the pump is to be used in a pond, raise the pump off of the pond floor to ensure that it is above any dirt that will collect, as this will adversely affect the performance of the pump.
- Adjust the flow rate (if applicable) to the maximum (+) position.
- Connect the power cord from the pump to a properly grounded, grounding type receptacle (GFCI).
- If necessary, readjust the flow rate to the desired level (remember to always disconnect from the power source before handling the pump).
CARE & MAINTENANCE
- Keep the water clean – clean water will prolong the useful life of your pump.
- Use a pre-filter on your pump if available.
- Regular cleaning of the pump will be necessary depending upon the environment in which it is operated. Clean the pump when it is visibly soiled or when a noticeable drop in performance is detected. Failure to clean the pump will result in overheating of the pump and the voiding of the warranty!
- Before cleaning, always disconnect the pump from the power source.
- Disassemble the pump by removing the inlet screen & the impeller housing. Remove the impeller/rotor assembly by gently pulling on the impeller blades. Use a soft cloth or brush to clean the area inside of the pump where the impeller/rotor assembly was. Clean the inlet screen, impeller housing & impeller in warm soapy water. Reassemble the pump and inspect for proper operation.
TIPS AND TROUBLESHOOTING
- Ensure that the pump’s flow control switch is set to maximum (+) before operating. Once the flow is established, the pump can be adjusted downward to the desired level.
- If the pump operates, but there is no flow, check to ensure the pump is fully submerged.
- If the pump operates, but there is no flow, check the supply tubing for kinks and correct.
- If the pump operates, but there is no flow, and if the pump is submerged and there are no kinks in the supply tubing, lift the pump from the water. Remove supply tubing at pump outlet and clean tubing inside and out if necessary. Reset pump in water (outlet side up) and once water begins to flow, re-attach the supply tubing.
SAVE THESE INSTRUCTIONS – This manual contains important safety and operating instructions for power units.
 Contact: [email protected]
[xyz-ips snippet=”download-snippet”]