PROFESSIONAL GAILLS
MAKE THE MOST OF YOUR
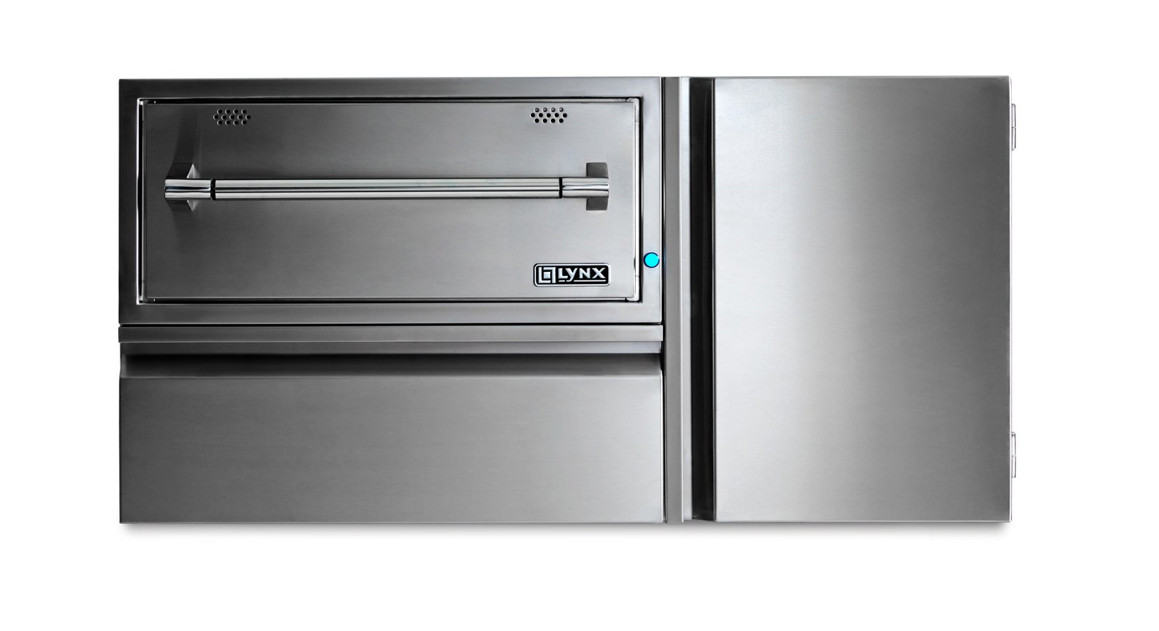
Warming Drawer / Warming Drawer CabinetCARE & USE/INSTALLATION
Important Safety Instructions
![]() WARNING:
WARNING:![]() Read this manual carefully and completely before using your warming drawer to reduce the risk of:• Fire• Burn hazard, personal injury, or property damage• Unapproved installation or service
Read this manual carefully and completely before using your warming drawer to reduce the risk of:• Fire• Burn hazard, personal injury, or property damage• Unapproved installation or service
This product is designed for indoor or outdoor installation. Improper installation, adjustments, alteration, service or maintenance can cause personal or property damage and may void the warranty. Read this manual thoroughly before installation, use or service.
CAUTION: UNPLUG the warming drawer before beginning any work. Make sure you READ and UNDERSTAND these instructions BEFORE installation. If you have any questions or concerns prior to, or during service, please call Customer Care/Tech. Support at 888-289-5969.
IMPORTANT: When using electrical appliances, basic safety precautions should always be followed including the following:
- Read all instructions before using the warming drawer
- Do not store or use gasoline or other fl ammable vapors and liquids in the drawer or in the vicinity of this or any other appliance.
- Do not touch hot surfaces, the heating elements or drawer interior surfaces while the drawer is in use. Only touch handles or knobs. Use only dry potholders. Using moist or damp pot holders may cause steam burns to your hands.
- To protect against electrical shock, do not immerse cord, plugs, or base in water or other liquids.
- Do not use foil to line the interior of the drawers. This traps heat and increases the risk of damage.
- Close supervision is necessary when the appliance is used by or near children.
- Do not allow the cord to touch hot surfaces.
- Do not install on or near a hot gas or an electric burner.
- Make sure the appliance is turned off before plugging in or removing the plug from the power receptacle.
- Do not use this appliance for anything other than the intended use.
- Keep the warming drawer away from water sprinklers.
- Do not store materials, not recommended by the manufacturer, in the drawer when not in use.
- Always place steam racks in desired position while the appliance is cool.
- Do not obstruct the warming drawer vent ducts while cooking. You may want to close them when the unit is not in use to help keep rain/water from getting into the drawer.
- Do not cover food with plastic wraps or use plastic food containers in the drawer while heating. Plastics will melt and damage the drawer interior.
- Do not place food in sealed containers in the drawer. Pressure could build up and cause the container to burst resulting in damage or personal injury.
- Use care while opening a heated drawer to allow hot air and steam to escape before removing or replacing food.
- This appliance is designed to be installed by a qualifi ed technician and plugged into a dedicated, properly grounded, GFIC outlet.
- ETL listed for indoor and outdoor use.
- Unplug the unit when not in use and before cleaning. Allow to cool before putting on or taking off parts.
- Do not operate any appliance with damaged cord or plug, or after the appliance malfunctions or has been damaged in any manner. Contact our Preferred Customer Service facility for information or additional details.
- Do not repair or replace any part of this warming drawer. All servicing should be done by an authorized service agency. Contact Lynx Customer Service at 1-888-289-5969
- Save these instructions for future reference.
Electrical Information
![]() WARNING: ELECTRICAL GROUNDING
WARNING: ELECTRICAL GROUNDING
- Warming drawer must be installed in accordance with the local electric code or, in the absence of local codes, the latest edition of the National Electrical Code ANSI/NFPA No. 70, or the Canadian Electrical Code CGA 1.6b 2005.
- Use only a Ground Fault Interrupter (GFI) protected circuit with this outdoor appliance. This type of outlet should be installed by a qualifi ed electrician.
- This warming drawer is equipped with a three-prong (grounded) electric plug for your protection against shock hazards and must be plugged directly into a properly grounded three-prong outlet. Never cut or remove the grounding prong from this plug.
- Use only extension cords with a 3 prong grounding plug rated for the power of the equipment and approved for outdoor use with a “WA” marking.
- To protect against electric shock, do not immerse any part of the power cord, extension cord, or any plugs in water or other liquids.
- Unplug or shut down the circuit to the warming drawer from the outlet before cleaning or when not in use for extended periods. Allow the drawer to cool before putting on or taking off parts.
- Do not clean this product with a water spray or the like.
- Allow the drawer to cool before putting on or taking off parts.
- Do not use the warming drawer for purposes other than intended.
- Do not operate the warming drawer with a damaged cord, plug or after the appliance malfunctions, or has been damaged in any manner. Contact Lynx Customer Service for repairs. 1-888-289-5969
![]() WARNING: ELECTRICAL SHOCK HAZARD
WARNING: ELECTRICAL SHOCK HAZARD
This appliance is equipped with a 3-prong power cord with a grounding plug for your protection against shock hazard and should be plugged directly into a properly grounded receptacle. Only use power cord supplied with the unit. Do not operate warming drawer with a damaged plug or cord.
Connection to AC:
Installation requires an outdoor 120 VAC, 15 amp dedicated GFI protected outlet.The warming drawer is rated as follows; 120 VAC, 60 Hz, 480 W, 4 AMP
IF SHIPMENT ARRIVED DAMAGED:
- VISIBLE LOSS OR DAMAGE: Be certain this is noted on freight bill or express receipt and signed by person making the delivery.
- FILE CLAIM FOR DAMAGES IMMEDIATELY, regardless of extent of damage.
- CONCEALED LOSS OR DAMAGE: If damage is unnoticed until merchandise is unpacked, notify transportation company or carrier immediately and fi le a “concealed damage” claim with them. This should be done within (15) days of date delivery is made to you. Be sure to retain container for inspection. We cannot assume responsibility for damage or loss incurred in transit.
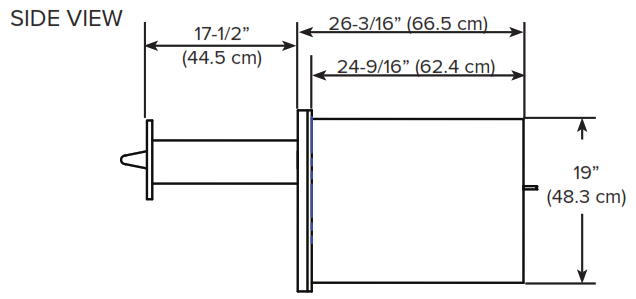
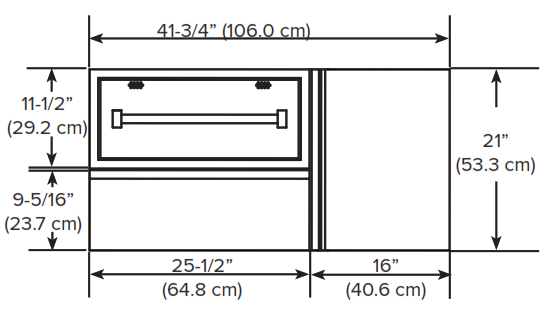
L30WD Dimensions
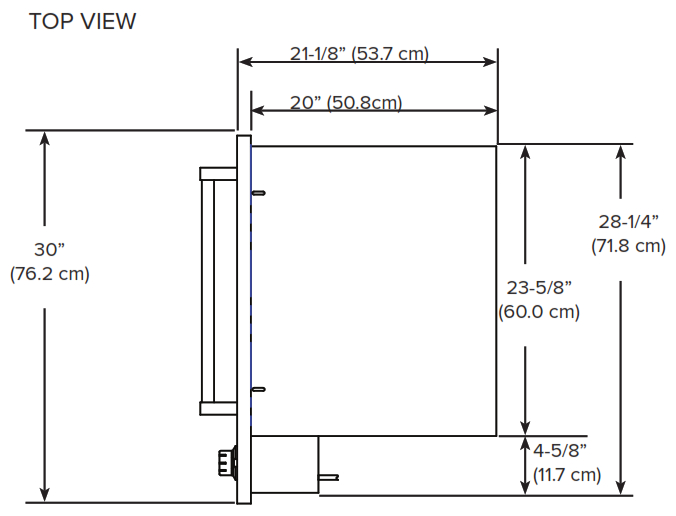
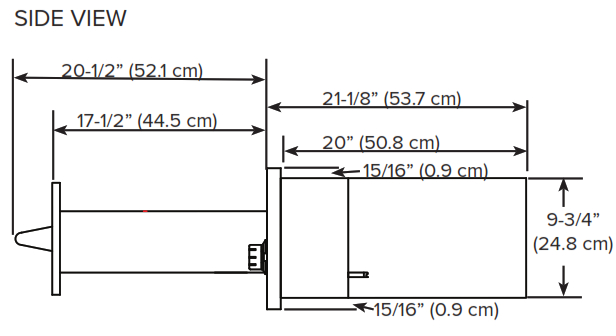

Installing the Warming Drawer – L30WD
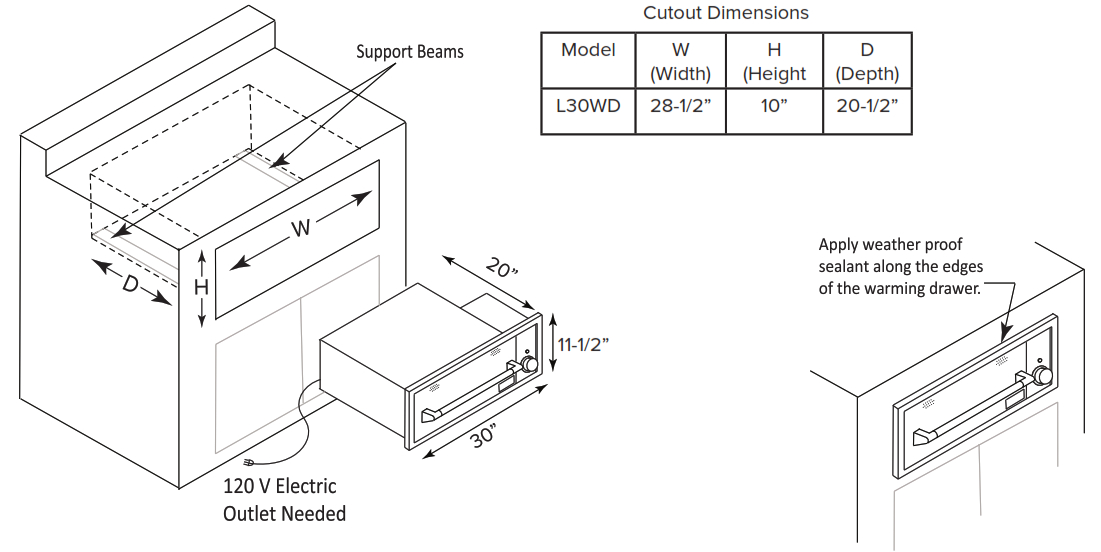
Typical Island Installation L30WD-1
- Provide a 10” x 28 ½” cutout to the front of the island.
- Provide support beams using metal studs.
- Pull the drawer out of the drawer casing to gain access on the mounting holder at the front of the casing.
- Insert the drawer casing into the island opening.
- Secure the drawer casing with screws at the inside front top and bottom, using the pre-punched mounting holes.
- Re-assemble the drawer section into the drawer casing.
- Apply weatherproof sealant along the edges of the warmer.
- Plugin the warmer to a weatherproof, and properly grounded, electrical outlet.
- If installing the unit directly under a grill, please allow 2-3/16″ between the grill cutout bottom and the top of the warming drawer cutout
IMPORTANT
- Be sure that the warming drawer is properly grounded and installed by a qualifi ed technician. The electrical cord has a 3 prong plug. Do not cut any of the prongs.
- Make sure that the island is free of cracks that would allow water or other liquids to get into the electrical controls.
- Keep the warming drawer away from water sprinklers.
- When not in use, cover the island to protect from rain and harsh weather.
- If installing the unit directly under a grill, please allow 2-3/16” between the grill cutout bottom and the top of the warming drawer cutout.
L42CC Dimensions

Installing the Warming Drawer w/Cabinet L42CC
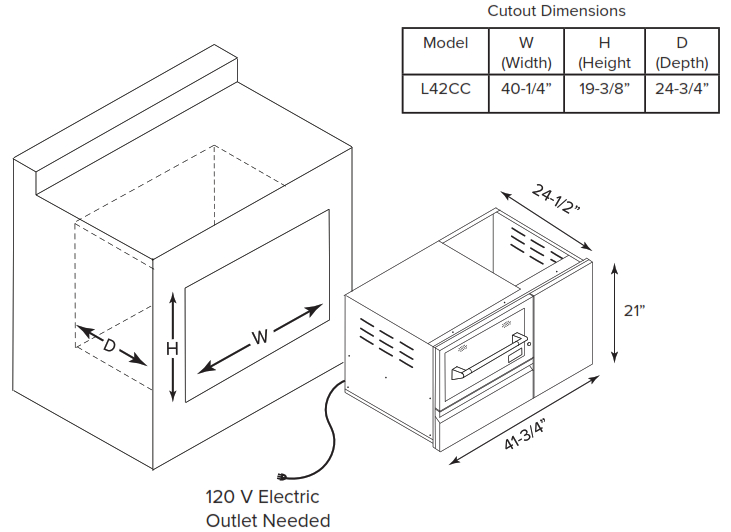
Typical Island Installation L42CC
- Provide a 19 3/8” x 40 ¼” cutout to the front of the island.
- Provide support beams using metal studs.
- Pull the drawer out of the drawer casing to gain access on the mounting holder at the front of the casing.
- Insert the drawer casing into the island opening.
- Secure the drawer casing with screws at the inside front top and bottom, using the pre-punched mounting holes.
- Re-assemble the drawer section into the drawer casing.
- Apply weatherproof sealant along the edges of the warmer.
- Plug in the warmer to a weatherproof, and properly grounded, electrical outlet.
- If installing the unit directly under a grill, please allow 2-3/16″ between the grill cutout bottom and the top of the warming drawer cutout.
IMPORTANT
- Be sure that the warming drawer is properly grounded and installed by a qualifi ed technician. The electrical cord has a 3 prong plug. Do not cut any of the prongs.
- Make sure that the island is free of cracks that would allow water or other liquids to get into the electrical controls.
- Keep the warming drawer away from water sprinklers.
- When not in use, cover the island to protect from rain and harsh weather.
- If installing the unit directly under a grill, please allow 2-3/16” between the grill cutout bottom and the top of the warming drawer cutout.
Before Using Your Appliance
All products are wiped clean with solvents at the factory to remove any visible signs of dirt, oil, and grease which may have remained from the manufacturing process. Before using, clean the drawer thoroughly with hot, soapy water. There may be some burn off and odors on fi rst use of the appliance—this is normal.
Temperature Controls
The temperature control dial is used to select the temperature of the warming drawer.
The warming drawer should only be opened when adding or removing food. Continuous opening of the drawer allows warm air to escape and make the food colder.
Do not use aluminum foil to line the drawer. It is an excellent heat insulator and will trap heat beneath it. This may affect the performance of the warming drawer and the interior fi nish.
Heat Light ONThe heat-on blue indicator light turns on when the control knob is set and cycles “on” and “off ” with the heating element as temperature is maintained.
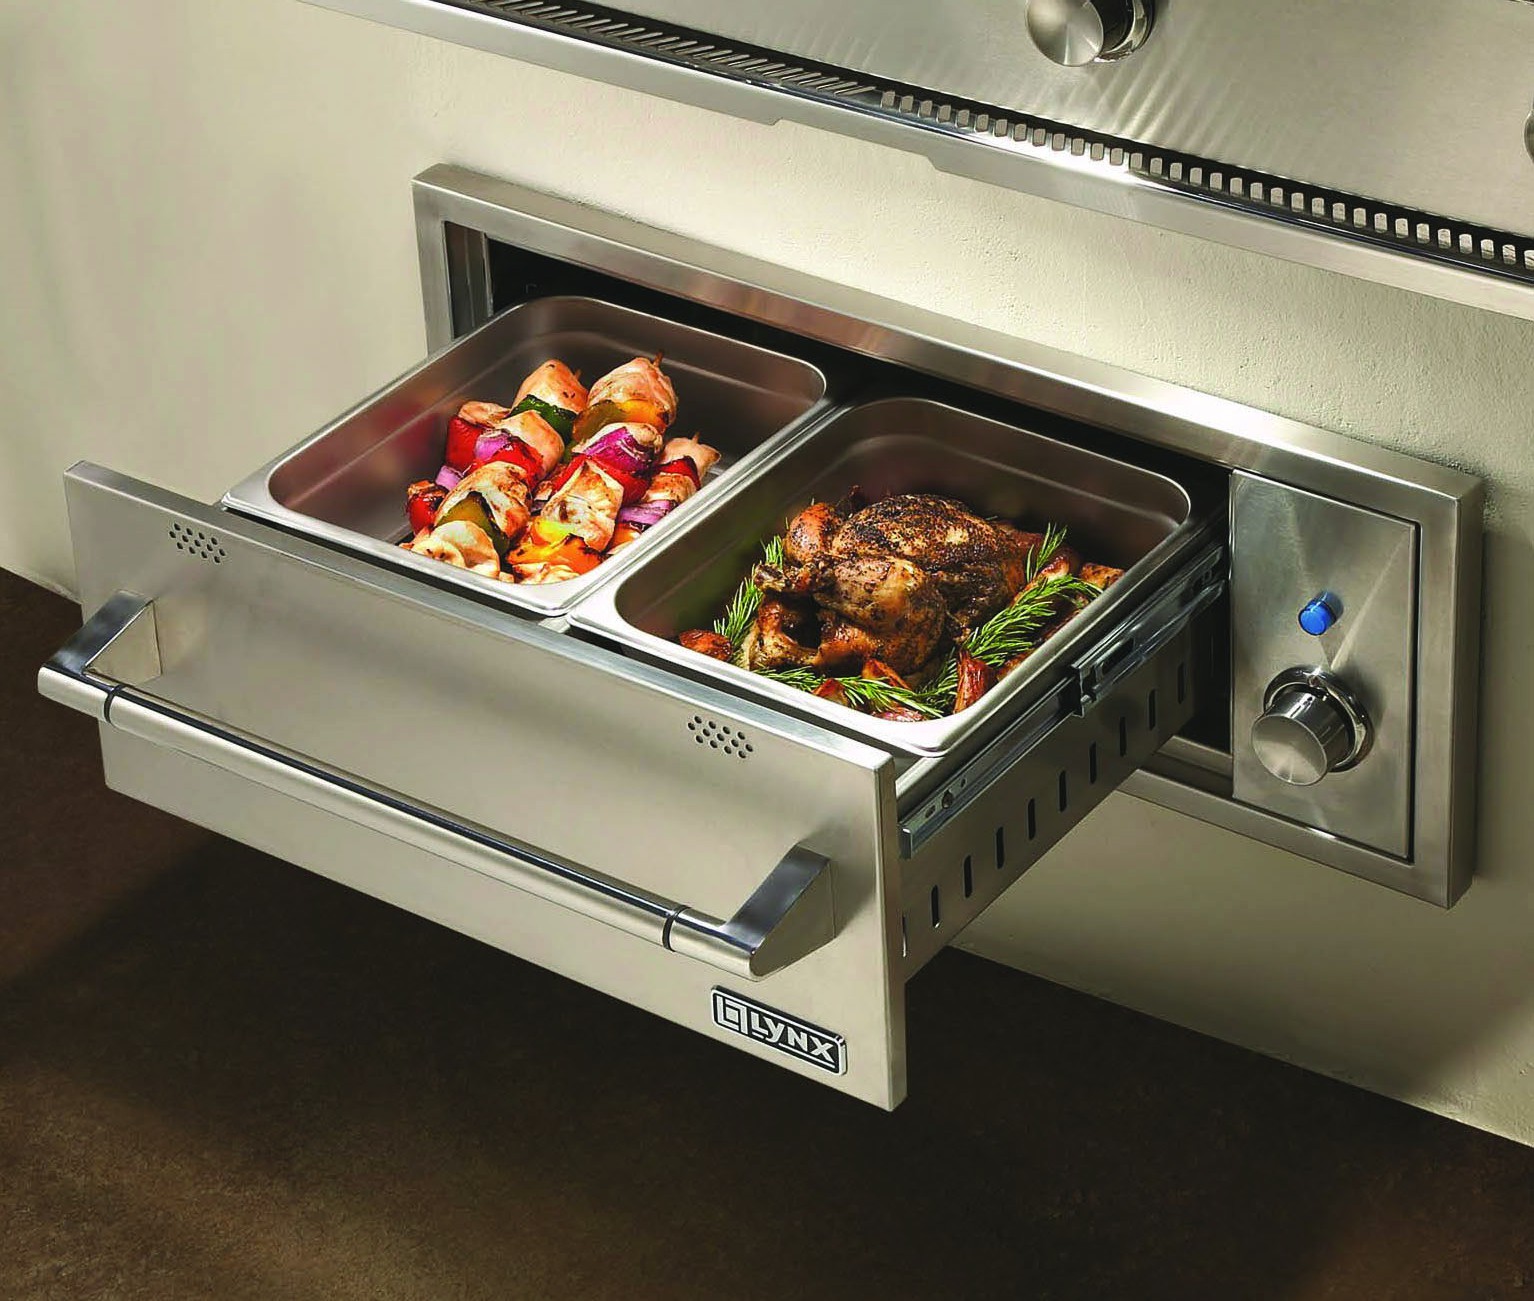
Moisture Vent ControlThe moisture vent control is located at the top inside of the warming drawer. It can be adjusted in any position between “open” and “close” to maintain desired degree of moisture.
For crispy foods, slide the moisture vent control inward to open the vents and allow the moisture to escape.For moist food, slide the moisture vent control outward to close the vents and seal the moisture inside the drawer.
Heating Instructions
- Dry Heat• The main function of the warming drawer is to maintain food at a desired serving temperature.• Place previously prepared foods directly into the empty steam pans (no water) and set the moisture vent control.• Set the temperature control dial. The heat-on blue indicator light will illuminate until the desired temperature is reached.
- Moist Heat• The warming drawer also seals moisture within the drawer to keep the food moist.• Put just enough of water, approximately ½” high, in the steam pans.• Place the steam rack inside the steam pan.• Place the food directly on the rack or use a suitable container that will fi t in the steam pans. Do not use plasticcontainers or utensils.• Set the temperature control dial. The heat-on blue indicator light will illuminate until the desired temperature is reached.• Periodically, check the water level in the steam pans and add water when necessary.
Cleaning and Maintenance
The Warming Drawer is made of welded stainless steel. It is non-rusting and non-magnetic.
- Allow the warming drawer and its accessories to cool before cleaning.
- Remove steam pans and all accessories from the warming drawer.
- Unplug the warming drawer prior to cleaning.
- Clean all items including the drawer with a mild cleanser. Scrub dirt with a sponge in the direction of the grain.
- When cleaning the front panel, always scrub in the direction of the grain. In order to maintain the luster and highlights of the polished surface, do not use abrasives when cleaning the polished surfaces.
- Do not use steel wool to clean the drawer and accessories.
- Check out the slide rails and make sure they are clean and free from debris.
- It is recommended to clean the warming drawer after every use.
Stainless Steel
Lynx products are known for their attractive appearance. We achieve this by selecting only the finest grades of stainless steel and applying exacting workmanship.In order to maintain this attractive appearance over the life of the grill it is important to take the following steps: Use a commercially available Stainless Steel cleaner* to clean and polish the exterior surfaces.
Doing these things on a regular basis minimizes the amount of effort required. Part of the appeal of your Lynx Accessory is the fine grain finish. When removing stubborn stains:
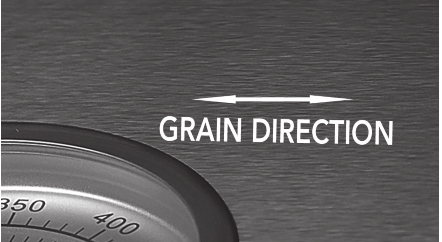
- Do not use metallic abrasives and always rub in the direction of the grain.
- Some household cleaning products are not suitable for stainless steel; be sure to read the label before using on your Lynx Accessory.
- Always use the mildest cleaning solution first, scrubbing in the direction of the grain. Specks of grease may gather in the grain of the stainless steel and bake onto the surface, giving the appearance of rust. To remove these baked-on foods use a fine to medium grit non-metallic abrasive pad (Scotch Brite is good) in conjunction with a stainless steel cleaner.
- Solutions used for cleaning concrete and masonry can be very corrosive and will ‘attack’ stainless steel. Ensure your Lynx products are well protected before you allow the use of such chemicals.
SPECIAL NOTE FOR LOCATIONS NEAR POOLS AND COASTAL AREAS:The 304 stainless steel material used in the construction of a Lynx Grill is highly rust-resistant, however, chlorine in the airfrom swimming pools or the salt from sea air may cause surface rust to appear and even create some pitting if left on the product.
Here are a few tips to avoid this:
- Regularly wipe down the exterior surfaces with a damp cloth. (Micro fiber cloths such as E-cloth perform very well).
- Allow the surfaces to dry before installing the cover. Do not cover a damp sink.
- In extreme environments apply a rust inhibitor which leaves a microscopic protective layer on the stainless. Products that provide a layer of vapor corrosion inhibitors (VpCI™) protect the surface very well.
- For seasonal storage use the product referred to above, ensure the sink is dry and then cover and secure the cover to minimize the amount of damp air getting to the surfaces.
THE LYNX LIMITED LIFE TIME WARRANTY PROVIDES PROTECTION AGAINST RUST-THROUGH OF PARTS THAT RENDER THE PRODUCT INOPERATIVE. IT DOES NOT COVER OCCASIONAL SURFACE RUST OR STAINING DUE TO ENVIRONMENTAL CONDITIONS.For light and heavy food stains, there are many different stainless steel cleaners available.
Cleaning and Maintenance
Cleaning Chart
| Material | Recommendations |
| Drawer interior (stainless steel) | Use dish detergent. Wash, rinse well, and dry. For hard water spots or scales, use white vinegar. Apply with a sponge or cloth, rinse, and dry. Heat Discoloration / Corrosion:
Clean with BarKeeper’s Friend® sprinkled on a wet sponge or wet cloth. Apply to the stainless steel surface. Rub gently and evenly in the direction of the grain. Rinse and dry. |
| Drawer exterior (stainless steel) | Always wipe or rub in the direction of the grain. Clean with a soapy sponge, then rinse and dry or use mild non-abrasive cleaners on a paper towel. Protect and polish with stainless steel cleaner and a soft cloth. Remove water spots a cloth dampened with white vinegar. |
| Control Panel | Clean with hot soapy water or mild non-abrasive cleaner on a clean sponge. Wipe clean. Avoid usng abrasive cleaners and scrubbing pads. |
Trouble Shooting Guide and Obtaining Service
| 1. Warming drawer will not heat up.2. Heat on indicator light does not illuminate | 1. Check if the unit is plugged into an electrical outlet.2. Check to ensure the GFCI has not been tripped.3. Check if the temperature control dial is set properly.4. Check if the circuit breaker has not been tripped |
| If Service is required: | 1. Call Preferred Customer Service (888-289-5969)2. Provide the following information: Model NumberSerial Number Date of Purchase Name of the Dealer |
Contacting Customer Care
Please record the following information and refer to this information when contacting Lynx Customer Care.This information is found on the data plate, which is located on the right rear side panel.
| Model Number | |
| Serial Number | |
| Date of Purchase | |
| Place of Purchase |
The model and serial number is located on the rating label.
| VOLTS: 120VAC | Hz: 50/60 |
| AMPS: | WATTS: |
LYNX PROFESSIONAL GRILLS GREENWOOD, MISSISSIPPI U.S.A
| MODELNUMBER | |
| SERIAL NUMBER |
OUTDOOR USE ONLY 2 WIRE GROUNDED SINGLE PHASE
CAUTION: TO ENSURE CONTINUED PROTECTION AGAINST THE RISK OF ELECTRIC SHOCK, CONNECT TO PROPERLY GROUNDED OUTLETS ONLY. THE CONNECTION TO AN EXTENSION CORD SHOULD BE KEPT DRY AND OFF THE GROUND. DO NOT CLEAN THIS PRODUCT WITH A WATER SPRAY OR THE LIKE. DO NOT IMMERSE IN WATER.
 THIS DESIGN CONFORMS TOANSI STD 1026:2016-Latest EditionCERTIFIED TO CSA STDc22.2 no. 64:2014-Latest Edition
For warranty service, contact Lynx Customer Care for an authorized service agent near you by calling (888) 289-5969 or online at www.lynxgrills.com. Your satisfaction is of the utmost importance to us. If a problem cannot be resolved to your satisfaction, please write, fax or email us at:
Lynx Grills62201 Hwy82 WestGreenwood, MS 38930Service: 1-888-289-5969www,lynxgrills.com
Wiring Schematic
Lynx Limited Warranty
I. Limited Lifetime WarrantyThe stainless steel housing is warranted to be free from defects in material and workmanship when subjected to normal domestic use and service for the lifetime of the original purchaser. This warranty excludes surface corrosion, scratches, and discoloration which may occur during regular use. This warranty is limited to the replacement of the defective parts, with the owner paying all other costs including labor.
II. Limited Five-Year WarrantyThe structural integrity of the interior parts, exterior, and drip pans are warranted to be free from defects in material nd workmanship, when subjected to normal domestic use and service, for a period of fi ve (5) years from the original date of purchase. Lynx will eplace of repair parts found to be defective at no cost to the original purchaser.
III. Limited Two-Year WarrantyAll other components are warranted to be free from defects in material and workmanship, when subjected to normal domestic use and service, for a period of two (2) years from the original date of purchase. This warranty is limited to the replacement of the defective parts, with the owner paying all other costs including labor, shipping, and handling.
IV. Limited One-Year WarrantyFor a period of one (1) year from the original date of purchase, Lynx will replace or repair parts found to be defective at no cost to the original purchaser. This includes the cost of shipping replacement parts and, where necessary, service labor at prevailing local rates by a Lynx authorized service person. Service will be provided during normal business hours and must be authorized in advance by Lynx.
V. Limitations & Exclusions
- This Warranty shall apply to products purchased and located in the United States and Canada. Products must be purchased in the country where service is requested.
- Warranty applies only to the original purchaser and may not be transferred.
- Warranty is in lieu of all other warranties expressed or implied and all other obligations or liabilities related to the sale or use of its grill products.
- Warranty shall not apply and Lynx is not responsible for damage resulting from misuse, abuse, alteration of or tampering with the appliance, accident, hostile environment, fl are-ups, improper installation, or installation not in accordance with the instructions contained in this manual, or the local codes.
- Lynx shall not be liable for incidental, consequential, special or contingent damages resulting from its breach of this warranty or any implied warranty.
- Some states do not allow limitations on how long an implied warranty lasts, or the exclusions of limitations on consequential damages. This warranty gives you specifi c legal rights and you may have other rights which vary from state to state.
- No one has the authority to add to or vary Lynx’s warranty, or to create for Lynx any other obligation or liability in connection with the sale or use of its products.
- Limited to the replacement of defective parts with the owner paying all other costs including labor.
VI. What is not covered: Lynx shall not be responsible for and shall not pay for the following:
- Installation or start-up, damages or problems caused by improper installation or use;
- Service by an unauthorized service provider;
- Damage or repair due to service by an unauthorized service provider or use of unauthorized parts;
- Warranty does not apply to products installed in any commercial or non-residential application. Examples of excluded applications include, but are not limited to daycare centers, schools, bed and breakfast centers, churches, private clubs, fi re stations, club housed, common areas in multi-family dwellings, restaurants, hotels, nursing homes, food service locations, and institutional foodservice locations.
- Correcting normal adjustments, settings, improper installation, or commissioning of local gas supply properties.
- Shipping and handling costs, import/export duties, installation, removal, or reinstallation costs.
- Display models are sold “as is”. If you have purchased a display model, please be advised that it is sold “as is” and that it is subject to the following warranty exclusions: any exterior of cosmetic damage is nonwarrantable; any missing components will be replaced at the consumer’s expense; major handling damage to manifold, valve and ignition system will be serviced at consumer’s expense; all other warranty’s (standard warranty) will remain in eff etc.
- The cost of a service call to diagnose trouble
Lynx Common Area Limited Warranty
The Lynx Limited Warranty covers residential installations only and is not transferable to any other party. This ‘nonresidential’ warranty applies when the product is installed in a common area where more than a single party has the rightful access to its use or in locations considered beyond normal residential use such as B&Bs, and private clubs.
THIS PROVISION EXCLUDES ALL COMMERCIAL APPLICATIONS, INCLUDING, BUT NOT LIMITED TO RESTAURANTS AND INSTITUTIONAL FOOD SERVICE LOCATIONS.
I. Limited Five-Year WarrantyThe stainless steel housing is warranted to be free from defects in material and workmanship when subjected to normal domestic use and service for a fi ve (5) year period from the original purchase date. This warranty excludes surface corrosion, scratches, and discoloration which may occur during regular use. This warranty is limited to the replacement of the defective parts, with the owner paying all other cost including labor.
II. Limited -Year WarrantyThe structural integrity of the interior parts, exterior, and drip pans are warranted to be free from defects in material and workmanship, when subjected to normal domestic use and service, for a period of one (1) year from the original date of purchase. Lynx will replace or repair parts found to be defective at no cost to the original purchaser.
III. Limited Parts & Labor WarrantyAll other components are warranted to be free from defects in material and workmanship for a period of 90 days from the original date of purchase. lynx will replace or repair parts found to be defective at no cost to the original purchaser. After the 90 day period Lynx will sell parts to the holder of this warranty at Lynxcontractor prices for an additional 9 months.
IV. Limitations & Exclusions
- This Warranty shall apply to products purchased and located in the United States and Canada. Products must be purchased in the country where service is requested.
- Warranty applies only to the original purchaser and may not be transferred.
- Warranty is in lieu of all other warranties expressed or implied and all other obligations or liabilities related to the sale or use of its grill products.
- Warranty shall not apply and Lynx is not responsible for damage resulting from misuse, abuse, alteration of or tampering with the appliance, accident, hostile environment, fl are-ups, improper installation, or installation not in accordance with the instructions contained in this manual, or the local codes.
-
Lynx shall not be liable for incidental, consequential, special or contingent damages resulting from its breach of this warranty or any implied warranty.
-
Some states do not allow limitations on how long an implied warranty lasts, or the exclusions of limitations on consequential damages. This warranty gives you specifi c legal rights and you may have other rights which vary from state to state.
-
No one has the authority to add to or vary Lynx’s warranty, or to create for Lynx any other obligation or liability in connection with the sale or use of its products.
-
Limited to the replacement of defective parts with the owner paying all other costs including labor.
- Installation or start-up, damages or problems caused by improper installation or use;
- Service by an unauthorized service provider;
- Damage or repair due to service by an unauthorized service provider or use of unauthorized parts;
- Warranty does not apply to products installed in any commercial or non-residential application. Examples of excluded applications include, but are not limited to daycare centers, schools, bed and breakfast centers, churches, private clubs, fi re stations, clubhouses, common areas in multi-family dwellings, restaurants, hotels, nursing homes, food service locations, and institutional food service locations.
- To correct normal adjustments or settings, sue to improper installation, commissioning of local gas supply properties.
- Shipping and handling costs, export duties, installation, removal, or reinstallation costs.
- Display models are sold “as is”. If you have purchased a display model, please be advised that it is sold “as is” and that it is subject to the following warranty exclusions: any exterior of cosmetic damage is non warrantable; any missing components will be replaced at the consumer’s expense; major handling damage to manifold, valve and ignition system will be serviced at consumer’s expense; all other warranty’s (standard warranty) will remain in effect.
- The cost of a service call to diagnose trouble.
- Limited Warranty covers residential installations only and is not transferable to any other party. This ‘nonresidential’ warranty applies when the roduct is installed in a common area where more than a single party has rightful access to its use or in locations considered beyond normal residential use such as B&Bs, and private clubs.
References
[xyz-ips snippet=”download-snippet”]