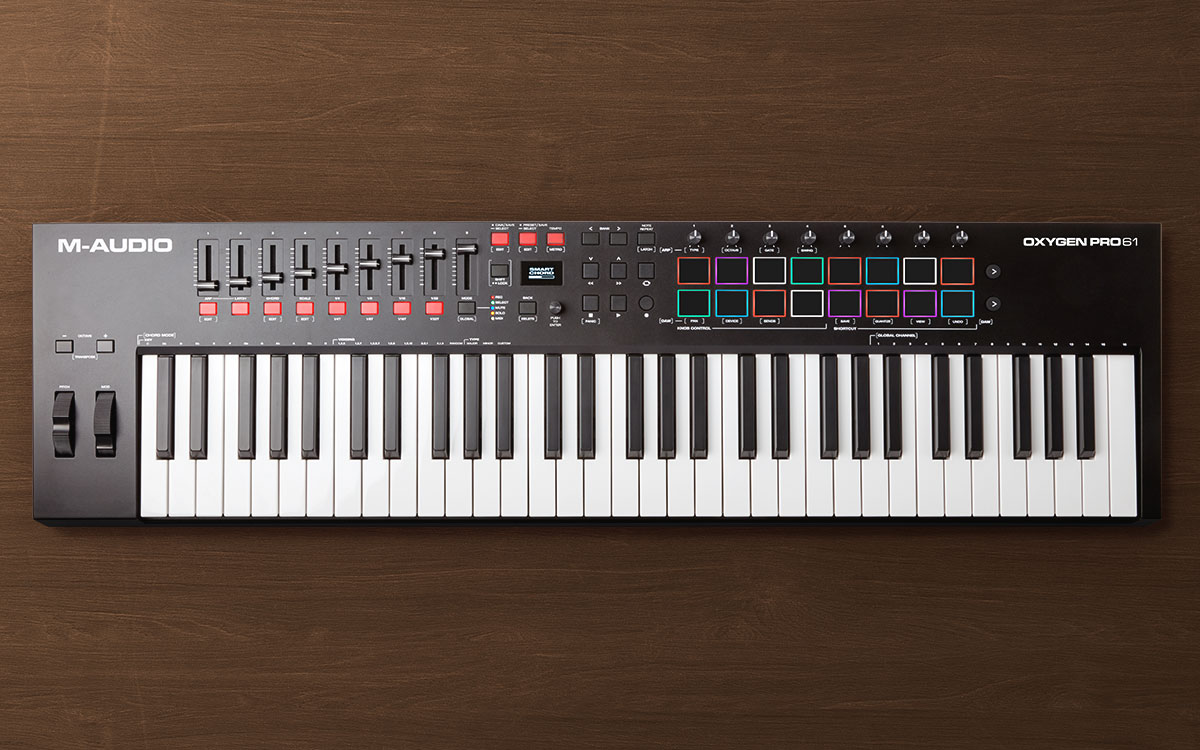
M-Audio 505947 Oxygen Pro 61
Introduction
Box Contents
- Oxygen Pro 61
- USB Cable
- Software Download Card
- Quickstart Guide
- Safety & Warranty Manual
SupportFor the latest information about this product (system requirements, compatibility information, etc.) and product registration, visit m-audio.com.For additional product support, visit m-audio.com/support.
Setup
To start using your Oxygen Pro 61, you need to connect your equipment, get your software properly configured, and then set the keyboard’s operation Mode. To connect Oxygen Pro 61 to your computer, use the included USB cable. Plug the USB-B end of the cable into the keyboard and the USB-A end of the cable into your computer (or into a USB hub connected to your computer).
Note: In addition to sending data, the USB cable powers the keyboard. If you will be connecting Oxygen Pro 61 to a USB hub that has other devices connected to it, then we recommend using a powered USB hub.
To configure your DAW to work with Oxygen Pro 61, enable Oxygen Pro 61 as a MIDI control surface in the appropriate settings menu within the DAW (Preferences, Options, Device Setup, etc.). If you will be using Oxygen Pro 61 with the included MPC Beats, Pro Tools | First M-Audio Edition, or Ableton Live Lite software, see Installing Your Included Software for more specific instructions on configuring your DAW with Oxygen Pro 61. If you will be using a different DAW, consult the user manual provided with the DAW for additional help with this step. If you will be using Oxygen Pro 61 with a hardware synth rather than your computer, connect Oxygen Pro 61’s MIDI Out port to a synth with a standard 5-pin MIDI cable. Then make sure that Oxygen Pro 61 is set to operate with one of its custom presets selected (as instructed in Setting the Keyboard’s Operation Mode) and that the Oxygen Pro 61 is set to send MIDI data from the 5-pin MIDI out port in the Global Settings. In order to use an external hardware synth, you will need to connect Oxygen Pro 61 to a computer, laptop, or to a powered USB hub.
Installing Your Included Software
We’ve included MPC Beats, Pro Tools | First M-Audio Edition, and Ableton Live Lite with Oxygen Pro 61 so you can get started making music with professional software right out of the box. Additionally, we’ve included a set of Expansion Packs and AIR virtual instrument plugins for you to use with your DAW. To download the included MPC Beats, Pro Tools | First M-Audio Edition, or Ableton Live Lite software, register your Oxygen Pro 61 on m-audio.com and follow the installation instructions in your User Account. If you will be using Ableton Live Lite, we recommend visiting ableton.com to check for any available software updates. For help configuring either DAW with Oxygen Pro 61, see Pro Tools | First M-Audio Edition Setup or Ableton Live Lite Setup below. To download the included AIR virtual instrument plugins, follow the instructions on the software download card in the box. After installation, most DAWs will not load virtual instrument plugins automatically; you may need to manually choose a plug-in folder for your software to scan. The pluginfolders for Pro Tools | First M-Audio Edition and Ableton Live Lite depend on your operating system, as indicated below.
Pro Tools | First M-Audio Edition/AAX plugin folders:
- Windows (32-bit): C:\Program Files (x86)\Common Files\Avid\Audio\Plug-Ins
- Windows (64-bit): C:\Program Files\Common Files\Avid\Audio\Plug-Ins
- MacOS: Macintosh HD/Library/Application Support/Avid/Audio/Plug-Ins
Ableton/VST Plugins:
- Windows (32-bit): C:\Program Files (x86)\VSTplugins
- Windows (64-bit): C:\Program Files\VSTplugins
- MacOS: Macintosh HD/Library/Audio/Plugins/VST
To set your plugin folder in Ableton Live Lite:
- Go to the Preferences menu.
- Select the File Folder tab. Under Plug-In Sources, click Browse and select the appropriate plugin folder (as indicated above).
- After making your selection, the Use VST Custom Plug-In Folder button should be ON. If it is not, click the button to turn it on. You can then exit the Preferences menu.
Ableton Live Lite Setup
- First, connect Oxygen Pro 61 to your computer. Then launch Ableton Live Lite.
- Open the Ableton Live Lite Preferences window. If you are using a Mac, go to Live > Preferences. If you are using a PC, go to Options > Preferences.
- Select the Link / MIDI tab on the left. Under the MIDI Ports section, adjust the settings as follows: Under Control Surfaces, for Input and Output select Oxygen Pro 61. Next to Input: Oxygen Pro 61, select On in the Track and Remote columns. Next to Output: Oxygen Pro 61, select On in the Track and Remote columns.
- Close the Preferences window.
- To add an instrument or plugin to trigger with Oxygen Pro 61, select Instruments or Plug-ins in the Categories column.
- In the Name column to the right of the Categories column, locate the Instrument or Plug-in of your choice. Click-and-drag the instrument to a MIDI track in Ableton Live Lite to load the instrument. The Instrument can now be triggered with Oxygen Pro 61.
Pro Tools | First M-Audio Edition Setup
- Connect Oxygen Pro 61 to your computer. Then launch Pro Tools | First M-Audio Edition.
- Open or Create a Project.
- Select the Setup pulldown menu and open MIDI Input Devices. Enable MIDI Input from the Oxygen Pro 61 by clicking the box next to Oxygen Pro 61.
- Create a new instrument track by selecting the Track pulldown menu and clicking New.
- In the New pulldown menu, select Stereo and then Instrument Track.
- In the newly created track, add an Insert to your track by clicking in your track’s Inserts A-E and selecting Multichannel Plugin > Instrument. Select the instrument you would like to use, such as Xpand!2 (Stereo). The plugin can now be triggered with Oxygen Pro 61.
Preset EditorTo download the included Preset Editor software, follow the instructions on the software download card in the box. This software can be used to create custom MIDI mappings for you to load onto Oxygen Pro 61. For more information on operating the keyboard with one of the custom presets selected, see the following section and Operation > Using Custom Mappings. The Preset Editor also comes with its own Editor User Guide.
Setting the Keyboard’s Operation Mode
Once you’ve set up Oxygen Pro 61 to work with your DAW, it’s time to set the keyboard’s operation Mode. By choosing the operation Mode, you can set the keyboard to automatically coordinate with your DAW’s features or set it to work as a personally customized controller. With these two Modes, Oxygen Pro 61 gives you the option to quickly switch between controlling a plugin to controlling your DAW with just the touch of a button.The two operation Modes determine the function of the MIDI keyboard’s editable controls:
- DAW: In DAW Mode, the keyboard’s controls will be automatically mapped to sliders, buttons, knobs, and pads in your DAW.
- Preset: In Preset Mode, the keyboard’s editable controls can be set to functions that you design yourself. A number of individual preset mappings can be created and then saved to the keyboard’s internal memory for you to load at a later time. To set the keyboard to operate in DAW Mode, press the DAW Button. The button will be lit to show that DAW Mode is selected.
To change which DAW your keyboard is set to control:
- Press and hold the DAW Button to open the DAW Select menu on the Display.
- Turn the Select/Scroll Encoder to cycle through the available DAWs on the Display. As you turn the encoder, the currently selected DAW will update on the Display. The User option enables you to map custom DAW controls to the keyboard, as described in Operation > Using Custom Mappings.
- When the DAW you want is shown on the Display, press the Select/Scroll Encoder to confirm your selection.Note: To exit out of DAW Mode without changing the currently selected DAW, press the Back Button. To set the keyboard to operate in Preset Mode, press the Preset Button. The button will be lit to show that Preset Mode is selected.
To change the currently selected preset:
- Press and hold the Preset Button to open the Preset Select menu on the Display.
- Turn the Select/Scroll Encoder to cycle through the available Presets on the Display. As you turn the encoder, the currently selected Preset will update on the Display.
- When the preset you want is shown on the Display, press the Select/Scroll Encoder to confirm your selection. See Operation > Using Custom Mappings for more information on mapping Presets.
Features
Top Panel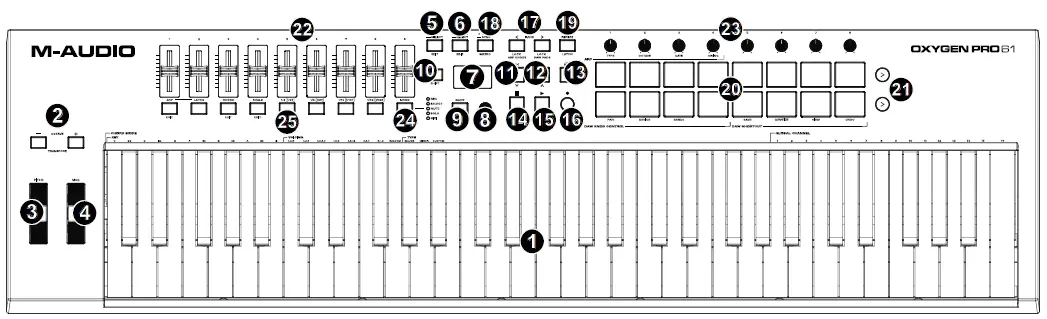
Note: Text accompanying keyboard controls indicates secondary functions that can be accessed by pressing Shift while using the control.
- Keybed: This velocity-sensitive keybed is the primary method of sending Note On/Off MIDI data. In addition to being velocity sensitive, the keybed also includes channel aftertouch, which means you can affect the sound a virtual instrument plugin makes by varying how much pressure you apply on the key after initially pressing the key. Hold Shift and press keys C2–Bb3 to edit Chord Mode settings. See Operation > Using the Keyboard’s Internal Functions to learn more about this feature.
- Octave Buttons: Press these buttons to adjust the pitch range of the keys up or down one octave. Hold Shift and press these buttons to adjust the pitch range of the keys up or down one semitone. The keyboard can be raised up to four octaves or lowered down to three octaves from its default octave range and a total of twelve semitones from its default transposition. To reset Oxygen Pro 61 to its default octave range and transposition (C2–C7 on the keybed), press the Octave – and Octave + Buttons simultaneously.
- Pitch Bend Wheel: Roll this wheel up and down from the center position to bend the pitch of the keyboard while playing. The default range of the pitch-bend will vary between software synths. The wheel is spring mounted and will return to the center position when released.
- Modulation Wheel: Move this wheel to send continuous controller data—MIDI CC #01 (modulation), by default.
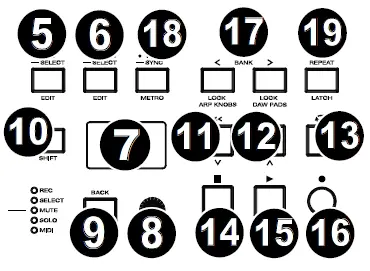
- DAW Button: Press this button to set Oxygen Pro 61 to operate in DAW Mode. Press and hold the button to open the DAW Select menu on the Display. Hold Shift and press this button to edit and create your own DAW preset. After editing the User DAW, press the button again to Save your changes to the User DAW. See Setup > Setting the Keyboard’s Operation Mode for more information on DAW Mode. See Operation > Using Custom Mappings for information on mapping the User preset.
- Preset Button: Press this button to set Oxygen Pro 61 to operate in Preset Mode. Press and hold the button to open the Preset Select menu on the Display. Hold Shift and press this button to edit a preset. After editing one of the presets, press the button again to save your changes to the current Preset. See Setup > Setting the Keyboard’s Operation Mode for more information on Preset Mode. See Operation > Using Custom Mappings for information on mapping a preset.
- Display: The main Display screen shows the status of the last used control. Use this screen to monitor parameter levels as you adjust controls on the keyboard. Also, use the Display along with the Select/Scroll Encoder to view and edit keyboard settings. See Operation > Display Overview for more information on the Display.
- Select/Scroll Encoder: If you are entered into one of the Display’s Edit menus, turn this encoder to change settings/parameters and press the encoder to confirm a selection. If you are not viewing any of the edit menus, turning the encoder and pressing the encoder will each function as separate MIDI controls. When operating with a DAW, the assigned controls will be predetermined. When operating with a preset or the User DAW selected, the controls can be edited.
- Back Button: If entered into one of the Display’s Edit menus, press this button to go back to the main Display screen. If you are not viewing one of the Edit menus, this button will be assigned to a control. When operating with a DAW, the assigned control will be predetermined. When operating with a preset or the User DAW selected, the control can be edited. When editing a Preset or DAW name press the Shift button and the Back button to delete a letter.
- Shift Button: Hold the Shift Button while moving or pressing controls or buttons on the keyboard to baccess their secondary functions.
- << Button: Depending on what screen is selected in your DAW, this button will either rewind the open song or move down in the active window.
- >> Button: Depending on what screen is selected in your DAW, this button will either fast forward the open song or move up in the active window.
- Loop Button: Press this button to activate/deactivate the loop function in your DAW.
- Stop Button: Press this button to stop the open song in your DAW. Double-press this button to stop the open song and return the playhead to the beginning of the song. Press Shift and this button to send a MIDI panic message to turn off all Note messages and return all controls to zero.
- Play Button: Press this button to play the song in your DAW.
- Record Button: Press this button to activate recording in your DAW.
- Bank Buttons: If operating in DAW Mode or one of the custom presets, use these buttons to switch the currently selected bank for the Sliders, Knobs, Pads, and Function Buttons. There are four banks for these controls, giving you the equivalent of 36 sliders, 32 knobs, and 64 pads. Press Shift and the Bank < button will lock the Shift modifier ARP knob controls. This is useful for changing ARP parameters during a live performance. Press Shift and the Bank > button will lock the Shift modifier Pad controls. This is useful for making edits while mixing a song. To return the knobs or pads to their normal mode, press the Shift button and the Bank < or Bank > button.
- Tempo Button: Tap this button to set Oxygen Pro 61’s tempo or press and hold it to pull up the Tempo Edit menu on the Display, where you can use the Select/Scroll Encoder to manually enter the tempo band choose to sync Oxygen Pro 61’s tempo with your DAW. The tempo setting affects the keyboard’s arpeggiator and note repeat functions. See Operation > Using the Keyboard’s Internal Functions for more details. Hold Shift and press this button to turn your DAW’s metronome on/off.
- Note Repeat Button: Press this button to activate the note repeat function for the Pads. To latch the note repeat function, hold Shift and then press this button. While Note Repeat is active the Select/Scroll Encoder can be used to change the current Time Division setting of the Arpeggiator and pad Note Repeat. See Operation > Using the Keyboard’s Internal Functions for more details on note repeat.
- Pads (1–16): Use these velocity-sensitive pads to send MIDI Note On/Off messages or perform other MIDI assignments (if using a preset or the User DAW). Hold Shift while pressing Pads 9–11 to reassign the function of the Knobs, and hold shift while pressing Pads 13–16 to use the DAW shortcuts (see Operation > Using Secondary Controls in DAW Mode to learn more).
- Pad Row Play: Press this button to play through the audio clips assigned to each pad in the corresponding row of pads. Depending on the DAW, these buttons will have different functions.
- Sliders (1–9): Push these sliders up/down to perform their assigned controls. When operating with a DAW, the assigned controls will be predetermined. When operating with a preset or the User DAW selected, the controls can be edited.
- Knobs (1–8): Turn these knobs left/right to perform their assigned controls. When operating with a DAW, the assigned controls will be predetermined. When operating with a preset or the User DAW selected, the controls can be edited. See Operation > Using Secondary Controls in DAW Mode to learn how to change the predetermined assignments of the Knobs when operating in DAW Mode with a DAW selected. Hold Shift while turning Knobs 1–4 to edit arpeggiator settings. See Using the Keyboard’s Internal Functions to learn more about the arpeggiator.Important: Both the Sliders and Knobs are enabled with “soft takeover.” This means that if you switch banks, a slider or knob will not work until it is positioned at the current value of the newly selected software control. For example, if you move Slider 1 in Bank 1 and then switch to Bank 2, physical Slider 1 will not affect software Slider 10 until the physical slider is positioned at the current value of software Slider 10. This feature allows you to make changes in one bank and then switch banks without making unwanted changes to the new bank’s controls. The Display will show a checkered value meter if a Slider or Knob needs to be moved before it can “take over” its assigned control (see Display Overview for an illustration).Important: In Avid Pro Tools, stereo tracks have two panning controls: left and right. Press the Shift button to switch the knobs between the left channel and right channel. If the pan controls aren’t moving on a mono track, press the Shift button to change pan knob back to controlling the pan control normally.
- Mode Button (with LEDs): Press the Mode Button to activate one of the secondary Modes for the Function Buttons. When the keyboard is set to operate in DAW Mode, the available secondary Modes for the Function Buttons are Rec, Select, Mute, and Solo; in these Modes, the buttons perform predetermined DAW channel Record Arm, Track Select, Mute, and Solo functions (see Operation > Using Secondary Controls in DAW Mode to learn more). When the keyboard is set to operate in Preset Mode, the available secondary Mode for the Function Buttons is MIDI, in which the buttons perform MIDI controls that are predetermined in one of the custom presets. The LEDs to the right of the Mode Button indicate which Mode the Function Buttons are in. Hold Shift and press the Mode Button to access the keyboard’s Global Settings menu.
- Function Buttons (1–8): When the Function Buttons are set to their primary Mode, they will control the keyboard’s internal functions, as described below:ARP Button: Press this button to activate the arpeggiator. Hold Shift and press this button to edit the arpeggiator’s settings.Latch Button: Press this button to toggle the arpeggiator between momentary and latch Mode.Chord Button: Press this button to activate Chord Mode. Hold Shift and press this button to edit the Chord Mode settings.Scale Button: Press this button to activate Scale Mode. Hold Shift and press this button to edit the Scale Mode settings. 1/4–1/32T(Time Division Buttons): Use these buttons to select the keyboard’s time division setting for the note repeat and arpeggiator functions. Each press of one of these buttons alternates between the standard timing listed above the button and the triplet timing listed beneath the button. A solid red LED shows that a standard timing is selected, while a flashing LED shows that a triplet timing is selected. See Operation > Using the Keyboard’s Internal Functions to learn more about the features mentioned above.
Rear Panel
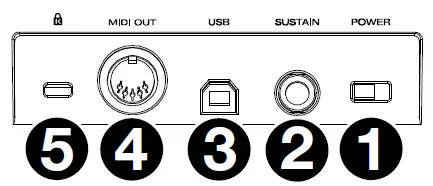
- Power Switch: Use this switch to power Oxygen Pro 61 on or off.
- Sustain Pedal Input: This input accepts a momentarycontact foot pedal (not included). When pressed, the pedal by default will sustain the sound you are playing without you having to keep your fingers pressed down on the keys. The sustain pedal input can be remapped to perform a custom MIDI assignment.Note: The polarity of the sustain pedal is determined by the keyboard upon startup. When an Oxygen Pro 61 keyboard is powering up, the sustain pedal is assumed to be in the “up” (Off) position. It is important that the sustain pedal is not in the down position before starting up the keyboard, as the pedal will then operate in reverse, and notes will sustain when the pedal is not pressed.
- USB Port: When connected to a computer, the USB port delivers power to the keyboard and transmits MIDI data.
- MIDI Out: Use a standard 5-pin MIDI cable to connect this port to a hardware synth or other MIDI device.Note: The MIDI output port can send MIDI from the Oxygen Pro 61, your connected computer, or both. Go into the Global Settings to set what is sent to the MIDI Out.
- Kensington® Lock Connector: This connector is compatible with standard laptop-style Kensington security cables for theft protection.
Operation
Display Overview
Main Display Screen
As you use the keyboard’s Sliders, Knobs, Pads, and Function Buttons while performing, the Display will update with the current bank for the last used control, the name/number of the control, the current level applied by the control (00–127, if applicable), and a graphical meter illustrating the level (if applicable). While performing, the Display screen will have a black background with white text.Note: The Display shows the number of the software control, which does not always match the number of the hardware control on your keyboard. For example, if the keyboard is set to Bank 3, and you turn Knob 1 on the keyboard, the Display will read Knob 20, since hardware Knob 1 controls software Knob 20 when the keyboard is set to Bank 3.
As described in Features > Top Panel, the Sliders and Knobs are enabled with soft takeover. If you switch banks and a Slider or Knob needs to be moved before it can take over its assigned control, the Display illustrates this by showing a checkered, gray meter underneath the control level. As pictured in the example to the right, the bank has just been switched to Bank 2, and Slider 1 needs to be pushed all the way up in order for it to begin controlling software Slider 10.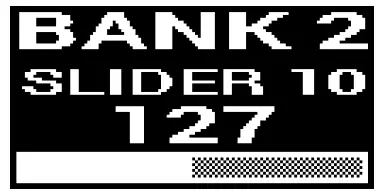
Edit Menus
In addition to showing last used controls while performing, the Display (along with the Select/Scroll Encoder) is your main tool for editing various keyboard settings, including the MIDI assignments for editable controls, the settings for the keyboard’s internal functions (such as the arpeggiator), as well as global hardware settings. When you enter into an Edit menu for any keyboard function, the Display will show the name of the Edit menu, a setting field highlighted for editing, a parameter field showing the setting’s current status, and graphical blocks at the bottom of the screen to indicate how many other settings are available in the Edit menu. While entered into an Edit menu, the Display will have a white background with black text.
To scroll through settings in an Edit menu, turn the Select/Scroll Encoder while the setting field is highlighted. To select a setting to edit, press the Select/Scroll Encoder while the setting field is highlighted. The parameter field will then be highlighted. To edit the setting parameter, select the setting to edit as described above. Then turn the Select/Scroll Encoder while the parameter field is highlighted. Once the desired parameter is highlighted, press the Select/Scroll Encoder to confirm the edit. The Display will then go back to highlighting the setting field. To exit the Edit menu without saving changes, press the Back Button. To exit the Edit menu and save changes, press the DAW Button (if editing the User DAW), or the Preset Button (if editing a Preset).Note: The settings that are available in the Edit menu may change depending on what parameters you select. For example, the Arpeggiator Edit menu varies depending on the selected parameter for the Arpeggiator Type setting.
Using Secondary Controls in DAW Mode
While DAW Mode is designed so that complex mapping is not necessary to use Oxygen Pro 61 with your DAW, some of the keyboard’s controls still have multiple features that you can switch between in DAW Mode.
Modes for the Function Buttons
When the keyboard is set to operate in DAW Mode and a DAW is selected, the Function Buttons can be toggled between five different Modes. To toggle the Mode for the Function Buttons, press the Mode Button to the right of the Function Buttons. With each press, the Mode Button LED will change to indicate which Mode is currently selected. The following Modes are available:Primary (No LED): When no LED is lit, the Function Buttons are set to their primary assignments (printed above/below each button). These assignments relate to the keyboard’s internal functions: the arpeggiator, note repeat, Chord Mode, and Scale Mode. For more information on using the Function Buttons with these features, see Using the Keyboard’s Internal Functions.Rec (Red LED): When set to Record Mode, each button will activate/deactivate recording for the corresponding track in your DAW (track 1–32, depending on which button is pressed and which bank is selected).Select (Green LED): In this Mode, each button will bring into focus the corresponding software track (track 1–32, depending on which button is pressed and which bank is selected).Mute (Blue): In this Mode, each button will mute/unmute the corresponding software track (track 1–32, depending on which button is pressed and which bank is selected).Solo (Yellow LED): In this Mode, each button will solo or unsolo the corresponding software track (track 1–32, depending on which button is pressed and which bank is selected).Note: MIDI Mode is intended either for custom MIDI mapping. This Mode is only available when the keyboard is set to operate in Preset Mode.
Changing the Function of the Knobs in DAW Mode
Note: Not all parameters are available in every DAW.When operating in DAW Mode, the knobs can perform one of three functions. To change how the knobs work, hold the Shift Button and press Pad 9, 10, or 11. The following functions are available:Pan (Pad 9): Each knob will pan the corresponding software track (track 1–32, depending on which knob is turned and which bank is selected).Device (Pad 10): Each knob will control device controls of the corresponding software track (track 1–32, depending on which knob is turned and which bank is selected).Sends (Pad 11): Each knob will control the level of the aux sends for the corresponding software track (track 1–32, depending on which knob is turned and which bank is selected). Accessing DAW Shortcuts with the PadsNote: Not all parameters are available in every DAW. In DAW Mode, pressing a pad will send a Note On message so that you can trigger a synth or sample in your software. However, you can hold Shift and press Pads 13, 14, 15, or 16 to perform the following commands:Save (Pad 13): Save changes to the currently open file in your DAW.Quantize (Pad 14): Quantize the currently selected audio region in your DAW.Undo (Pad 15): Undo the last change made to the file in your DAW.View (Pad 16): Toggle between different windows (e.g. Mix, or Edit) for your DAW.Important: In order for these shortcuts to work with your DAW, PC needs to be set to Win (Windows) or Mac in Oxygen Pro 61’s Global Settings menu. To access the Global Settings menu on the Display, hold Shift and press the Mode Button. Use the Select/Scroll Encoder to adjust the setting according to your PC type, and then press the Back Button to exit the menu.
Using Custom Mappings
Oxygen Pro 61 has many fully customizable controls, and with the ability to create and save keyboard mappings, you can store different mappings for different DAWs, plugins, or performance scenarios that can be changed on the fly.
When operating in Preset Mode, there are 16 presets available on the keyboard (1–16). A preset is a group of MIDI assignments for Oxygen Pro 61’s controls that can be saved to the keyboard’s internal memory and loaded at a later time. Presets can be edited when the keyboard is in Preset Edit Mode. In addition to having these 16 presets on the keyboard, you can use the included Editor software to store an unlimited number of presets on your computer and modify which 16 are currently saved to the keyboard’s internal memory. When operating in DAW Mode, the User setting allows you create a custom mapping for the keyboard that includes not only MIDI messages but also Mackie or Mackie/HUI messages. This allows you to map keyboard controls with commands for the DAW itself (such as “Save” or “Mute”) in addition to mapping keyboard controls with MIDI assignments for instrument/plug-in parameters within the DAW. The User DAW setting can be edited when the keyboard is in DAW Edit Mode. In addition to having the User DAW on the keyboard, you can use the included Editor software to store an unlimited number of User DAWs on your computer and modify which one is currently saved to the keyboard’s internal memory.
To enter Preset Edit Mode, first select the preset you want to edit (as described in Setup > Setting the Keyboard’s Operation Mode). Then press and hold Shift and press the Preset Button. To enter DAW Edit Mode, press and hold Shift and press the DAW Button. To exit Edit Mode and save your changes, press the Preset Button (if you were editing presets) or the DAW Button (if you were editing the User DAW setting). If you made changes, the Display screen will ask if you would like to save them. Use the Select/Scroll Encoder to choose between Cancel, Replace, and Save As. Selecting Cancel will take you back to Edit Mode, while selecting Replace will save the preset without changing its name. Select Save As to save and be able to rename and change the preset location number of the preset using the Select/Scroll Encoder. If you need to delete a character while editing the name, press and hold the Shift Button and the Back Button. For help using the Preset Editor, see the Editor User Guide that comes with the software.
Using the Keyboard’s Internal Functions
The following keyboard functions can be used when the keyboard is set to operate in either DAW or Preset Mode.
Note: In order to control the arpeggiator, Chord Mode, or Scale Mode functions described in the following sections, the Function Buttons underneath the Sliders have to be set to their primary Mode. The Function Buttons are set to their primary Mode when no LED to the right of the Mode Button is lit. If the Function Buttons are not set to their primary Mode, press the Mode Button as many times as necessary until no LED to the right of the Mode Button is lit. In the following sections, the described LED operation for the Function Buttons assumes that they are set to their primary Mode.
Note Repeat
When this feature is activated, any pressed Performance Pad will repeat its Note On message in rhythm with the keyboard’s current tempo and time division settings. Each repeated note will be the length selected for the time division setting. For more help changing the tempo and time division settings, see Keyboard Tempo and Time Division.
The note repeat feature can be activated momentarily or it can be latched.To use note repeat momentarily, press and hold the Note Repeat Button and then press a pad. As long as you are holding the Note Repeat Button, the note played by the pad will repeat.To latch the note repeat feature, hold Shift and press the Note Repeat Button. Pressing any pad will cause its assigned note to repeat without you having to hold down the Note Repeat Button.To turn off the Toggle/Latch feature, press the Note Repeat Button again.Note: While Note Repeat is active, the Select/Scroll Encoder can be used to change the current Time Division setting of the Arpeggiator and pad Note Repeat.
Arpeggiator
When the arpeggiator is activated, the keyboard will repeatedly play pressed keys in sequence. The arpeggiator’s timing and rhythm is based on the keyboard’s time division setting and either the keyboard’s or your DAW’s tempo setting. Each note in the arpeggio will be the length you’ve selected for the time division setting; for example, if you select 1/4, each note in the arpeggio will be a quarter note. See Keyboard Tempo and Time Division for help editing these settings.
The arpeggiator can be operated in one of two Modes:
- Momentary: the arpeggiator will play notes only as long as the keys are pressed down; when you release the keys, the arpeggiator will stop.
- Latch: the arpeggiator will play notes when you press down the keys, and it will continue to play even after you release your fingers from the keys.To activate or deactivate the arpeggiator, press the Arp Button. When the arpeggiator is activated, the button LED will be lit.To toggle between momentary and latch Mode, press the Latch Button. When latch is activated, the button LED will be lit.To start an arpeggio, press any keys while the arpeggiator is activated.To start a new latched arpeggio while a previously latched arpeggio is still playing, press a new combination of keys.To add notes to a latched arpeggio while it is still playing, hold down the same keys you previously pressed for the arpeggio while pressing the keys for the new notes you want to add.To edit the arpeggiator’s settings, hold Shift and press the Arp Button. The Display will then enter the menu for editing the Arpeggiator. Use the Select/Scroll Encoder to adjust settings (as described in Display Overview). When you’re done editing settings, press the Back Button to exit the Arpeggiator Edit menu. Alternatively, you can hold Shift or press Shift and Bank < to lock the Shift modifier ARP knob controls while turning Knobs 1–4 to edit some but not all of the settings. The Display will show the new settings as you change bthem.Note: While Note Repeat is active, the Select/Scroll Encoder can be used to change the current Time Division setting of the Arpeggiator and pad Note Repeat.
Keyboard Tempo and Time Division
Oxygen Pro 61’s tempo and time division settings determine the timing and rhythm for the note repeat and arpeggiator features. When Clock is set to Internal in the Tempo Edit screen on the Display, the keyboard’s tempo can be tapped in or it can be entered exactly from within the Tempo Edit screen. When Clock is set to External, the keyboard’s tempo will automatically sync with your DAW’s tempo.To tap in the keyboard’s tempo, tap the Tempo Button two or more times at the desired BPM. The Display will update with the new tempo as you tap the button.Note: In order to tap in the keyboard’s menu, the keyboard’s Clock setting in the Tempo Edit menu must be on Internal. If set to External, the keyboard’s tempo will sync with your DAW.To enter the Tempo Edit menu on the Display, press and hold the Tempo Button. Use the Select/Scroll Encoder to change the Clock setting or enter in an internal keyboard tempo (20.0–240.0). When you’re done editing settings, press the Back Button to exit the Tempo Edit menu. See Display Overview for more help on using the Select/Scroll Encoder with the Display’s Edit menus.To set the keyboard’s time division, press the Time Division Button for the desired setting (as printed above/below the button). Double-press the button if you want to use a triplet setting. When a standard time division is selected, the corresponding button will be lit. When a triplet time division is selected, the corresponding button will flash.Note: While Note Repeat is active the Select/Scroll Encoder can be used to change the current Time Division setting of the Arpeggiator and pad Note Repeat.
Chord Mode
When you activate Chord Mode, pressing a single key or pad will play a full chord rather than only one note. The key or pad you press will determine the root note in the chord, and the type of chord selected will depend on the current settings.
The chord feature can be operated by turning the Select/Scroll Encoder to one of two Modes that will determine the exact chord assigned to each key:
- Smart Mode: In this Mode, you will first assign the keyboard to a musical key (e.g. D minor). Then you will assign the desired voicing for the chords (what intervals will be included in the chord, e.g. 1-3-5). Each key’s chord voicing will then be automatically enharmonic to the selected key.
- Custom: In this Mode, you can determine the chord structure that will be assigned to each key by manually playing it. For example, if you select this Mode, and play a 1-b3-5-b7 chord, every key will then be assigned to play this chord structure. The note of the key you press will serve as the root of the chord. To activate or deactivate Chord Mode, press the Chord Button. While Chord Mode is activated, the Chord Button will be lit.To edit the Chord Mode settings, first hold Shift while pressing the Chord Button to enter the Chord Edit menu on the Display. Then use the Select/Scroll Encoder to adjust settings (as described in Display Overview). When you’re done editing settings, press the Back Button to exit the Chord Edit menu. Alternatively, you can hold Shift while pressing keys C2–Bb3 if you are using the Smart chord Mode.Note: By default, the keys are setup to play chords when Chord Mode is activated. However, in the Global Settings menu this can be changed so that when Chord Mode is active, chords will play on the keys or pads or both.
Scale Mode
With Scale Mode, you can set the keybed so that keys outside the notes of a selected musical scale are disabled. This allows you to play within a chosen scale without the risk of playing any “wrong” notes. You can choose from 16 different options when assigning a scale to the keyboard. To activate or deactivate Scale Mode, press the Scale Button. While Scale Mode is activated, the Scale Button will be lit.
To determine what musical scale the keybed is set to, enter the Scale Edit menu on the Display by holding Shift and pressing the Scale Button. Then use the Select/Scroll Encoder to adjust settings (as described in Display Overview). When you’re done editing settings, press the Back Button to exit the Scale Edit menu.
Global Settings Menu
 report this ad
Use the Global Settings Menu on the Display to customize some of the keyboard’s default controls. These settings apply to the keyboard in both DAW and Preset Mode, and any changes made from the Global Settings Menu will be saved after the keyboard is turned off.To enter the Global Settings Menu, hold Shift and press the Mode Button. Use the Select/Scroll Encoder to adjust settings (as described in Display Overview).To exit the Global Settings Menu, press the Back Button.![]()
References
[xyz-ips snippet=”download-snippet”]