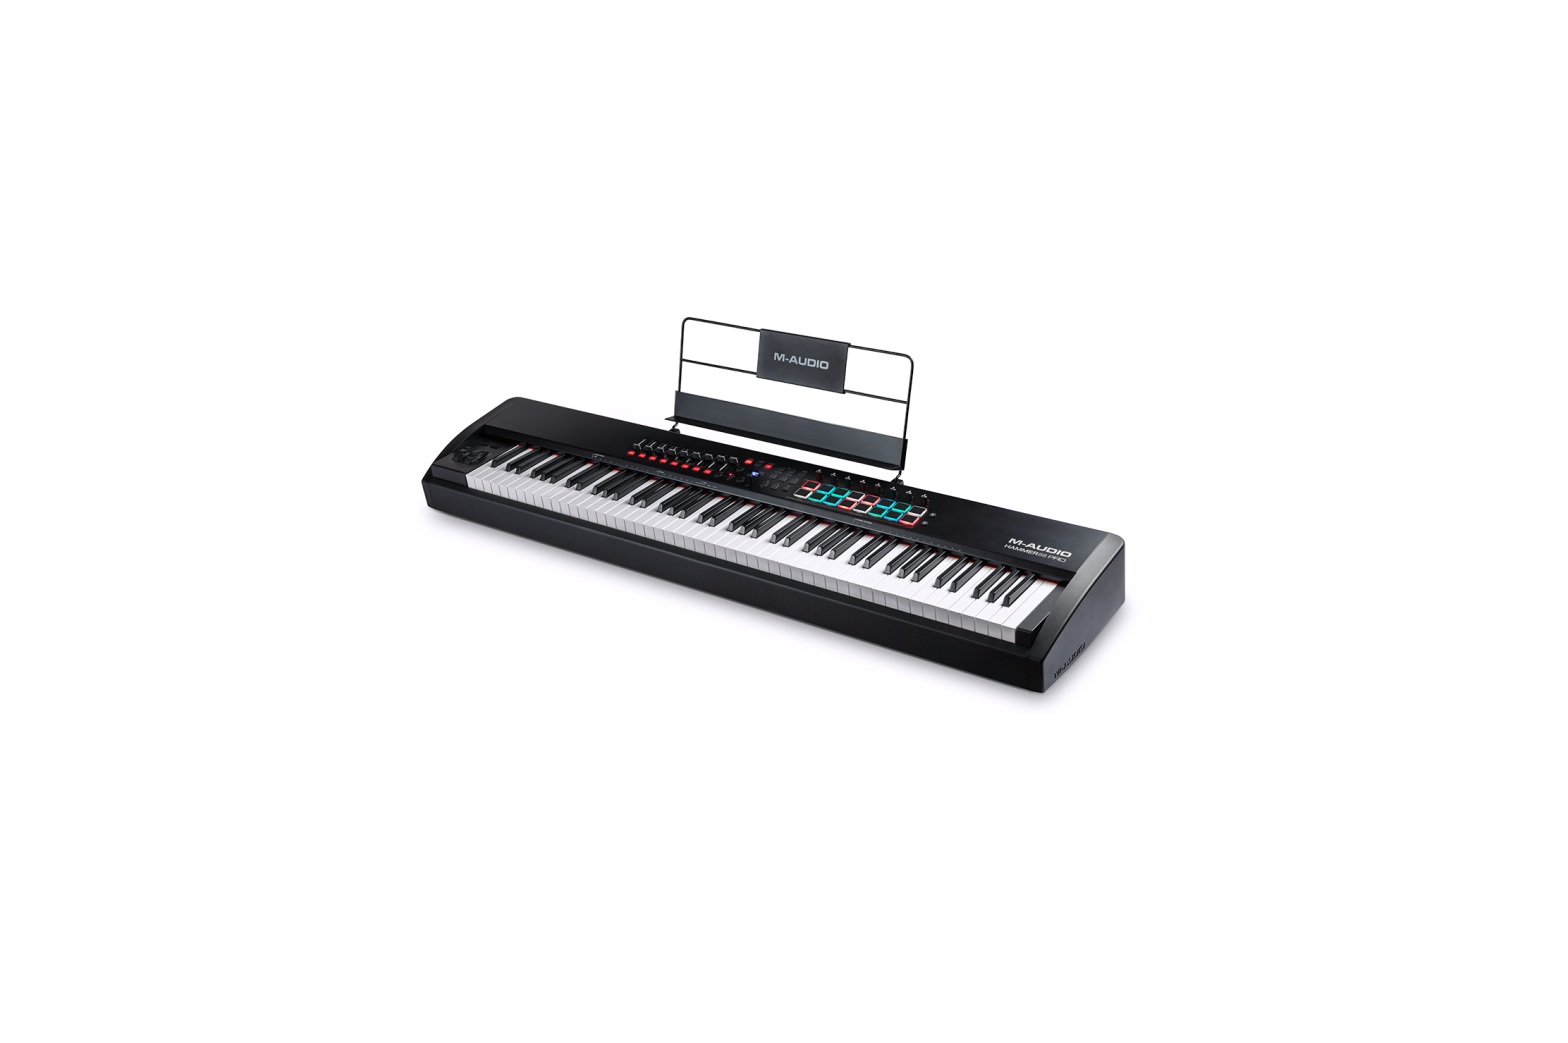
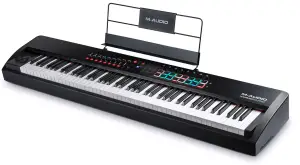
M-AUDIO Hammer 88 Pro Keyboard Controller
Introduction
Box Contents
- Hammer 88 Pro
- USB Cable
- Music Rest
- Software Download Card
- Quickstart Guide
- Safety & Warranty Manual
Support
For the latest information about this product (system requirements, compatibility information, etc.) and product registration, visit m-audio.com.
For the full User Guide, visit m-audio.com.
For additional product support, visit m-audio.com/support.
Setup
To connect Hammer 88 Pro to your computer, use the included USB cable. Plug the USB-B end of the cable into the keyboard and the USB-A end of the cable into your computer (or into a USB hub connected to your computer). Note: In addition to sending data, the USB cable powers the keyboard. If you will be connecting Hammer 88 Pro to a USB hub that has other devices connected to it, then we recommend using a powered USB hub.To configure your DAW to work with Hammer 88 Pro, enable Hammer 88 Pro as a MIDI control surface in the appropriate settings menu within the DAW (Preferences, Options, Device Setup, etc.).If you will be using Hammer 88 Pro with the included MPC Beats, Pro Tools | First M-Audio Edition, or Ableton Live Lite software, see Installing Your Included Software for more specific instructions on configuring your DAW with Hammer 88 Pro. If you will be using a different DAW, consult the user manual provided with the DAW for additional help with this step.If you will be using Hammer 88 Pro with a hardware synth rather than your computer, connect Hammer 88 Pro’s MIDI Out port to a synth with a standard 5-pin MIDI cable. Then make sure that Hammer 88 Pro is set to operate with one of its custom presets selected (as instructed in Setting the Keyboard’s Operation Function) and that the Hammer 88 Pro is set to send MIDI data from the 5-pin MIDI out port in the Global Settings. In order to use an external hardware synth, you will need to connect Hammer 88 Pro to a computer, laptop, or to a powered USB hub.
Installing Your Included Software
We’ve included MPC Beats, Pro Tools | First M-Audio Edition, and Ableton Live Lite with Hammer 88 Pro so you can get started making music with professional software right out of the box. Additionally, we’ve included a set of Expansion Packs and AIR virtual instrument plugins for you to use with your DAW.
To download the included MPC Beats, Pro Tools | First M-Audio Edition, or Ableton Live Lite software, register your Hammer 88 Pro on m-audio.com and follow the installation instructions in your User Account. If you will be using Ableton Live Lite, we recommend visiting ableton.com to check for any available software updates. For help configuring either DAW with Hammer 88 Pro, see Pro Tools | First M-Audio Edition Setup or Ableton Live Lite Setup below.
To download the included AIR virtual instrument plugins, follow the instructions on the software download card in the box. After installation, most DAWs will not load virtual instrument plugins automatically; you may need to manually choose a plug-in folder for your software to scan. The plugin folders for Pro Tools | First M-Audio Edition and Ableton Live Lite depend on your operating system, as indicated below.
Pro Tools | First M-Audio Edition/AAX plugin folders:
- Windows (32-bit): C:Program Files (x86)Common FilesAvidAudioPlug-Ins
- Windows (64-bit): C:Program FilesCommon FilesAvidAudioPlug-Ins
- MacOS: Macintosh HD/Library/Application Support/Avid/Audio/Plug-Ins
Ableton/VST Plugins:
- Windows (32-bit): C:Program Files (x86)VSTplugins
- Windows (64-bit): C:Program FilesVSTplugins
- MacOS: Macintosh HD/Library/Audio/Plugins/VST
To set your plugin folder in Ableton Live Lite:
- Go to the Preferences menu.
- Select the File Folder tab. Under Plug-In Sources, click Browse and select the appropriate plugin folder (as indicated above).
- After making your selection, the Use VST Custom Plug-In Folder button should be ON. If it is not, click the button to turn it on. You can then exit the Preferences menu.
Ableton Live Lite Setup
- First, connect Hammer 88 Pro to your computer. Then launch Ableton Live Lite.
- Open the Ableton Live Lite Preferences window. If you are using a Mac, go to Live > Preferences. If you are using a PC, go to Options > Preferences.
- Select the Link / MIDI tab on the left. Under the MIDI Ports section, adjust the settings as follows:Under Control Surfaces, for Input and Output select Hammer 88 Pro (Port 3).Next to Input: Hammer 88 Pro (Port 1), select On in the Track and Sync columns.Next to Output: Hammer 88 Pro (Port 1), select On in the Track column.Next to Input: Hammer 88 Pro (Port 3), select On in the Track and Remote columns.Next to Output: Hammer 88 Pro (Port 3), select On in the Track and Remote columns.
- Close the Preferences window.
- To add an instrument or plugin to trigger with Hammer 88 Pro, select Instruments or Plug-ins in the Categories column.
- In the Name column to the right of the Categories column, locate the Instrument or Plug-in of your choice. Click-and-drag the instrument to a MIDI track in Ableton Live Lite to load the instrument.The Instrument can now be triggered with Hammer 88 Pro.
Pro Tools | First M-Audio Edition Setup
- Connect Hammer 88 Pro to your computer. Then launch Pro Tools | First M-Audio Edition.
- Open or Create a Project.
- Select the Setup pulldown menu and open MIDI Input Devices. Enable MIDI Input from the Hammer 88 Pro by clicking the box next to Hammer 88 Pro.
- Create a new instrument track by selecting the Track pulldown menu and clicking New.
- In the New pulldown menu, select Stereo and then Instrument Track.
- In the newly created track, add an Insert to your track by clicking in your track’s Inserts A-E and selecting Multichannel Plugin > Instrument. Select the instrument you would like to use, such as Xpand!2 (Stereo).
The plugin can now be triggered with Hammer 88 Pro.
Preset Editor
To download the included Preset Editor software, follow the instructions on the software download card in the box. This software can be used to create custom MIDI mappings for you to load onto Hammer 88 Pro. For more information on operating the keyboard with one of the custom presets selected, see the following section. The Preset Editor also comes with its own Editor User Guide.
Setting the Keyboard’s Operation Function
Once you’ve set up Hammer 88 Pro to work with your DAW, it’s time to set the keyboard’s operation function. You can set the keyboard to automatically coordinate with your DAW’s features or set it to work as a personally customized controller. Hammer 88 Pro gives you the option to quickly switch between controlling a plugin to controlling your DAW with just the touch of a button.
The two operation functions determine the keyboard’s editable controls:
- DAW: The keyboard’s controls will be automatically mapped to Faders, buttons, knobs, and pads in your DAW.
- Preset: The keyboard’s editable controls can be set to functions that you design yourself. A number of individual preset mappings can be created and then saved to the keyboard’s internal memory for you to load at a later time.
To set the keyboard to operate with a DAW, press the DAW Button. The button will be lit to show that DAW is selected.
To change which DAW your keyboard is set to control:
- Press and hold the DAW Button to open the DAW Select menu on the Display.
- Turn the Select/Scroll Encoder to cycle through the available DAWs on the Display. As you turn the encoder, the currently selected DAW will update on the Display. The User option enables you to map custom DAW controls to the keyboard.
- When the DAW you want is shown on the Display, press the Select/Scroll Encoder to confirm your selection.Note: To exit without changing the currently selected DAW, press the Back Button.
To set the keyboard to operate with a Preset, press the Preset Button. The button will be lit to show that Preset is selected.
To change the currently selected preset:
- Press and hold the Preset Button to open the Preset Select menu on the Display.
- Turn the Select/Scroll Encoder to cycle through the available Presets on the Display. As you turn the encoder, the currently selected Preset will update on the Display.
- When the preset you want is shown on the Display, press the Select/Scroll Encoder to confirm your selection.
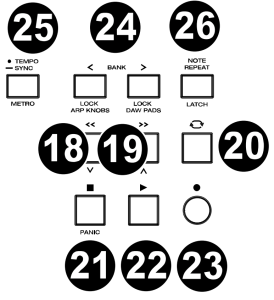
Features
Top Panel
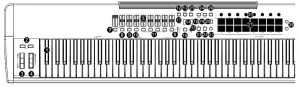
Keybed/Octave/Wheels
Note: Text accompanying keyboard controls indicates secondary functions that can be accessed by pressing SHIFT while using the control.
- Keybed: This velocity-sensitive keybed is the primary method of sending Note On/Off MIDI data.Chord Mode: Hold SHIFT and press keys C2Bb3 to edit Chord Mode settings.
- OCTAVE +/-: Press these buttons to adjust the pitch range of the keys up or down one octave.TRANSPOSE: Hold SHIFT and press these buttons to adjust the pitch range of the keys up or down one semitone.The keyboard can be raised up to four octaves or lowered down to three octaves from its default octave range and a total of twelve semitones from its default transposition.To reset Hammer 88 Pro to its default octave range and transposition (C2C7 on the keybed), press the Octave – and Octave + Buttons simultaneously.
- PITCH: Roll this wheel up and down from the center position to bend the pitch of the keyboard while playing.The default range of the pitch-bend will vary between software synths.The wheel is spring mounted and will return to the center position when released.
- MOD (Modulation): Move this wheel to send continuous controller data–MIDI CC #01 (modulation), by default.Faders/Buttons

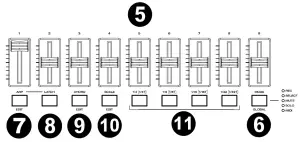
- Faders (19): Push these Faders up/down to perform their assigned controls.
- MODE: Press the Mode Button to activate one of the secondary Modes for the Fader Buttons.GLOBAL: Hold SHIFT and press the Mode Button to access the keyboard’s Global Settings menu.
- ARP: Press this button to activate the arpeggiator.EDIT: Hold SHIFT and press this button to edit the arpeggiator’s settings.
- LATCH: Press this button to toggle the arpeggiator between momentary and latch Mode.
- CHORD: Press this button to activate Chord Mode.EDIT: Hold SHIFT and press this button to edit the Chord Mode settings.
- SCALE: Press this button to activate Scale Mode.EDIT: Hold SHIFT and press this button to edit the Scale Mode settings.
- 1/4 [1/4T], 1/8 [1/8T], 1/16 [1/16T], 1/32 [1/32T] (Time Division Buttons): Use these buttons to select the keyboard’s time division setting for the note repeat and arpeggiator functions.Central Buttons
- • DAW: Press this button to set Hammer 88 Pro to operate in DAW Mode.– SELECT: Press and hold the button to open the DAW Select menu on the Display.EDIT: Hold SHIFT and press this button to edit and create your own DAW preset. After editing the User DAW, press the but ton again to Save your changes to the User DAW.
- • PRESET: Press this button to set Hammer 88 Pro to operate in Preset Mode.– SELECT: Press and hold the button to open the Preset Select menu on the Display. EDIT: Hold SHIFT and press this button to edit a preset. After editing one of the presets, press the button again to save your changes to the current Preset.
- Display: The main Display screen shows the status of the last used control.
- Select/Scroll Encoder: If you are entered into one of the Display’s Edit menus, turn this encoder to change settings/parameters and press the encoder to confirm a selection.
- BACK: If entered into one of the Display’s Edit menus, press this button to go back to the main Display screen. DELETE: Hold the SHIFT button and press the Back button to delete a letter.
- SHIFT: Hold the SHIFT Button while moving or pressing controls or buttons on the keyboard to access their secondary functions.
- << | v: Depending on what screen is selected in your DAW, this button will either rewind the open song or move down in the active window.
- >> | v: Depending on what screen is selected in your DAW, this button will either fast forward the open song or move up in the active window.
- Loop: Press this button to activate/deactivate the loop function in your DAW.
- Stop: Press this button to stop the open song in your DAW.Double-press this button to stop the open song and return the playhead to the beginning of the song.PANIC: Hold SHIFT and this button to send a MIDI panic message to turn off all Note messages and return all controls to zero.
- Play: Press this button to play the song in your DAW.
- Record: Press this button to activate recording in your DAW.
- < BANK >: If operating in DAW Mode or one of the custom presets, use these buttons to switch the currently selected BANK for the Faders, Knobs, Pads, and Fader Buttons. There are four BANKs for these controls, giving you the equivalent of 36 Faders, 32 knobs, and 64 pads.LOCK ARP KNOBS: Pressing SHIFT and the BANK < button will lock the SHIFT modifier LOCK ARP KNOBS controls. This is useful for changing ARP parameters during a live performance.LOCK DAW PADS: Pressing SHIFT and the BANK > button will lock the SHIFT modifier LOCK DAW PADS controls. This is useful for making edits while mixing a song.To return the knobs or pads to their normal mode, press the SHIFT button and the BANK < or BANK > button.
- • TEMPO: Tap this button to set Hammer 88 Pro’s tempo.– SYNC: Press and hold to pull up the Tempo Edit menu on the Display, where you can use the Select/Scroll Encoder to manually enter the tempo and choose to sync Hammer 88 Pro’s tempo with your DAW.
- NOTE REPEAT: Press this button to activate the note repeat function for the Pads.LATCH: To latch the note repeat function, hold SHIFT and then press this button.While Note Repeat is active the Select/Scroll Encoder can be used to change the current Time Division setting of the Arpeggiator and pad Note Repeat.Pads/Knobs
- Pads (1-16): Use these velocity-sensitive pads to send MIDI Note On/Off messages or perform other MIDI assignments (if using a preset or the User DAW).Pads 9-11: Hold SHIFT while pressing Pads 91-1 to reassign the function of the Knobs.Pads 13-16: Hold SHIFT while pressing Pads 13-16 to use the DAW shortcuts
- Pad Row Play: Press these buttons to play through the audio clips assigned to each pad in the corresponding row of pads. Depending on the DAW, these buttons will have different functions.
- Knobs (1-8): Turn these knobs left/right to perform their assigned controls. When operating with a DAW, the assigned controls will be predetermined. When operating with a preset or the User DAW selected, the controls can be edited. Knobs 1-4: Hold SHIFT while turning Knobs 1-4 to edit arpeggiator settings.


Rear Panel

- Kensington® Lock Connector: This connector is compatible with standard laptop-style Kensington security cables for theft protection.
- SUSTAIN: This input accepts a momentary-contact foot pedal (not included). When pressed, the pedal by default will sustain the sound you are playing without you having to keep your fingers pressed down on the keys. The sustain pedal input can be remapped to perform a custom MIDI assignment.Note: The polarity of the sustain pedal is determined by the keyboard upon startup. When a Hammer 88 Pro keyboard is powering up, the sustain pedal is assumed to be in the “up” (Off) position. It is important that the sustain pedal is not in the down position before starting up the keyboard, as the pedal will then operate in reverse, and notes will sustain when the pedal is not pressed.
- FS 2 / FS 3: These 1/4″ TS inputs accept a soft pedal, such as the M-Audio SP-2 pedal, to soften the notes and modify the tonal quality. The footswitch inputs are fully assignable to CC messages.
- MIDI IN: Use a standard 5-pin MIDI cable (sold separately) to connect this port to a hardware synth or other MIDI device.
- MIDI OUT: Use a standard 5-pin MIDI cable (sold separately) to connect this port to a sound module, hardware sequencer, or other MIDI device.
- EXPRESSION: This 1/4″ TRS input is to be used with an expression pedal (such as the M-Audio EX-P) for adding expressive changes during performances. The M-Audio EX-P Expression Pedal is set to normally open (pedal up). The expression pedal input is fully assignable to CC messages.
- USB: When connected to a computer, the USB port delivers power to the keyboard and transmits MIDI data.
- POWER Switch: Use this switch to power Hammer 88 Pro on or off.
- POWER INPUT: This input accepts an optional 9V DC, 800 mA power supply (sold separately). A power supply must be connected when using Hammer 88 Pro in stand-alone mode (when triggering external hardware synths). Use a USB cable to power Hammer 88 Pro when connecting to a computer to trigger software synths.
Operation
Display Overview
Main Display Screen
As you use the keyboard’s Faders, Knobs, Pads, and Fader Buttons while performing, the Display will update with the current BANK for the last used control, the name/number of the control, the current level applied by the control (00-127, if applicable), and a graphical meter illustrating the level (if applicable). While performing, the Display screen will have a black background with white text. Note: The Display shows the number of the software control, which does not always match the number of the hardware control on your keyboard. For example, if the keyboard is set to BANK 3, and you turn Knob 1 on the keyboard, the Display will read Knob 20, since hardware Knob 1 controls software Knob 20 when the keyboard is set to BANK 3.The Faders and Knobs are enabled with soft takeover. If you switch BANKs and a Fader or Knob needs to be moved before it can take over its assigned control, the Display illustrates this by showing a checkered, gray meter underneath the control level. As pictured in the example to the right, the BANK has just been switched to BANK 2, and Fader 1 needs to be pushed all the way up in order for it to begin controlling software Fader 10.
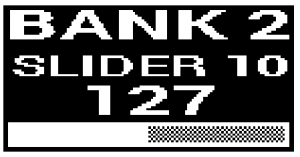 Edit MenusIn addition to showing last used controls while performing, the Display (along with the Select/Scroll Encoder) is your main tool for editing various keyboard settings, including the MIDI assignments for editable controls, the settings for the keyboard’s internal functions (such as the arpeggiator), as well as global hardware settings.When you enter into an Edit menu for any keyboard function, the Display will show the name of the Edit menu, a setting field highlighted for editing, a parameter field showing the setting’s current status, and graphical blocks at the bottom of the screen to indicate how many other settings are available in the Edit menu. While entered into an Edit menu, the Display will have a white background with black text.
 To scroll through settings in an Edit menu, turn the Select/Scroll Encoder while the setting field is highlighted.To select a setting to edit, press the Select/Scroll Encoder while the setting field is highlighted. The parameter field will then be highlighted.To edit the setting parameter, select the setting to edit as described above. Then turn the Select/Scroll Encoder while the parameter field is highlighted. Once the desired parameter is highlighted, press the Select/Scroll Encoder to confirm the edit. The Display will then go back to highlighting the setting field. To exit the Edit menu without saving changes, press the Back Button.To exit the Edit menu and save changes, press the DAW Button (if editing the User DAW), or the Preset Button (if editing a Preset).Note: The settings that are available in the Edit menu may change depending on what parameters you select. For example, the Arpeggiator Edit menu varies depending on the selected parameter for the Arpeggiator Type setting.
Appendix
Preset List
| 1. MPC Pl (MPC Plugin) | 9. Preset |
| 2. Hybrid (Hybrid 3) | 10. Preset |
| 3. MiniGrd (MiniGrand) | 11. Preset |
| 4. Velvet | 12. Preset |
| 5. Xpand (Xpand!2) | 13. Preset |
| 6. Vacuum | 14. Preset |
| 7. Boom | 15. Preset |
| 8. DB33 | 16. Preset |
DAW List
| 1. Pro Tools | 7. Logic |
| 2. MPC (MPC Beats) | 8. Bitwig |
| 3. Ableton (Ableton Live) | 9. Garage (Garage Band) |
| 4. Studio One | 10. Reaper |
| 5. Reason | 11. FL St. (FL Studio) |
| 6. Cubase | 12. User DAW |
Technical Specifications
| Power | 9V DC, 800 mA |
| Dimensions (Width x Depth x Height) | 56.0” x 11.1” x 5.0”142.2 x 28.2 x 12.7 cm |
| Weight | 40.8 lbs. / 18.5 kg |
Specifications are subject to change without notice.
Trademarks and Licenses
M-Audio is a trademark of inMusic Brands, Inc., registered in the U.S. and other countries.
AAX, Avid, and Pro Tools are registered trademarks of Avid Technology, Inc. in the U.S. and other countries.
Ableton is a trademark of Ableton AG.
Apple Store, macOS, Macintosh, and iPad are trademarks of Apple Inc., registered in the U.S. and other countries.
Windows is a registered trademark of Microsoft Corporation in the United States and other countries.
Kensington is a registered trademark of ACCO Brands.
 report this ad
All other product or company names are trademarks or registered trademarks of their respective owners.
References
[xyz-ips snippet=”download-snippet”]