
M-AUDIO M Track Duo User Guide

Introduction
Box Contents
- M-Track Duo
- USB-BtoUSB-A Cable
- Software Download Cards
- User Guide
- Safety & Warranty Manual
Support
For the latest information about this product (system requirements, compatibility information, etc.) and product registration, visit m-audio.com. For additional product support, visit m-audio.com/support.
Quick Start
macOS users: No driver installation is needed for class-compliant operation with M-Track Duo
iOS users: The power available from an iOS device is not sufficient to power M-Track Duo. Use the Apple Camera Connection Kit (sold separately), a USB break-out cable (sold separately), and a USB power adapter (sold separately) which will provide an additional USB connector to power M-Track Duo
Windows users:Before connecting M-Track Duo to your computer, install the drivers:
- Go to m-audio.com/drivers and download the latest M-Track Duo driver for your operating system.
- Open the file you downloaded and double-click the driver installer file.
- Follow the on-screen instructions to install the drivers.
Software:We’ve included Pro Tools | First M-Audio Edition and MPC Beats with your M-Track Duo so you can get started making music with professional software right out of the box.Register your M-Track Duo on m-audio.com/softwaredownload, and follow the install instructions in your User Account.
Virtual Instruments:Follow the instructions in your user account for installing the included virtual instrument plugins. After installation, most DAWs will not load virtual instrument plugins automatically. In order to access the virtual instrument plugins with Pro Tools | First M-Audio Edition, you will need to choose the plugin folder for the software to scan:
Pro Tools | First M-Audio Edition (AAX) plugin folders:Windows (32-bit): C:Program Files (x86)Common FilesAvidAudioPlug-Ins Windows (64-bit): C:Program FilesCommon FilesAvidAudioPlug-Ins macOS: Macintosh HD/Library/Application Support/Avid/Audio/Plug-Ins To set M-Track Duo as your default playback device, follow the directions below based on your computer’s operating system.
Windows:
- Use the included USB cable to connect the M-Track Duo to your computer.
- In the Taskbar, locate the Volume Control “speaker” icon. Right-click the speaker andopen Sound Settings > Sounds. Alternatively, go to Start Menu > System > Sound > Sound Control Panel.
- In the Windows Sound control panel select the Playback tab and select USB Audio Codec as the default device.
- Click the Recording tab and select USB Audio Codec as the default device.
- Click Properties in the lower right-hand corner.
- In the new window, click the Advanced tab and select 2-channel, 16-bit, 48000 Hz (Studio Quality) as the default format
- Uncheck both boxes under Exclusive Mode.
- Click OK to close the Properties window.
- Click OK to close the Sound control panel.
macOS:
- Use the included USB cable to connect the M-Track Duo to your computer.
- Go to Applications > Utilities > Audio MIDI Setup.
- In the Audio Devices window, select USB Audio Codec in the left column.
- Right-click USB Audio Codec, and select Use this device for sound input.
- Right-click USB Audio Codec, and select Use this device for sound output.
- Quit Audio MIDI Setup.
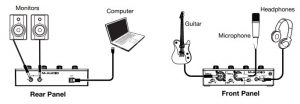
Connection Diagram
Items not listed under Introduction > Box Contents are sold separately.
Note: Use the +48V (Phantom Power) Switch only if a microphone requires phantom power. Most dynamic microphones and ribbon microphones do not require phantom power, but most condenser microphones do. Consult your microphone’s documentation to find out whether it needs phantom power.
Setting Up M-Track Duo with Your Software
Setting Up M-Track Duo with Pro Tools | First M-Audio Edition
- Use the included USB cable to connect the M-Track Duo to your computer.
- Open Pro Tools | First M-Audio Edition.
- Go to Setup > Playback Engine….
- Open the Playback Engine dropdown menu and select USB Audio Codec.Note:You may need to save and restart your project.
- Select your Sample Rate and then click OK to close the Setup window. You can now add tracks to send and receive audio from sources connected to M-Track Duo inputs and stream recorded audio back through the M-Track Duo outputs.
Setting Up M-Track Duo with MPC Beats
- Use the included USB cable to connect the M-Track Duo to your computer.
- Open MPC Beats.
- Go to Edit > Preferences….
- For Windows Users: In the Audio window, select ASIO under the Audio Device Type dropdown menu. In the Device dropdown menu, select M-Track Solo and Duo ASIO. For MacOS Users: In the Audio window, select USB Audio Codec under the Output and Input dropdown menus.Note: You may need to save and restart your project
- Select your Sample Rate and then click OK to close the Preferences window. You can now add tracks to send and receive audio from sources connected to M-Track Duo inputs and stream recorded audio back through the M-Track Duo outputs.
Features
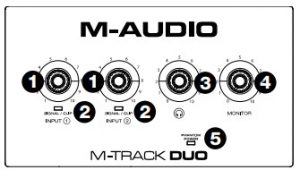
Top Panel
- Input Gain: Adjusts the input’s gain level. Set this knob so the corresponding Signal/Clip LED (located below the knob) displays a “healthy” level during performance–but not so high that the LED “clips” or peaks, causing distortion in the audio.

- Signal/Clip LED: The LED will light up green when an input signal is detected. The LED will light up red if the signal level is too high which may cause distortion or “clipping”. If this occurs, turn down the Input Gain and/or reduce the output level from your sound source.
- Headphone Level: Adjusts the output volume of the Headphone Output
- Monitor Level: Adjusts the output volume of Main Outputs, which should be connected to your powered monitors or amplifier system.
- +48V (Phantom Power) LED: Lights up when phantom power is engaged.
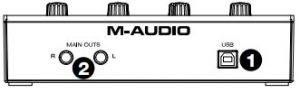
Rear Panel
- USB Port (Type B): This connection will allow you to send audio to and from a computer. Use the included USB-B-to- USB-A cable to connect the M-Track Duo to a computer. The M-Track Duo requires a USB 2.0 connection (orhigher).
- Main Outputs: Use standard 1/4″ (6.35 mm) TRS cables to connect these outputs to your powered monitors, amplifier system, etc. The mix you hear from these outputs will be determined by the Direct Mono/Direct Stereo/USB Switch. The level of these outputs is controlled by the Monitor Level knob.
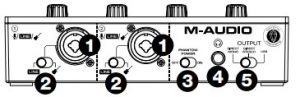
Front Panel
- Combo Input: Connect a microphone, a guitar or bass with an active pickup, or a line-level device to this input. For microphones, use an XLR or 1/4″ (6.35 mm) TRS cable. For a guitar or bass with an active pickup, use a standard 1/4″ (6.35 mm) TS cable. For line-level signals, use a 1/4″ (6.35 mm) TRS cable.
- Line/Instrument Switch: Set the switch to Line when connecting a microphone, or keyboard. Set the switch to Instrument when connecting a guitar or bass
- +48V (Phantom Power) Switch: This switch activates and deactivates phantom power. When activated (lit), phantom power supplies +48 volts to the Combo Input. Please note that most dynamic microphones and ribbon microphones do not require phantom power, while most condenser microphones do. Consult your microphone’s documentation to find out whether it needs phantom power.
- Headphone Output: Connect 1/4″ (6.35 mm) TRS headphones to this output. The mix you hear from this output will be determined by the Direct Mono/Direct Stereo/USB Switch. The level of this output is controlled by the Headphone Level knob
- Direct Mono/Direct Stereo/USB Switch: This switch controls whether or not the mono direct input signal, the stereo direct input signal, or the USB stream return signal is sent to the Headphone Output and Main Outputs
- When set to USB, only the USB audio playback from your computer will be heard.
- Set the switch to Direct Mono to monitor the direct input signal with all inputs summed and heard equally on each side. This is useful for monitoring a guitar or vocal mic signal. This switch does not affect the DAW playback or how your sound is recorded into your DAW; it only affects how you hear the input signal in the Headphone Output and Main Outputs.
- Set the switch to Direct Stereo to monitor the direct input signal with Input 1 in the left channel and Input 2 in the right channel. This is useful if you want to directly monitor a stereo mic setup such as a stereo signal from a keyboard, or overhead drum mics.
References
[xyz-ips snippet=”download-snippet”]