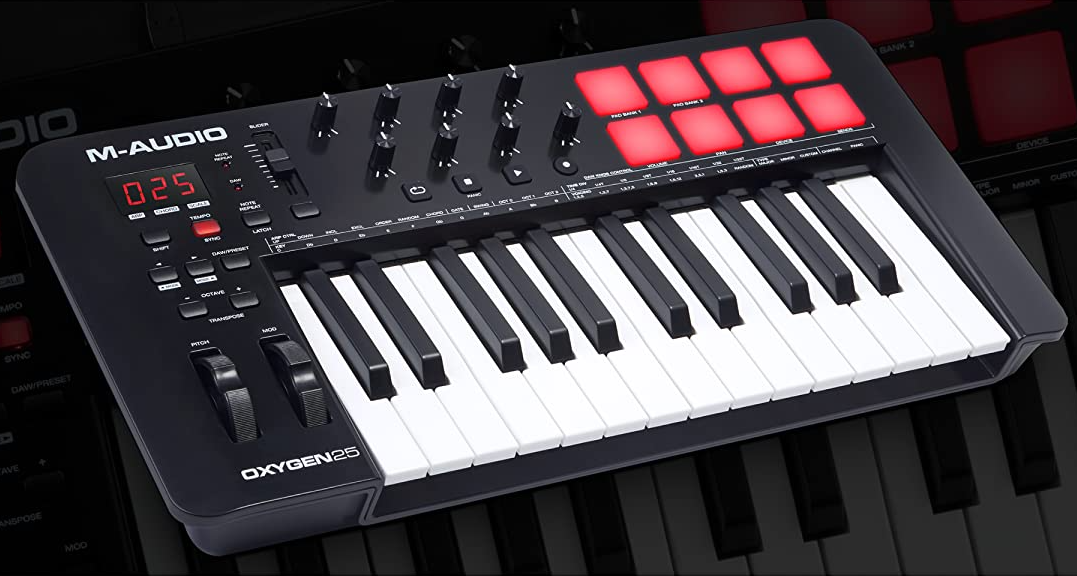
M-Audio OXYGEN25 USB Keyboard and Pad MIDI Controller

Introduction
Box Contents
- Oxygen Series MKV Keyboard
- USB Cable
- Software Download Card
- Quickstart Guide
- Safety & Warranty Manual
Support
For the latest information about this product (system requirements, compatibility information, etc.) and product registration, visit m-audio.com.For additional product support, visit m-audio.com/support.
Setup
Connecting Your Keyboard
You can power the keyboard via a powered USB port. The Oxygen keyboards are low-power devices. It is recommended that you connect the Oxygen keyboard to an onboard USB port or to a powered USB hub.

Initial Setup – DAW Setup
Your Oxygen has the ability to control all of your DAW’s faders, knobs, and in some cases pads for launching clips, as well as all of your virtual instrument controls. In order to have these controls set properly, we’ll first need to get your Oxygen to set to with your DAW.
- Press the PRESET/DAW Button so that the DAW button is lit, and the Oxygen keyboard is in DAW mode.
- Press and hold the PRESET/DAW Button to open the DAW Select menu on the Display.
- While continuing to press and hold the PRESET/DAW Button, press the < or > buttons to cycle through the available DAWs on the Display. As you press the < or > buttons, the currently selected DAW will update on the Display.
- When the DAW you want is shown on the Display, release the PRESET/DAW Button to confirm your selection.
Most DAWs will automatically recognize the Oxygen series keyboard, and automatically configure your Oxygen’s controls as a control surface in DAW mode, and virtual instrument controller in Preset mode.If your DAW does not automatically configure your Oxygen series keyboard, please follow the setup steps listed in the Oxygen DAW Setup Guides.
- NC1: Mackie 1: Will send standard Mackie messages. Mackie control is typically used for DAWs like Cubase, Studio One, and Reaper.
- NC2: Mackie 2. Will send standard Mackie messages, but with higher resolution for the pan pots. If your DAW’s pan isn’t able to do a full sweep of the pan pot, use Mackie 2. Mackie control is typically used for DAWs like Cubase, Studio One, and Reaper.
- M|h: Mackie/HUI will send standard Mackie/HUI messages for DAWs like Pro Tools and Logic.
- N1: MIDI 1 will send 1 set of standard MIDI messages for use with Ableton.
- N2: MIDI 2 will send 1 set of standard MIDI messages for use with MPC Beats, and Reason.
- N3: MIDI 3 will send 1 set of standard MIDI messages for use with Ableton for controlling clip launching, and more advanced features.
Initial Setup – Virtual Instrument/Plugin Setup
Now that you’ve selected the correct DAW. we’ll set your Oxygen to work with all of the included Virtual Instrument plugins, and any other Virtual Instrument plugins you may have.
- Press the PRESET/DAW Button so that the DAW button is unlit, and the Oxygen is in Preset mode.
- Press the < or > buttons to cycle through the available Presets on the Display. As you press the buttons, the currently selected Preset will appear on the Display. You can create your own custom virtual instrument presets, using the Oxygen Preset Editor Software.
- The Preset you want is selected after you stop pressing < or > buttons.
There are Presets for all of the Virtual Instruments included with your Oxygen. For Virtual Instruments that aren’t included with your Oxygen, we suggest using MPC Beats as a plugin wrapper in your favorite DAW, and the Oxygen’s Preset 1 – MPC PI preset. MPC Beats opens as a plugin in all mainstream DAWs to merge the best of all DAW worlds. This gives you the freedom to use MPC Beats as a soft synth/Virtual Instrument plugin wrapper, enabling you to have all of your Oxygen controls auto-mapped to your favorite soft synth/Virtual Instrument plugin.To download the included MPC Beats software, follow the instructions on the included software download card.
Presets
- MPC PI
- Hybrid 3
- Mini Grand
- Velvet
- Xpand!2
- Vacuum
- Boom
- DB33
- General MIDI
- General MIDI
Installing Your Included Software
We recommend registering your Oxygen keyboard on m-audio.com and downloading the Oxygen Series Software Manager. Follow the instructions on your included Software Download Card to access the Oxygen Series Software Manager.
DAWs and Virtual InstrumentsIn the Software Manager you’ll have access to all of your included software.We’ve included 2 DAWs, MPC Beats, and Ableton Live Lite with your Oxygen series keyboard so you can get started making music with professional software right out of the box. Additionally, we’ve included a set of MPC Beats Expansion Packs and AIR virtual instrument plugins for you to use with your DAW.To download the included MPC Beats, or Ableton Live Lite DAW software, AIR virtual instrument plugins, and MPC Beats Expansion Packs, register your Oxygen on m-audio.com and download the Oxygen Series Software Manager. The Oxygen Series Software Manager will guide you step-by-step on downloading and installing all of your included software.
Preset EditorTo download the included Preset Editor software, follow the instructions in the Oxygen Series Software Manager. This editor software is found when the “Show Advanced Software” box is checked in the Oxygen Series Software Manager. The Preset Editor software can be used to create custom Preset mappings for you to load onto your Oxygen series keyboard. The Preset Editor also comes with its own Editor User Guide.
MPC BeatsTo download the included MPC Beats software, follow the instructions in the Oxygen Series Software Manager. MPC Beats is an intuitive to use DAW and soft synth/Virtual Instrument plugin wrapper built on the legacy of the legendary AKAI Pro MPC hardware and innovative MPC2 desktop software, MPC Beats empowers new beat makers with all the tools to create excellent sounding beats and more.For complete integration with existing DAWs, MPC Beats opens as a plugin in all mainstream DAWs to merge the best of all DAW worlds. This gives you the freedom to use MPC Beats as a soft synth/Virtual Instrument plugin wrapper, enabling you to have all of your Oxygen controls auto-mapped to your favorite soft synth/Virtual Instrument plugin.
Features
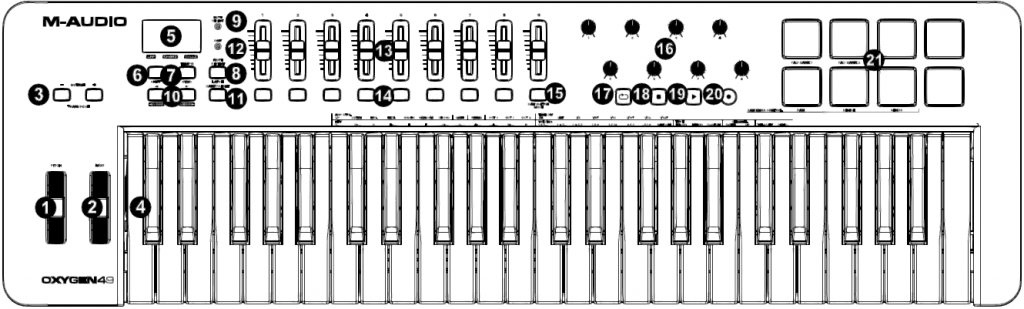
Oxygen 25 – Top Panel
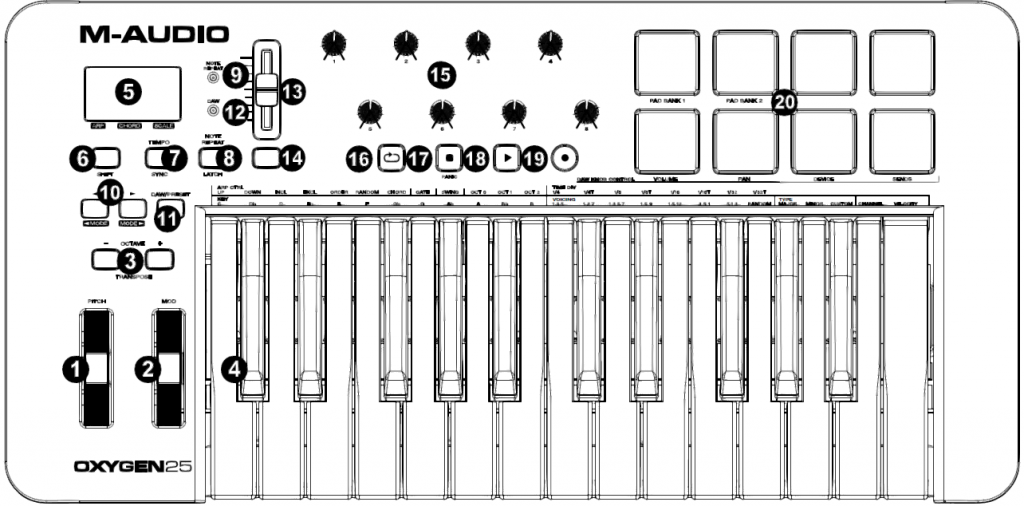
Octave/Wheels
- PITCH: This wheel creates expressive changes in performances by raising and lowering pitch.Rolling the Pitch Bend wheel upward will raise an instrument’s pitch whereas rolling it downward will lower the pitch.The upper and lower pitch bend limit is determined by settings on your hardware or software synthesizer, not by the Pitch Bend wheel on the Oxygen 25 keyboard itself. Typically, this can be either a half note or an octave up/down.This wheel is spring mounted and will return to the center detent position when released.
- MOD (Modulation): This wheel is used to add expression to performances by changing the intensity of certain effects.By default, most synthesizers assign this wheel to control vibrato (change in intonation) or tremolo (change in volume) although it is usually possible to reassign the function of thiswheel through the instrument’s control panel.Rolling the Modulation Wheel upward will increase the modulation effect, while rolling downward will reduce the effect.The Modulation Wheel is an assignable controller capable of sending a variety of MIDI messages other than Modulation data.
- OCTAVE – / +: The Octave buttons are used to shift the keyboard’s octave range up or down in one octave increments, extending the octave range of the pads or keys.TRANSPOSE: Hold SHIFT and press either of these buttons to transpose the keyboard up or down.

- Keybed: The velocity-sensitive keyboard is not only the primary method of sending Note On/Off and velocity data when performing. It is also used to access extended programing functions listed along its upper edge.Hold SHIFT and press a labeled key to access these additional programming functions:Note: The Key modifiers are dependent on what mode is currently active. For example, if Smart Chord mode is active, the only Shift modifier functions will be available for the Smart Chord functionality.Arpeggiator Parameters:
- ARP CTRL (Arpeggiator Control): Control Arpeggiator settings for the following parameters:UP, DOWN, INCL, EXCL, ORDER, RANDOM, and CHORD: Selects in which order notes will sound when the keys are pressed.
- GATE: Controls the length of the arpeggiated note.
- SWING: Controls the rhythm deviation of the arpeggiated notes.
- OCT 0, OCT 1, OCT 2: Controls how many octaves will be played in the arpeggiated pattern.
- TIME DIV (Time Division): Determines the timing and rhythm for the note repeat and arpeggiator features. Control Arp, and Note Repeat Time Division settings for the following parameters: 1/4, 1/4T, 1/8, 1/8T, 1/16, 1/16T, 1/32, 1/32T.
Smart Chord and Scale Parameters:
- KEY: Selects which key the notes will use in the chosen Smart Chord or Smart Scale. Control Key settings for the following parameters: C, Db, D, Eb, E, F, Gb, G, Ab, A, Bb, B.
- VOICING (Smart Chord Mode only): Selects which type of full chord will be played when a single key is pressed.Control SMART CHORD settings for the following parameters: 1,3,5; 1,3,7; 1,3,5,7; 1,5,9; 1,5,12; 3,5,1; 5,1,3; RANDOM.
- TYPE: Selects which key and type of musical scale will be used when using the SMART CHORD or SMART SCALE feature.Control Smart Chord MODE settings for the following parameters: MAJOR, MINOR, CUSTOM.Control Smart Scale MODE settings for the following parameters: MAJOR, PENTATONIC MAJOR, MINOR, MELODIC MINOR, HARMONIC MINOR, PENTATONIC MINOR, CUSTOM DORIAN, CUSTOM BLUES.
MIDI Channel and Velocity Parameters:
- CHANNEL DOWN, UP: Selects which MIDI channel will be used to transmit for the keys, pads, or controls.
- VELOCITY: Changes the Velocity Curve for the keys or pads depending on which controls were last pressed.
To access additional features, refer to the software Preset Editor at m-audio.com.
Central Functions
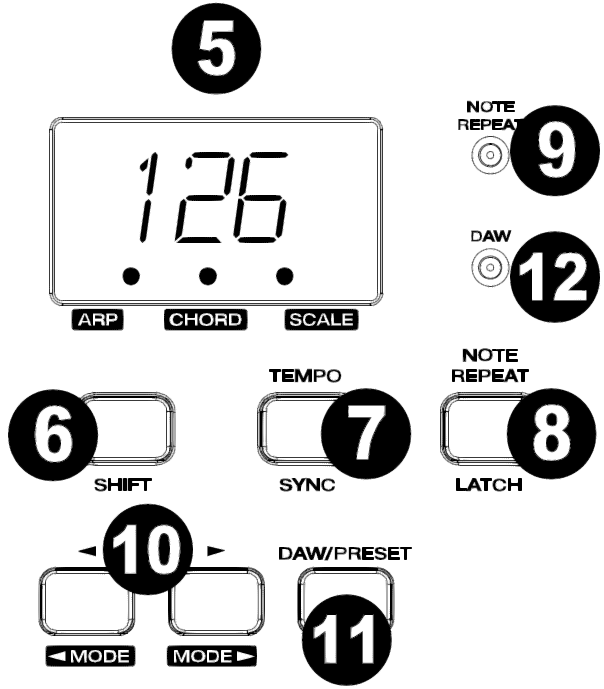
- Display: The Oxygen 25 features a 3-digit LED display providing visual information regarding current operation, programing, and controller status.The 3 dot LEDs on the Display correspond to one of the 4 available modes that is active: ARP, ARP Latch, Smart Chord, and Smart Scale.
- ARP: LED is lit when ARP mode is active.LED flashes when ARP Latch mode is active.
- CHORD: LED is lit when Smart Chord mode is active.
- SCALE: LED is lit when Smart Scale mode is active.
- SHIFT: Hold the SHIFT button while moving or pressing controls or buttons on the keyboard to access their secondary functions.
- TEMPO: Tap this button to set Oxygen 25’s tempo. Press and hold this button and use the < and > buttons to make incremental changes to the tempo.SYNC: Press and hold SHIFT and the TEMPO button to access the SYNC feature, allowing the keyboard to be synced to your DAWs Time Clock messages (Tempo).The tempo setting affects the keyboard’s arpeggiator and note repeat functions.
- NOTE REPEAT: Press this button to activate the note repeat function for the Pads.LATCH: To latch the note repeat function, hold SHIFT and then press this button.While Note Repeat is active, hold SHIFT and press the Time Division keys to change the current Time Division setting of the Arpeggiator and pad Note Repeat.
- NOTE REPEAT (LED): This LED will be lit solid when Note Repeat is active.
- <, >: The < and > buttons will select presets when in Preset mode.< MODE SELECT >: When SHIFT is held and one of these buttons is pressed, the active mode will change (ARP, ARP Latch, Smart Chord, Smart Scale, or no mode active).To turn on or off the currently active mode, press the < and > buttons simultaneously. For example, if Smart Scale is active, pressing the < and > buttons simultaneously will deactivate Smart Scale mode and return the keybed to its normal functionality.You can also turn off all modes by pressing the < or > buttons until no Mode button is lit.Note: Depending on what mode the keyboard is currently in the buttons’ functionality will change.DAW Mode: In DAW mode, < and > will scroll through track banks.Preset Mode: In Preset Mode, the < and > buttons will scroll through presets. In Edit Mode, they will cycle through the currently selected editable control.Note Repeat: When Note Repeat is active the < and > buttons will scroll up and down through time division settings.
- DAW / PRESET: When this button is pressed, it will activate the keyboard’s Preset or DAW functionality on the fader, knobs, button, and pads.When DAW mode is active, controls (Fader, Fader button, < and >, pads, and knobs) will send Mackie, Mackie/HUI, or MIDI CC messages, depending on which DAW is selected.When Preset mode is active, Preset select will latch on for you to use the < and > buttons to select from a list of Virtual Instrument presets.IMPORTANT: To change what DAW is currently selected, press and hold the SHIFT button and the DAW/PRESET button.
- NC1: Mackie 1: Will send standard Mackie messages. Mackie control is typically used for DAWs like Cubase, Studio One, and Reaper.
- NC2: Mackie 2. Will send standard Mackie messages, but with higher resolution for the pan pots. If your DAW’s pan isn’t able to do a full sweep of the pan pot, use Mackie 2. Mackie control is typically used for DAWs like Cubase, Studio One, and Reaper.
- M|h: Mackie/HUI will send standard Mackie/HUI messages for DAWs like Pro Tools and Logic.
- N1: MIDI 1 will send 1 set of standard MIDI messages for use with Ableton.
- N2: MIDI 2 will send 1 set of standard MIDI messages for use with MPC Beats, and Reason.
- N3: MIDI 3 will send 1 set of standard MIDI messages for use with Ableton for controlling clip launching, and more advanced features.
- DAW (LED): This LED will be lit solid when DAW mode is active.
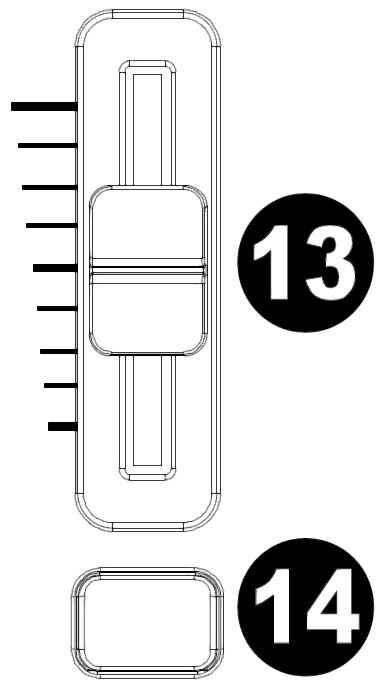
- FADER: Sends different types of standard MIDI CC messages or advanced MIDI messages based on the assigned parameter or the active preset.DAW Mode: Sends channel Fader messages for Track Faders or other DAW controls.Preset Mode: Sends predefined messages or user editable MIDI CC messages.
- FADER Button: This mappable button can be assigned to send Note, CC, and other MIDI messages.DAW Mode: Sends Mackie/HUI messages or predefined CC messages.Preset Mode: Sends predefined messages or user editable MIDI CC messages.
Knobs/Transport Controls
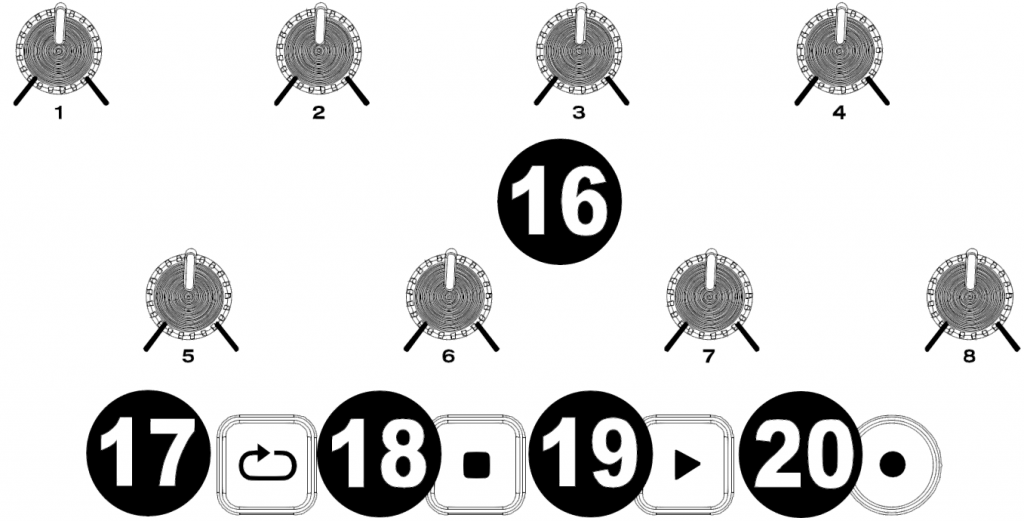
- Knobs 1-8: Sends different types of standard MIDI CC messages or advanced MIDI messages based on the assigned parameter or the active preset. Each knob can be individually assigned to a different MIDI parameter.DAW Mode: Sends predefined Mackie/HUI, Mackie messages or predefined CC messages for Track Volume, Panning, Device, or Sends.Preset Mode: Sends user editable MIDI Messages in preset 1-10.
- (Loop): Press this button to activate/deactivate the loop function in your DAW.
- (Stop): Press this button to stop the open song in your DAW.Double-press this button to stop the open song and return the playhead to the beginning of the song.Shift and Press PANIC: Sends an “All Notes Off” message on all 16 MIDI channels.
- (Play): Press this button to play the song in your DAW.
- (Record): Press this button to activate recording in your DAW.
Pads
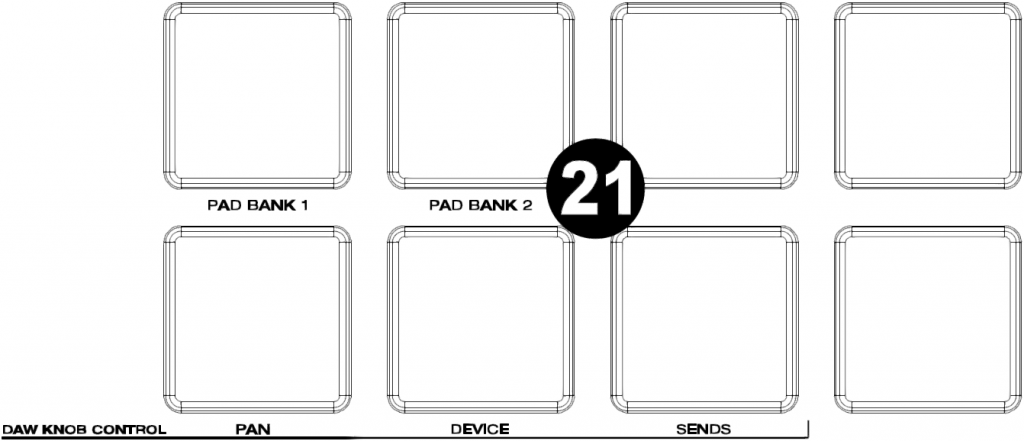
- Pads 1-8: Press these velocity-sensitive pads to send Note On/Off and velocity data when performing.Hold SHIFT and press a pad to change to activate its secondary function:PAD BANK 1 (Pad 1): Select pad bank for all Pads 1-8.PAD BANK 2 (Pad 2): Select pad bank for all Pads 1-8.DAW KNOB CONTROLSet all Knobs 1-8 to:VOLUME (Pad 5): Each knob will adjust the volume of the corresponding software track.PAN (Pad 6): Each knob will pan the corresponding software track.DEVICE (Pad 7): Each knob will control device controls of the corresponding software track.SENDS (Pad 8): Each knob will control the level of the aux sends for the corresponding software track.Note: Not all knob functions will be available in every DAW.
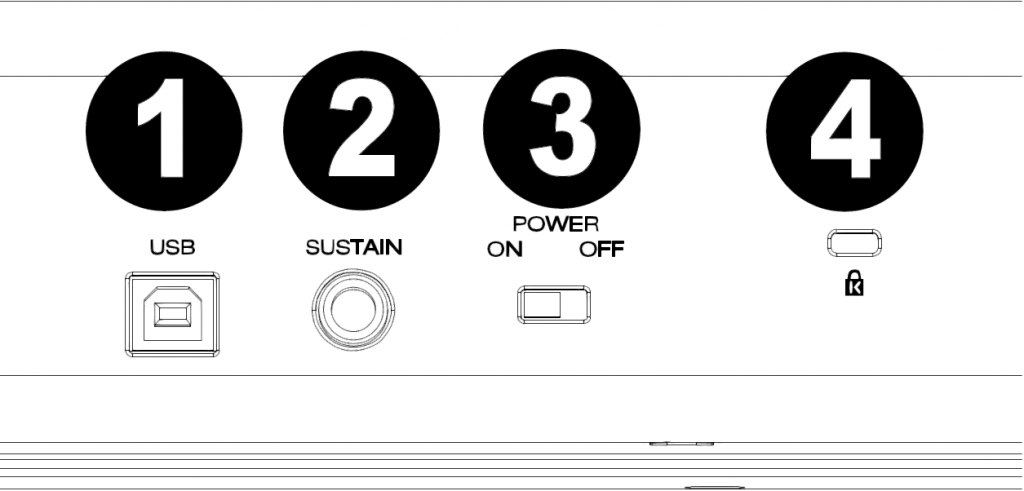
Rear Panel
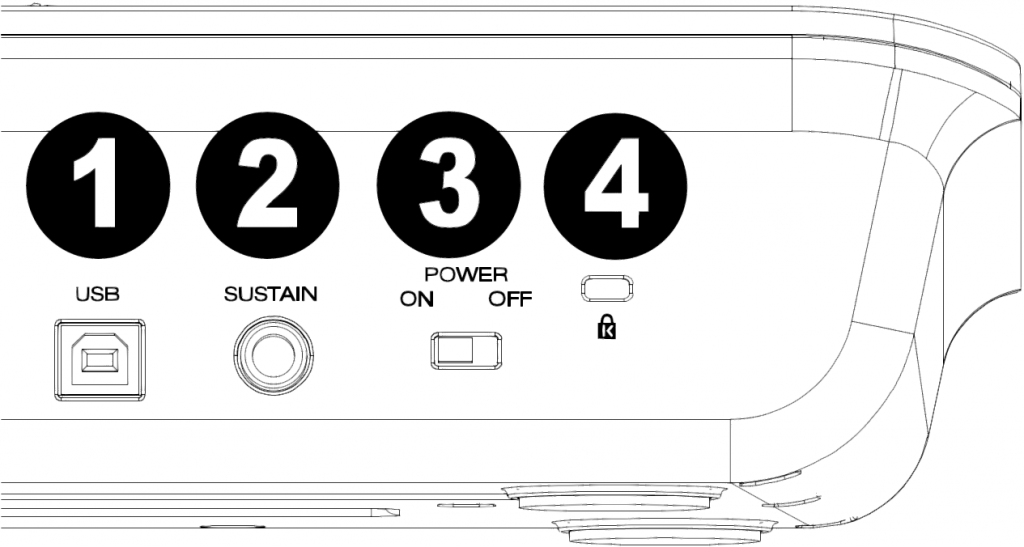
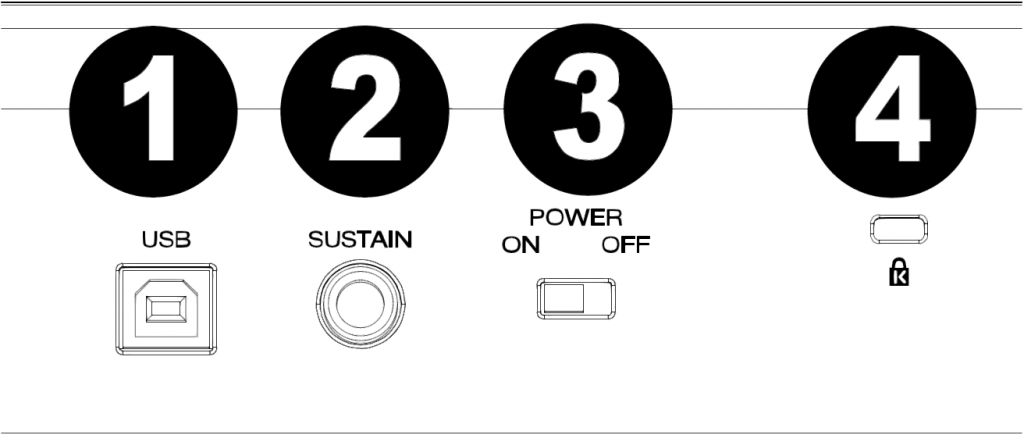
- USB: The USB 2.0 port delivers power to the keyboard and transmits MIDI data when connected to a computer.
- SUSTAIN: This input accepts a momentary-contact foot pedal (not included). When pressed, this pedal will sustain the sound you are playing without having to keep your fingers pressing down on the keys.Note: The polarity of the sustain pedal is determined by the keyboard upon startup. When an Oxygen 25 keyboard is powering up, the sustain pedal is assumed to be in the “up” (Off) position. It is important that the sustain pedal is not pressed during startup, otherwise the pedal will reverse its operation, and notes will sustain when the pedal is not pressed.
- POWER ON/OFF: Use this switch to power the device on or off. When this switch is set to the “on” position, Oxygen 25 is powered through the USB connection to your computer.
- Kensington Lock: This connector is compatible with standard laptop-style Kensington security cables for theft protection.
Top Panel
Octave/Wheels

- PITCH: This wheel creates expressive changes in performances by raising and lowering pitch.Rolling the Pitch Bend wheel upward will raise an instrument’s pitch whereas rolling it downward will lower the pitch.The upper and lower pitch bend limit is determined by settings on your hardware or software synthesizer, not by the Pitch Bend wheel on the Oxygen 49 keyboard itself. Typically, this can be either a half note or an octave up/down.This wheel is spring mounted and will return to the center detent position when released.
- MOD (Modulation): This wheel is used to add expression to performances by changing the intensity of certain effects.By default, most synthesizers assign this wheel to control vibrato (change in intonation) or tremolo (change in volume) although it is usually possible to reassign the function of this wheel through the instrument’s control panel.Rolling the Modulation Wheel upward will increase the modulation effect, while rolling downward will reduce the effect.The Modulation Wheel is an assignable controller capable of sending a variety of MIDI messages other than Modulation data.
- OCTAVE – / +: The Octave buttons are used to shift the keyboard’s octave range up or down in one octave increments, extending the octave range of the pads or keys. TRANSPOSE: Hold SHIFT and press either of these buttons to transpose the keyboard up or down.
- Keybed: The velocity-sensitive keyboard is not only the primary method of sending Note On/Off and velocity data when performing. It is also used to access extended programing functions listed along its upper edge.Hold SHIFT and press a labeled key to access these additional programming functions: Note: The Key modifiers are dependent on what mode is currently active. For example, if Smart Chord mode is active, the only Shift modifier functions will be available for the Smart Chord functionality.Arpeggiator Parameters:
- ARP CTRL (Arpeggiator Control): Control Arpeggiator settings for the following parameters:UP, DOWN, INCL, EXCL, ORDER, RANDOM, and CHORD: Selects in which order notes will sound when the keys or pads are pressed.
- GATE: Controls the length of the arpeggiated note.
- SWING: Controls the rhythm deviation of the arpeggiated notes.
- OCT 0, OCT 1, OCT 2: controls how many octaves will be played in the arpeggiated pattern.
- TIME DIV (Time Division): Determines the timing and rhythm for the note repeat and arpeggiator features. Control Arp, and Note Repeat Time Division settings for the following parameters: 1/4, 1/4T, 1/8, 1/8T, 1/16, 1/16T, 1/32, 1/32T.
Smart Chord and Scale Parameters:
- KEY: Selects which key the notes will use in the chosen Smart Chord or Smart Scale. Control Smart Chord and Smart Scale Key settings for the following parameters: C, Db, D, Eb, E, F, Gb, G, Ab, A, Bb, B.
- VOICING (Smart Chord Mode only): Selects which type of full chord will be played when a single key is pressed.Control Smart Chord settings for the following parameters: 1,3,5; 1,3,7; 1,3,5,7; 1,5,9; 1,5,12; 3,5,1; 5,1,3; RANDOM.
- TYPE: Selects which type of musical scale will be used when using the Smart Chord or Smart Scale feature.Control Smart Chord and Smart Scale Mode settings for the following parameters: MAJOR, MINOR, CUSTOM.Control Smart Scale MODE settings for the following parameters: MAJOR, PENTATONIC MAJOR, MINOR, MELODIC MINOR, HARMONIC MINOR, PENTATONIC MINOR, CUSTOM DORIAN, CUSTOM BLUES.
MIDI Channel, Velocity Curve, and Panic Parameters:
- CHANNEL DOWN, UP: Selects which MIDI channel will be used to transmit for the keys, pads, or controls.
- VELOCITY: Changes the Velocity Curve for the keys or pads depending on which controls was last pressed.
- PANIC: Sends an “All Notes Off” message on all 16 MIDI channels.To access additional functions, refer to the software Preset Editor at m-audio.com.
Central Functions
- Display: The Oxygen 49 features a 3-digit LED display providing visual information regarding current operation, programing, and controller status.The 3 dot LEDs on the Display correspond to one of the 4 available modes that is active: ARP, ARP Latch, Smart Chord, and Smart Scale.
- ARP: LED is lit when ARP mode is active.LED flashes when ARP Latch mode is active.
- CHORD: LED is lit when Smart Chord mode is active.
- SCALE: LED is lit when Smart Scale mode is active.
- SHIFT: Hold the SHIFT button while moving or pressing controls or buttons on the keyboard to access their secondary functions.
- TEMPO: Tap this button to set Oxygen 49’s tempo. Press and hold this button and use the < and > buttons to make incremental changes to the tempo.SYNC: Press and hold SHIFT and the TEMPO button to access the SYNC feature, allowing the keyboard to be synced to your DAWs Time Clock messages (Tempo).The tempo setting affects the keyboard’s arpeggiator and note repeat functions.
- NOTE REPEAT: Press this button to activate the note repeat function for the Pads.LATCH: To latch the note repeat function, hold SHIFT and then press this button.While Note Repeat is active hold SHIFT and press the Time Division keys to change the current Time Division setting of the Arpeggiator and pad Note Repeat.
- NOTE REPEAT (LED): This LED will be lit solid when Note Repeat is active.
- <, >: The < and > buttons will select presets when in Preset mode.< MODE, MODE >: When SHIFT is held and one of these buttons is pressed, the active mode will change (ARP, ARP Latch, Smart Chord, or Smart Scale).To turn on or off the currently active mode, press the < and > buttons simultaneously. For example, if Smart Scale is active, pressing the < and > buttons simultaneously will deactivate Smart Scale mode and return the keybed to its normal functionality.Note: Depending on what mode the keyboard is currently in the buttons’ functionality will change.DAW Mode: In DAW mode, < and > will scroll through track banks.Preset Mode: In Preset Mode, the < and > buttons will scroll through presets. In Edit Mode, they will cycle through the currently selected editable control.Note Repeat: When Note Repeat is active the < and > buttons will scroll up and down through time division settings.
- DAW / PRESET: When this button is pressed, it will activate the keyboard’s Preset or DAW functionality on the faders, knobs, button, and pads.When DAW mode is active, controls (Faders, Fader buttons, < and >, pads, and knobs) will send Mackie, Mackie/HUI, or MIDI CC messages, depending on which DAW is selected.When Preset mode is active, Preset select will latch on for you to use the < and > buttons to select from a list of Virtual Instrument presets.IMPORTANT: To change what DAW is currently selected, press and hold the SHIFT button and the DAW/PRESET button.
- NC1: Mackie 1: Will send standard Mackie messages. Mackie control is typically used for DAWs like Cubase, Studio One, Logic, and Reaper.
- NC2: Mackie 2. Will send standard Mackie messages, but with higher resolution for the pan pots. If your DAW’s pan isn’t able to do a full sweep of the pan pot, use Mackie 2. Mackie control is typically used for DAWs like Cubase, Studio One, Logic, and Reaper.
- M|h: Mackie/HUI will send standard Mackie/HUI messages for DAWs like Pro Tools and Logic.
- N1: MIDI 1 will send 1 set of standard MIDI messages for use with Ableton.
- N2: MIDI 2 will send 1 set of standard MIDI messages for use with MPC Beats, and Reason.
- N3: MIDI 3 will send 1 set of standard MIDI messages for use with Ableton for controlling clip launching, and more advanced features.
- DAW (LED): This LED will be lit solid when DAW mode is active.

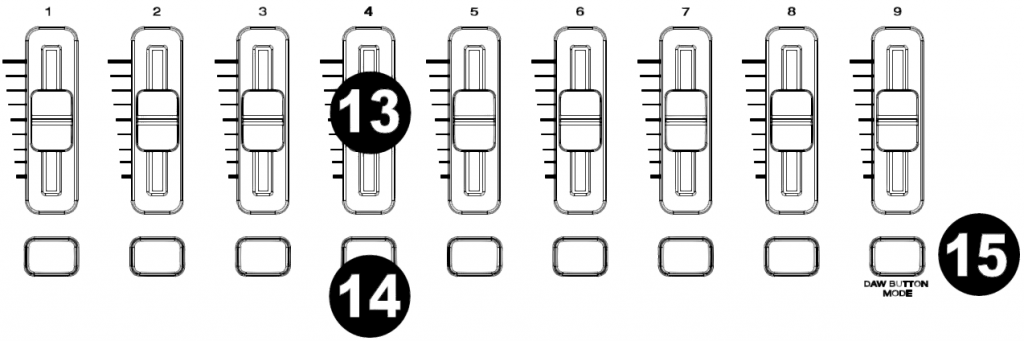
- Faders 1-9: Sends different types of standard MIDI CC messages or advanced MIDI messages based on the assigned parameter or the active preset.DAW Mode: Sends channel Fader messages for Track Faders or other DAW controls.Preset Mode: Sends predefined messages or user editable MIDI CC messages.
- Fader Buttons: These mappable buttons can be assigned to send Note, CC, and other MIDI messages.DAW Mode: Sends Mackie/HUI messages or predefined CC messages for Track Rec Arm, Track Select, Track Solo, and Track Mute.Preset Mode: Sends predefined messages or user editable MIDI CC messages.
- DAW BUTTON MODE: When in DAW mode and SHIFT and this button is pressed, it will change the Fader buttons’ modes between Track Rec Arm, Track Select, Track Mute, or Track Solo.
Knobs/Transport Controls
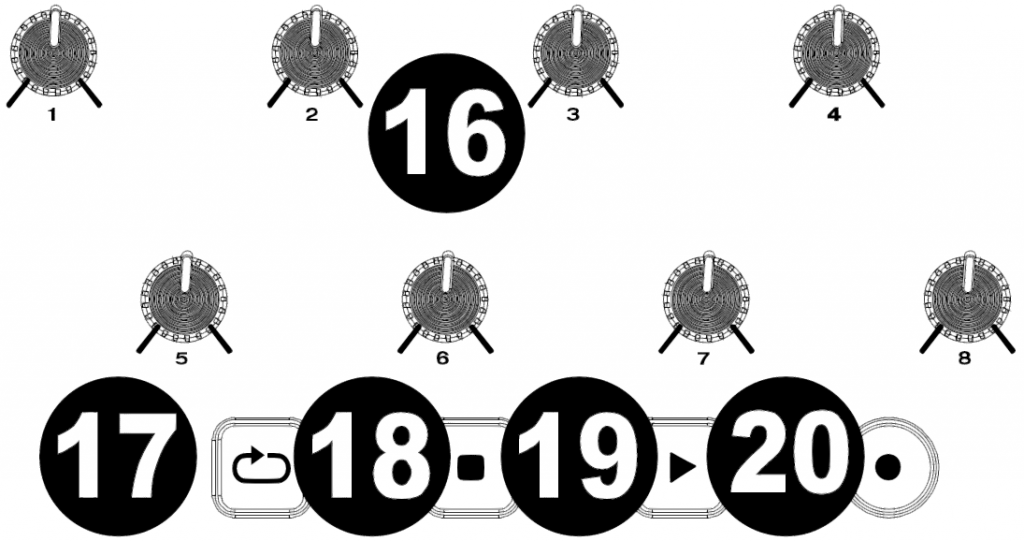
- Knobs 1-8: Sends different types of standard MIDI CC messages or advanced MIDI messages based on the assigned parameter or the active preset.Each knob can be individually assigned to a different MIDI parameter.DAW Mode: Sends predefined Mackie/HUI, Mackie messages or predefined CC messages for Track Panning, Device, or Sends.Preset Mode: Sends user editable MIDI Messages in preset 1-10.
- (Loop): Press this button to activate/deactivate the loop function in your DAW.
- (Stop): Press this button to stop the open song in your DAW.Double-press this button to stop the open song and return the playhead to the beginning of the song.
- (Play): Press this button to play the song in your DAW.
- (Record): Press this button to activate recording in your DAW.
Pads
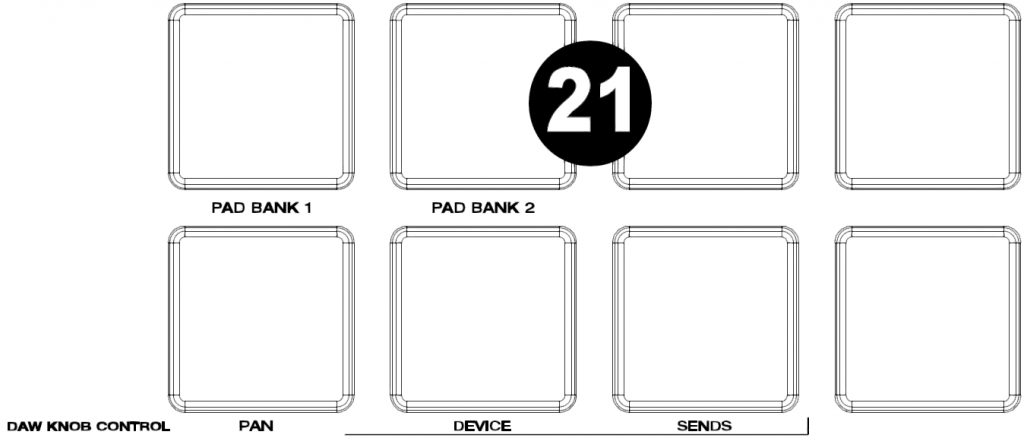
- Pads 1-8: Press these velocity-sensitive pads to send Note On/Off and velocity data when performing.Hold SHIFT and press a pad to change to activate its secondary function:PAD BANK 1 (Pad 1): Select pad bank for all Pads 1-8.PAD BANK 2 (Pad 2): Select pad bank for all Pads 1-8.DAW KNOB CONTROLSet all Knobs 1-8 to:PAN (Pad 6): Each knob will pan the corresponding software track.DEVICE (Pad 7): Each knob will control device controls of the corresponding software track. SENDS (Pad 8): Each knob will control the level of the aux sends for the corresponding software track.Note: Not all knob functions will be available in every DAW.
Rear Panel
- USB: The USB 2.0 port delivers power to the keyboard and transmits MIDI data when connected to a computer.
- SUSTAIN: This input accepts a momentary-contact foot pedal (not included). When pressed, this pedal will sustain the sound you are playing without having to keep your fingers pressing down on the keys.Note: The polarity of the sustain pedal is determined by the keyboard upon startup. When an Oxygen 49 keyboard is powering up, the sustain pedal is assumed to be in the “up” (Off) position. It is important that the sustain pedal is not pressed during startup, otherwise the pedal will reverse its operation, and notes will sustain when the pedal is not pressed.
- POWER ON/OFF: Use this switch to power the device on or off. When this switch is set to the “on” position, Oxygen 49 is powered through the USB connection to your computer.
- Kensington Lock: This connector is compatible with standard laptop-style Kensington security cables for theft protection.
Top Panel

Octave/Wheels

- PITCH: This wheel creates expressive changes in performances by raising and lowering pitch.Rolling the Pitch Bend wheel upward will raise an instrument’s pitch whereas rolling it downward will lower the pitch.The upper and lower pitch bend limit is determined by settings on your hardware or software synthesizer, not by the Pitch Bend wheel on the Oxygen 61 keyboard itself. Typically, this can be either a half note or an octave up/down.This wheel is spring mounted and will return to the center detent position when released.
- MOD (Modulation): This wheel is used to add expression to performances by changing the intensity of certain effects.By default, most synthesizers assign this wheel to control vibrato (change in intonation) or tremolo (change in volume) although it is usually possible to reassign the function of this wheel through the instrument’s control panel.Rolling the Modulation Wheel upward will increase the modulation effect, while rolling downward will reduce the effect.The Modulation Wheel is an assignable controller capable of sending a variety of MIDI messages other than Modulation data.
- OCTAVE – / +: The Octave buttons are used to shift the keyboard’s octave range up or down in one octave increments, extending the octave range of the pads or keys.TRANSPOSE: Hold SHIFT and press either of these buttons to transpose the keyboard up or down.
- Keybed: The velocity-sensitive keyboard is not only the primary method of sending Note On/Off and velocity data when performing. It is also used to access extended programing functions listed along its upper edge.Hold SHIFT and press a labeled key to access these additional programming functions:Note: The Key modifiers are dependent on what mode is currently active. For example, if Smart Chord mode is active, the only Shift modifier functions will be available for the Smart Chord functionality.Arpeggiator Parameters:
- ARP CTRL (Arpeggiator Control): Control Arpeggiator settings for the following parameters:UP, DOWN, INCL, EXCL, ORDER, RANDOM, and CHORD:Selects in which order notes will sound when the keys or pads are pressed.
- GATE: Controls the length of the arpeggiated note.
- SWING: Controls the rhythm deviation of the arpeggiated notes.
- OCT 0, OCT 1, OCT 2: controls how many octaves will be played in the arpeggiated pattern.
- TIME DIV (Time Division): Determines the timing and rhythm for the note repeat and arpeggiator features. Control Arp, and Note Repeat Time Division settings for the following parameters: 1/4, 1/4T, 1/8, 1/8T, 1/16, 1/16T, 1/32, 1/32T.
Smart Chord and Scale Parameters:
- KEY: Selects which key the notes will use in the chosen Smart Chord or Smart Scale. Control Smart Chord and Smart Scale Key settings for the following parameters: C, Db, D, Eb, E, F, Gb, G, Ab, A, Bb, B.
- VOICING (Smart Chord Mode only): Selects which type of full chord will be played when a single key is pressed.Control Smart Chord settings for the following parameters: 1,3,5; 1,3,7; 1,3,5,7; 1,5,9; 1,5,12; 3,5,1; 5,1,3; RANDOM.
- TYPE: Selects which type of musical scale will be used when using the Smart Chord or Smart Scale feature.Control Smart Chord MODE settings for the following parameters: MAJOR, MINOR, CUSTOM.Control Smart Scale MODE settings for the following parameters: MAJOR, PENTATONIC MAJOR, MINOR, MELODIC MINOR, HARMONIC MINOR, PENTATONIC MINOR, CUSTOM DORIAN, CUSTOM BLUES.
MIDI Channel, Velocity Curve, and Panic Parameters:
- CHANNEL DOWN, UP: Selects which MIDI channel will be used to transmit for the keys, pads, or controls.
- VELOCITY: Changes the Velocity Curve for the keys or pads depending on which controls was last pressed.
- PANIC: Sends an “All Notes Off” message on all 16 MIDI channels.To access additional functions, refer to the software Preset Editor at m-audio.com.
Central Functions
- Display: The Oxygen 61 features a 3-digit LED display providing visual information regarding current operation, programing, and controller status.The 3 dot LEDs on the Display correspond to one of the 4 available modes that is active: ARP, ARP Latch, Smart Chord, and Smart Scale.
- ARP: LED is lit when ARP mode is active.LED flashes when ARP Latch mode is active.
- CHORD: LED is lit when Smart Chord mode is active.
- SCALE: LED is lit when Smart Scale mode is active.
- SHIFT: Hold the SHIFT button while moving or pressing controls or buttons on the keyboard to access their secondary functions.
- TEMPO: Tap this button to set Oxygen 61’s tempo. Press and hold this button and use the < and > buttons to make incremental changes to the tempo.SYNC: Press and hold SHIFT and the TEMPO button to access the SYNC feature, allowing the keyboard to be synced to your DAWs Time Clock messages (Tempo).The tempo setting affects the keyboard’s arpeggiator and note repeat functions.
- NOTE REPEAT: Press this button to activate the note repeat function for the Pads.LATCH: To latch the note repeat function, hold SHIFT and then press this button.While Note Repeat is active hold SHIFT and press the Time Division keys to change the current Time Division setting of the Arpeggiator and pad Note Repeat.
- NOTE REPEAT (LED): This LED will be lit solid when Note Repeat is active.
- <, >: The < and > buttons will select presets when in Preset mode.< MODE, MODE >: When SHIFT is held and one of these buttons is pressed, the active mode will change (ARP, ARP Latch, Smart Chord, or Smart Scale).To turn on or off the currently active mode, press the < and > buttons simultaneously. For example, if Smart Scale is active, pressing the < and > buttons simultaneously will deactivate Smart Scale mode and return the keybed to its normal functionality.You can also turn off all modes by pressing the < or > buttons until no Mode button is lit.Note: Depending on what mode the keyboard is currently in the buttons’ functionality will change.DAW Mode: In DAW mode, < and > will scroll through track banks.Preset Mode: In Preset Mode, the < and > buttons will scroll through presets. In Edit Mode, they will cycle through the currently selected editable control.Note Repeat: When Note Repeat is active the < and > buttons will scroll up and down through time division settings.
- DAW / PRESET: When this button is pressed, it will activate the keyboard’s Preset or DAW functionality on the faders, knobs, button, and pads.When DAW mode is active, controls (Faders, Fader buttons, < and >, pads, and knobs) will send Mackie, Mackie/HUI, or MIDI CC messages, depending on which DAW is selected.When Preset mode is active, Preset select will latch on for you to use the < and > buttons to select from a list of Virtual Instrument presets.IMPORTANT: To change what DAW is currently selected, press and hold the SHIFT button and the DAW/PRESET button.
- NC1: Mackie 1 will send standard Mackie messages. Mackie control is typically used for DAWs like Cubase, Studio One, Logic, and Reaper.
- NC2: Mackie 2 will send standard Mackie messages, but with higher resolution for the pan pots. If your DAW’s pan isn’t able to do a full sweep of the pan pot, use Mackie 2. Mackie control is typically used for DAWs like Cubase, Studio One, Logic, and Reaper.
- M|h: Mackie/HUI will send standard Mackie/HUI messages for DAWs like Pro Tools.
- N1: MIDI 1 will send 1 set of standard MIDI messages for use with Ableton.
- N2: MIDI 2 will send 1 set of standard MIDI messages for use with MPC Beats, and Reason.
- N3: MIDI 3 will send 1 set of standard MIDI messages for use with Ableton for controlling clip launching, and more advanced features.
- DAW (LED): This LED will be lit solid when DAW mode is active.
- Faders 1-9: Sends different types of standard MIDI CC messages or advanced MIDI messages based on the assigned parameter or the active preset.DAW Mode: Sends channel Fader messages for Track Faders or other DAW controls.Preset Mode: Sends predefined messages or user editable MIDI CC messages.
- Fader Buttons: These mappable buttons can be assigned to send Note, CC, and other MIDI messages.DAW Mode: Sends Mackie/HUI messages or predefined CC messages for Track Rec Arm, Track Select, Track Solo, and Track Mute.Preset Mode: Sends predefined messages or user editable MIDI CC messages.
- DAW BUTTON MODE: When in DAW mode and SHIFT and this button is pressed, it will change the Fader buttons’ modes between Track Rec Arm, Track Select, Track Mute, or Track Solo.
Knobs/Transport Controls
- Knobs 1-8: Sends different types of standard MIDI CC messages or advanced MIDI messages based on the assigned parameter or the active preset. Each knob can be individually assigned to a different MIDI parameter.DAW Mode: Sends predefined Mackie/HUI, Mackie messages or predefined CC messages for Track Panning, Device, or Sends.Preset Mode: Sends user editable MIDI Messages in preset 1-10.
- (Loop): Press this button to activate/deactivate the loop function in your DAW.
- (Stop): Press this button to stop the open song in your DAW.Double-press this button to stop the open song and return the playhead to the beginning of the song.
- (Play): Press this button to play the song in your DAW.
- (Record): Press this button to activate recording in your DAW.
Pads
- Pads 1-8: Press these velocity-sensitive pads to send Note On/Off and velocity data when performing.Hold SHIFT and press a pad to change to activate its secondary function:PAD BANK 1 (Pad 1): Select pad bank for all Pads 1-8.PAD BANK 2 (Pad 2): Select pad bank for all Pads 1-8.DAW KNOB CONTROLSet all Knobs 1-8 to:PAN (Pad 6): Each knob will pan the corresponding software track.DEVICE (Pad 7): Each knob will control device controls of the corresponding software track.SENDS (Pad 8): Each knob will control the level of the aux sends for the corresponding software track.Note: Not all knob functions will be available in every DAW.
Rear Panel
- USB: The USB 2.0 port delivers power to the keyboard and transmits MIDI data when connected to a computer.
- SUSTAIN: This input accepts a momentary-contact foot pedal (not included). When pressed, this pedal will sustain the sound you are playing without having to keep your fingers pressing down on the keys.Note: The polarity of the sustain pedal is determined by the keyboard upon startup. When an Oxygen 61 keyboard is powering up, the sustain pedal is assumed to be in the “up” (Off) position. It is important that the sustain pedal is not pressed during startup, otherwise the pedal will reverse its operation, and notes will sustain when the pedal is not pressed.
- POWER ON/OFF: Use this switch to power the device on or off. When this switch is set to the “on” position, Oxygen 61 is powered through the USB connection to your computer.
- Kensington Lock: This connector is compatible with standard laptop-style Kensington security cables for theft protection.
Operation
This chapter describes the features of your Oxygen Series keyboard.
Oxygen Series Basic Concepts
This section gives an overview of some fundamental concepts that will help you understand and use your Oxygen series keyboard.KeyboardOctaves and TranspositionTempo ControlNote Repeat/Latch ButtonPresetsDAW and Preset ModeSHIFT< and > ButtonsARP and Latch ControlSmart Chord ControlSmart Scale ControlDAW Button ModeDAW Knob ControlChannel SelectionVelocity CurvePanicFactory ResetEach section contains links to other relevant sections of this guide, which we recommend reading, as well.
Keyboard
The keyboard is velocity-sensitive with aftertouch and can access the full range of 127 available MIDI notes across 10 octaves.Pressing SHIFT and one of the labeled keys allows you to quickly edit Smart Chord, Smart Scale, Arpeggiator, Channel and Velocity functionality.
Octaves and Transposition
By using the Key Octave –/+ buttons, the keyboard can access the full range of 127 available MIDI notes (10 octaves). Additionally, you can transpose the keyboard up to 12 semitones (1 octave) in either direction.To change the octave of the keyboard, use the Key Octave –/+ buttons to lower or raise the octave, respectively. The display will temporarily show OCT and the current octave shift.
Oxygen 25’s keyboard can be shifted 4 octaves down or 5 octaves up.Oxygen 49’s keyboard can be shifted 3 octaves down or 4 octaves up.Oxygen 61’s keyboard can be shifted 3 octaves down or 3 octaves up.
To change the transposition of the keyboard, press and hold Shift, and then use the Key Octave –/+ buttons to lower or raise the keybed by one one, respectively. The display will temporarily show the current transposition (-12 to 12).
Tempo Control
To edit the Tempo button, press the Tempo button. You can either repeatedly tap the TEMPO button to enter in the tempo, or press and hold the TEMPO button and use the < and > Buttons to scroll to your desired tempo.SYNC: Pressing the Shift Button and the Tempo Button selects whether the tempo is sent from the keyboard’s internal tempo or synced to an external DAW.Available Values: Internal, ExternalBPM ###.: 20.00 – 240.00Note: Clock messages are sent and received on Oxygen Port 1 (Oxygen ##/USB MIDI).
When this button is pressed and held it will activate the Pad’s Note Repeat/Roll functionality.If SHIFT and this button are pressed together, then that will activate the Note Repeat button’s Latch feature.While Note Repeat is active, in Preset Mode the < and > Buttons can be used to change the current Time Division setting of the Arpeggiator and pad Note Repeat. Time Division settings can also be changed when the ARP is active by pressing and holding the SHIFT Button and pressing the keys labeled with Time Division settings.
- 1/4
- 1/4T
- 1/8
- 1/8T
- 1/16
- 1/16T
- 1/32
- 1/32T
Presets
A preset is a saved collection of assignments for your Oxygen’s controls, channel settings, keyboard zone settings, etc. You can store up to 10 Preset presets in Oxygen 25, 49 and 61’s internal memory, enabling you to use a dedicated preset for each virtual instrument, or project/session.We recommend registering your Oxygen on m-audio.com and downloading the Oxygen Series Software Manager.In the Software Manager you’ll have access to all of your included software as well as the Oxygen Preset Editor. The Preset Editor gives you a visual and intuitive way to edit the various messages that Oxygen’s controls send to your computer without having to use the hardware interface. The Preset Editor enables you to save and load custom presets from your computer.To select a Preset preset on the Oxygen, press the DAW/PRESET button to put the keyboard in Preset Mode (DAW button unlit), and use the < and > Buttons to select your desired preset.To select a DAW preset on the Oxygen, press and hold the DAW/PRESET button when in DAW mode (DAW button lit), and use the < and > Buttons to select your desired DAW preset.
DAW and Preset Mode
Once you’ve set up your Oxygen keyboard to work with your DAW, it’s time to set the keyboard’s operation Mode, Preset or DAW. By choosing the operation Mode, you can quickly switch between the Oxygen controlling your DAW’s controls when DAW mode is active to controlling a soft synth/Virtual Instrument when Preset mode is active.These two operation Modes determine the function of the MIDI keyboard’s editable controls:
- DAW: In DAW Mode, the keyboard’s controls will be mapped to faders, buttons, knobs, and in some cases pads in your DAW.
- NC1: Mackie 1: Will send standard Mackie messages. Mackie control is typically used for DAWs like Cubase, Studio One, and Reaper.
- NC2: Mackie 2. Will send standard Mackie messages, but with higher resolution for the pan pots. If your DAW’s pan isn’t able to do a full sweep of the pan pot, use Mackie 2. Mackie control is typically used for DAWs like Cubase, Studio One, and Reaper.
- M|h: Mackie/HUI will send standard Mackie/HUI messages for DAWs like Pro Tools and Logic.
- N1: MIDI 1 will send 1 set of standard MIDI messages for use with Ableton.
- N2: MIDI 2 will send 1 set of standard MIDI messages for use with MPC Beats, and Reason.
- N3: MIDI 3 will send 1 set of standard MIDI messages for use with Ableton for controlling clip launching, and more advanced features.
- Preset: In Preset Mode, the keyboard’s controls will be mapped to faders, buttons, knobs, and pads in your selected Virtual Instrument. The keyboard’s editable controls can be set to functions that you design yourself. The following preset mappings can be edited using the Oxygen Preset Editor and then saved to the keyboard’s internal memory for you to load at a later time:
- MPC PI
- Hybrid 2
- Mini Grand
- Velvet
- Xpand!2
- Vacuum
- BOOM
- DB33
- General MIDI
- General MIDI
To set the keyboard to operate in DAW Mode, press the DAW/Preset Button so that the DAW button is lit.To change which DAW your keyboard is set to control:While in DAW mode, press and hold the DAW/Preset Button and then use the < and > Buttons to select your DAW.Most DAWs will automatically recognize the Oxygen series keyboard, and automatically configure your Oxygen’s controls as a control surface in DAW mode, and virtual instrument controller in Preset mode.If your DAW does not automatically configure your Oxygen series keyboard, please follow the setup steps listed in the Oxygen DAW Setup Guides.To set the keyboard to operate in Preset Mode, press the DAW/Preset Button so that the DAW button is unlit.To change the currently selected preset:To select a Preset preset on the Oxygen, press the DAW/PRESET button to put the keyboard in Preset Mode (DAW button unlit), and use the < and > Buttons to select your desired preset.There are Presets for all of the Virtual Instruments included with your Oxygen. For Virtual Instruments that are not included with your Oxygen, we suggest using MPC Beats as a plugin wrapper in your favorite DAW, and the Oxygen’s MPC PI preset. MPC Beats opens as a plugin wrapper in all mainstream DAWs to merge the best of all DAW worlds. This gives you the freedom to use MPC Beats as a soft synth/Virtual Instrument plugin wrapper, enabling you to have all of your Oxygen controls auto-mapped to your favorite soft synth/Virtual Instrument plugin.To download the included MPC Beats software, follow the instructions on the included software download card.
When this button is pressed and held it will enable you to select SHIFT modifier functions of the keyboard.
When in any of the keyboard’s available editing modes these buttons are used for scrolling through selections. When in DAW Mode this Encoder will send separate Up/Down or Left/Right messages (depending on the DAW, DAW Selection, and depending on if Shift and these buttons are pressed). In Preset mode these buttons will scroll through available presets.If Note Repeat mode is active, these buttons will be used to select time division settings.If Tempo is pressed and held, these buttons will be used to change the internal Tempo.When SHIFT and these buttons are pressed, they will scroll through the available Modes, ARP, ARP Latch, Smart Chord, or Smart Scale.When these buttons are pressed together at the same time, they will activate or deactivate the current mode.
ARP and ARP LATCH Control
On the Oxygen, when SHIFT and either the < or > button is pressed, it will enable you to select and activate the keyboard’s internal arpeggiator. When the ARP is active, the ARP LED will be lit. The arpeggiator’s rate is based on the current Tempo and Time Division settings – Tempo settings are editable using the Tempo button. Time Division settings can be accessed by pressing and holding the Note Repeat button and pressing < or > buttons.To activate the ARP Latch functionality, press and hold SHIFT and either the < or > button until the ARP LED is flashing.The arpeggiator’s rate is based on the current Tempo and Time Division settings – Tempo settings are editable using the Tempo button, by tapping it, or pressing and holding the Tempo button and pressing the < or > buttons. Time Division settings can be accessed by pressing and holding the Note Repeat button and pressing the < or > by pressing the Shift button and any of the time division keys (1/4, 1/4T, 1/8, 1/8T, 1/16, 1/16T, 1/32, 1/32T).You can turn on and off the ARP by pressing both < and > buttons simultaneously.
Arp Mode
Type:
- Up: Notes will sound from the lowest to the highest.
- Down: Notes will sound from the highest to the lowest.
- Inclusive (Incl): Notes will sound from the lowest to the highest, then back down. The lowest and highest notes will sound twice when changing direction.
- Exclusive (Excl): Notes will sound from the lowest to the highest, then back down. The lowest and highest notes will sound only once when changing direction.
- Order: Notes will sound in the order they were pressed.
- Random: Notes will sound in random order.
- Chord: All notes of the chord will sound together repeatedly.
Gate: Determines how much length the arpeggiators notes will have. The shorter the gate, the shorter the note.
- Value: 5% – 100%
Swing: Determines how much tempo swing the arpeggiators notes will have.
- 50%: No Swing
- 55%: 55% swing
- 57%: 57% swing
- 59%: 59% swing
- 61%: 61% swing
- 64%: 64% swing
- 66%: 64% swing
- 75%: 75% swing
Octave: Determines the arpeggiators octave range.
- 0: No octaves
- 1: 1 octave
- 2: 2 octaves
LED Parameters
|
Parameters |
LED |
| Type – Up | Up |
| Type – Down | dn |
| Type – Incl | inc |
| Type – Excl | Ecl |
| Type – Order | ord |
| Type – Random | rnd |
| Type – Chord | crd |
| Gate – 0 | 0 |
| Gate – 10 | 10 |
| Gate – 20 | 20 |
| Gate – 30 | 30 |
| Gate – 40 | 40 |
| Gate – 50 | 50 |
| Gate – 60 | 60 |
| Gate – 70 | 70 |
| Gate – 80 | 80 |
| Gate – 90 | 90 |
| Gate – 100 | 100 |
| Swing – 50 | 50 |
| Swing – 55 | 55 |
| Swing – 57 | 57 |
| Swing – 59 | 59 |
| Swing – 61 | 61 |
| Swing – 64 | 64 |
| Swing – 66 | 66 |
| Swing – 75 | 75 |
| Octave – 0 | 0 |
| Octave – 1 | 1 |
| Octave – 2 | 2 |
Smart Chord Control
On the Oxygen, when SHIFT and either the < or > button is pressed, it will enable you to select and activate the keyboard’s internal Smart Chord Mode. When Smart Chord is active, the Chord LED will be lit. The Smart Chord settings are based on the current Key, Voicing, and Type settings. Key, Voicing, and Type settings are editable when Smart Chord mode is active and using the SHIFT button and pressing one of the Key, Voicing, or Type keys.When Smart Chord mode is active a single key press will play a chord as selected in the current Smart Chord Edit options. This functionality is available in the 2 keyboard modes, DAW, PRESET.You can turn on and off Smart Chord Mode by pressing both < and > buttons simultaneously.
- Smart Mode: In this Mode, you will first assign the keyboard to a musical key (e.g. D minor). Then you will assign the desired voicing for the chords (what intervals will be included in the chord, e.g. 1-3-5). Each key’s chord voicing will then be automatically enharmonic to the selected key.
- Custom: In this Mode, you can determine the chord structure that will be assigned to each key by manually playing it. For example, if you hold Shift and press the Custom key, the LED display will show “C5t”. When “C5t” is shown on the LED display, the Shift button can then be released and you can press up to 6 keys simultaneously to enter in a custom chord, for example 1-b3-5-b7 chord, every key will then be assigned to play this chord structure. The note of the key you press will serve as the root of the chord.
|
Silkscreen |
LED |
| Key – C | C |
| Key – Db | dB |
| Key – D | D |
| Key – Eb | Eb |
| Key – E | E |
| Key – F | F |
| Key – Gb | Gb |
| Key – G | G |
| Key – Ab | Ab |
| Key – A | A |
| Key – Bb | Bb |
| Key – B | B |
| Voicing – 1,3,5 | 135 |
| Voicing – 1,3,7 | 137 |
| Voicing – 1,3,5,7 | 135 |
| Voicing – 1,5,9 | 159 |
| Voicing – 1,5,12 | 150 |
| Voicing – 3,5,1 | 351 |
| Voicing – 5,1,3 | 513 |
| Voicing – Random | Rnd |
| Type – Major | 1 |
| Type – Minor | 2 |
| Type – Custom | C5t |
Smart Scale Control
On the Oxygen, when SHIFT and either the < or > button is pressed, it will enable you to select and activate the keyboard’s internal Smart Scale Mode. When Smart Scale is active, the Scale LED will be lit. The Smart Scale settings are based on the current Key, and Type settings. Key, and Type settings are editable when Smart Scale mode is active and using the SHIFT button and pressing one of the Key, or Type keys.The Smart Scale functionality will only function on notes being played on the keyboard. When Smart Scale Mode is active, keys will only play notes in the key of the current key and type selection. This functionality is available in the 2 keyboard modes, DAW, PRESET.You can turn on and off Smart Scale Mode by pressing both < and > buttons simultaneously.Key: C, Db, D, Eb, E, F, Gb, G, Ab, A, Bb, B.Type: Major, Pentatonic Major, Minor, Melodic Minor, Harmonic Minor, Pentatonic Minor, Custom – Dorian, Custom – Blues.
|
Silkscreen |
LED |
| Key – C | C |
| Key – Db | dB |
| Key – D | D |
| Key – Eb | Eb |
| Key – E | E |
| Key – F | F |
| Key – Gb | Gb |
| Key – G | G |
| Key – Ab | Ab |
| Key – A | A |
| Key – Bb | Bb |
| Key – B | B |
| Voicing – 1,3,5 | 135 |
| Voicing – 1,3,7 | 137 |
| Voicing – 1,3,5,7 | 135 |
| Voicing – 1,5,9 | 159 |
| Voicing – 1,5,12 | 150 |
| Voicing – 3,5,1 | 351 |
| Voicing – 5,1,3 | 513 |
| Voicing – Random | Rnd |
| Type – Major | 1 |
| Type – Minor | 2 |
| Type – Custom | C5t |
On the 49- and 61-key, when the Shift button and this button are pressed, it will change the current fader buttons mode in DAW mode. The DAW Button mode selections are track Record (Record arm), Select, Mute, and Solo.
DAW Mode
- Rec: Fader Buttons will activate Record Arm MIDI, Mackie, or Mackie/HUI messages for the associated button’s current channel in your DAW.
- Select: Fader Buttons will activate Track Select MIDI, Mackie, or Mackie/HUI messages for the associated button’s current channel in your DAW.
- Mute: Fader Buttons will activate Mute MIDI, Mackie, or Mackie/HUI messages for the associated button’s current channel in your DAW.
- Solo: Fader Buttons will activate Solo MIDI, Mackie, or Mackie/HUI messages for the associated button’s current channel in your DAW.
DAW Knob Control
Using the SHIFT button and Pads 9-12 (on the 25-key), or 9-11 (on the 49-key and 61-key) will enable you to change the function of knobs in DAW mode.
DAW Mode
- Volume: Will change the knobs function to control the channel faders in your DAW.
- Pan: Will change the knobs function to control the channel pan knobs in your DAW.
- Device: Will change the knobs function to control the currently selected channel’s plugin controls in your DAW.Note: Not all DAWs support Device control.
- Sends: Will change the knobs function to control the currently selected channel’s send controls in your DAW.Note: Not all DAWs support Sends control.
Channel Selection
This selects the MIDI channel that will be used to send MIDI messages from the keys, pads, knobs, faders, and buttons.The last selected control will be the one selected for editing. For example, if the keys are pressed before pressing Shift Button and the Channel key are pressed, then the keybed’s channel will be selected for editing.
|
Value |
LED |
| G,1-16 | G1o, 1-16 |
Velocity Curve
The Velocity Curve selects the velocity curve that the keyboard or drum pads will use for each MIDI note. There are 4 different velocity curve settings, and 3 fixed dettings. The 4 velocity curve settings are Low, Medium, High, and Linear. The 3 fixed velocity settings give velocities of 64, 100, and 127, respectively.The last selected control will be the one selected for editing. For example, if the keys are pressed before pressing Shift Button and the Velocity key are pressed, then the keybed’s velocity curve will be selected for editing.If the Velocity Curve function is selected for the drum pads, all drum pads will begin flashing to show their Velocity is being edited.As Velocity Curves are selected, the LED Display will show the curve in the format as listed above.Performance Mode will resume after 2 seconds of a value being selected.
|
Value |
LED |
| Low | Lo |
| Medium | Med |
| High | Hi |
| Linear | LIn |
| 64 | 64 |
| 100 | 100 |
| 127 | 127 |
Panic
Press the Panic key or Shift and the Stop button (on the 25-key) to send an “All Notes Off” message on all 16 MIDI channels. This stops any stuck notes that continue to play even after their keys have been released.
Factory Reset
Factory default settings can be restored by holding down the Octave – and + buttons during power-up. At this point all previously saved data will be erased.
Technical Specifications
Oxygen 25
| Power | USB bus-powered |
| Dimensions (Width x Depth x Height) | 19.3″ x 9.6″ x 3.7″
492 mm x 243 mm x 94 mm |
| Weight | 4 lbs.
1.8 kg |
Oxygen 49
| Power | USB bus-powered |
| Dimensions (Width x Length x Height) | 32″ x 9.6″ x 3.7″
814 mm x 243 mm x 94 mm |
| Weight | 6.4 lbs.
2.9 kg |
Oxygen 61
| Power | USB bus-powered |
|
Dimensions (Width x Depth x Height) |
38.5″ x 9.6″ x 3.7″
977 mm x 243 mm x 94 mm |
|
Weight |
7.5 lbs.
3.4 kg |
![]()
References
[xyz-ips snippet=”download-snippet”]