
User Manual
Portable Live Streaming and Podcast ConsoleFor Computer & Smartphone
Product Description
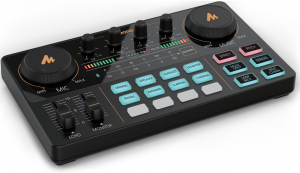
Maonocaster AU-AM200 is a comprehensive solution for audio processing that integrates audio collecting, processing and output controlling. It is compatible with smartphones, tablets and computers, including Android, iOS, Window and macOS. It is plug-and-play with no extra driver required. The built-in DSP digital audio processor makes it possible to vary your voice and add more sound effect to your podcast with one single button, which will make your livestream more entertaining.
Product Features
- Compatible with smartphones, tablets, and computers
- Intuitive and easy-to-use interface
- Multiple sound effects
- Real-time headphone monitoring, simultaneously listening and recording
- Support two microphone input at the same time
- Noise & ambient sound cancelling, make your voice pure and clear
- Side chain function enables it to highlight human voice by automatically lowering the volume of back background music
- Separate control of microphone volume and accompaniment volume
- Independent accompaniment input enables multiple audio input to live room
- Three-way live broadcast output enables multi-platform live broadcast
- USB-C interface for power and data
- Built-in lithium battery provides up to 8 hours of usage, convenient for outdoor live broadcast
Applicable SituationLive broadcast on mobile phone/tablet/computerApplicable app/software: Tik Tok/SNS Platform
Accessory ListAM200 Podcast Console x 1 User Manual x 1 USB C to USB C Data-only cable x 1 USB-A to USB-C Cable x 1 3.5 mm TRRS Audio Cable x 3
Specification
Data Transmission USB-CFrequency Response 20Hz-20kHzTHD THD<0.5% 1kHzHeadset Output Power 35MW, 32Ω (1KHD+N=1%)Sample Rate 48kHz/16bitWireless Connection Bluetooth 5.0Battery Type Li-PolymerBattery Capacity 1200mAhCharge Parameter 5V/1ACharge Time Appr. 3hBattery Life Appr. 8h (Highest keypads brightness)Dimension L24*W14*H4.2CM(button included)
– 01 –
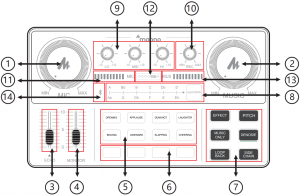
Product Layout
– 02 –
1. Microphone volume controlRotate the control knob clockwise to increase the volume of the microphone.
2. Accompaniment volume controlRotate the control knob clockwise to adjust the volume of the external accompaniment music. When in use, you can turn clockwise to increase the volume of accompaniment music or counterclockwise to decrease the volume of accompaniment music.
3. Reverb effect controlSlide the control fader up to increase the reverb effect and vice versa.
4. Monitor volume controlPush the control fader up to increase the monitoring volume. Please slide the fader down to the bottom before wearing the headset, and then slowly increase the volume to avoid damage to your hearing.
5. Default sound effectThis area presets 8 default sound effect buttons, including: opening, applause, gunshot, laughter, booing, awkwad, cheering, slapping. The user can press the corresponding button to trigger the sound effect. Each sound effect button has an indicator light which will be always-on when not triggered; after pressing the sound effect button, the button light flashes until the sound effect ends. And it restores to be always-on.
6. Custom sound effect:This podcast console provides users with 4 custom sound effects buttons. Users can record audio clips and import them to the podcast console through a microphone, an external audio source, or Bluetooth device to use these sound effects in live broadcasts.
6.1 Recording: Turn the product on, connect it with either one of microphone, external audio input device, Bluetooth device. Turn on the “LOOP BACK” mode. Hold any custom key until button light flashes to start recording. Audio input will be recorded and saved. Release the button to end recording.
Note: If you do not release your hand during recording, the recording will stop automatically when there is no enough space, and the light will automatically turn off.
6.2 Clear recording: Hold any of the recorded custom sound effect for 2 seconds to start the clearing process. The button light will be turned on without flashes. The button light will be turned off when the recording is cleared.
6.3 Play sound effects: Short press any recorded custom button to activate sound effects. It will beep if it is empty and there is no recording.
– 03 –
7. Vocal FX
There are six function buttons in this area, which are EFFECT, PITCH, MUSIC ONLY, DENOISE, LOOP BACK , SIDE CHAIN.
7.1 “EFFECT” The button has 4 modes corresponding to different light colors, including the original sound mode (Pink ), professional mode (red), pop mode (blue), and yelling mode (green).
7.2 ” PITCH” button has 4 modes corresponding to different light colors, including male to female (red), female to male (blue), girlish voice (green), robot (Pink). “EFFECT” and “PITCH” can not be triggered at the same time.
7.3 ” MUSIC ONLY” mode can remove the human voice in the background music and keep the accompaniment, to facilitate the user to sing along the music. Press the button to turn this function on and off, correspondingly button lights on and off.
7.4 “DENOISE” mode can automatically reduce the ambient sound from the microphone input. Press the button to turn this function on and off, correspondingly button lights on and off.
7.5 ” LOOP BACK ” mode. The user can control whether the background music be route to the live stream or not when playing the accompaniment from the computer.
If turns on (the lights on), the computer music is input to the live broadcast room, and vice versa. No matter whether this function is triggered or not, the computer music can always be heard from monitor headphones output (please remember to turn it on when broadcasting).
7.6 “SIDE CHAIN” mode, when turning on this mode in the live stream, the podcast console will automatically lower the volume of the background music, and highlight the voice of the human, suitable for live chat scenes. The light will be on when the mode is on, and off when the mode is off.
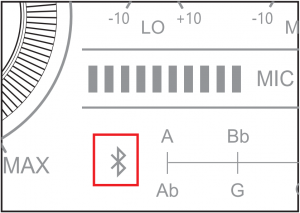
8. Electronic Music Key ChangerThere are 12 keynotes: A, Bb. B.C, Dd. D, Ab. G. Gb. F, E, Eb. Short press the “Electrical Tone” area to switch to the corresponding electronic tone and long press to close it.
9. Low, Medium and High KeyIt is to adjust tune of the microphone to achieve deep bass, smooth midrange and clear treble.
10. Recording Volume Control KnobThis knob controls the volume of the sound output to the live broadcast, and the user can adjust it accordingly.
– 04 –
11. Microphone Volume Level DisplayIndicate the volume of the microphone.
12. Battery Level Display4 LED lights on means 100% fully charged, 3 LED lights on means 75%, 2 LED lights 50%, 1 LED 25%; The power indicator LED flashes and red light on when charging.
13. Accompaniment Volume DisplayIndicate the volume of the accompaniment.
14. Wireless Bluetooth AccompanimentThe Bluetooth will automatically be on and pairing when turn on the podcast console. After paired, the accompaniment would be transmitted to the podcast console by Bluetooth. (The Bluetooth is only for wireless accompaniment playback)
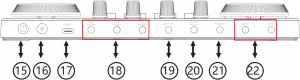
15.Power SwitchTurn on/off the product by long press for 3 seconds.
16. Keypad Brightness AdjustmentThe keypad backlight is 6 level adjustable.
17. USB-C InterfaceThe USB-C interface can be used for charging and data transmission. The product serves as an external podcast console for the computer while live streaming, recording or singing on the computer.
18. POD Output 1, 2, 3The processed audio can be output to the smartphone, tablet or other device by connecting the podcast console to devices through a 3,5 mm TRRS cable. The podcast console provides 3 output interfaces with the same function, which can live stream to multiple platforms at the same time.
19. OutputTo connect audio playback device such as speakers and headphones.
20. Music InputTo connect an external audio source or device to the podcast console via an audio cable to facilitate background music playback during live streaming or audio production.
21. Headset InterfaceIt can be connected to a headset with a 3.5 mm headphone jack.
– 05 –
22. Microphone interfaceIt can be connected to a 3.5 mm condenser microphone that does not require external power supply, such as MAONO A03, A340, PM325 and other models.
Sound card connection guide
1. Karaoke by mobile phone
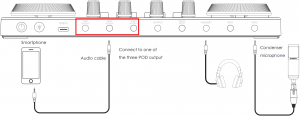
- Connect the smartphone/headsets/microphone to the podcast console as the picture shows.
- Download the karaoke app on smartphone.
- Turn on the podcast console and select the sound effects needed.
- Open the app on the smartphone and start to sing.
Note
Since some smartphones do not have 3.5 mm jacks, a USB-C/Lightning to 3.5 mm adapter is required Please purchase the 3.5 mm audio adapter from the phone manufacturer.
– 06 –
2. Live Streaming on mobile phones
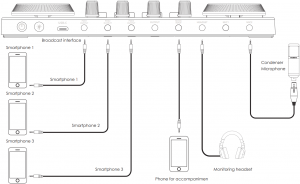
- Connect the mobile phone/headsets/microphone to the podcast console as the picture shows.
- Download the steaming app on smartphone.
- Turn on the podcast console and select the sound effects needed.
- Open the music app on the mobile phone end and start streaming.
Note:
- Since some smartphones do not have 3.5 mm jacks, a USB-C/Lightning to 3.5 mm audio adapter is required.
- Please purchase the USB-C/Lightning to 3.5 mm audio adapter from the phone manufacturer.
- The podcast console can support live streaming up to 3 different devices and take up to two micro-phones inputs at the same time. You do not have to connect all output and input devices if not needed.
– 07 –
3. Live streaming on computer
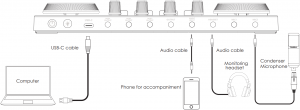
- Connect the accompaniment music (smartphone), headsets, and microphone to the podcast console as the pictures shows.
- Connect the computer and the podcast console by USB-C cable. The computer will automatically recognize the podcast console and select the driver.
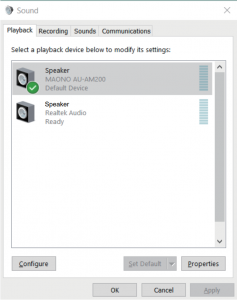
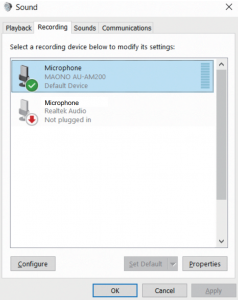
- Enter the sound control panel of Windows, and set the podcast console “MAONO AU-AM200” as the system default playback in “Playback” and “Recording” option.
– 08 –
4. Open the live streaming software on the computer and confirm again in software settings that “MAONO AU-AM200” is the the default audio and playback device.
NOTE:
- You can stream to computer and smartphone at the same time.
- Please activate “LOOP BACK” mode during call-in in live streaming.
- Please adjust settings on the podcast console for each software individually.
4. Charging
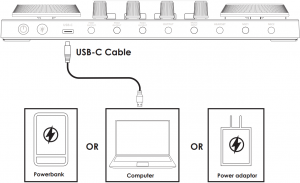
- It can be charged by connecting the podcast console to the computer /power bank and power adapter via USB-C cable.
- The “battery indicator” on the podcast console will light up red when charging, and flash according to the battery level.
- When the podcast console is connected to the computer, it can be charged while being used.
Note:
- Please charge the podcast console before using for the first time.
- If not used for a long period, please charge the podcast console every 3 months.
- Charging is also possible when the power is off.
- Do not charge for a long time. Please stop charging when the battery is fully charged to avoid over-charging.
– 09 –
5. Bluetooth Connection
This podcast console has a Bluetooth connection feature (refer to item 14 in the function introduction), which can be connected to a smartphone for live accompaniment.
- Turn on the podcast console, the Bluetooth light on the front of the sound card starts to flash.
- Search for the device in the Bluetooth menu of the phone, find the Bluetooth device of “MAONO AU-AM200”, and choose it to connect.
- After the phone is connected to the podcast console, the Bluetooth light stops flashing.
- Please connect the mobile phone to the podcast console through Bluetooth and set up the accompaniment music player on the mobile phone in advance.
- Open the live broadcast software on the mobile phone or computer for live streaming.
Notes:
- Bluetooth connection is limited by distance. Please do not place the too far away from the podcast console to avoid interference.
- Bluetooth feature is only for accompaniment music playback.
6. Troubleshooting
6.1 Cannot boot
- Please check if the podcast console has power, please charge it and then turn it on.
- You need to long press the ”
 ” for more than three seconds to turn it on.
6.2 No sound from accompaniment music
- Please check whether the external audio source is connected to the accompaniment interface of the podcast console.
- Please check whether the accompaniment volume control knob on the right is turned on.
- Please check the volume of the accompaniment device.
– 10 –
6.3 No sound from headphones
- Please check whether the headphone cable is inserted into the correct interface. It should be inserted to the “headset” or “sound” interface.
- Please check whether is the “monitor fader” of the sound card upwards. You can gradually increase the volume by sliding it up.
6.4 No sound from the microphone
- Please check whether the microphone is correctly connected to the microphone interface. If not, please try again.
- Please check whether the microphone knob on the left is turned on. Turn the knob clockwise to increase the microphone volume slowly.
- Please check whether is the “monitor fader” of the sound card upwards. You can gradually increase the volume by pushing it up.
- Please confirm with your microphone dealer whether your microphone can be used with this podcast console, or consult us for the recommended microphone model.
6.5 No sound in live broadcast
- Please check whether the “recording” knob on the podcast console is turned on, and rotate the “recording knob” clockwise to slowly increase the volume of the live broadcast.
- Please check whether the podcast console “MAONO AU-AM200″ has been set as the default playback and recording device of the live broadcast software. If not, please set refer to ” Live Streaming on the Computer ” part.
Notes:To avoid personal injury or property damage caused by high temperature, noise, radiation, fire, machinery and other factors, please use this product in a safe environment, and read carefully and observe the following.
- If you encounter product heat, smoke, odor, etc. during use, please turn off the power and cut the power in time, and send it to the seller for maintenance.
- Please do not modify, disassemble or repair this equipment by yourself to avoid invalidating the product warranty or causing personal injury. If necessary, please contact the distributor to deal with it.
- This product should be used and stored in a dry, ventilated, and safe environment. Do not use this product in a humid, dusty environment.
- Please avoid rain and dust entering the product to avoid short circuit. Close to the fire, collision and severe vibration will cause irreversible damage to the product damage.
- Please do not use this product in the occasions prohibited by law, and follow the relevant safety regulations to use this product to avoid any accidents.
- This product cannot be used as a children’s toy, please place it out of the reach of children.
– 11 –
Model : AU-AM200
Technical Support:[email protected]www.maono.com

References
[xyz-ips snippet=”download-snippet”]