![]()
Operation / Installation ManualRV6200
 Wall Mount Touch Screen AM/FM/Bluetooth/DVD Multimedia Receiver
For Technical Assistance, please call (310) 735-2000, or for more accessories or replacement parts visit www.magnadynestore.com.
Introduction
Please take the time to read all of the information in this manual. Familiarity with operation and installation procedures will help you obtain the best possible performance from your new AM/FM Stereo Multi-Media Receiver.WARNING! To prevent fire or electrical shock hazards, do not expose this product to moisture.No user-serviceable parts inside. Refer servicing to qualified personnel.
Getting Started
- Power On/Off, Mute: Short press to turn the unit on or to mute on/off. Long press to power off.
- Volume +: Short press to increase volume. Long press to quickly increase volume.
 Seek Up: Press to tune the radio to a higher frequency or to navigate to the next track in USB, Disc, or Bluetooth mode.
- A Speaker Selection: Short press to control A speakers volume. Long press all speakers on/off.
- B Speaker Selection: Short press to control B speakers volume. Long press all speakers on/off.
- C Speaker Selection: Short press to control C speakers volume. Long press all speakers on/off.
- SLEEP: Short press for sleep on/off. Long press for sleep time setting.
- ALARM: Short press to turn alarm on/off. Long press for alarm time setting.
- DIM: Short press for screen dimmer adjustment between high/mid/low/off.
- Disc Slot: To play a disc, insert a disc with the label facing up.
- AM/FM: Short press to select radio bands: FM1, FM2, FM3 (MHz), AM1, AM2 (kHz). Long press to auto store stations.
- EJECT: Short press to eject the disc.
- DISC: Short press to switch to disc mode and B song search while in disc mode.
- AUX: Short press for AUX 1, long press for AUX 2.
- USB: Short press to switch to USB mode and song search while in USB mode.
- BT: Short press to switch to Bluetooth mode. Long press to unpair a connected device.
- 6 / DIR+: Short press to recall radio preset or search ahead in DISC/USB mode. Long press to memorize a radio station.
- Headphone Socket: Accepts 3.5mm stereo headphone jacks.
- 5 / DIR-: Short press to recall radio preset or search backward in DISC/USB mode. Long press to memorize a radio station.
- USB Charging: Quick charge USB port. (Will not play music)
- 4 /RDM: Short press to recall radio preset or to turn Random ON/OFF in DISC/USB mode. Long press to memorize a radio station.
- Reset: Press to reset the unit to default settings.
- 3 / RPT: Short press to recall radio preset or to toggle between Repeat One / All in DISC/USB mode. Long press to memorize a radio station.
- USB Music: Music media USB port.
- 2 / INT: Short press to recall radio preset or to turn Intro ON/OFF in DISC/USB mode.Long press to memorize a radio station.
- Audio Input Jack: Plugin a device via the 3.5mm audio input plug.
- Play, Pause: Short press to recall radio preset. Long press to memorize a radio station.Press to pause in DISC/USB/BT modes, press again to restore playback. Long press to show software version in AUX mode.
- DISP: Short press to toggle between info and clock display. Long press to enter into clock settings.
- Volume -: Short press to decrease volume.Long press to quickly decrease volume.
- EQ: Short press to toggle between EQ presets:FLAT-POP-ROCK-CLAS or EQ OFF. Long press to turn LOUD ON/OFF.
- Seek Down: Press to tune the radio to a lower frequency or to navigate to the previous track in USB, Disc or Bluetooth mode.
- SEL: Short press to select sound controls: BAS-TRE-BAL-EQ-LOUD. Long press for BEEP ON/OFF, Clock 12/24, P-Vol, CT Indep/Sync, Area USA/EUR, Lo/DX, ST/Mo.
- IR Sensor: Remote control sensor.
RV6200 General Operations
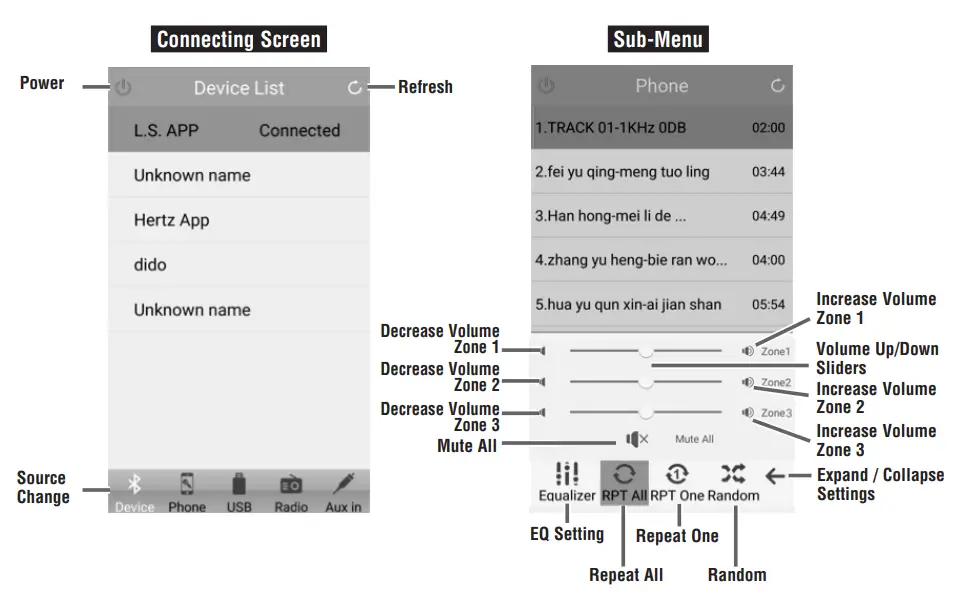
Power On/Off:Press the![]() button to turn the unit On. When the unit is on, a short press will mute all audio. Press and hold to turn the unit off.Selecting a Play Source:Press the touch screen panel on the unit to directly select AM/FM, DISC, AUX, USB or BLUETOOTH play sources.Dimming the Display:Short press the DIM button to select from the 4 levels of brightness for the display area: DIM LOW, DIM MID, DIM HIGH, off.Display Selection:Press the DISP button to display the clock.Press again to return to the previous display.Press and hold to perform clock setting functions (See “Setting the Clock” for more details).Selecting Speaker Sets: Note: See Sound Controls for detailed volume and mute control operations.Setting the Clock:
button to turn the unit On. When the unit is on, a short press will mute all audio. Press and hold to turn the unit off.Selecting a Play Source:Press the touch screen panel on the unit to directly select AM/FM, DISC, AUX, USB or BLUETOOTH play sources.Dimming the Display:Short press the DIM button to select from the 4 levels of brightness for the display area: DIM LOW, DIM MID, DIM HIGH, off.Display Selection:Press the DISP button to display the clock.Press again to return to the previous display.Press and hold to perform clock setting functions (See “Setting the Clock” for more details).Selecting Speaker Sets: Note: See Sound Controls for detailed volume and mute control operations.Setting the Clock:
- Press the DISP button until the clock appears in the display.
- Press and hold the DISP button until the Hours number starts flashing.
- Press the + or – buttons to set to the desired hour displayed on the unit’s screen.Note: When setting the clock, make sure to select the correct AM or PM.
- Press the DISP button and the Minute indicators will start flashing.
- Press the + or – buttons to set to the desired minutes displayed on the unit’s screen. When finished, press the DISP button and the time will be set.
Setting the Alarm Timer:
- Short press the ALARM button to toggle between either ALARM ON or ALARM OFF.
- To set the alarm time, press and hold the ALARM button. The hour will flash and then can be adjusted and set using the + and – buttons. To adjust the minutes, press and hold the ALARM button until the minutes flash and then can be adjusted and set by again pressing the + and – buttons to the desired time.
- With the alarm set, “ALARM” will appear in the display. When the set alarm time is reached, a beep sound will be heard and will continue until any radio button is pushed.
- When the alarm time is set and the unit is off, the unit will automatically turn on to sound the alarm beep when the scheduled time is reached.
Setting the Sleep Timer:
- Press the SLEEP button to toggle between SLEEP ON and SLEEP OFF.
- With SLEEP ON selected, press the + or – buttons to set desired sleep time up to 60 minutes.
- Wait 5 seconds and the display will return to normal operation and “SLEEP” will appear in the display.
- After the designated sleep timer has expired the unit will turn off automatically.
Canceling the Sleep Timer:
- Press the SLEEP button and SLEEP OFF will appear in the display.
- Wait 5 seconds and the display will return to normal operation.
Headphone Operations:Insert headphones into the 3.5mm headphone jack located on the front panel of the radio. The speakers of the unit will automatically be muted.Resetting the Unit: To reset the unit to original factory settings press the reset button located on the front of the radio using the tip of a ballpoint pen.Note: All memory settings will need to be re-input.
BEEP ON/OFF:To turn the unit’s audible beep on or off, short press the SEL button until BEEP ON or BEEP OFF appears in the display. Use the VOL +/- buttons to make your selection.CLOCK 12/24:To set the unit’s clock to either a 12 or a 24-hour format press the SEL button until CLOCK 12 or CLOCK 24 appears in the display. Use the VOL +/- buttons to make your selection.
Sound Controls
SPK A/B/C Volume/ Mute Control Operation
- The volume of each set of speakers can be adjusted independently. Short press the A, B, or C button to select the speakers that the volume control will affect (LCD displays the “SPK A”, “SPK B” or “SPK C” icon). Pressing VOL +/- button will change the volume of the speakers selected.
- To control the volume of all speaker sets at the same time, press and hold the A, B, or C button for 2 seconds (LCD will display “SPK A”, “SPK B”, and “SPK C” icons together).
- To mute the sound of all speakers, quickly press the power button. All speakers will be muted. Quick press the power button again to resume the current volume level.
Note: To bring all speaker outputs to the same volume level, press and hold the A, B, or C button for 2 seconds (LCD will display the “SPK A”, “SPK B” and “SPK C” icons together) then press and hold the volume (-) until each level reaches zero. From that point, press the volume (+) button, and all speakers will rise in volume equally.
Bass, Treble, and Balance Control:Select the desired sound mode to adjust by short pressing the SEL button. The modes will be displayed in the following order: Bass, Treble, Balance EQ, Loud.
Bass:Select the Bass mode by short pressing the SEL button. Adjust the level of Bass by pressing the VOL +/- buttons. After 5 seconds control reverts back to volume control.Treble: Select the Treble mode by pressing the SEL button. Adjust the level of Treble by pressing the VOL +/- buttons. After 5 seconds control reverts back to volume control.Balance:Select the Balance mode by pressing the SEL button. Adjust the Balance by pressing the VOL +/- buttons.0 = Equal sound Right and LeftR 7 = Right speaker onlyL 7 = Left speaker onlyAfter 5 seconds control reverts back to volume control.Equalizer (EQ):Select the EQ mode by pressing the SEL button.Adjust the EQ by pressing the VOL +/- buttons to choose between the preset settings: Classic, Rock, Pop, Flat or EQ OFF as indicated in the display area.After 5 seconds control reverts back to volume control.Loud:To boost high and low tones at low volume levels, press the SEL button until “LOUD ON” appears in the display. To deselect, press either VOL +/- buttons, and “LOUD OFF” will appear in the display.
Radio Operations
Radio Settings: Press and hold the SEL button to access radio settings, then short press the SEL to select between the below listed setting options. Press the + and – buttons to make your selections (ON / OFF, up or down levels): P-VOL- Radio’s default volume level.AREA- USA, EUR.DX/LOC- Distant / Local. Effects seek and scan sensitivity and ability to lock into either distant weak signal stations or local strong signal stations.STEREO/MONO- Multiple separated stereos sound or single-channel sound.CT SYNC / INDEX:CT SYNC: When receiving an RDS station, the clock will be synchronized to the station’s time. CT INDEP: The clock will run independently, not synchronized to the station’s time. This is the default setting.
Receive a Radio Station:
- Press the AM/FM button to select RADIO mode.
- Press the AM/FM button to select betweenAM 1 or 2 (KHz) or FM 1, 2 or 3 (MHz).
- Short presses of or will seek to the nearest reachable radiofrequency. Long presses will allow you to manually find a station.
Manually Storing and Recalling Stations:
- Tune into desired station and press and hold one of the preset buttons (1-6) for 2 seconds. The current station will be stored into that number buttons memory and then can be recalled with a short press of that button.
Auto Storing Stations:
- Press and hold the AM/FM button for 2 seconds to auto scan and store AM 1, 2, and FM 1, 2, and 3 stations into numeric buttons 1-6.
Note: When the MHz (FM) band is selected the 18 strongest stations will be stored. When the kHz (AM) band is selected the 12 strongest stations will be stored.
USB Operation
Selecting USB Audio Play Source: When a USB device is inserted into the unit, the unit will automatically switch to USB mode and play files off of the inserted device. If the USB device is left inserted any other audio source button can be pushed to navigate to other modes or also returned to by pushing the USB button.USB File Selection:Short press the![]() /
/ ![]() button to skip to the next/previous audio track. File information will automatically appear in the display.Press and hold the
button to skip to the next/previous audio track. File information will automatically appear in the display.Press and hold the![]() /
/![]() button to fast forward or reverse through a selected track.DIR+ / DIR-: Press the DIR+ / DIR- button to play next/previous folder from the USB device.Pausing the Audio:Press the
button to fast forward or reverse through a selected track.DIR+ / DIR-: Press the DIR+ / DIR- button to play next/previous folder from the USB device.Pausing the Audio:Press the![]() button to pause the audio file.Press again to resume playback.Intro:Press the INT button to play the first 10 seconds of each file. Press again to stop this function.Repeat:Press the RPT button to repeat a single track or to repeat an entire playlist.Random:Press the RDM button to play files from a playlist in random order.Specific Track Number:Press the USB button to display NUM 0000.Press the VOL +/- buttons or directly enter desired track number.To enter specific track number using radio buttons press:Buttons 1-6EQ button = 7
button to pause the audio file.Press again to resume playback.Intro:Press the INT button to play the first 10 seconds of each file. Press again to stop this function.Repeat:Press the RPT button to repeat a single track or to repeat an entire playlist.Random:Press the RDM button to play files from a playlist in random order.Specific Track Number:Press the USB button to display NUM 0000.Press the VOL +/- buttons or directly enter desired track number.To enter specific track number using radio buttons press:Buttons 1-6EQ button = 7![]() button = 8
button = 8![]() button = 9DISP button = 0
button = 9DISP button = 0
AUX 1 / AUX 2 Operation
Selecting the Audio Source:Note: The RV6200 does not control AUX connected devices, it just allows the audio to be played through the system.Front Audio Input:Insert the 3.5mm jack from the audio device into the AUX input socket on the front of the unit. Press the AUX button until “AUX 1” appears in the display. Refer to the audio device’s owner’s manual for proper operation.Rear Audio Input:To select the rear RCA connected audio play source, press and hold the AUX button until “AUX 2” appears in the display. Refer to the audio device’s owner’s manual for proper operation.Note: The volume setting of the connected audio device has an effect on the overall loudness of the RV6200.
Video In / Out Function
There is a V-IN and a TV-OUT 2 connecter behind the unit. The V-IN connector is directly connected passthrough to the V-OUT 2 connector, so you do not need to operate the unit for V-IN/V-OUT 2 function. The TV-OUT 1 is for Video out from the radio’s DVD player.
HDMI Arc Function
The radio’s HDMI output supports the ARC (Audio Return Channel) feature and will allow audio from the TV set to be played through the radio without additional connection cables. ARC is a relatively new feature and not all TV sets will have it available. In these cases, the HDMI connection from the radio will only deliver a video signal to your TV set.If your TV’s HDMI input connection supports ARC, it will be identified as HDMI (ARC). In some cases, TVs with HDMI (ARC) input may require some activation of the ARC feature through the TV’s setting menu. Check your TV user manual.
- To play sound from the TV through the radio speakers, select “Disk” on the radio (You must eject any disk that is inside the radio) and the display will read HDMI ARC. Wait a few seconds for the system to handshake and the TV sound will play through the radio speakers. The volume level of the radio speakers is controlled at the radio.
- If you change the source on the radio (go back to FM radio for example) the TV will stop and the alternate source will play through the radio speakers.
- If you want to play the radio’s DVD sound through the TV speakers only, you can lower the sound at the radio and turn up the sound of the TV speakers.
Bluetooth Operation
Pairing Bluetooth Devices:
- Open the Bluetooth settings program on the mobile device and activate the Bluetooth feature.
- From your mobile device scan for available devices.
- Select “LINEAR SERIES” to connect to the unit Note: Enter “0000” if a password is requested.
- When the mobile device has been paired the BT icon will be displayed on the unit’s LCD screen.Note: To disconnect or reconnect the paired Bluetooth device press and hold the BT button.
Bluetooth Operation:Play/Pause Button:Press the![]() button to pause or resume the Bluetooth playback.Changing the Track: Press the
button to pause or resume the Bluetooth playback.Changing the Track: Press the![]() button to select a higher track. Press the
button to select a higher track. Press the![]() button to select a lower trackSound Controls: Use the sound controls on the RV6200 to adjust the volume and sound quality.Note: For optimum sound quality make sure the media volume on the device is set at 75% or greater.
button to select a lower trackSound Controls: Use the sound controls on the RV6200 to adjust the volume and sound quality.Note: For optimum sound quality make sure the media volume on the device is set at 75% or greater.
DISC Operation
Selecting DISC Audio Play Source:When a CD or DVD is inserted into the unit, the unit will automatically switch to DISC mode automatically begin to play. If the disc is left inserted any other audio source button can be pushed to navigate to other modes or also returned to by pushing the DISC button.DISC File Selection:Short press the ![]() /
/ ![]() button to skip to the next/previous audio track. File information will automatically appear in the display.Press and hold the
button to skip to the next/previous audio track. File information will automatically appear in the display.Press and hold the ![]() /
/![]() button to fast forward or reverse through a selected track.DIR+ / DIR-:Press the DIR+ / DIR- button to play next/previous folder from the disc (MP3/WMA files).Pausing the Audio: Press the
button to fast forward or reverse through a selected track.DIR+ / DIR-:Press the DIR+ / DIR- button to play next/previous folder from the disc (MP3/WMA files).Pausing the Audio: Press the ![]() button to pause the audio file. Press again to resume playback.
button to pause the audio file. Press again to resume playback.
Intro:Press the INT button to play the first 10 seconds of each file. Press again to stop this function.Repeat:Press the RPT button to repeat a single track or to repeat an entire playlist.Random: Press the RDM button to play files from a playlist in random order.Specific Track Number: Press the DISC button to display NUM 0000.Press the VOL +/- buttons or directly enter desired track number.To enter a specific track number using radio buttons press:Buttons 1-6EQ button = 7![]() button = 8
button = 8![]() button = 9DISP button = 0Additional DVD controls see remote locations and functions below
button = 9DISP button = 0Additional DVD controls see remote locations and functions below
Remote Control Locations and Functions

- Power On/Off Button (): Press to turn the unit on or off.
- DISC Button: Press to access disc mode.
- Mute Button: Press to mute audio.
- AM/FM, Save Button: Press to select the radio mode. Sequential presses will select radio bands: FM1, FM2, FM2 (MHz), and AM1, AM2 (kHz).Press and hold for automatic radio station memory storing.
- AUX Button: Press to select between AUX-IN and AV IN1.
- Display Button (DISP): Press to toggle through the available display information. Press and hold to access the clock setting function.
- Play/Pause and Mute Button (): Disc: Press to pause DISC/USB play, press again to resume play.
- Random Button: Press to play tracks in random order in DISC/USB mode.
- DIR- Button: Press to navigate back through directories in DISC/USB mode.
- Down, Up Buttons: Radio Mode: Press to seek/select the next available lower or higher radiofrequency. DISC/USB Mode: Press to search for the beginning or next track or chapter.
- SEL Button: Short press to access sound adjustment settings: BASS, TRE, BAL, EQ, and LOUD and settings BEEP ON/OFF and 12/24 CLOCK. Long press to access AF ON/OFF, TA ON/OFF, radio genre settings, REG ON/OFF, P-VOL, AREA selection, DX/LOC, STEREO/MONO.
- Navigation Buttons ( , , , ):Moves feature selection up, down, left or right.
- OK Button: Executes a selected item.
- Stop Button: Press to stop disc play.
- TITLE Button: Back to title menu in DVD DISC mode.
- GOTO Button: Select exact time, track or chapter in DVD DISC mode.
- Speakers A, B, C Buttons: Press to select speakers to adjust independently or in groups. Press and hold any of the 3 buttons to mute the selected speakers. Press and hold again to resume the sound.
- Volume Buttons (VOL / VOL ): Press VOL to increase or VOL decrease the volume level. Use these buttons to adjust manual sound settings up and down or when selecting ON/ OFF settings.
- BT Button: Press to enter Bluetooth mode and access files off Bluetooth connected device. USB Button: Press to enter USB mode and access files of a USB-connected device.
- USB Button: Press to enter USB mode and access files off a USB-connected device.
- RPT Button: Press to select REPEAT ONE or REPEAT ALL in DISC/USB mode.
- INT Button: Press to play 1st 10 seconds of tracks in DISC/USB mode.
- EQ/LOUD Button: Short press to select between EQ presets: FLAT, POP, ROCK, CLASS, EQ OFF.Press and hold to toggle between LOUD ON/ OFF.
- DIR+ Button: Press to navigate up through directories in DISC/USB mode.
- REV, FWD Buttons: Radio Mode: Press to manually tune into lower or higher radiofrequency. Press and hold to rapidly move forward or back. DISC/USB Mode: Press and hold to fast forward or backward through the currently selected track.
- SLEEP Button: Press to toggle between SLEEP ON/OFF. Press and hold to enter the SLEEP time setting. Once in the SLEEP time setting, the time is adjusted using the VOL+ and VOL- buttons.
- ALARM Button: Press to toggle between ALARM ON/ALARM OFF. Press and hold to enter ALARM time setting mode. Once in the ALARM time setting, toggle between hours and minutes by again pressing the ALARM button. With either hours or minutes selected (flashing), use the VOL+ and VOL- buttons to adjust to the desired time.Note: Make sure desired AM or PM is selected.
- DIM Button: Press to select screen brightness: LOW, MED, HIGH or OFF.
- ZOOM Button: Zoom in/out in picture mode.
- SETUP Button: Press to access the DVD setup menu.
- SUB-T Button: Press to access the movie disc’s subtitle languages.
- AUDIO/MO/ST Button: Radio Mode: Select STEREO or MONO. DVD DISC Mode: Press to change audio soundtrack on a multi-audio soundtrack DVD.
BT APP Operation
APP Installation:
- Your smartphone can be used as an alternative way to control the RV6200.You will need to install the “LINEAR SERIES” app on your smartphone. The APP can be downloaded from Google Play (Android phone) or App Store (iPhone). Search for “LINEAR SERIES” and proceed to download. Install per the app instructions.
Note 1. Your smartphone must be Bluetooth version 4.0 or above.Note 2. Before turning on the APP, make sure the unit didn’t pair with another device.RADIO Mode:The “LINEAR SERIES” App displays memorized preset radio stations that are set manually or automatically on the RV6200 unit. See instructions on page 6 for Storing Radio Stations under Radio Operations.All other App operations refer to the key below.
To Download App: Go to Google Play/Apple store Search for ‘Linear Series Remote’ Install application Accept any permissions

Installation
- Read the instruction manual carefully before installing the unit
- Make sure to connect other wires before powering on the unit.
- To avoid short circuits, make sure all the exposed wires are insulated.
- Secure all wires after installation.
- Connect the player according to the wiring connection instruction on page 13 of this manual.A wrong connection may cause damage to the unit.
- This player is only fitted with 12V DC devices.
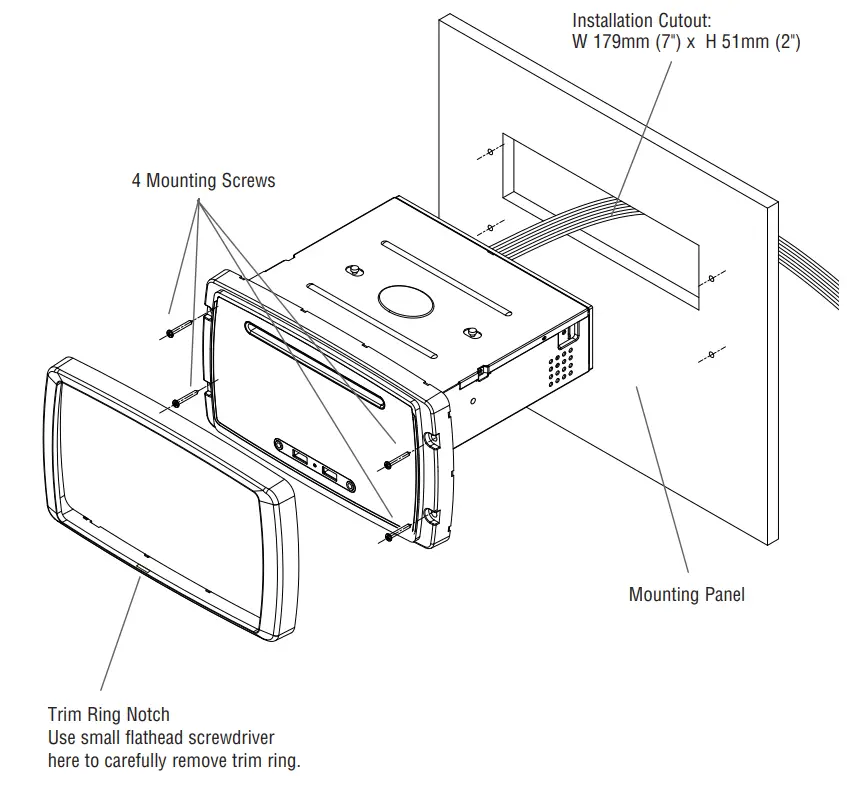
MOUNTING THE RV6200. Take off the unit’s front trim ring.
- Align the unit to dash cutout and mounting holes.
- Secure unit into the dash with 4 screws.
- Snap the front trim ring back onto the unit.
Wiring
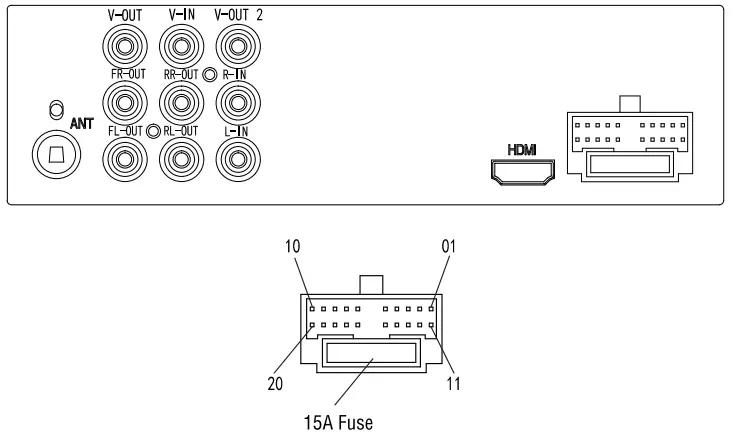
| NO | WIRE COLOR | DESCRIPTION | NO | WIRE COLOR | DESCRIPTION |
| 1 | ORANGE | SPEAKER C RIGHT+ | 11 | BROWN | SPEAKER C LEFT+ |
| 2 | ORANGE/BLACK | SPEAKER C RIGHT- | 12 | BROWN/BLACK | SPEAKER C LEFT- |
| 3 | 13 | ||||
| 4 | 14 | ||||
| 5 | BLUE | +12V REMOTE OUT | 15 | RED | B+ |
| 6 | 16 | BLACK | GND | ||
| 7 | GRAY/BLACK | SPEAKER A RIGHT – | 17 | WHITE/BLACK | SPEAKER A LEFT- |
| 8 | GRAY | SPEAKER A RIGHT+ | 18 | WHITE | SPEAKER A LEFT+ |
| 9 | PURPLE/BLACK | SPEAKER BRIGHT- | 19 | GREEN/BLACK | SPEAKER B LEFT- |
| 10 | PURPLE | SPEAKER B RIGHT+ | 20 | GREEN | SPEAKER B LEFT+ |
- This player operates on 12V DC.
- Do not connect to the battery until the player is absolutely well connected.
- Make sure the red wire is connected to the battery’s positive (+) terminal.
- When changing the fuse, make sure the specifications are the same.
- For the best sound from this equipment, use good quality 4-8 ohm speakers.
Trouble Shooting
| Symptom | Cause | Solution |
| No power. | The car ignition switch is not on. | If the power supply is connected to the car accessory circuits, but the engine is not moving, switch the ignition key to “ACC”. |
| The fuse is blown. | Replace the fuse. | |
| No sound. | Volume is in a minimum. | Adjust volume to the desired level. |
| The wiring is not properly connected. | Check wiring connection. | |
| The operation keys do not work. | The built-in microcomputer is not operating properly due to noise. | Press the reset button. |
| The radio does not work. | The antenna cable is not connected. | Insert the antenna cable firmly. |
| The radio station automatic selection does not work. | The signals are too weak. | Select a station manually. |
| APP play phone music sound can’t send to the unit. | Unit paired with another mobile phone. | 1)Turn off the Bluetooth function of another mobile. 2) Exit APP and turn on APP again. |
Specifications
GENERALPower Supply Requirements: DC 12 Volts, Negative GroundChassis Dimensions: 179(W) x 146(D) x 52(H)Tone Controls:Bass (at 100 Hz): ±10 dBTreble (at 10 kHz): ±10 dBMaximum Output Power: 4 x 40 watts + 2 x 15 wattsCurrent Drain: 10A (max.)
| RADIO | FM | AM |
| Frequency Coverage:IF:Sensitivity:Stereo Separation: | 87.5 to 108 MHz10.7 MHz4μV(S/N=30dB)>25dB | 520 to 1710 kHz450 kHz36dBuV(S/N=20dB) |
Warranty
ONE (1) YEAR LIMITED WARRANTYMagnadyne Corporation or its authorized agents will within one year from the date of sale to you, repair, replace or refund the retail sales price of said product or any part thereof, at the option of the Magnadyne Corporation or its authorized agents, if said product or part is found defective in materials or workmanship when properly connected and operating on the correct power requirements designated for the specific product. This warranty and Magnadyne Corporation or its authorized agent’s obligations hereunder do not apply where the product was; damaged while in the possession of the consumer, subjected to unreasonable or unintended use, not reasonably maintained, utilized in commercial or industrial operations, or serviced by anyone other than Magnadyne Corporation or its authorized agents, or where the warning seal on the product is broken or the power and/or plugs are detached from the unit. Magnadyne Corporation or any of its authorized agents will not assume any labor costs for the removal and reinstallation of any product found to be defective, or the cost of transportation to Magnadyne Corporation or its authorized agents. Such costs is the sole responsibility of the purchaser.This warranty does not cover the cabinet appearance items or accessories used in connection with this product, or any damage to recording or recording tape, or any damage to the products resulting from improper installation, alteration, accident, misuse, abuse or acts of nature.MAGNADYNE CORPORATION OR ITS AUTHORIZED AGENTS SHALL NOT BE LIABLE TO ANYONE FOR CONSEQUENTIAL OR INCIDENTAL DAMAGES OR CLAIMS EXCEPT THOSE ACCORDED BY LAW. NO EXPRESSED WARRANTY OR IMPLIED WARRANTY IS GIVEN EXCEPT THOSE SET FORTH HEREIN. NO IMPLIED WARRANTY SHALL EXTEND BEYOND ONE YEAR FROM THE DATE OF SALE.This warranty extends only to the original purchaser of the product and is not transferable. Some states do not allow limitations on how long an implied warranty lasts, and some states do not allow the exclusion or limitation of incidental or consequential damages, so the above limitations or exclusion may not apply to you. This warranty gives you specific legal rights, and you may have other rights that vary from state to state.“NOTE: The manufacturer is not responsible for any radio or TV interference caused by unauthorized modifications to this equipment. Such modifications could void the User’s authority to operate the equipment.” Defective merchandise should be returned to the original point of purchase or secondly, to Magnadyne Corporation, 1111 W. Victoria Street, Compton CA 90220.Return Authorization must be obtained before sending, or merchandise may be refused.
 report this ad
© Copyright 2020Magnadyne CorporationRV6200-UMRev. C 7-22-20
[xyz-ips snippet=”download-snippet”]