MAGNASONIC EAAC601 SelfSet Clock Radio with Dual Alarm
Thank you for your purchase of this Magnasonic product. Please read this instruction manual carefully before using product to ensure proper use. Keep this manual in a safe place for future reference.
WARNING 
Do not ingest the battery, Chemical Burn Hazard. This product contains a coin/button cell battery. If the coin/button cell battery is swallowed, it can cause severe internal burns in just 2 hours and can lead to death. Keep new and used batteries away from children. If the battery compartment does not close securely, stop using the product and keep it away from children. If you think batteries might have been swallowed or placed inside any part of the body, seek immediate medical attention.
- Mains plug is used as disconnect device and it should remain readily operable during intended use. In order to disconnect the apparatus from the mains completely, the mains plug should be disconnected form the socket outlet completely.
- Caution marking is located at the back of apparatus.
CAUTION
- Danger of explosion if battery is incorrectly replaced. Replace only with the same or equivalent type.
- Battery cannot be subjected to high or low extreme temperatures, low air pressure at high altitude during use, storage or transportation.
- Replacement of a battery with an incorrect type that can result in an explosion or the leakage of flammable liquid or gas.
- Disposal of a battery into fire or a hot oven, or mechanically crushing or cutting of a battery, that can result in an explosion.
- Leaving a battery in an extremely high temperature surrounding environment that can result in an explosion or the leakage of flammable liquid or gas.
- A battery subjected to extremely low air pressure that may result in an explosion or the leakage of flammable liquid or gas.
PRODUCT INFORMATION


- Month Indicator
- Daylight Savings Time `on’ Indicator
- Year Indicator
- PM Indicator
- Time Zone Selection `on’ Indicator
- FM/AM Band Indicator
- Alarm Indicators:Alarm 1 Radio / Alarm 1 Buzzer / Alarm 2 Radio / Alarm 2 Buzzer
- Sleep Mode `on’ Indicator
- Day of the Week Indicator
- Date Indicator
- Time / Main Function Indicator
- Indoor Temperature Display
- LCD Screen
- << / Daylight Savings Time
- >> / ºC-ºF
- Volume Down / Nap
- Volume Up / Calendar
- Projection Unit
- Set / Memory
- Time Zone / Snooze / Sleep / Dimmer
- Radio ON/OFF / AM/FM Band
- Alarm 1
- Alarm 2
- AUX Input
- Speaker
- FM Antenna
- Indoor Temperature Sensor
- Battery Door
- Projection Focus
- Projection 180º Flip / Projection Temperature ON/OFF
- Projection ON/OFF
OPERATING INSTRUCTIONS
Connecting Power
The SelfSet™ Clock Radio is equipped with an “auto time set” feature. When power is connected, the clock display will flash `2′ which is TIME ZONE 2 (Eastern time) and the default TIME ZONE setting.To select TIME ZONE 2 (Eastern time) as your default time zone:
- Press ONCE to confirm your selection.
- The correct time will be displayed, unless you are in another time zone.
To change your time zone upon setup:
- Press or until your own time zone appears on the display; press ONCE to confirm your selection.
To change your time zone after setup:
- With the radio off, press and hold the zone TIME ZONE HOR button until the time zone numbers flash.
- Press or until your own time zone appears on the display; press ONCE to confirm your selection.
There are 8 programmed times zones:
0 – Newfoundland time1 – Atlantic time2 – Eastern time (default)3 – Central time4 – Mountain time5 – Pacific time6 – Alaska time7 – Hawaiian time
Setting Alarm 1 & Alarm 2Press the ALARM 1 ![]() or ALARM 2
or ALARM 2 ![]() button once to view the current alarm setting and then press and hold to enter the alarm set mode. The alarm time will flash, and the settings will appear in the following order: HOUR > MIN > ALARM MODES > WAKE OPTIONS > RADIO VOLUME (if applicable)
button once to view the current alarm setting and then press and hold to enter the alarm set mode. The alarm time will flash, and the settings will appear in the following order: HOUR > MIN > ALARM MODES > WAKE OPTIONS > RADIO VOLUME (if applicable)
- Press the or buttons to decrease/increase the HOUR; press theor button to confirm HOUR. The MINUTES will begin to flash.
- Press the or buttons to decrease/increase the MINUTES; press the or button to confirm MINUTES. Alarm modes will flash.Alarm modes allow you to set more than one alarm in a week e.g.,ALARM 1 set to wake you Monday-Friday and ALARM 2 set to wake you on weekends.Alarm mode settings:1-5 : Monday to Friday1-7 : Whole week6-7 : Saturday & Sunday1-1 : One day of weekNOTE: When selecting 1-1, you must select a specific day as follows:1=Monday2=Tuesday3=Wednesday4=Thursday5=Friday6=Saturday7=Sunday
- Press the or buttons to toggle between the ALARM MODE settings then press the or button to confirm your selection; if 1-1 is selected, press the or buttons to toggle between the days of the week and press the or button to confirm your selection. The Wake options will begin to flash.
- Press the or buttons to toggle between the Wake options AM, FM or bu (buzzer); press the or button to confirm your selection; if AM or FM is selected, the Alarm Volume selection will begin to flash.
- Press the or buttons to decrease/increase the Alarm Volume; press the or button to confirm your selection.
- Press and hold the or buttons to quickly decrease/increase through settings.
- To cancel an alarm while it is going off, press the button.
- If an alarm is not cancelled, it will sound for 30 minutes then automaticallyturn off. It will resume to the same alarm time on next scheduled day. · To enable/disable an alarm, press and hold the or button. An icon will appear on screen to indicate that an alarm is enabled.
Setting the Date & Time
To change the Date/Time, press and hold the in the following order: button. The settings will appear YEAR > MONTH > DAY > 12/24 H > HOUR > MIN
- Press the or buttons to toggle through the settings
- To confirm your selection, press the button once again.
Daylight Saving Time (DST) / Summer TimeDaylight Saving Time/Summer Time is automatically preset. An icon will appear on screen to indicate DST is on![]()
- Daylight saving time begins at: 2:00 AM on the second Sunday of March.
- Standard time begins at: 2:00 AM on the first Sunday of November.
Canceling / Reactivating Automatic DST / Summer Time
- To cancel DST/Summer Time, press and hold the onds while the radio is OFF. button for 3 sec-
- `OFF’ will appear in the display to show that the Automatic DST/Summer Time adjustment is canceled. The display will return to the clock.
- To reactivate DST/Summer Time, press and hold the seconds while the radio is OFF. button for 3
- `ON’ will appear in the display to show that the Automatic DST/Summer Time adjustment is reactivated. The display will return to the clock.
- The timing of Automatic DST/Summer Time employed by the unit (see above) is subjected to variations by region and the law in each country/region. In such a case, cancel the Automatic DST/Summer Time adjustment.
- If you live in a country/region that has not introduced Daylight Saving Time/Summer Time, you must cancel Automatic DST/Summer Time adjustment before using the unit.
Battery Backup
This alarm clock is equipped with a battery backup feature. This feature will restore your alarm clock settings in the event of a power outage. The 3V, CR2032 Flat Lithium battery is pre-installed at the factory, however, should you need to replace the battery, please read the following instructions.
Installing the Battery
- Using a small Phillips Head screwdriver, loosen the screw from the battery panel on the bottom of the unit.
- Remove the battery compartment panel.
- Remove/properly dispose of depleted battery and replace with new, 3V, CR2032 Flat Lithium battery.
- Close the battery compartment and put screw into place to secure battery panel.
- Batteries must be installed by an adult.
- Use only the recommended size and type of battery specified.
- Please be sure to follow the correct polarity when installing the batteryin the battery compartment. A reversed battery may cause damage to the alarm clock.
- When not using the unit for a prolonged period of time, please remove the battery to avoid possible damage caused by a leaking battery.
ATTENTION
- When replacing the battery, do not disconnect AC plug from AC outlet. Current time and alarm will stay the same.
- Do not plug or unplug the power cable if you have wet hands.
- If you are not planning to use the unit for an extended period of time, dis- connect the power cable from the wall outlet.
- Do not pull on the cord! You may damage the power cord and may cause an electric shock when disconnecting the power cord from the wall outlet. Pull firmly at the base of the plug.
Snooze Function
- When an alarm is sounding, press the button to stop the alarm for 9 minutes. Alarm will resume after 9 minutes.
- Pressing the button on the top of the unit will cancel the snooze function; Snooze function will also stop automatically after 30 minutes.
Sleep Timer
The sleep timer allows you to listen to music for a preset amount of time ranging from 90 minutes to 15 minutes. It is commonly used by people who prefer to fall asleep to music.
- Press the button to turn the radio on.
- Press the button to toggle through the preset times: 90min > 60min > 30min > 15min > OFF
- To cancel the sleep timer, press the button until you see ‘OFF’ in the display or press the button.
Nap Timer
The nap timer allows you to set a buzzer alarm to go off after a preset amount of time ranging from 90 minutes to 10 minutes.
- With radio off, press the button to turn on the nap timer.
- Press the button to toggle through the preset times; 90min > 80min > 70min > 60min > 50min > 40min > 30min > 20min > 10min > OFF
- When enabled, pressing the button will show current nap timer and pressing again will reset the timer to 90 minutes.
- When the nap timer expires, it will continue to buzz for 30 minutes or it can be stopped by pressing the button.
- To cancel the nap timer, press the display. button until you see `OFF’ in the display.
Dimmer
You can adjust the brightness of the LCD display making it brighter, dimmer or even turning it off. There are three dimming options: High > Low > OFF.
1. With the radio off, press the dimmer settings.
Temperature Settings The temperature can be displayed in °C or °F.
- With the radio off, press and hold the button to switch between °C or °F modes.
Listening to the Radio
- Press the button on the top panel to turn the radio ‘ON’.
- Press and hold the button while the radio is ON to toggle between AM and FM radio.
- Press the or buttons once, to move back/move forward one station at a time.
- Press and hold the or buttons for one second to scan back/forward through the stations; the unit will automatically scan to the next broadcasting station.
- Control the radio volume with the or buttons.
- Press the button to turn the radio ‘OFF’.
Please ensure that the FM antenna is completely unrolled and extended forbest FM reception. The AM band uses an internal directional aerial. For best reception, please rotate the radio.
To Set the Radio Presets
- Press the button on the front panel to turn the radio ‘ON’.
- Press and hold the button while the radio is ON to toggle between AM and FM radio.
- Use the or buttons to select the desired radio station.
- To set a radio present, press and hold the button. A preset number will blink on the display e.g., ‘P02’.
- Use the or buttons to toggle to the desired preset number.
- Press the button again to set the preset.
- Repeat steps 2 through 6 to set more presets.
To Recall the Radio Presets
- Press the button on the front panel to turn the radio `ON’.
- Press the button to select a preset. The current preset number will appear on the display. Press the button again to cycle through all radio presets.There are 20 available presets. 10 for AM radio (P01 to P10) and 10 for FM radio (P01 to P10)
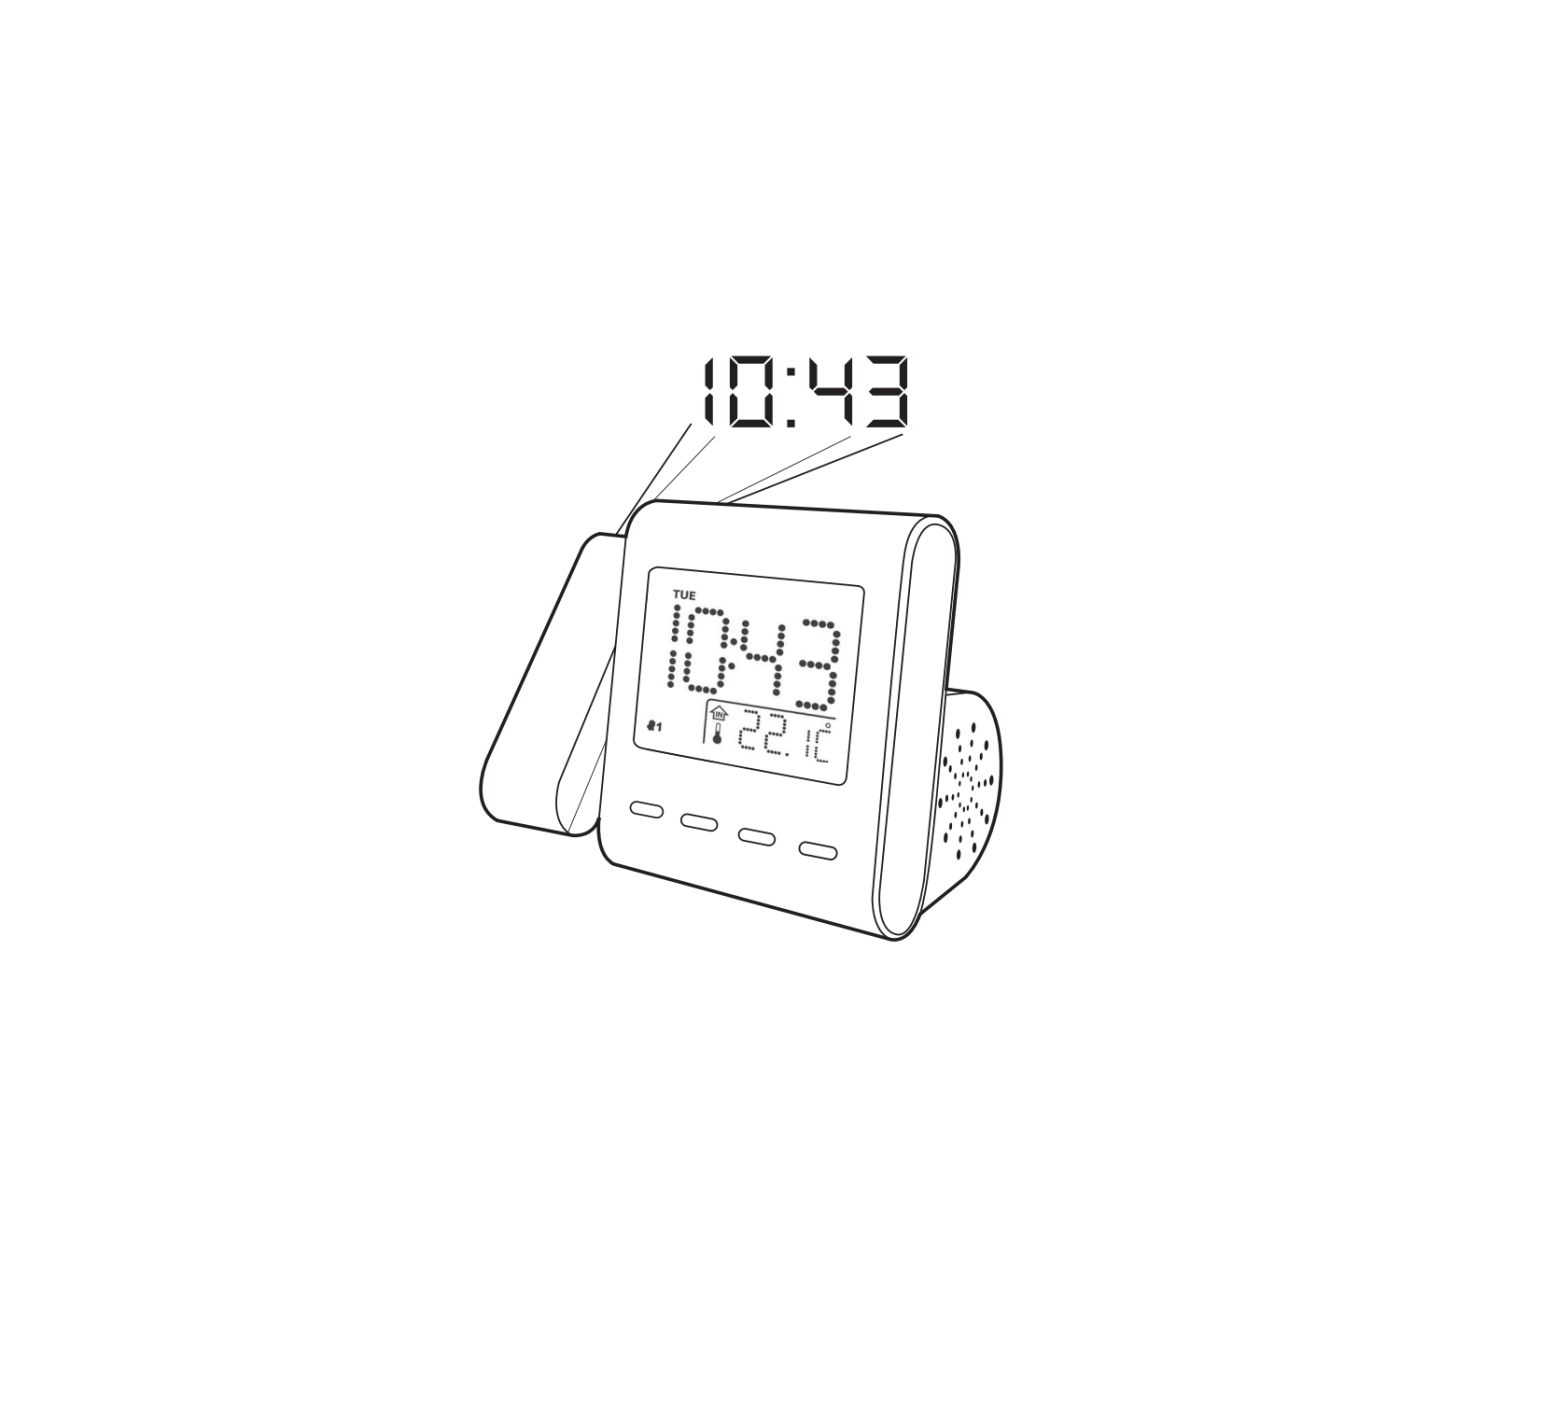
Projection Unit
The Projection Unit will project the Time or the Temperature on a wall or ceiling of a darkened room (maximum distance is 3-9 feet).
- To turn the projected image ON/OFF, press the button.
- Turn the Focus Adjustment Wheel ( on the back of the projection unit) until the projected time/temperature is clearly shown on the ceiling or wall.
- To display the temperature, press and hold the button on the back of the projection unit. To flip the projected image (temperature or time) 180°, press the button once.
AUX In
This clock radio is equipped with a convenient auxiliary input that allows you to use your clock radio as a speaker for another audio device.
- Connect a 3.5mm cable (not included) into the connection on the back of the clock radio and connect the other end of the cable to the audio out connection of your external audio device.
- Any device connected through the auxiliary input will override the radio function when the radio is on.
- Operate the external audio device as you normally would. You can control the volume with the clock radio or buttons.
MAGNASONIC® WARRANTY
WARRANTY INFORMATION
Thank you for choosing Magnasonic! We guarantee your investment in our products is a solid one. Our products come with a complete one-year parts and labor warranty. High performance components combined with quality craftsmanship allow us to maintain the highest possible production standards. All items are guaranteed against defects in materials and craftsmanship. Magnasonic has outstanding quality control; if something should go wrong with any of our products, we will repair it free of charge within the warranty period. If the product cannot be repaired, we will replace the product. In the event that Magnasonic replaces a product under warranty, the replacement would only carry the original warranty from the original date of purchase.
Warranty Exclusions
Magnasonic products are warrantied for parts and labor for one year from date of original purchase, and are subject to the terms and conditions of the warranty. Magnasonic warranties are valid for the original owner and are non-transferable.
- Any defects caused or repairs required as a result of abusive operation, negligence, accident, improper installation or inappropriate use as outlined in the owner’s manual.
- Any Magnasonic product tampered with, modified, adjusted, or repaired by any party other than Magnasonic.
- Any cosmetic damage to the surface or exterior that has been defaced or caused by normal wear and tear.
- Any damage caused by external or environmental conditions, including but not limited to, trans- mission line/power line voltage or liquid spillage.
- Any product received without an appropriate model and serial number.
- Any products used for rental or commercial purposes.
- Any installation, set up and/or programming charges.
To Obtain Warranty ServiceShould your product require warranty service, please contact us at www.magnasonic.com/contact or call us at 1-855-768-3589 to set up a Return Authorization. Products returned without a valid Return Authorization number will be refused.
Magnasonic products must be returned in their original packaging. Our products are packaged specially to protect them from any damage during shipping, and without this packaging the return shipment could get damaged.
This warranty does not cover the shipping cost, insurance, or any other incidental charges. Products shipped for warranty service must be pre-paid by the customer, and Magnasonic will cover the cost to ship the repaired or replaced product back to the customer.
MAGNAOSONIC
 DO NOT RETURN THIS PRODUCT TO THE STORE
Please contact a Magnasonic customer support representative first regarding any additional information on product features, specifications or assistance with setup. Please contact us via one of the methods below:
 Support:Magnasonic.com/supportOnline Web Chat:Magnasonic.com
For more product information visit Magnasonic.com
TROUBLESHOOTING
If you experience a problem with this unit, check the chart below before calling for service.
| SYMPTOM | POSSIBLE CAUSE | POSSIBLE SOLUTION |
| GENERAL | ||
| Power does not come on | AC cord not plugged in | Insert plug firmly into AC outlet |
| RADIO | ||
| No sound | Power is not on | Press power to turn the radio on |
| Volume control is at the mini- mum position | Turn the volume control up | |
| Noise or sound is distorted on AM or FM radio | AM: Interference | Position the radio for better AM reception |
| FM: Antenna wire not extended | Extend antenna wire | |
| CLOCK | ||
| Incorrect time | Batteries inserted incorrectly, not connected or dead | Check batteries |
| Clock not set | Set the clock | |
| Alarm does not turn on | Alarm is not set to turn on | Press and hold ALARM 1 or ALARM 2 to turn on the alarm |
| Clock is not set | Set the clock | |
| Alarm time is not set | Set alarm time |
SPECIFICATIONS
| Frequency Range (AM) | 520 – 1710 kHz |
| Frequency Range (FM) | 87.5 – 108 MHz |
| Power Supply | AC 120V ~ 60Hz, 5W |
| Battery Backup | DC 3V CR2032 (battery included) |
CARE AND MAINTENANCE
PRECAUTIONS:
- Always turn off the unit after use.
- Keep the unit away from magnetic objects, water or heat sources.
- Use a clean soft cloth moistened with lukewarm water to clean the cabinet.Never use chemical cleaners that could damage the finish of the unit.
- Disconnect the unit from any power sources before cleaning.
NOTE: This equipment has been tested and found to comply with the limits for a Class B digital device, pursuant to Part 15 of the FCC Rules. These limits are designed to provide reasonable protection against harmful interference in a residential installation. This equipment generates, uses, and can radiate radio frequency energy and, if not installed and used in accordance with the instructions, may cause harmful interference to radio communications. However, there is no guarantee that interference will not occur in a particular installation. If this equipment does cause harmful interference to radio or television reception, which can be determined by turning the equipment off and on, the user is encouraged to try to correct the interference by one or more of the following measures:
- Reorient or relocate the receiving antenna.
- Increase the separation between the equipment and the receiver.
- Connect the equipment to an outlet on a circuit different from that to which the receiver is connected.
 report this ad
![]()
References
[xyz-ips snippet=”download-snippet”]