![]() Pathfinder 500W
Pathfinder 500W
![]() PLEASE READ ME FIRSTwww.magnumbikes.com
PLEASE READ ME FIRSTwww.magnumbikes.com
General Introduction
WELCOMEThank you for purchasing a Magnum electric bike and welcome to the Magnum Bikes family of e-bike enthusiasts. We encourage you to join our Facebook group “Magnum Bikes Community” which you can find at the following link: https://www.facebook.com/groups/389290978573773Our Facebook group is a place for Magnum riders to ask questions, have discussions, share recommendations and experiences and connect with other Magnum Bike enthusiasts.USE OF THE MANUALWe encourage you to read this manual thoroughly before you take your new E-bike for a ride. It is important not to overlook the safety instructions and explanations of both traditional and non-traditional bike parts, as this will offer you a general understanding of your new E-bike. This manual is designed to help you get the most out of your E-bike, and so we have attempted to answer as many of your potential questions as possible. Please take a moment to read through the various sections before you get in the saddle.SERVICE AND TECHNICAL SUPPORTThis manual is intended as a general overview of your new E-bike and is therefore not an extensive reference. For technical support, including information about service, maintenance and repairs, please consult your dealer. You can visit our website (www.magnumbikes.com) for more information about our products and technology, or to find a dealer close to you.
INCLUDED WITH THE PATHFINDER E-BIKE
![]()
Unpacking & Assembling
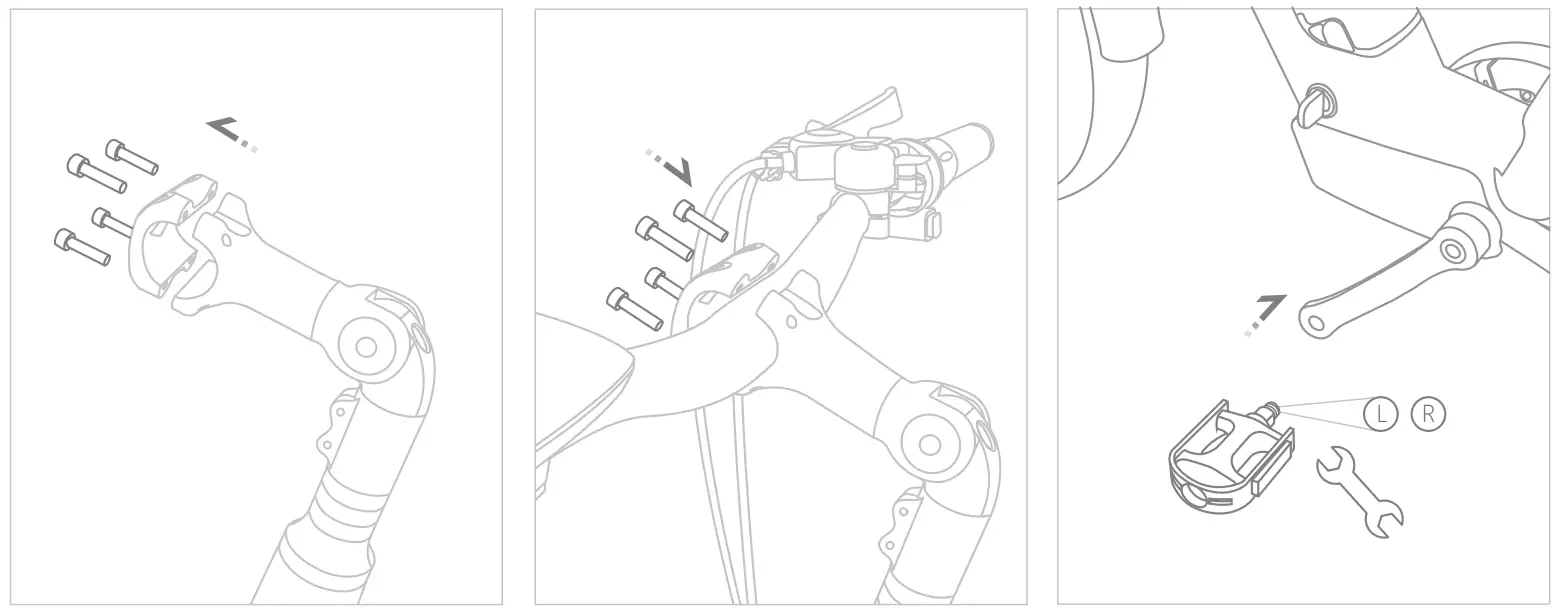
STEP 1. Install the handlebar and stem
- Turn out the front end screw of the stem
- Open the front cover of the stem and put the handlebar into it. Adjust the angle of the handlebar
- Tighten the screw at the upper end of the stern and lock the handlebar
- After installation, move the handlebar back and forth to make sure the screws are tightened
STEP 2. Install pedals
- Take out the pedal and tool kit from the accessory box. L (left) and R (right) are engraved on the end of the foot screw.
- Screw-in the pedal, left counterclockwise, right clockwise, and finally, tighten with an open-end wrench.
Parts Introduction
| 1. Display2. The left brake lever controls the rear disc brake3. The right brake lever controls the front disc brake4. Electronic horn | 5. Gear shifter6. Throttle7. Stem adjustment |
Brake lever adjustment and fixingAdjust the angle of the brake lever to a comfortable position, and then tighten the screw above the brake lever with the Allen wrench from the included tool kit.
HANDLEBAR HORIZONTAL ADJUSTMENTWhen unpacking and assembling, adjust the horizontal angle of the handlebars with stem adjustment 7. Adjust to a desired or comfortable horizontal position and finally tighten the stem adjustment with provided tool kit.

Battery
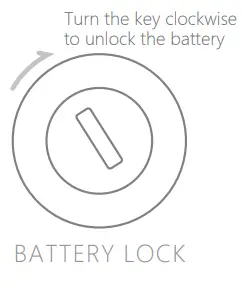
BATTERY REMOVALInsert the key into the Inc–k hole on the Side of the e-bike and twist it to the battery unlock position, then the battery can be taken out.BATTERY INSTALLATIONKey is in the lock hole on the side of the battery in the unlock position, then place the battery into the slot and twist the key to the lock position. Remove key.
BATTERY SAFETYDo not leave the battery unused for a long time, take it out and charge it at least once a month. Battery failure caused by improper or irregular charging is not covered by the warranty.Try not to exhaust the battery completely during riding. Charge it as soon as possible at the last bar of the battery indicator on the meter. Complete exhaustion of the battery will affect the battery life.Waterproof instructions: The battery casing protects from basic rain while inserted and riding. Do not leave the whole e-bike in rain for a long time. After exposure to light rain wipe the battery dry as soon as possible.DO NOT submerge the battery or allow heavy rain exposure.
Product Specs
ELECTRONIC DETAILSMotor Type: Rear Geared Hub MotorMotor Output:48v 500wBattery Voltage / Amp Hours / Watt Hours: 48v / 13ah /624whBattery Chemistry: Lithium Nickel Cobalt Manganese (Li-ncm)Estimated Charge Time: 4-4.5 HrsEstimated Min And Max Range:30 To 50 Miles (Depending On Riding Style, Terrain, Rider Weight, and Pedal Assist Level.)Display Type: Bigstone H102 DisplayDisplay Readouts: Speed (mph or kph), Frontlight on/off, Assist Level 0-3, Battery Level, Odometer, Trip Distance, Range (estimated remaining mileage)Drive Modes: Pedal Assist, Twist ThrottleMax Speed:25mphLights: Integrated Front and Rear Light controlled by the display (power on/off)BICYCLE DETAILSTotal Weight: 50IbsBattery Weight: BibsFrame Type: Low StepFork Details: Fixed AlloyGearing Details: Shimano Altus 7 SpeedShifter Details: Shimano AltusStem: Adjustable AlloyBrake Details: Tektro Hydraulic disc brakesSaddle: VELO saddleSeat post:RigidRack / Fenders: Rear rack, front and rear fendersTires: Innova 20″ fat tireWheel Size:20″ x 3″
Safety
PRECAUTIONS
- When adjusting the handlebars or saddles, be careful not to expose the safety line marks off the handlebars and saddles
- Before cleaning the e-bike, please turn off the main power supply and unplug the charging cable
- Note about water washing: It is strictly forbidden to directly wash or soak the e-bike with a high-pressure water gun or water pipe, and it is strictly forbidden to wash with water
- This product has a certain rain-proof function, please dry it in time after riding on rainy days, do not rain for a long time
BATTERY CHARGING & MAINTENANCE
- Charge at 0°C – 40°C, discharge at -20°C – 50°C, keep the battery dry and ventilated
- When there is only one battery power indicator or the meter shows only one bar left, please turn off the power and charge it in time. The exhaustion of the battery will seriously affect the battery’s performance and life. Please turn off the electric door lock when charging
- Do not leave your battery charging overnight.
- Please use the original charger, pay attention to the battery type and voltage applied to the charger
- The charger lights up in red during charging and turns green when fully charged. Please unplug the charging head when the battery is full.
- Please close the rubber cover of the charging port after charging, otherwise, it will affect the rainproof effect and cause damage to the battery
- When replacing the charger, it should match the battery model
- It is strictly forbidden to put the battery in acid or alkaline liquid, try to avoid rain, keep away from fire, heat, and high temperature. It is strictly forbidden to destroy or disassemble the battery. Do not insert metal objects into the charging port to avoid short circuits.
- Used batteries cannot be dismantled without authorization, and should be recycled by relevant professional departments
![]() Pathfinder Display ManualSpecification of H102 Display
Pathfinder Display ManualSpecification of H102 Display
![]()
![]()
Key Functions
H102 display is included 3 buttons, the distribution position is shown in the figure below, and the functions are as follows![]() Power key, for switching machine and function confirmation, and information switching function.
Power key, for switching machine and function confirmation, and information switching function.![]() Adjust and increase the button, which is used to adjust the power gear, select the setting options and switch the lights.
Adjust and increase the button, which is used to adjust the power gear, select the setting options and switch the lights.![]() Adjust and reduce buttons for power gear adjustment, setting options selection, and 6KM start assistant.
Adjust and reduce buttons for power gear adjustment, setting options selection, and 6KM start assistant.

Functional Overview
6.1. Switch on and off machine operation and displayShut downstate, continue to press down 2 seconds The meter displays the welcome form and then enters the main form of the system.In the power-on state, press continuously 2 seconds, the meter displays the shutdown form, and then the system shutdown. The button can be released.6.2. Main form and operationH102 provides you with a variety of displays to meet your riding needs. The display content of H102 includes
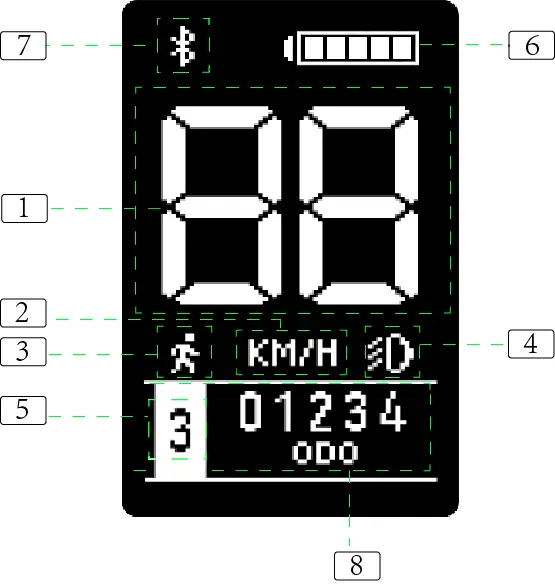
- Speed display :Shows the speed of the current ride.
- Speed unit display:You can set the select speed unit by km/h or mph.
- 6KM Display:When the power gear is not 0Continuous press
 for opening the 6km implementation functions location will display the 6km icon.
 - The lights display:Power On mode holds the key for more than 2 seconds, for opening or turning off the lights.
- assistant level displays:Display the current assistant level, turn on the default level 0, adjustable range 0-6, and the 6th level may be hidden, but can be hidden or closed by setting items.
- Battery level display:Display current battery power information. The battery is full of electricity, showing full, and when the last level starts flashing, the tip needs to be charged to the battery.
- Bluetooth instructions:Bluetooth function not available on the Pathfinder 350 or 500
- Information display:
i. ODO: This shows the mileage accumulated by the user.ii. TRIP: Display the user’s cycling mileage. The single mileage will not be cleared when power is off. The user needs to reset the mileage manually in the setting interface.iii. RANGE: Remaining mileage. The remaining mileage is an estimate that may differ from the actual ride.6.3. Average speed and maximum speed displayUnder the normal speed display interface, press the key and the key at the same time to enter the average speed and maximum speed display page, as shown below
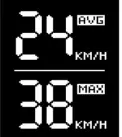
Average speed refers to the average speed of the vehicle up to the moment of starting up, and the maximum speed is also the maximum speed recorded so far in this starting up. After shutdown and restart, the average speed and maximum speed start recording and calculation again.Press any key once to exit the average speed and maximum speed display.6.4. Setting item description and operation6.4.1. Enter and exit the Settings page and instructions for theSettingsPress the key ![]() and
and ![]() at the same time enter the setting interface. The meter on the setting page is displayed as follows:
at the same time enter the setting interface. The meter on the setting page is displayed as follows:
On the Settings page, you can select ![]() and
and ![]() modify or display the items.After the item is selected, press the key
modify or display the items.After the item is selected, press the key ![]() to confirm the perforationIf more than one page is displayed, there will be PAGE DOWN under the display area. Select PAGE DOWN to enter the next page.
to confirm the perforationIf more than one page is displayed, there will be PAGE DOWN under the display area. Select PAGE DOWN to enter the next page.
In the Settings page, press ![]() and
and ![]() at the same time can quickly exit the Settings page, back to the main page display.Wheel setting and displaySelect the TIRE SIZE, and then press the key
at the same time can quickly exit the Settings page, back to the main page display.Wheel setting and displaySelect the TIRE SIZE, and then press the key ![]() to enter the WheelDiameter Setting and Display Items page.
to enter the WheelDiameter Setting and Display Items page.
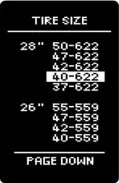
If the vehicle controller has fixed the vehicle wheel diameter size, this numeric term will not be adjustable and will only be used to display the system wheel diameter size.6.4.2. Unit settings and displaySelect the UNITS, and then press the key ![]() to enter the Unit Settings and Display Items page.
to enter the Unit Settings and Display Items page.
Users can adjust the display unit of mileage and speed according to actual needs. Choice of metric or British units.6.4.3. Maximum speed settingSelect the TOP SPEED, and then press the key ![]() to enter the Maximum Speed Setting page.
to enter the Maximum Speed Setting page.
This item can be adjusted only by entering the password, which can be selected as 20KM/H, 25HK/H, and 32KM/H. Please consult the dealer or vehicle manufacturer for the password.6.4.4. Battery information.Select the BATTERY INFO and then press the key ![]() to enter theBATTERY information display page.
to enter theBATTERY information display page.

Display current battery voltage, battery capacity, number of charging cycles. If the battery is not recommended by the manufacturer, the battery information may not be displayed properly.6.4.5. System versionSelect the VERSION, and then press the key ![]() to enter the Version information display page.
to enter the Version information display page.
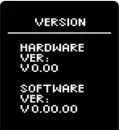
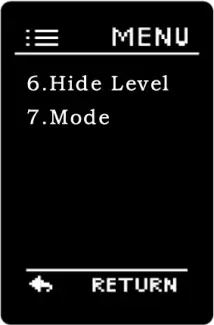
Display the hardware version and the software version, respectively.6.4.6. Hidden assistant level settingSelect the PAGE DOWN, and then press the key ![]() to enter the nextSettings page, select HIDE LEVEL and then press
to enter the nextSettings page, select HIDE LEVEL and then press ![]() again.
again.

Select ON to turn on the hidden gear function, and select OFF to turn off the hidden gear function. If ON is selected, the adjustable range of the gear in the main interface is 0-5. If OFF is selected, the adjustable range of the power gear is 0-6.6.4.7. Mode settingSelect the MODE, and then press the key ![]() to enter the Mode setting item.
to enter the Mode setting item.
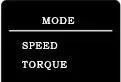
SPEED mode or TORQUE mode can be selected depending on the type of power sensor. Default SPEED mode.6.4.8. Single mileage resetSelect the TRIP, and then press the key ![]() to enter the TRIP page.
to enter the TRIP page.

report this adPress the key ![]() and
and ![]() at the same time for more than 2 seconds to clear the single mileage value.
at the same time for more than 2 seconds to clear the single mileage value.
Common questions and solutions
Q: Why can’t you turn it on?Answer: the boot needs to hold down the power button for 2 seconds. If you can’t turn on the check table wire beam and the controller’s connector contact is secure.Q: How should the instrument display the fault code?A: Please check the corresponding faults according to the fault description and control check. If you can’t solve it, please send the vehicle to the nearest dealer.Q: the operating instrument has no response and how to handle it.Answer: Long presses the power key for more than 2 seconds, turns on again.
![]() WarrantyYour MAGNUM E-bike comes with a limited warranty. Please visit www.maanumbikes.com or your local magnum dealer for details.The bike must be registered at www.magnumbikes.com/warranty in order to be covered by the one-year warranty.Stay Connected
WarrantyYour MAGNUM E-bike comes with a limited warranty. Please visit www.maanumbikes.com or your local magnum dealer for details.The bike must be registered at www.magnumbikes.com/warranty in order to be covered by the one-year warranty.Stay Connected @magnumbikes
![]() @magnumbikes
@magnumbikes![]() www.magnumbikes.com
www.magnumbikes.com![]() [email protected]
[email protected] 323-375-2666
[xyz-ips snippet=”download-snippet”]