INSTRUCTION MANUAL  IMPORTANT: Read Before Using.
 IMPORTANT: Read Before Using.
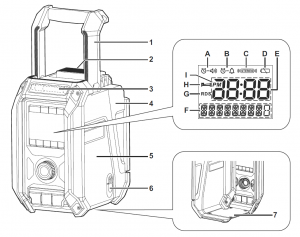

EXPLANATION OF GENERAL VIEW (Fig. 1)
- Handle/Built-in antenna (FM)
- Battery compartment locker
- Built-in antenna (AM)
- Battery compartment cover (covering batterycartridge)
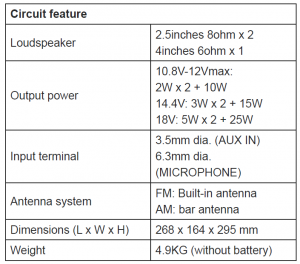
- Speaker
- DC IN socket
- Subwoofer
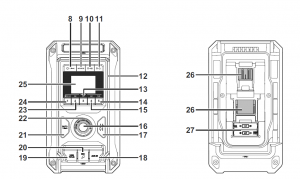
- Power/Sleep timer button
- Source button
- Radio alarm button
- Buzzer alarm button
- LED light
- Preset 3/Play/Pause button
- Preset 5/Plus button
- Preset 4/Next track button
- Volume/Tuning control/Select knob
- EQ control button
- AUX IN socket
- USB power supply port
- Microphone socket
- Menu/Info button
- EQ mode LED indicator
- Preset 2/Previous track button
- Preset 1/Bluetooth pairing button/L/R button
- LCD display
- Battery compartment
- Back up batteries compartment
LCD DISPLAY
A. Radio alarmB. Buzzer alarmC. Stereo symbolD. Low battery indicatorE. ClockF. FrequencyG. RDS (Radio data system)H. Sleep timer iconI. PM for clock
SYMBOLS
The following show the symbols used for the equipment.Be sure that you understand their meaning before use.
![]() Read instruction manual.
Read instruction manual.
 Only for EU countries.Do not dispose of electric equipment orbattery pack together with householdwaste material! In observance ofthe European Directives, on WasteElectric and Electronic Equipmentand Batteries and Accumulators andWaste Batteries and Accumulators andtheir implementation in accordancewith national laws, electric equipmentand batteries and battery pack (s) thathave reached the end their life must becollected separately and returned to anenvironmentally compatible recyclingfacility.
IMPORTANT SAFETYINSTRUCTIONS
![]() WARNING:When using electric tools, basic safety precautions shouldalways be followed to reduce the risk of fire, electricshock, and personal injury, including the following:
WARNING:When using electric tools, basic safety precautions shouldalways be followed to reduce the risk of fire, electricshock, and personal injury, including the following:
- Read this instruction manual and the chargerinstruction manual carefully before use.
- Clean only with dry cloth.
- Do not install near any heat sources such asradiators, heat registers, stoves, or other apparatus(including amplifiers) that produce heat.
- Only use attachments/accessories specified by themanufacturer.
- Unplug this apparatus during lighting storms or whenunused for long periods of time.
- A battery operated radio with integral batteries or aseparate battery pack must be recharged only withthe specified charger for the battery. A charger thatmay be suitable for one type of battery may create arisk of fire when used with another battery.
- Use battery operated radio only with specificallydesignated battery packs. Use of any other batteriesmay create a risk of fire.
- When battery pack is not in use, keep it away fromother metal objects like: paper clips, coins, keys, nails,screws, or other small metal objects that can make aconnection from one terminal to another. Shorting thebattery terminals together may cause sparks, burns,or a fire.
- Avoid body contact with grounded surfaces suchas pipes, radiators, ranges and refrigerators. Thereis an increased risk of electric shock if your body isgrounded.
- Under abusive conditions, liquid may be ejected fromthe battery; avoid contact. If contact accidentallyoccurs, flush with water. If liquid contacts eyes,additionally seek medical help. Liquid ejected from thebattery may cause irritation or burns.
- Do not use a battery pack or tool that is damaged ormodified. Damaged or modified batteries may exhibitunpredictable behavior resulting in fire, explosion orrisk of injury.
- Do not expose a battery pack or tool to fireor excessive temperature. Exposure to fire ortemperature above 130°C (266°F) may causeexplosion.
- Follow all charging instructions and do not charge thebattery pack or tool outside the temperature rangespecified in the instructions. Charging improperlyor at temperatures outside the specified range maydamage the battery and increase the risk of fire.
- The MAINS plug is used as the disconnect device,and it shall remain readily operable.
- Do not use the product at a high volume for anyextended period. To avoid hearing damage, use theproduct at moderate volume level.
- (For products with LCD display only) LCD displaysinclude liquid which may cause irritation andpoisoning. If the liquid enters the eyes, mouth or skin,rinse it with water and call a doctor.
- Do not expose the product to rain or wet conditions.Water entering the product will increase the risk ofelectric shock.
- This product is not intended for use by persons
(including children) with reduced physical, sensoryor mental capabilities, or lack of experience andknowledge, unless they have been given supervisionor instruction concerning use of the product by aperson responsible for their safety. Children shouldbe supervised to ensure that they do not play with theproduct. Store the product out of the reach of children.
SAVE THESE INSTRUCTIONS
SPECIFIC SAFETY RULES FOR BATTERY CARTRIDGE
- Before using battery cartridge, read all instructionsand cautionary markings on (1) battery charger, (2)battery, and (3) product using battery.
- Do not disassemble battery cartridge.
- If operating time has become excessively shorter,stop operating immediately. It may result in a risk ofoverheating, possible burns and even an explosion.
- If electrolyte gets into your eyes, rinse them out withclear water and seek medical attention right away. Itmay result in loss of your eyesight.
- Do not short the battery cartridge:(1) Do not touch the terminals with any conductivematerial.(2) Avoid storing battery cartridge in a container withother metal objects such as nails, coins, etc.(3) Do not expose battery cartridge to water orrain. A battery short can cause a large currentflow, overheating, possible burns and even abreakdown.
- Do not store the tool and battery cartridge in locationswhere the temperature may reach or exceed 50°C(122°F).
- Do not incinerate the battery cartridge even if it isseverely damaged or is completely worn out. Thebattery cartridge can explode in a fire.
- Be careful not to drop or strike battery.
- Do not use a damaged battery.
- To avoid risk, the manual of replaceable the batteryshould be read before use. And the max dischargingcurrent of the battery should be greater than or equalto 8A.
- The contained lithium-ion-batteries are subject tothe Dangerous Goods Legislation requirements. Forcommercial transports e.g. by third parties, forwardingagents, special requirement on packaging andlabeling must be observed.For preparation of the item being shipped, consultingan expert for hazardous material is required. Pleasealso observe possibly more detailed nationalregulations.Tape or mask off open contacts and pack up thebattery in such a manner that it cannot move aroundin the packaging.
- Follow your local regulations relating to disposal ofbattery.
- Use the batteries only with the products specifiedby Makita. Installing the batteries to non-compliantproducts may result in a fire, excessive heat,explosion, or leak of electrolyte.
![]() CAUTION:
CAUTION:
- Danger of explosion if battery is incorrectlyreplaced.
- Replace only with the same or equivalent type.
- Only use genuine Makita batteries. Use of nongenuineMakita batteries, or batteries that havebeen altered, may result in the battery burstingcausing fires, personal injury and damage. It willalso void the Makita warranty for the Makita tooland charger.
Tips for maintaining maximum battery life
- Charge the battery cartridge before completelydischarged. Always stop tool operation and charge thebattery cartridge when you notice less tool power.
- Never recharge a fully charged battery cartridge.Overcharging shortens the battery service life.
- Charge the battery cartridge with room temperature at10°C – 40°C (50°F – 104°F). Let a hot battery cartridgecool down before charging it.
- Charge the battery cartridge if you do not use it for along period (more than six months).
OPERATING TIME
The suitable battery packs for this radio listed as the following table.The following table indicates the operating time on a single charge.
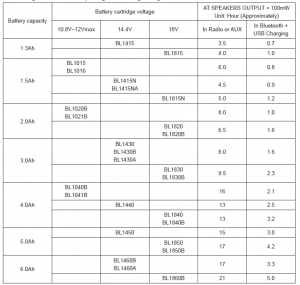
![]() WARNING:Only use the battery cartridges listed above. Use of any other battery cartridges may cause injury and/or fire.
WARNING:Only use the battery cartridges listed above. Use of any other battery cartridges may cause injury and/or fire.
NOTE:
- Table regarding to the battery operating time above is for reference.
- The actual operating time may differ with the type of the battery, charging condition, or usage environment.
INSTALLATION AND POWER SUPPLY
![]() CAUTION:
CAUTION:
- Be careful not to pinch your fingers when openingand closing the battery cover.
- Return the battery compartment locker to theoriginal position, after installing or removingbattery cartridge. If not, battery cartridge mayaccidentally fall out of the radio, causing injury toyou or someone around you.
- Always close and lock the battery compartmentlocker before moving the radio.
- Always switch off the radio before installing orremoving the battery cartridge.
- Be careful not to drop or strike the radio. Brokenshell may slash your finger or stab your body.Damaged radio may exhibit unpredictable behaviorresulting in fire, explosion or risk of injury.
IMPORTANT:
- Reduced power, distortion, “stuttering sound” or whenboth low battery indicator and “POWERFAIL” appearon the display are all the signs that the main batterypack needs to be replaced.
- When low battery indicator appears and an “EMPTY”keeps on flashing is the time to replace the back upbatteries.
- The battery cartridge can’t be charged via the suppliedAC power adaptor.
- The battery cartridge is not included as standardaccessories.
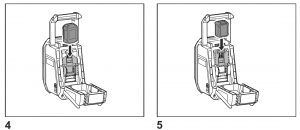
Installing or removing slide battery cartridge (Fig. 4 & 5)
- To install the battery cartridge, align the tongue on thebattery cartridge with the groove in the housing and slipit into place. Always insert it all the way until it locks inplace with a little click.
- If you can see the red indicator on the upper side of thebutton, it is not locked completely. Install it fully until thered indicator cannot be seen. If not, it may accidentallyfall out of the radio, causing injury to you or someonearound you.
- Do not use force when installing the battery cartridge.If the cartridge does not slide in easily, it is not beinginserted correctly.
- To remove the battery cartridge, slide it from the radiowhile sliding the button on the front of the cartridge.
Indicating the remaining battery capacity
* Only for battery cartridges with “B” at the end of themodel number.
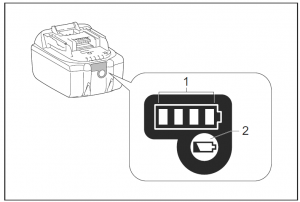
1. Indicator lamps 2. Check buttonPress the check button on the battery cartridge to indicatethe remaining battery capacity. The indicator lamps lightup for few seconds.
● 14.4V/18V batteries

● 10.8V-12Vmax batteries
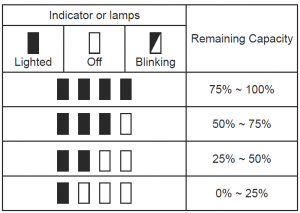
NOTE:Depending on the conditions of use and the ambienttemperature, the indication may differ slightly from theactual capacity.
Back up battery Installation (Fig. 2 & 3)
Keeping back up batteries inside the compartment preventstored data in preset memories from being lost.
- Pull out the battery compartment locker to releasebattery compartment. There are main battery packcompartment and back up battery compartment.
- Remove back up battery compartment cover and insert2 fresh UM-3 (AA sizes). Make sure the batteries arewith correct polarity as shown inside the compartment.Replace the battery cover.
- After back up batteries are inserted, insert the mainbattery pack to power radio.
Using supplied AC power adaptor
Remove the rubber protector and insert the adaptorplug into the DC socket on the right hand side of theradio. Plug the adaptor into a standard mains socketoutlet. Whenever the adaptor is used, the battery pack isautomatically disconnected.
 CAUTION:
- Always disconnected the AC power adaptorcompletely before moving the radio. If the ACadaptor is not removed, it may cause an electricshock.
- Never pull and/or drag the cord of the adaptor. Ifnot, the radio may accidentally fall down, causinginjury to you or someone around you.IMPORTANT:
- The mains adaptor is used as the means of connectingthe radio to the mains supply. The mains socket used forthe radio must remain accessible during normal use.
- In order to disconnect the radio, the mains adaptorshould be removed from the mains outlet completely.
- Use the AC power adaptor supplied with the product orspecified by Makita only.
- Do not hold the power supply cable and plug by yourmouth. Doing so might cause an electric shock.
- Do not touch the power plug with wet or greasy hands.
- Damaged or entangled cords increase the risk ofelectric shock. If the cord is damaged, have it replacedby our authorized service center in order to avoid asafety hazard. Do not use it before repair.
- After use, always store AC power adaptor out of thereach of children. If Children play with the cord, theymay suffer injury.
Note:When your radio has any interference in AM band by itsadaptor, please move your radio away from its AC poweradaptor over 30cm.
Charging with USB power supply port
There is the USB port at the front side of the radio. Youcan charge USB device trough the USB port.
- Connect the USB device, such as a MP3, or CD player, with USB cable available in the market.
- Press the Power button to switch on your radio.
- No matter if the radio is AC powered or batterypowered, the radio can charge the USB device whenthe radio is switched on and in FM radio mode, orBT mode, or AUX mode, which is appeared when anexternal audio source is connected.
Note:
- You cannot charge USB devices during AM modebecause radio signal reception becomes extremelypoor when charging USB device.
- The maximum volume of the output power speaker willdecrease when your USB is charging.
- The USB socket can provide max 5V/2.4A of electricalcurrent.
Important:
- Before connecting USB device to the charger, alwaysbackup your data of USB device. Otherwise your datamay lose by any possibility.
- The charger may not supply power to some USBdevices.
- When not using or after charging, remove the USBcable and close the cover.
- Do not connect power source to USB port. Otherwisethere is risk of fire. The USB port is only intended forcharging lower voltage device. Always place the coveronto the USB port when not charging the lower voltagedevice.
- Do not insert a nail, wire, etc. into USB power supplyport. Otherwise a circuit short may cause smoke and fire.
- Do not connect this USB socket with your PC USB port,as it is highly possible that it may cause breakdown ofthe units.
LISTENING TO THE RADIO
Scan tuning AM/FM
Note:The FM antenna is built into the handle. When operatingthe radio, please straighten the handle properly above theradio to get better reception. For the AM band, rotate theradio to get best signal as the AM antenna is built into theradio.
- Press the Power button to switch on your radio.
- Press the Source button to select AM or FM radiomode.
- Press and hold the Tuning control knob to carry outan auto-tune. Your radio will scan up the AM/FMband from the currently displayed frequency and willstop scanning automatically when it finds a station ofsufficient strength.
- After a few seconds the display will update. The displaywill show the frequency of the signal found.
- To find other station, press and hold the Tuning controlknob as before.
- When the end of the waveband is reached your radiowill recommence tuning from the opposite end of thewaveband.
- Rotate the Tuning control knob to adjust the soundlevel as required.
Note:
- While adjusting the volume, make sure the FM/AM isNOT flashing on the screen.
- If AM/FM is flashing on the screen, it allows you totune the stations manually (see the section of “Manualtuning – AM/FM” for more detail).
- The volume should not be too large. To preventpossible hearing damage, do not listen at highvolume levels for long periods.
8. To switch off your radio press the Power button.
Manual tuning – AM/FM
- Press the Power button to switch on your radio.
- Press the Source button to select AM or FM radiomode.
- Press the Tuning control knob and you will see the FMor AM is flashing on the display.Note:● FM/AM will flash approx. 10 seconds. Within thisperiod, only manual tuning is allowed.● If volume adjustment is desired while FM/AM isflashing, press the Tuning control knob to stop theflash and you can rotate the Tuning control knob toadjust sound level.
- Rotate the Tuning control knob to tune to a station.
- When the end of the waveband is reached your radiowill recommence tuning from the opposite end of thewaveband.
- Rotate the Tuning control knob to adjust the soundlevel as required.
Presetting stations in AM/FM mode
There are 5 preset stations each for AM and FM radio.They are used in the same way for each waveband.
- Press the Power button to switch on your radio.
- Press the Source button to select the desiredwaveband. Tune to the required radio station aspreviously described.
- Press and hold the required Preset button (1 to 5) untilthe display shows “P4” for example after the frequency.The station will be stored using the preset number.Repeat this procedure for the remaining presets as youwish.
- Preset stations which have already been stored maybe overwritten by following the above procedure ifrequired
Display modes – FM
Your radio has a range of display options for FM radio mode.Repeatedly press the Menu/Info button to view the RDSinformation of the station you are listening to.
a. Station name Displays the name of the stationbeing listened to.b. Program type Displays the type of station beinglistened to such as Pop, Classic,News, etc.c. Radio text Displays radio text message such asnew items etc.d. Year/Day Displays the year and day of the weekaccording to the date setting of yourradio.e. Date/Day Displays the date and day of the weekaccording to the date setting of yourradio.f. EQ mode Displays the EQ mode of the FM forthe station listened to.g. Frequency Displays the frequency of the FM forthe station listened to.
FM stereo (auto)/mono
If the FM radio station being listened to has a weak signalsome hiss may be audible. It is possible to reduce thishiss by forcing the radio to play the station in mono ratherthan stereo.
- Press the Power button as needed to select the FMband and tune to the desired FM station as previouslystated.
- Press and hold Menu/Info button to enter the menusetting.
- Rotate the Tuning control knob until the “FM AUTO (orMONO)” setting shows on the display. If the setting isAuto, press the Tuning control knob and then rotate theTuning control knob to switch to Mono mode to reducethe hiss. Press the Tuning control knob to select theoption.
Recalling a preset in AM/FM mode
- Press the Power button to switch on your radio.
- Press the Source button to select AM or FM radiomode.
- Momentarily press the required Preset button to tuneto your radio to one of the stations stored in the presetmemory.
MISCELLANEOUS SETTINGS
Setting the time and date format
The clock display used in stand-by mode and on theplaying mode screens can be set to different format. Theselected format is then also used when setting the alarms.
- Press and hold the Menu/Info button to enter the menusetting.
- Rotate the Tuning control knob until “CLOCK xxH”appears on the display and press the Tuning controlknob to enter the setting. You will see the time formatbegins to flash.
- Rotate the Tuning control knob to select either 12 or 24hour format. Press the Tuning control knob to confirmyour choice of clock format.Note:If the 12 hour clock format is chosen, the radio will thenuse the 12 hour clock for the setting.
- Press and hold the Menu/Info button to enter the menusetting.
- Rotate the Tuning control knob until a date (e.g. THUAPR 3) appears on the display and press the Tuningcontrol knob to enter the setting. You will see the dateformat begins to flash.
- Rotate the Tuning control knob to select the desireddate format. Press the Tuning control knob to confirmyour choice.
Setting the clock time and date
- Press and hold the Menu/Info button.
- Rotate the Tuning control knob until “CLOCK ADJ”appears on the display. Press the Tuning control knobto enter the setting.
- The hour setting on the display will begin flashing.Rotate the Tuning control knob to select the desiredhour, and press the Tuning control knob to confirm thesetting. Then rotate the Tuning control knob to selectthe desired minute, and press the Tuning control knobto confirm the setting.
- Rotate the Tuning control knob until “DATE ADJ”appears on the display. Press the Tuning control knobto enter the setting.
- Rotate the Tuning control knob to select the desiredyear and press the Tuning control knob to confirm thesetting. Then rotate the Tuning control knob to selectthe desired month, and press the Tuning control knobto confirm the setting. Then rotate the Tuning controlknob to select the desired date and press the Tuningcontrol knob to confirm the setting.
Radio Data System (RDS)
When you set the clock time using the RDS function, yourradio will synchronize its clock time whenever it tunes to aradio station using RDS with CT signals.
- When tuning to a station transmitting RDS data, theRDS symbol will be shown on the display. Press andhold the Menu/Info button.
- Rotate the Tuning control knob until “RDS CT” and aclock symbol appear on the display. Press the Tuningcontrol knob to enter the setting.
- Rotate the Tuning control knob until “RDS CT” appearson the display. Press the Tuning control knob to confirmthe setting. The clock time of the radio will set upautomatically according to the RDS data received.
Note:
- The radio clock time will be valid for 5 days each timethe radio time is synchronized with RDS CT.
- To disable the RDS CT function, go back to step 1 to2 and then rotate the Tuning control knob to select“MANUAL” option. Press the Tuning control knob toconfirm the setting.
Setting the alarm clock
Your radio has two alarms which can each be set to wakeyou to AM/FM radio or buzzer alarm. The alarms may beset while the unit is in standby mode or while playing.Note:Ensure that the time is set correctly before setting thealarms. If no buttons are pressed for 10 seconds, theradio will exit the alarm setup.
a. Setting radio alarm time:
- The radio can be set either when radio is on or off.
- Press and hold the radio alarm button, the radio alarmsymbol and the display hour will flash along with abeep.
- During radio alarm symbol flashes, rotate Tuningcontrol knob to select the hour and press Tuningcontrol knob again to confirm hour setting. Then rotatethe Tuning control knob to select the minute and pressTuning control knob to confirm minute setting.
- Rotate the Tuning control knob and the display willshow the frequency options for the alarm.The alarm options are as follows:ONCE – the alarm will sound onceDAILY – the alarm will sound everydayWEEKDAY – the alarm will sound only on weekdaysWEEKEND – the alarm will sound only at weekendsPress the Tuning control knob to confirm the setting.
- During radio alarm symbol is flashing, rotate Tuningcontrol knob to select desired wake-up band andstation, then press Tuning control knob to confirm theselection.
- Rotate Tuning control knob to select the desiredvolume and press Tuning control knob to confirm thevolume. Radio alarm setting is now completed.
Note:
- If new radio alarm station is not selected, it will selectthe last alarm station.
- If the selected AM/FM alarm station is not availablewhen the alarm is sounding, the buzzer alarm will beused instead.
b. Setting HWS (Humane Wake System) buzzer alarm:A beep tone will activate when selecting the HWS buzzeralarm.The alarm beep will sound shorter every 15 secondsfor one minute followed by one minute silence beforerepeating the cycle.
- The buzzer alarm can be set either when the radio ison or off.
- Press and hold the buzzer alarm button, the symboland the display hour will flash along with a beep.
- During buzzer alarm symbol flashes, rotate the Tuningcontrol knob to select the hour and press the Tuningcontrol knob again to confirm hour setting. Then rotatethe Tuning control knob to select the minute and pressTuning control knob to confirm minute setting.
- Rotate the Tuning control knob and the display willshow the frequency options for the alarm.The alarm options are as follows:ONCE – the alarm will sound onceDAILY – the alarm will sound everydayWEEKDAY – the alarm will sound only on weekdaysWEEKEND – the alarm will sound only at weekends.Press the Tuning control knob to confirm the setting.Note:There is no volume adjustment for buzzer alarm.
Stopping the alarm soundTo cancel a sounding alarm, press the Power button.
Disable the alarm settingTo disable the alarm setting before the alarm sounds,press and hold the corresponding alarm button until alarmsymbol disappears on the display.
Snooze
- When the alarm sounds, press any button other thanthe Power button will silence the alarm for 5 minutes.“SNOOZE” will appear on the display.
- To adjust the silence time for the snooze timer, pressand hold the Menu/Info button to enter the menusetting.
- Rotate the Tuning control knob until “SNOOZE X”appears on the display, then press the Tuning controlknob to enter the setting. Rotate the Tuning controlknob to adjust the silence time from 5, 10, 15 and 20minutes for the snooze timer.
- To cancel the snooze timer while the alarm issuspended, press the Power button.
Sleep timerYour radio can be set to turn off automatically after a preset time has elapsed. The Sleep Timer setting can beadjusted between 60, 45, 30, 15, 120 and 90 minutes.
- Press and hold the Power button to enter the SleepTimer setting. “SLEEP XX” will show on the display.
- Keep holding the Power button and the Sleep Timeroptions will start switching on the display. Stop until thedesired Sleep Timer setting appears on the display.The setting will be saved and the LCD will return tonormal display.
- Your radio will switch off automatically after the presetSleep Timer has elapsed. The Sleep Timer icon will beshown on the display indicating an active Sleep Timer.
- To cancel the Sleep Timer function before the presettime has elapsed, simply press the Power button toturn the unit off manually.
LoudnessYou can get compensation on lower and higher frequencyfor your radio by adjusting the loudness function.
- Press and hold the Menu/Info button to enter the menusetting.
- Rotate the Tuning control knob until “LOUD ON” or“LOUD OFF” appears on the display. Press the Tuningcontrol knob to enter the setting.
- Rotate the Tuning control knob to choose ON to turnon the loudness function, then press the Tuning controlknob to confirm the setting.
- To turn off the loudness function, select OFF and pressthe Tuning control knob to confirm the setting.
Equalizer function
There are 7 kinds of color LED indicators around theTuning control knob to indicate different EQ modes.
- Press the Power button to switch on your radio.
- Press the EQ control button to enter the EQ settingmenu.
- Rotate the Tuning control knob to select your requiredmode. Then press the Tuning control knob to confirmthe selection
| EQ mode | LED indicator |
| FLAT | White |
| JAZZ | Blue |
| ROCK | Red |
| CLASSIC | Brown |
| POP | Pink |
| NEWS | Yellow |
| MY EQ | Green |
Set up My EQ profile
- Press the EQ control button to enter the EQ settingmenu.
- Rotate the Tuning control knob to select “MY EQ”.Then press the Tuning control knob to enter the “BASS”setting.
- Rotate the Tuning control knob to select your requiredbass level. Press the Tuning control knob to enter the“MIDDLE” setting.
- Rotate the Tuning control knob to select your requiredmiddle level. Press the Tuning control knob to enter the“TREBLE” setting.
- Rotate the Tuning control knob to select your requiredtreble level. Press the Tuning control knob to confirmthe setting.Note:● When using the equalizer to emphasize the bass andlistening at high volume levels, it may cause soundcracking and distortion. In this case, adjust the radiovolume appropriately.
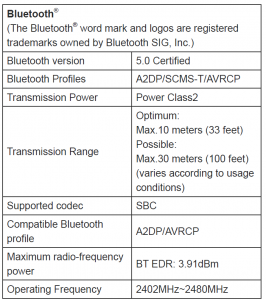
LISTENING TO MUSIC VIA BLUETOOTH STREAMING
You need to pair your Bluetooth device with the radiobefore you can auto-link to play/stream Bluetooth musicthrough the radio. Pairing creates a ‘bond’ so two devicescan recognize each other.
Note:
- To have the better sound quality, we recommendsetting the volume to more than two-thirds level on yourBluetooth device and then adjust the volume on theradio as required.
- The radio can memorize up to 8 sets of paired device,when the memory exceed this amount, the oldestpairing history will be over written.
Pairing your Bluetooth device for the first time
- Press the Power button to turn on the radio. Press theSource button to select Bluetooth mode. The displaywill appear “BT WAIT”. After a few seconds, the displaywill show “BT PAIR” and “PAIR” will flash on the display.
- Activate Bluetooth on your device according to thedevice’s user manual to link to the radio. Locate theBluetooth device list and select the device named‘DMR113’ (With some mobiles which are equipped withearlier versions than BT2.1 Bluetooth device, you mayneed to input the pass code “0000”).
- Once connected, there will be a confirmation tonesound. “BLUETOOTH” will remain on the display andthe backlight will be dim-out in10 seconds. You cansimply select and play any music from your sourcedevice. Volume control can be adjusted from yoursource device, or directly from the radio.
- Use the controls on your Bluetooth-enabled device oron the radio to play/pause and navigate tracks.
Note:
- If 2 Bluetooth devices, pairing for the first time, bothsearch for the radio, it will show its availability on both
and it attempts to reconnect with a device in memorywhich is last connected. If the last connected device is notavailable, the radio will be discoverable.
Disconnecting your Bluetooth device
Press and hold the Bluetooth pairing button for 2-3seconds until “BT PAIR” is shown on the display todisconnect with your Bluetooth device or turn off Bluetoothon your Bluetooth device to disable the connection.You can also press the Source button to select any modeother than Bluetooth mode to disable the connection.
Deleting Bluetooth paired device memory
To clear the memory of all paired devices, press and holdthe Bluetooth pairing button more than 5 seconds until“CLEARING” shows on the display.
TRUE WIRELESS STEREOb (TWS) FUCTION
True wireless stereo (TWS) is a feature that allows onedevice to wirelessly connect with another device. You canuse the TWS function to connect it to a second DMR113and play your music through two speakers.
Set up the first speaker
- Make sure the first speaker is in Bluetooth mode andconnect to a Bluetooth device.
- Press the Plus button, the display will show “ST/MULTI”. “ST” will flash on the display. Press the Plusbutton to enter the “ST PAIR” mode. If no buttons arepressed for 10 seconds, the speaker will also enter the“ST PAIR” mode. The display will show “ST PAIR” and“PAIR” will flash 1 minute.
Set up the second speaker
- Make sure a second speaker is in Bluetooth mode.
- Press the Plus button, the display will show “ST/MULTI”. “ST” will flash on the display. Press the Plusbutton to enter the “ST PAIR” mode. If no buttons arepressed for 10 seconds, the speaker will also enter the“ST PAIR” mode. When the connection is successful,“L-ST-R” will be shown on both displays at the sametime. The EQ setting will revert to Flat mode (initialsetting).
Note:Set up the second speaker within 1 minute. If you do notset it up within 1 minute, the setting of the first speaker willbe canceled.
Start playback
- Start playback on the connected Bluetooth device andadjust the volume on the Bluetooth device or one of thespeakers for comfortable listening. Note:Volume or EQ (not including MY EQ) adjustment of onespeaker is reflected on the other.2. Use the controls on your Bluetooth device to play/pause and navigate tracks. Alternatively, control theplayback using Play/Pause, Next track and Previoustrack buttons on the one of the speakers.3. Press and hold the Next track or Previous track buttonon the one of the speakers to move through the currenttrack. Release the button when the desired point isreached.
Switching the audio mode
- Using two speakers, you can switch between “L-ST-R”,“R-ST-R” and “L-ST-L” mode.
- Press the L/R button on either of the speakers tochange the audio mode.
- “L-ST-R” mode: Both speakers play the same sound.It is the initial setting.
- “R-ST-R” and “L-ST-L” mode: One speaker plays thesound on the right channel, while the other speakerplays the sound on the left channel for stereo playbackbetween the speakers.
Disconnecting the TWS Function
Press and hold the Plus button to disconnect the TWSfunction.
ENJOYING WIRELESSPLAYBACK USING MULTIPLE SPEAKERS
You can enjoy music at the same time by combining up to10 devices which are compatible with this function.
Set up the first speaker
- Make sure the first speaker is in Bluetooth mode andconnect to a Bluetooth device.
- Press the Plus button, the display will show “ST/MULTI”.
- Select “MULTI” by pressing the L/R button. “MULTI” willflash on the display. Press the Plus button to enter “MULPAIR” mode. If no buttons are pressed for 10 seconds,the speaker will also enter the “MUL PAIR” mode. Thedisplay will show “MUL PAIR” and “PAIR” will flash 1minute.
Connect the second and more speakers
- Make sure the multiple speakers are all in Bluetoothmode.
- Press the Plus button, the display will show “ST/MULTI”.
- Select “MULTI” by pressing the L/R button. “MULTI”will flash on the display. Press the Plus button to enter
the “MUL PAIR” mode. If no buttons are pressed for 10seconds, the speaker will also enter the “MUL PAIR”mode. When the connection is successful, the displaywill be shown “PARENT” (the master speaker) onthe first speaker and the other displays are all shown“CHILD” (the secondary speaker). The EQ setting willrevert to Flat mode (initial setting).
Note:When connecting the second and more speakers, connectit within 1 minute after setting the first speaker. After 1minute, the speaker cannot be connected.
Add a new secondary speaker
If you want to add another speaker after connecting,operate below steps:
- Make sure the new speaker is in Bluetooth mode.
- Press the Plus button on the master speaker, thedisplay will show “MUL ADD” and “ADD” will flash onthe display.
- Press the Plus button on the new speaker, the displaywill show “ST/MULTI”.
- Select “MULTI” by pressing the L/R button. “MULTI”will flash on the display. Press the Plus button to enterthe “MUL PAIR” mode. If no buttons are pressed for 10seconds, the speaker will also enter the “MUL PAIR”mode. When the connection is successful, “CHILD”(the secondary speaker) will be displayed on the newspeaker. The EQ setting will revert to Flat mode (initialsetting).
Start playback
- Start playback on the connected Bluetooth device andadjust the volume on the Bluetooth device or on thespeakers for comfortable listening. The same music isplayed from all speakers.Note:Only for the master speaker, the volume or EQ (notincluding MY EQ) adjustment will be synchronizedwith the other speakers. For other speakers, adjust thevolume or EQ individually with each speaker.
- Use the controls on your Bluetooth device to play/pause and navigate tracks. Alternatively, control theplayback using Play/Pause, Next track and Previoustrack buttons on the master speaker.
- Press and hold the Next track or Previous track buttonon the master speaker to move through the currenttrack. Release the button when the desired point isreached.
Disconnecting the multiple speakers
- To disconnect only one secondary speaker, press andhold the Plus button of the secondary speaker youwant to disconnect.
- To disconnect all connections and exit the multiple
speakers group, press and hold the Plus button of themaster speaker.
MICROPHONE SOCKET
A 6.3mm microphone socket is provided at the front ofyour radio to connect to the microphone.
- Connect the microphone (not supplied) to themicrophone (MIC) socket.
- Press the Power button to switch on your radio.
- Turn on the microphone.
- Adjust the volume control on the radio to the requiredlevel.
Note:Do not place the microphone against the speaker, it cancause feedback echo and it will damage the radio.
Setting the Microphone volume
- Press and hold the Menu/Info button to enter the menusetting.
- Rotate the Tuning control knob until “MIC VOL XX”appears on the display. Press the Tuning control knobto enter the setting.
- Rotate the Tuning control knob to choose your requiredvolume level. Press the Tuning control knob to confirmthe setting.
AUXILIARY INPUT SOCKET
A 3.5mm Auxiliary input socket is provided at the frontof your radio to permit an audio signal to be fed into theunit from an external audio device such as a MP3 or CDplayer.
- Connect an external audio source (for example, MP3or CD player) to the AUX IN socket.
- Press the Power button to switch on your radio.
- Repeatedly press and release the Source button until“AUX IN” is displayed.
- To have the better sound quality, we recommendsetting the volume to more than two-thirds level on youraudio device and then adjust the volume on the radioas required.
Note:Audio cord is not included as standard accessories.
MAINTENANCE
CAUTION:
- Never use gasoline, benzine, thinner, alcohol or thelike. Discoloration, deformation or cracks may result.
- Do not wash the radio with water.
SPECIFICATIONS

The company reserves the rights to amend thespecification without notice.
Read More About This Manual & Download PDF:
Job Site Radio DMR 113 Manual – Job Site Radio DMR 113 Manual –
[xyz-ips snippet=”download-snippet”]