
QUICK START GUIDE
WHAT’S INCLUDED
- Coin cell (CR2450) battery (x1, pre-installed)
- Tamper Proof Screws (x4)
- Tamper Proof Screw bit (x1)
- Instruction manual (x1)
- Quick start guide (x1)
- Flash Drive (PC app / Software)
- Micro USB Cable
REQUIREMENTS
- PC with Windows 7, 8 or 8.1
- Makita battery
IDENTIFICATION OF PARTS
1. Battery cartridge port2. ![]() Registration lamp3.
Registration lamp3. ![]() Warning lamp4.
Warning lamp4. ![]() Timer lamp5. Operation mode switch
Timer lamp5. Operation mode switch![]() Timer Mode
Timer Mode![]() Communication Mode
Communication Mode![]() Registration Mode6.
Registration Mode6. ![]() USB port (micro-B type)7. Installation screw holes8. Battery cover
USB port (micro-B type)7. Installation screw holes8. Battery cover
REGISTRATION
1.
 Connect the adapter to the PC with a micro USB cable.
2.Slide adapter switch to Communication Mode.
3.
Open software. Click Registration Data Setting.
4.
![]() : The adapter and the PC are connected.
: The adapter and the PC are connected.![]() : The adapter and the PC are not connected.NOTE: Make sure the
: The adapter and the PC are not connected.NOTE: Make sure the![]() icon is displayed on the title bar.
icon is displayed on the title bar.

Load Battery. Slide adapter to Registration Mode.Set PIN and User Name. Keep initial code as “0000.” Enter New PIN under Registration Data Setting.
SETTING TIMER & PROGRAMMING THE BATTERY
5.Day and Time – Selecting this option will allow you to set the day of the week and time that the battery will shut down. Great for weekly schedules.Total Hours – Selecting this option will allow you to set the total number of operating hours allowed before the battery will shut down. Maximum Setting: 1200 hours. Ideal for mobile sites and maintenance vehicles. Or when a worker is required to unlock batteries multiple times throughout the day.Calendar Date – Selecting this option will allow you to set the exact calendar date that the battery will shut down on. Perfect for extended job durations or for when you do not wish to have an adaptor on a site.

Choose when the battery shuts off by (a) day, (b) hour, and (c) calendar date.Click Transmit.6.
Slide adapter to Timer Mode.
7.
Load battery. A blue light will appear.The timer will apply. Congratulations you are done.
8.

Multiple batteries can be set by simply repeating steps 4 & 6.Slide battery on “Registration Mode” and flip switch to the “Timer Mode.” Repeat for each additional battery.
USE AND TROUBLESHOOTING
CHECKING THE SETTINGS OF THE BATTERY CARTRIDGE OR THE ADAPTERNOTICE: You can check whether the battery cartridge has expired by pressing the button (b) on the cartridge. If the battery cartridge is past its expiration date, all segments of the level indicator (a) will flash.
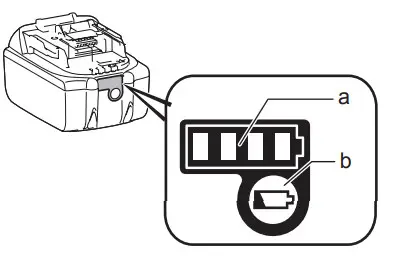
NOTE: If the battery cartridge will expire in approximately one hour, all segments of the level indicator (a) on the battery cartridge flash.
| SYMPTOM | CAUSE/REMEDY |
| The |
1. Setting is not in Timer Mode or Resgistration Mode when setting a PIN or depositing more time in the battery.2. PIN numbers between BPS01 and battery do not match.3. Low cell battery in BPS01 |
| The adapter malfunctions. | If you are using the PC app, connect the PC to the adapter before operatingthe app. |
| All segments of the level indicator on the battery cartridge flash. | The battery cartridge will expire in approximately one hour. |
ATTENTIONDo not forget the PIN as you will be unable to change the settings.0317 MA7178-17
[xyz-ips snippet=”download-snippet”]