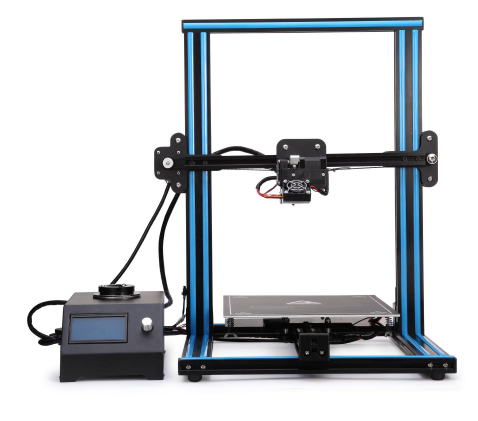
Raiscube R10User Manual
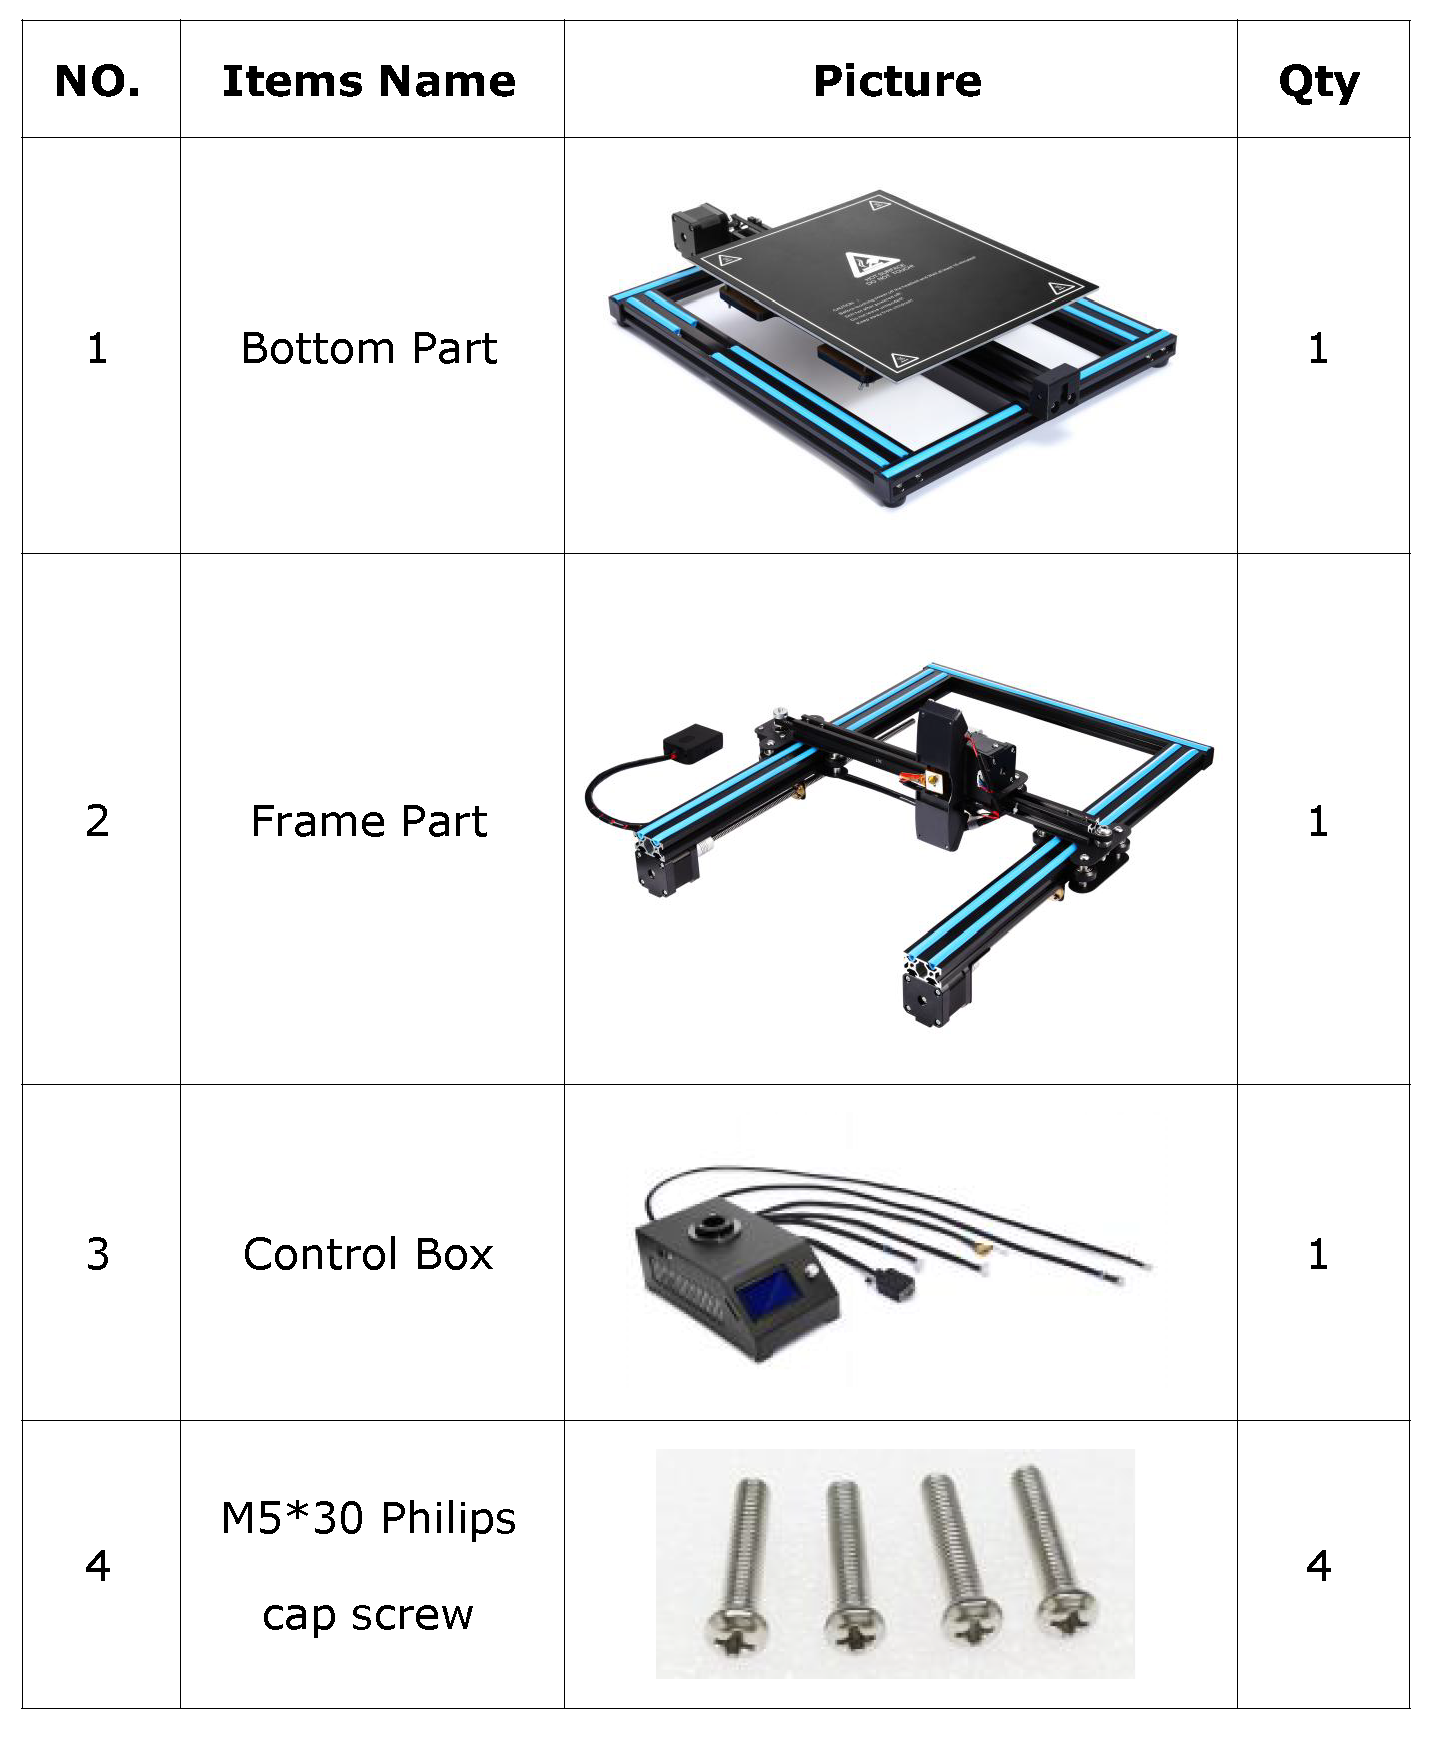
R10 Packing List

1. Installation of R10
This manual will offer your assemble instruction including wire connection, operation instruction, and support resources.
Unlike Acrylic kit required to be built piece by piece for over 10 hours to complete, you will find it done to be ready for first print in minutes!
Step 1 Preparation prior to install.
- Get all parts including tools and screws out of box, and check all if any damage exists,especially the wires and their connectors.
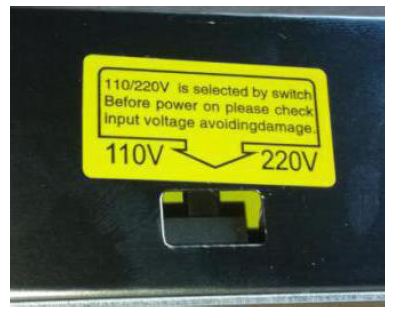
- Switch PSU to the correct position according to the voltage in your country. E.g: 110V forUS, 220V for UK. (Fig.01)

Fig.01 - Check heating bed if it is wobbly. Adjust the tension of heating bed by allen key and wrench(obtained in tool pack) to fix this if so.
Step 2 Install printer.
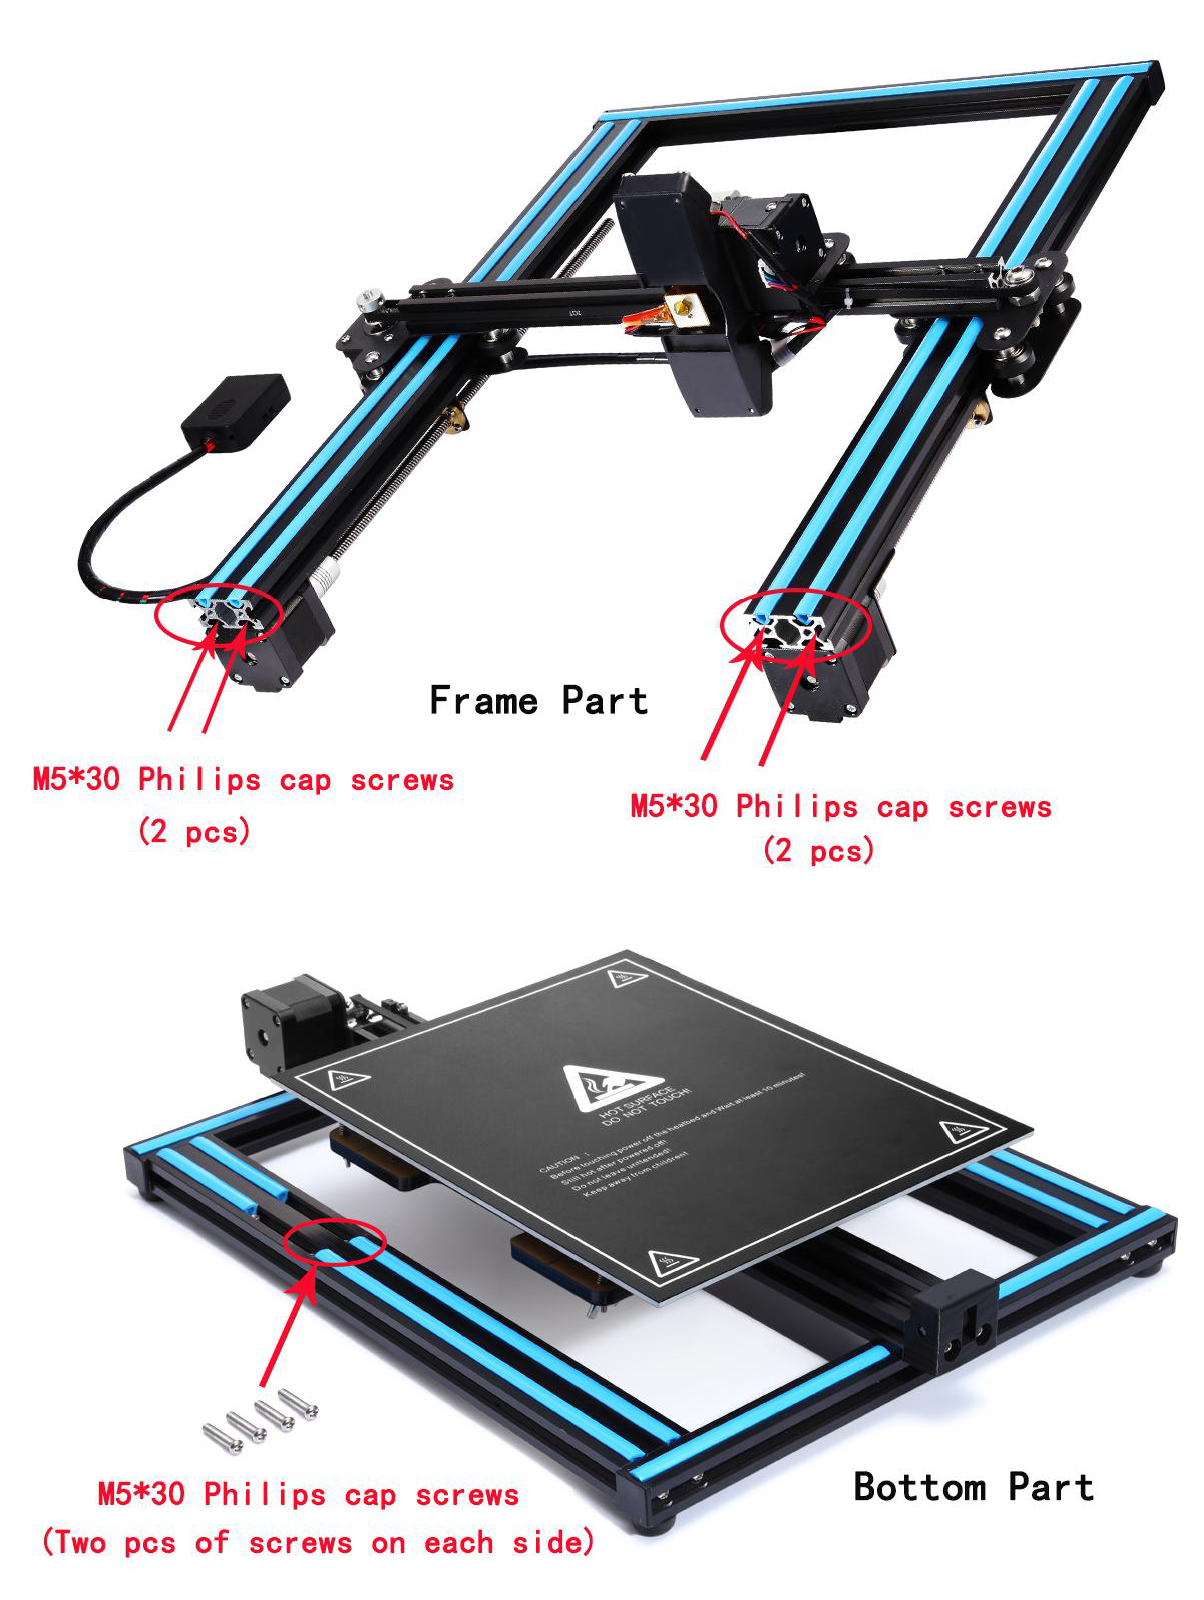
Items needed: Bottom Part, Frame Part and 4 pcs of M5*30 Philips cap screw.
Insert screws from bottom of “Bottom Part” to reach holes of “Frame Part”.
Please refer to Fig.02.
And Fig.03 is what is to be end of this step.
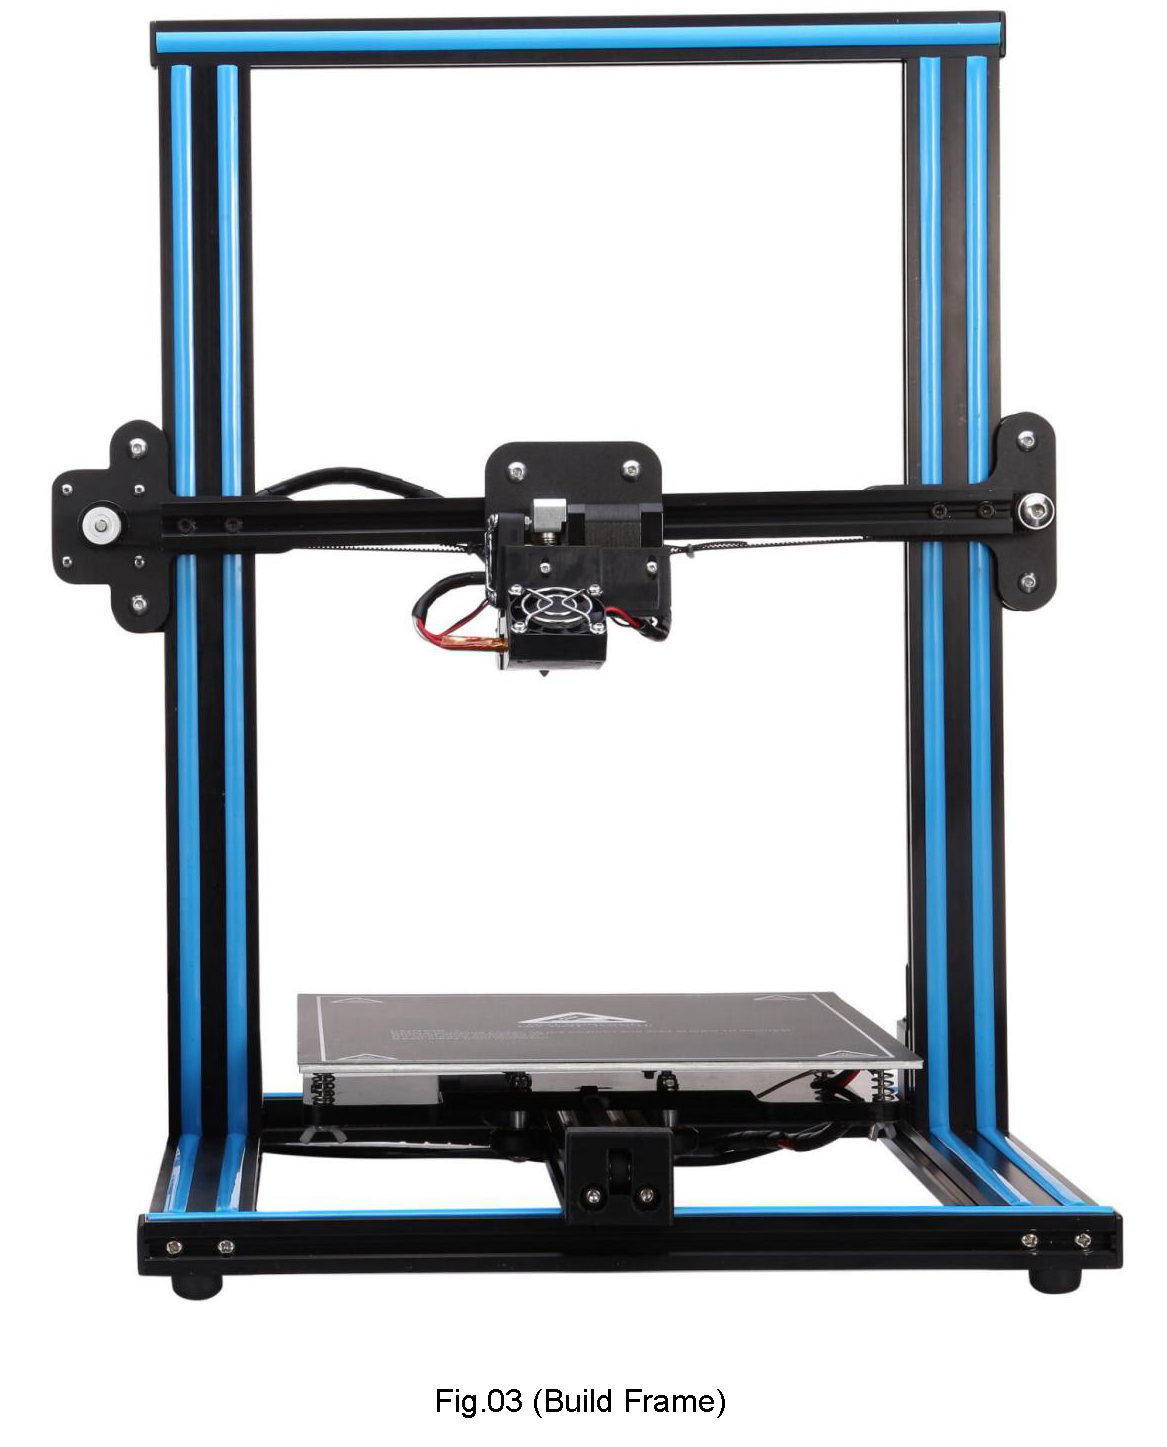
Step 3 Wire connection.
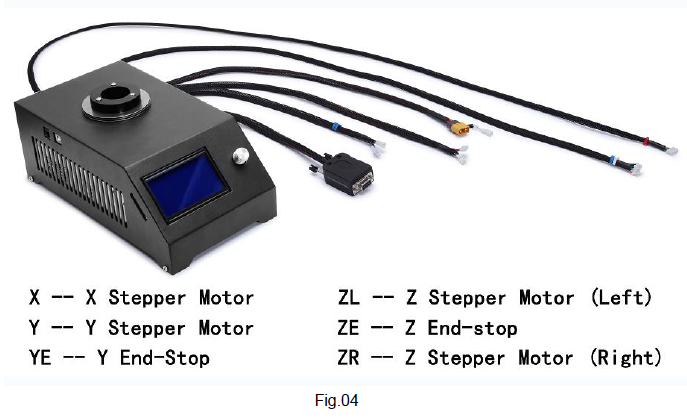
Items needed: Control box and Build Frame.Make “Control Box” circuits and “Build Frame” (Fig.03) circuits connected well. Please note thatthere are labels of each wire, please refer to Fig.04, and connector at end of each wire.
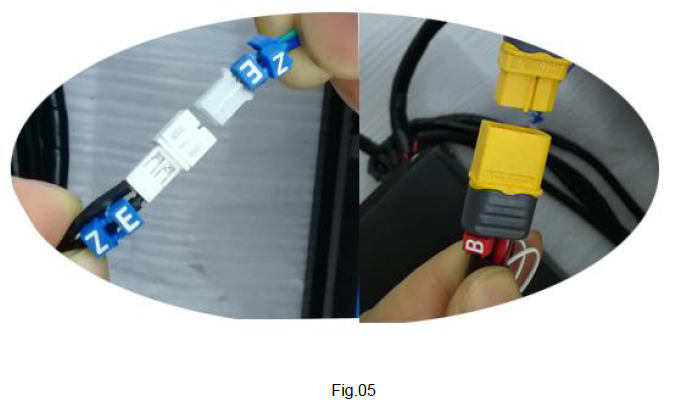
Plug a connector to the other matching connector, please refer to Fig.05.
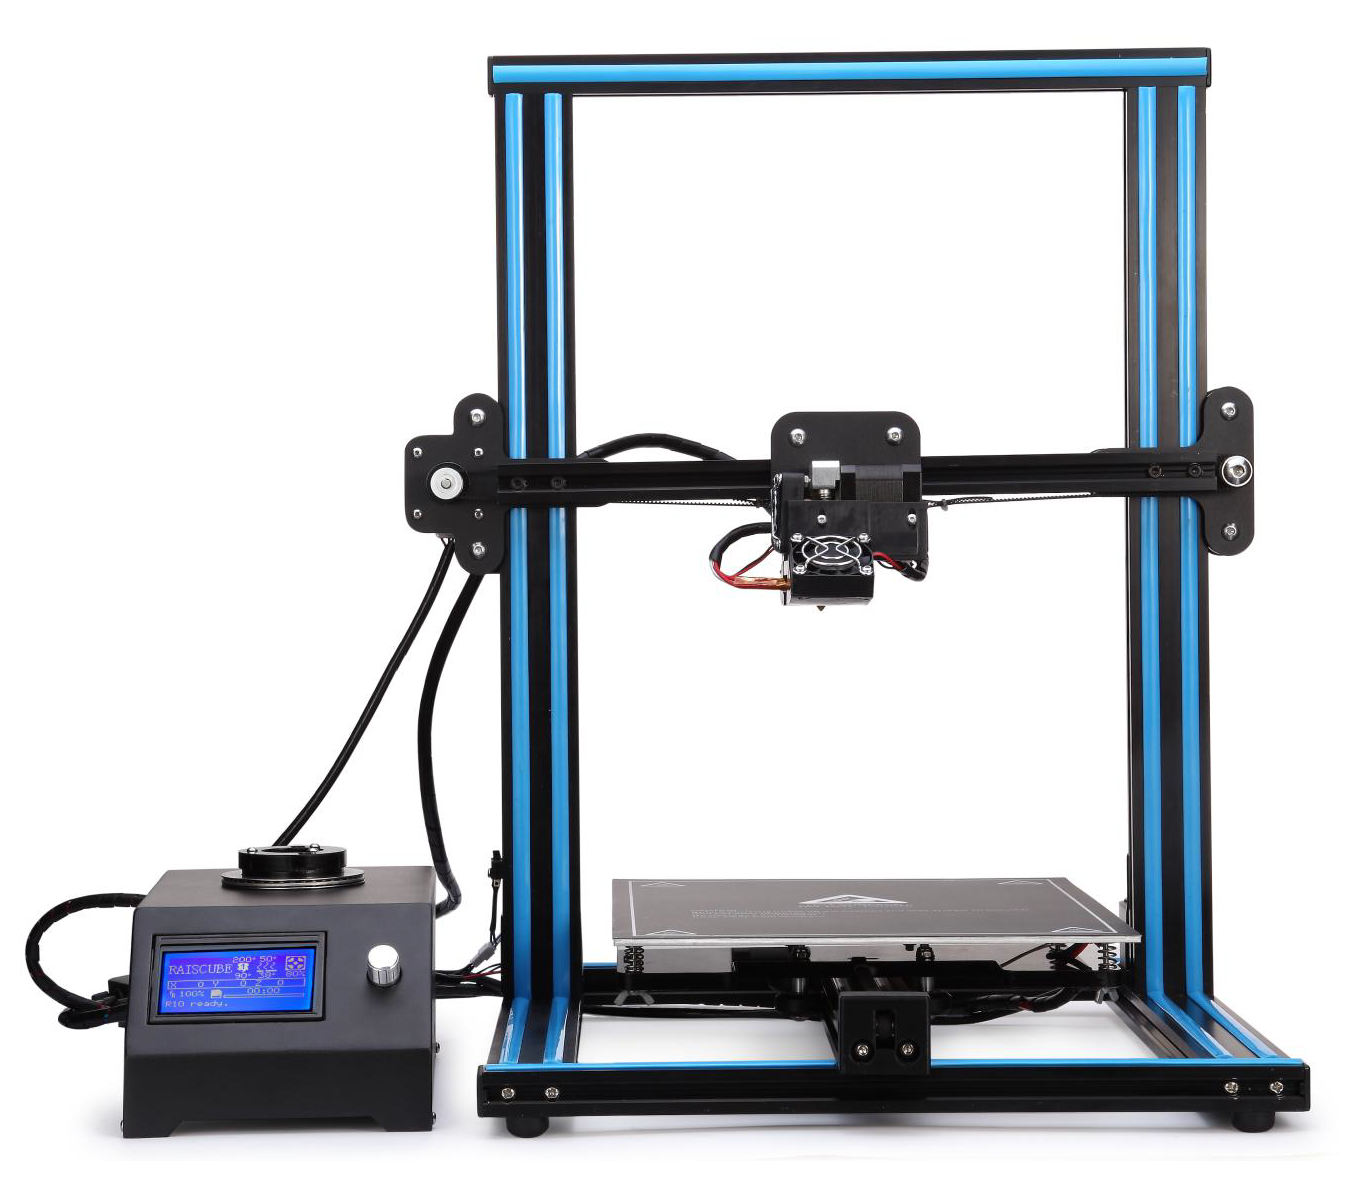
After done this, we get what in Fig.06.
Also please refer to Fig.07 when connecting
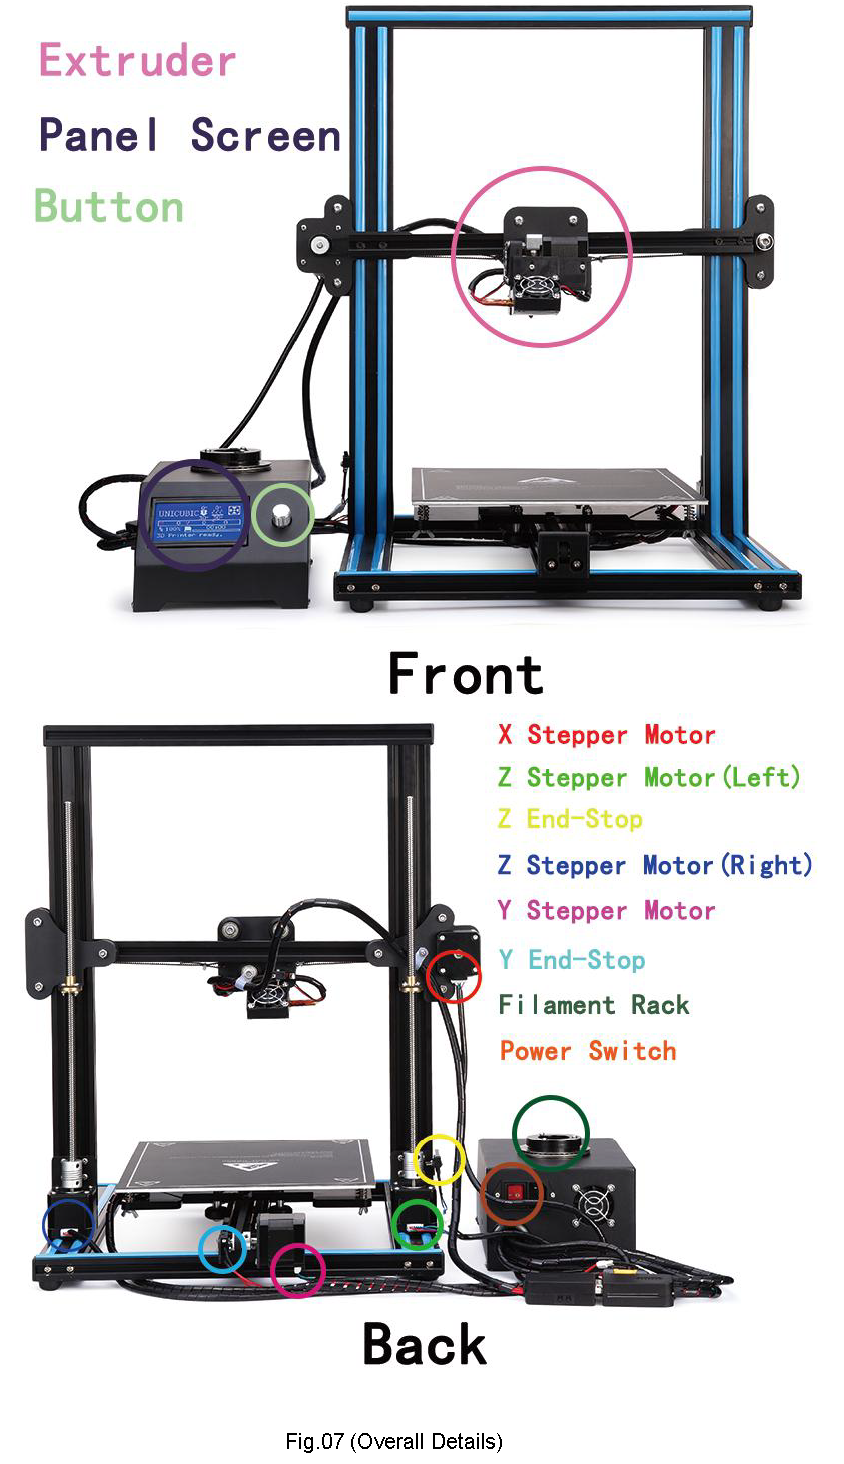
Remark:
Tension of X and Y axis belt.A proper tension of belt is required ahead of printing. Tension is well adjusted in factory, so generally speaking, it shall be ok. But may loose, check tension check is required. If too loose, need to fix it.
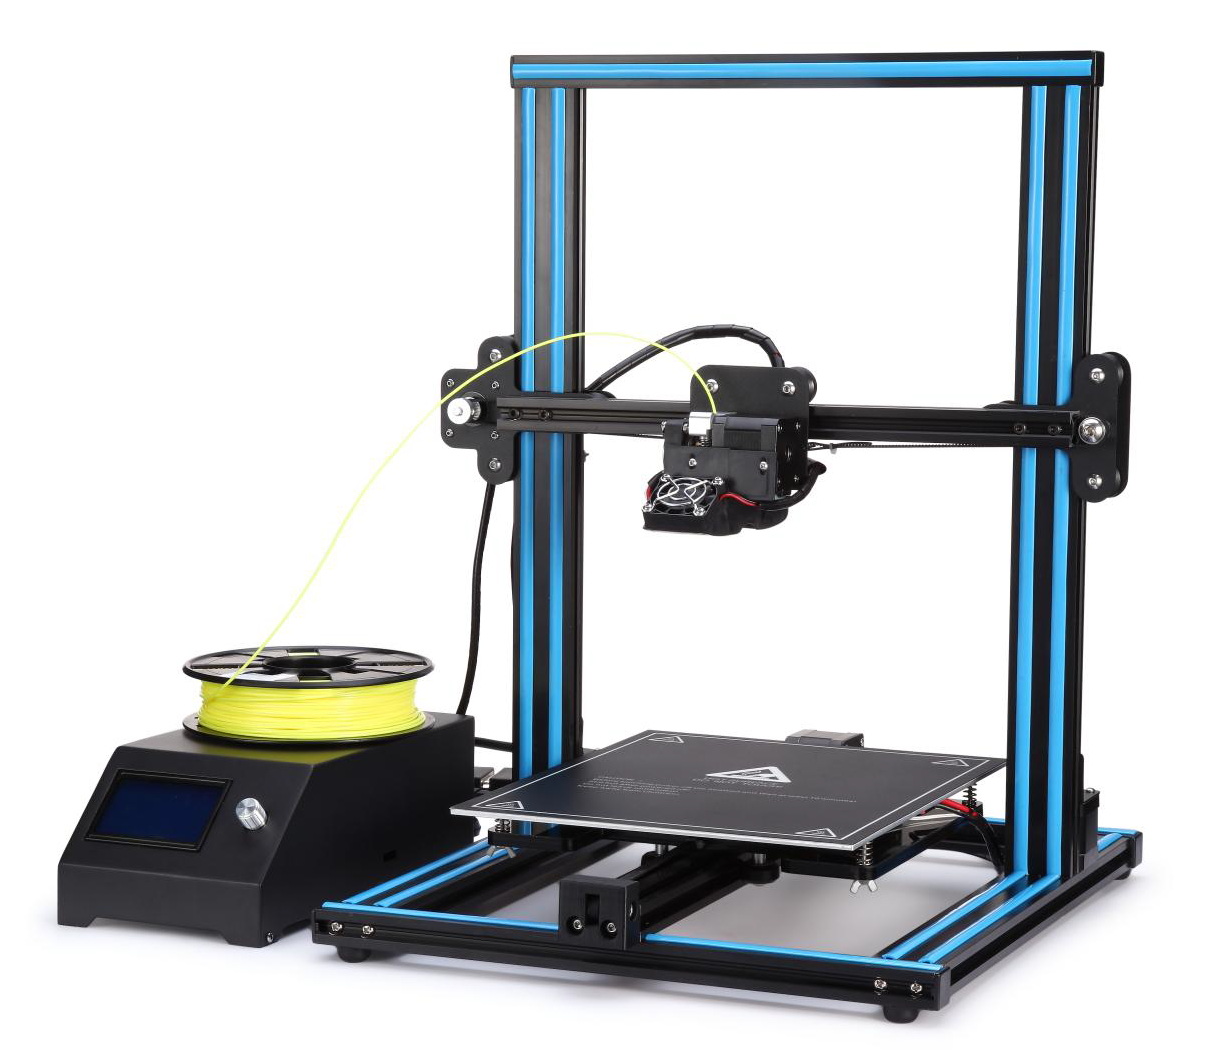
Load filament system.Place filament on to spool holder on top of control box. And feed filament into Extruder. Plug power line to socket, and press switch to turn on printer. Will see it on screen. And build is done. (Fig.08)
2. User Manual
Screen Information.
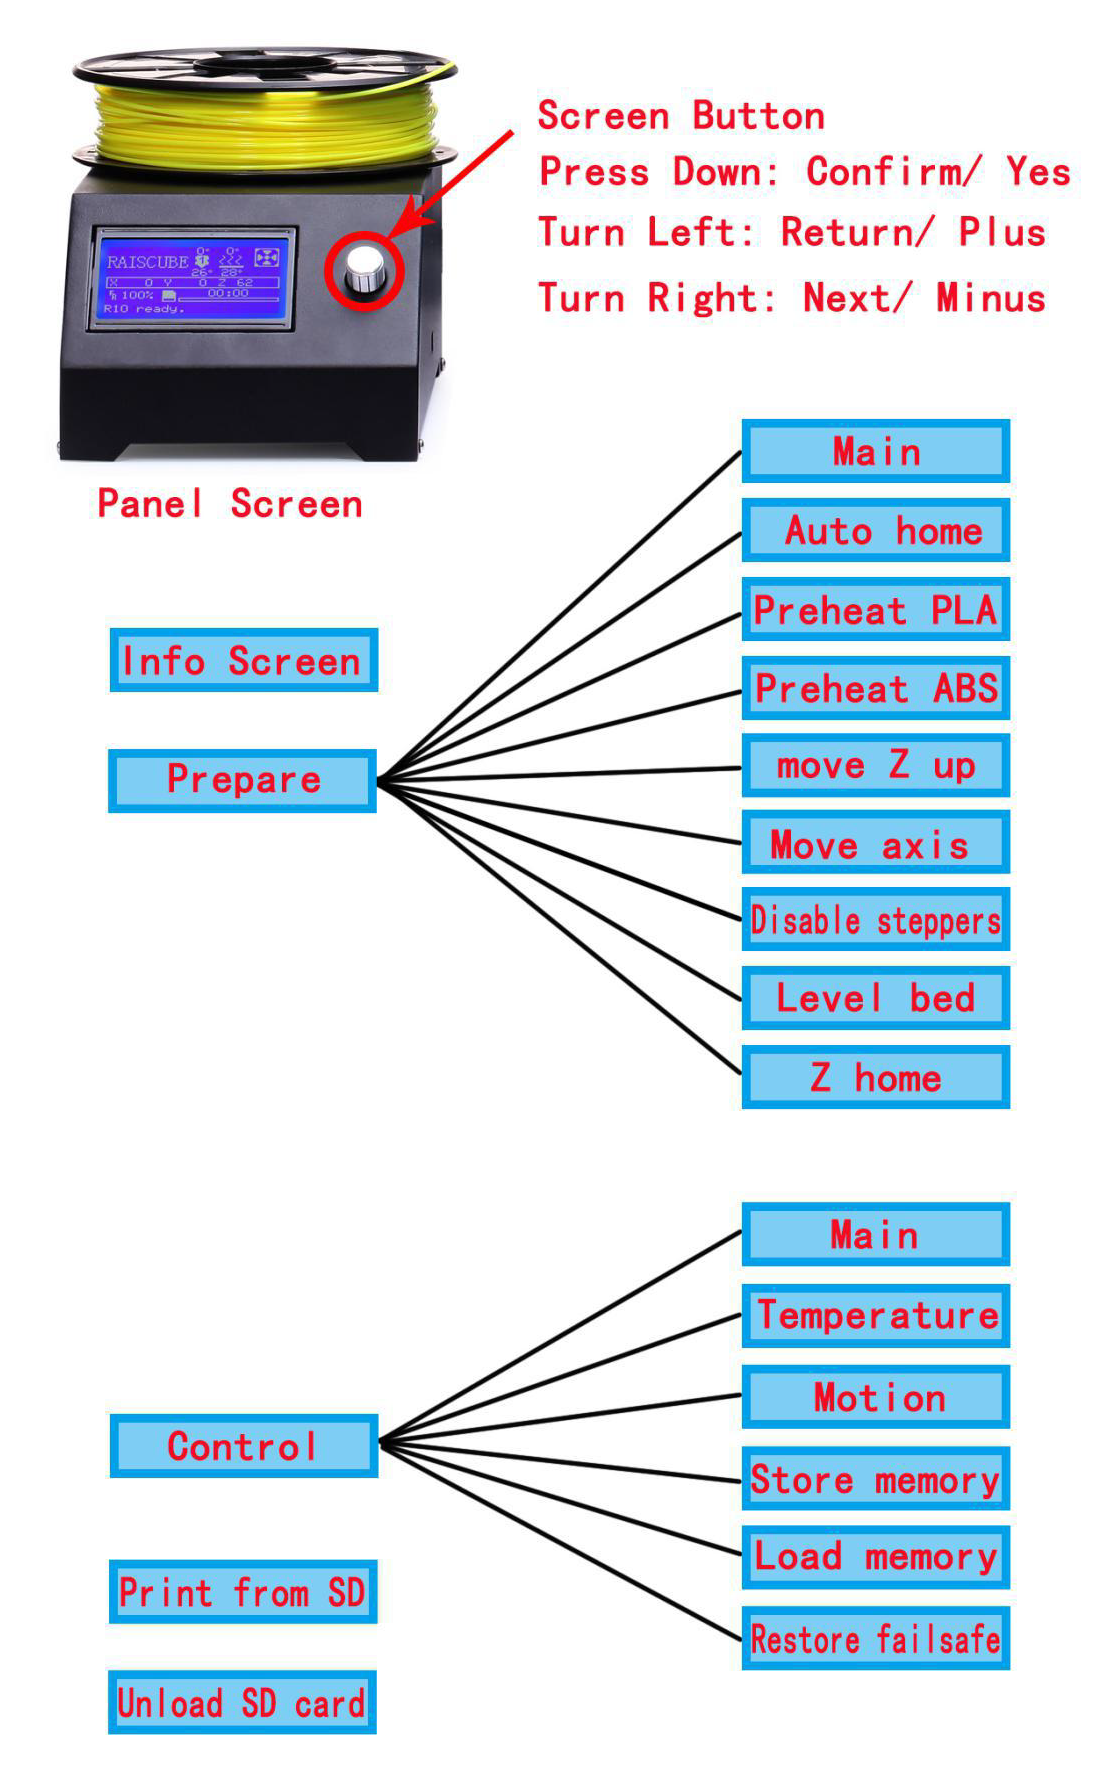
- Select “Control ” → “ Temperature ” → “ Bed ”.Turn the bed temperature to 55°C. Then navigate back to the Info Screen. This will heat the bed to actual printing conditions, making the leveling more accurate.
- Select “Prepare ” → “ Preheat PLA”.This will heat the nozzle and melt any hardened plastic that might be on the nozzle and affect the leveling process.
- Select “Prepare ” → “ Auto home”.This will move the nozzle to the home position at the front left corner of the build plate.
- Select “Prepare ” → “ Disable steppers”.This will allow you to move the nozzle assembly (X axis) and build plate (Y axis) by hand.Pro Tip: The Z axis stepper is also disabled, and you don’t want it to move at all.So you should handle the printer gently during the leveling process. Keep it flat and move the nozzle assembly carefully.
- Wait for the print bed temperature to reach 55°C and the nozzle temperature to reach 200°C. The Info screen displays this information below the nozzle and bed icons.
- Slide a piece of paper between the nozzle and the build plate.
- Adjust each of the four thumbscrews under the bed until the piece of paper sides, with just a tiny bit of drag, in all locations on the build plate
- Select “Prepare ” → “ Auto home”, then Prepare ” → “ Disable steppers”, and recheck in several places. This is to make sure the Z-axis lead screw didn’t rotate during the leveling process.
- During printing, there will be three selections coming out: “Pause print ”, ”Stop print”, ”Resume print”.Select “Pause print”, this will be stop printing temporarily, when need to feed/change another filament in the halfway of print process. After finishing feeding/changing, select ”Resume print”, this will continue to print unfinished process.Select “Stop print”, this will abandon the current print task. This will start another print process.Pro Tip: Can be turn the temperature of hotbed into 0°C for hotbed protection when making a long-time print model in the halfway of process.
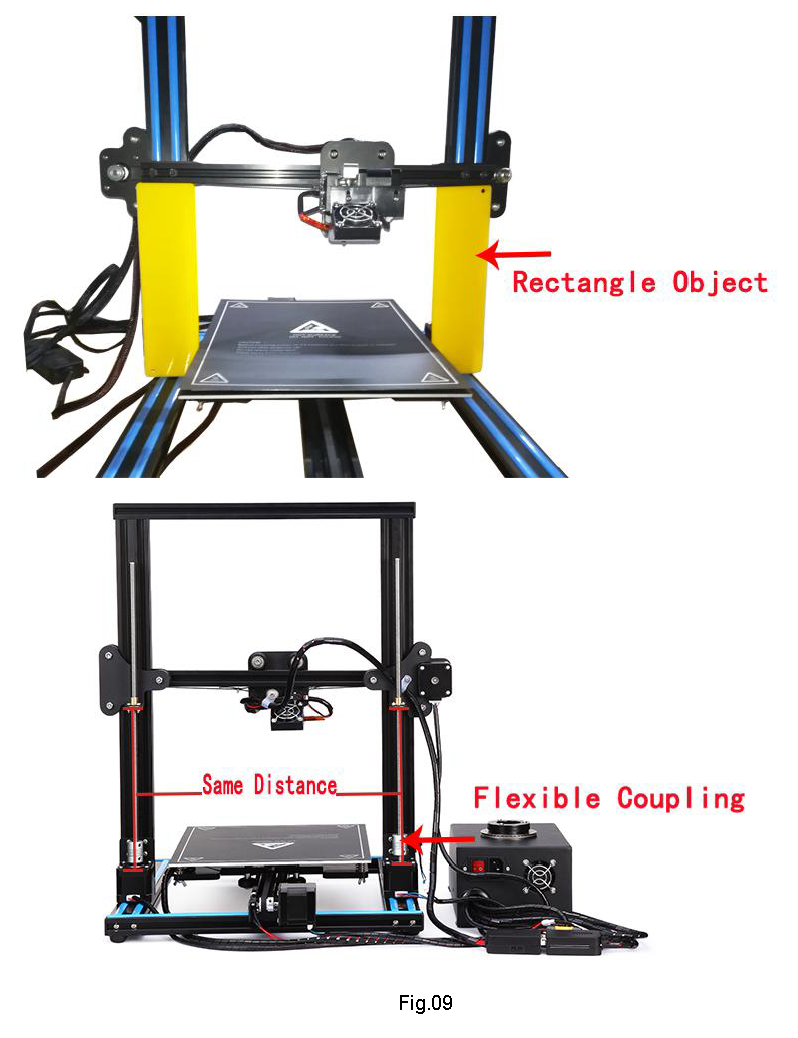
Step 1 Leveling the X Axis.
Get a regular rectangle object, to keep a same distance between top surface of Z-Axis Motor Fixed Plate and bottom face of Z-Axis Link Block (Left&Right). If not, turn a side of “Flexible Coupling” to keep two sides same to make it level.Please refer to Fig.09.
Step 2 Hotbed Leveling.
- Panel Control, press control button, “Prepare” → “Auto Home”, to move nozzle to origin point. Check if nozzle top almost touches hotbed surface. If not, find the long screw behind Left Z-Axis Link Block, and adjust it to be.
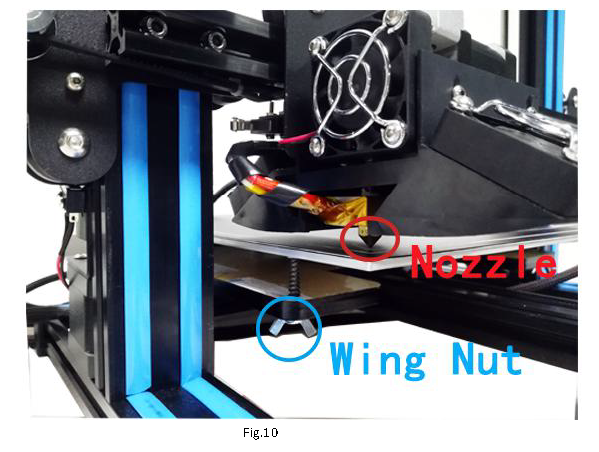
- Moving the Extruder towards the one of corners of hotbed. Panel Control, “Prepare” → “Z Home”, then Extruder moves towards hotbed. It should be only allow a piece of A4 paper to pass through. If not, make clockwise (or counterclockwise) rotation of the Wing Nuts beneath hotbed surface. Please refer to Fig.10.
- Manually move hotbed or slide Extruder to other vertexes of hotbed to make four corners of hotbed level evenly.
Step 3 Loading Filament.
- Load a spool of filament onto the filament rack.
- Cut off the used or bent end of the filament at an angle and it will be easier to feed into the Extruder.
Step 4 Preheat Filament.
Panel Control, “Prepare” → “Preheat PLA”.
Step 5 Feeding Filament.
- When the temperature of Extruder reaches about 180℃, feed the end of the filament into the extruder with one hand as you squeeze the squeeze head release lever with your other hand, to put the filament into the inlet port.
- Panel Control, “Prepare” → “Move Axis”→ “Move Extruder”, turning the button to right, to make the filament pass through the Teflon hose, and out of the outlet port.Please refer to Fig.11.

Remark:
- When the printer is fully heated, check to make sure the filament is fully loaded. This also removes all of the previous material left in the printer from other prints. To do this, manually push filament through the heated nozzle until the new color begins coming out of the nozzle.
- Never leave the printer preheated with material inside of it for long periods of time. This will cause the filament to bake inside of the nozzle assembly and can cause it to clog. And please do not touch the nozzle with your hands after heating.
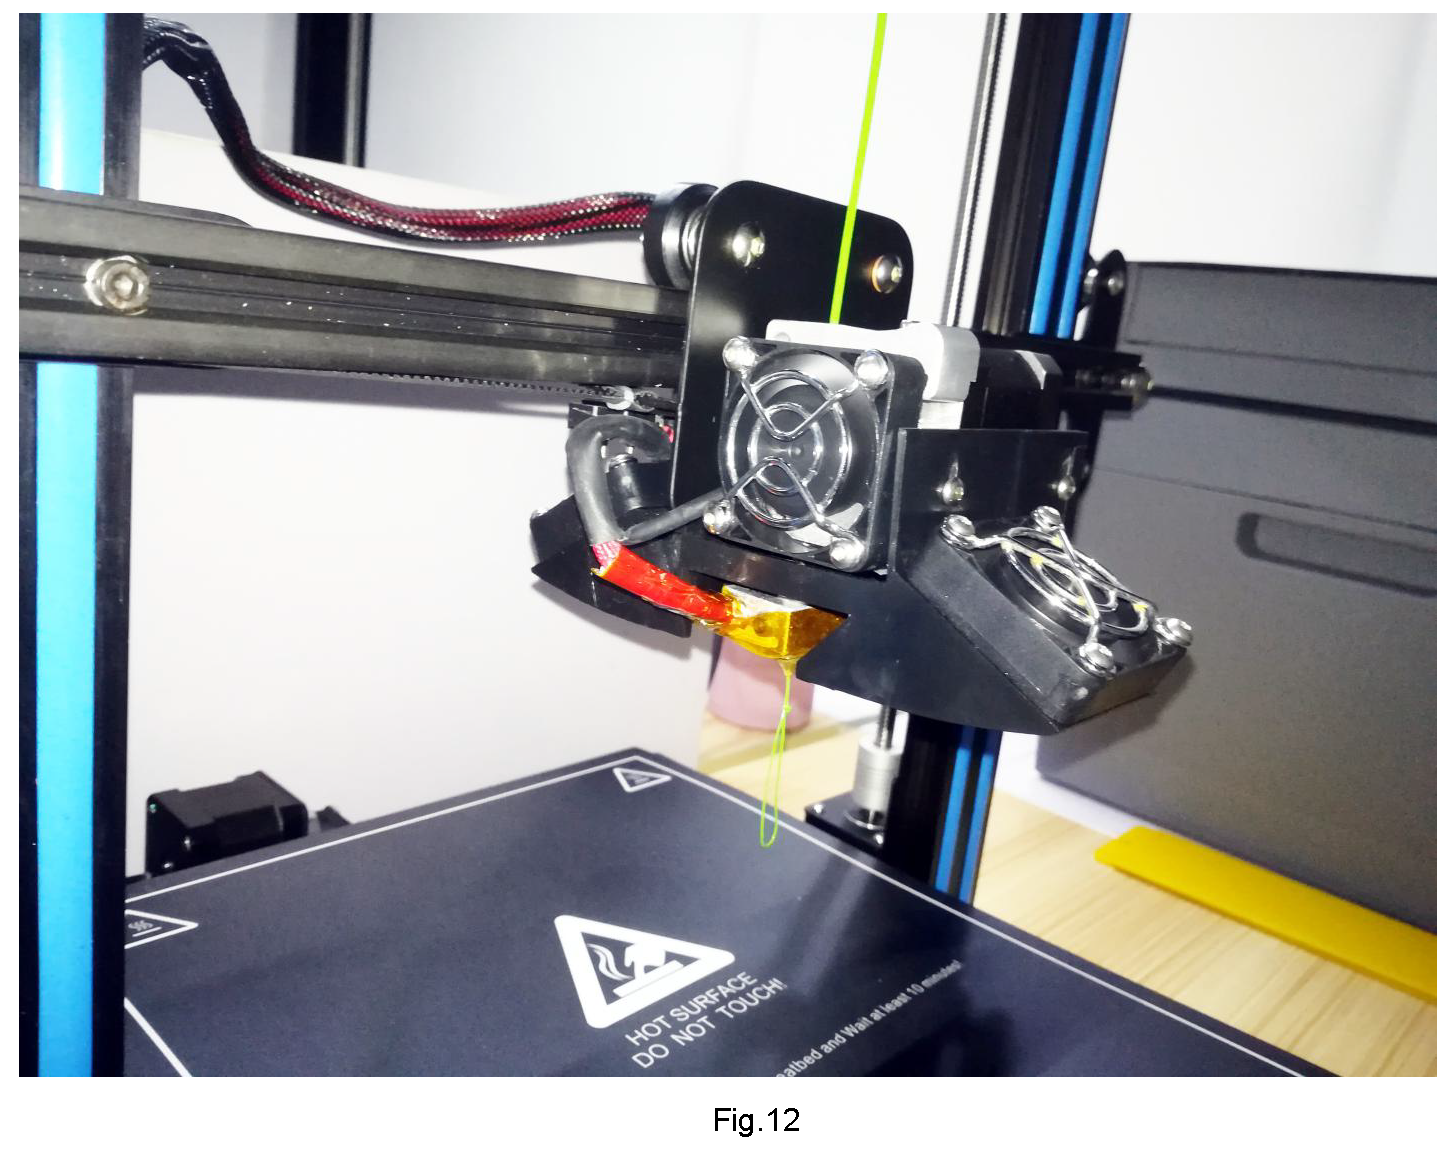
After done this, we get what in Fig.12.
Step 6 Printing.
Panel Control, “Print from SD”, wait for the Extruder moving and start to print.
Remark:
You may need to make fine adjustments to the bed level when you start printing. The first layer of the print will show whether the distance between the nozzle and build plate is correct. Refer to the following graphic.
- If the bed is too low, the extruded plastic may not stick to the build plate.
- Parallel lines of filament on the first layer will look rough, with high tracks and low valleys that are not stuck to the build plate.
- If the bed is too high, the extruded plastic will squeeze out the sides of the nozzle. The nozzle will plow through the plastic and leave a first layer that is too thin.
- You can try to carefully adjust the thumbscrews during the first layer of the build while the plate is moving until the distance between the build plate and the nozzle is producing smooth extruded lines. Be careful of the moving parts to not get pinched.
- After you have fine-tuned the bed level during the first layer, you may want to stop the build, clear the build plate, and restart the build.
Step 7 Removing Filament.
To remove the filament cleanly, you should do a “soft pull.” This involves heating the nozzle to 100°C, then pulling the filament out of the printer.
- Panel Control, “Prepare” → “Preheat PLA”, and wait until the nozzle temperature reaches 100°C. (You can also select “Control” → “ Temperature ” → “ Nozzle”, spin the temperature to 100°C, and then navigate back to the Info Screen.)
- Wait for the nozzle to reach the set temperature.
- When the nozzle temperature is 100°C, squeeze the Extruder release lever with one hand and pull the filament out of the Extruder with your other hand in one fluid motion.
- Cut the end of the filament to remove the partly melted plastic.
Remark:
Feed the end of the filament into the hole on the side of the spool. This will insure it doesn’t get tangled and cause a build to fail the next time you use it.
3. Operation :The Four Steps of 3D Printing
3D printing involves four steps:
- Step 1 Create or find a 3D file
- Step 2 Slice the file for 3D printing
- Step 3 Send the file to the printer
- Step 4 Print!
Step 1 Create or find a 3D file
- You can create a 3D model—a digital geometry—using any CAD(computer-aided design) software program. We recommend free programs, such as TinkerCAD, OnShape, and Blender. Another is SketchUp, which has free licenses available for schools. These programs take some time to learn, and can be challenging. But they are also rewarding, especially when you see your own creation being printed on your 3D printer!Every CAD program allows users to save or export digital files for 3Dprinting. You want to save your file as an STL file (“filename.stl”). The STL file is the standard file format for 3D printing. In some programs, it’s as easy as the Save command. In others, you need to select the File > Export option, and choose the STL format. OBJ files can also be sliced and 3D printed.
- You can find 3D models in many online libraries of digital content. Thingiverse.com, GrabCAD.com, and Instructables.com are examples, and many other sites exist.
Step 2 Slice the file for 3D printing
Slicing is the process of converting your 3D model into the layered print language your printer can understand, called G-Code. We recommend using free, open-source slicer programs. Our favorite slicers are Cura and Repetier Host. Both are free and easy to use. We’ve included Cura and its setup .ini file on your printer’s SD card because it’s easier for beginners. We recommend that you install Cura on a PC or Mac and use it to do your slicing.
There are a lot of slicers that will create G-Code automatically for your printer.All you have to do is input the correct settings for your printer (using the files we included), import your 3D model, and click slice! It’s that easy.
- Install the Cura program on a PC or Mac.
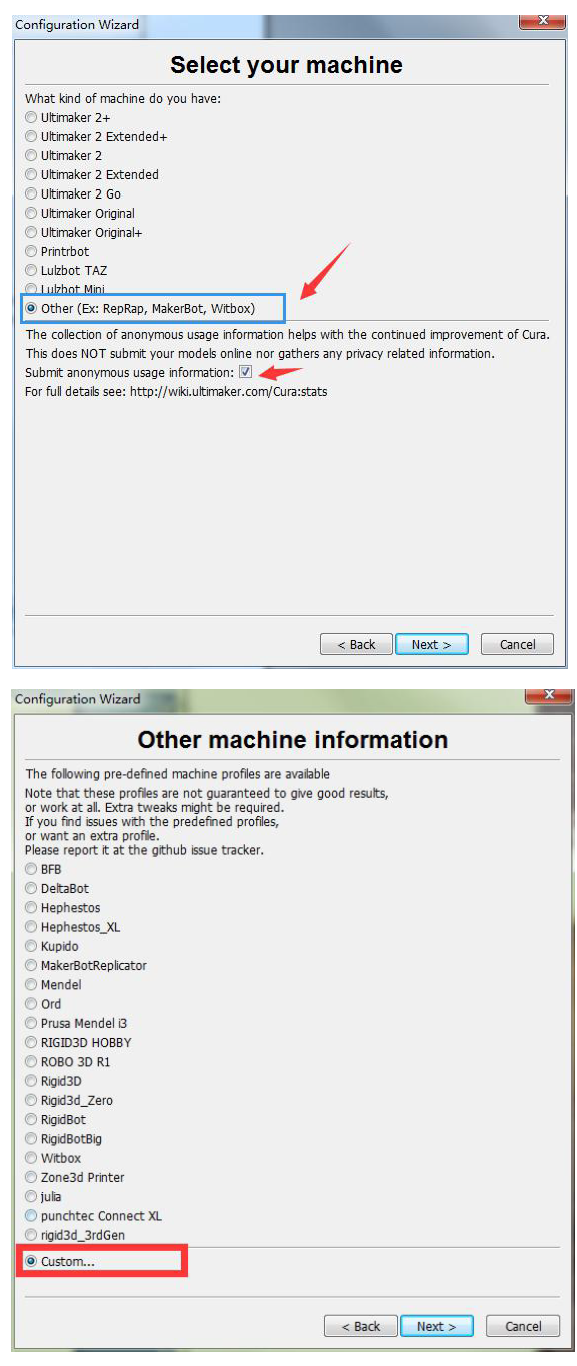
- Open the Cura application. You’ll be given several options. In the Configuration Wizard, choose the RepRap Machine and Mendel in other machine settings (RepRap (Marlin/Sprinter) G-Code Flavor, if it asks).
4. Load the model file in Cura. Rotate the file to the best orientation for printing. You may want to scale the file at this point as well.
5. When you are satisfied with the Cura settings and the position, orientation, and scale of the model, select the “Save toolpath” (or “SD” if the microSD card is inserted) icon or File > Save GCode. Save the file to the microSD card that came with your printer.
Step 3 Send the file to the printer
- After saving the G-Code to the it, remove the microSD card from the computer.
- Insert the microSD card, upside-down, into the slot on the right side of the control box.
- By using this method, no computer needs to be plugged into your printer and it will run autonomously until the print is finished.
Step 4 Print!
- On the A31 control screen, select Init./Change SD card, the last selection on the bottom of the main screen.
- Select Print from SD.
- Select your print (.gcode) file.
- Watch the 3D printer create your model!
4. Troubleshooting
This section covers the most common printing problems and how to fix them. Because 3D printing is still an emerging technology, a small level of tinkering and troubleshooting is needed. But if this section doesn’t solve your printing problems, then contact our admin on FB Group. We’re here to help you every step of the way to get you 3D printing!
1. Step-by-Step Troubleshooting
Step 1: Diagnose the problem.This may seem obvious, but many problems can be solved if you take a step back and see exactly what the printer is doing incorrectly.
Step 2: Determine if the problem is mechanical or digital.
- Mechanical problems are in the actual operation of the printer, such as the motors that drive the X, Y, and Z axes, the motor that pushes the filament, the nozzle heater, and the level of the build plate. The most common mechanical problems are caused by a build plate that is not adjusted correctly, a clogged nozzle, or an unplugged connector on a motor or limit switch.
- Digital problems are in the slice file that you prepare in Cura or other slicing program.Important slice file settings include layer height, print (nozzle) temperature, and print speed.
Step 3: Fix the problem.Once you’ve discovered what the actual problem is, you can fix it with the following procedures. (If none of these fix the problem, contact us.)
2. Digital problems: Slicer settings
- Check your slice file in Cura. Make sure the print is centered in the build area, making good contact with the build surface, and isn’t too big for the build envelope.
- Check the slice settings. Make sure that the layer height is between 0.1mm (high quality prints) and 0.3mm (low quality prints).
- Check the speed and temperature. For PLA, they should be set to 30–50mm/s and 230°C.
- Make sure the filament diameter is 1.75mm and the flow rate is 100%.
- Check the Fill Density (infill) and make sure it is at least 5%. You may need to adjust this value to your liking for your model.
- Your part may need supports. If it’s rounded you may need to select “Everywhere” for the support type. If it’s intricate, it may need to select “Raft” for the Platform adhesion type. A raft is a hatch pattern on the build plate that the model will print on. If the part warps when you begin to build it, you may need to select “Brim” Adhesion support type and reslice the file. (A brim will help the part stick so it doesn’t curl up at the edges.)
3. Mechanical problem: Leveling the build plate
Many of the failures in 3D printing are caused by a build plate that is not level or is not the correct distance from the nozzle. See the section “Leveling the Build Plate” in this manual.
4. Mechanical problem: Filament is not coming out of the Nozzle
When filament is not coming out of the nozzle, the nozzle may be clogged. You have several options for clearing a clogged nozzle.
- You can pull the clog backward out of the nozzle using the “soft pull” method.
- You can “floss” the clog out of the nozzle using a nozzle cleaner while the nozzle is heated.
- You can heat the nozzle and push the clog through the nozzle.
This video explain how to unclog a nozzle
NOTE: Never leave your printer nozzle at build temperature (220°C) while the printer is idle. The melted plastic remaining in the nozzle will “bake” onto the nozzle and become a hard carbon blockage.
- Try to pull the clog out of the nozzle using the “soft pull” method:● Turn the machine on, select Prepare PLA, and wait until the temperatureNOTE: Every time you change filament on your 3D printer, remove the filament with the nozzle at around 100°C. This method usually removes all the old color of filament from the hot end, so when you begin printing again, the new color will begin printing immediately.
- Use a nozzle cleaner to clear the nozzle:● S elect “ Prepare ” → “ Preheat PLA”. Wait for the nozzle to reach the set temperature of 195°C for PLA.● Raise the Z-axis carriage by selecting Prepare ” → “ Move axis ” → “ Move 1mm ” → “ Move Z” and spinning the knob. (You can also manually rotate the lead screw to move the carriage up.)● When the nozzle has reached 195°C, carefully insert the nozzle cleaner up into the tip of the nozzle. Squeeze the extruder release lever with one hand and push the filament into the extruder with your other hand.● Alternate “flossing” with the nozzle cleaner and pushing the filament through the extruder until a consistent bead of filament is extruded through the nozzle.● Reload the filament and move on to .
- Try to push the clog through the nozzle.● Select “Prepare ” → “ Preheat PLA”. Wait for the nozzle to reach the set temperature of 195°C for PLA.● When the nozzle has reached 195°C, squeeze the extruder release lever with one hand and push the filament into the extruder with your other hand.● Watch to see if any plastic is coming out of the nozzle.● Turn the machine off and wait 10 minutes. The nozzle needs to cool down completely.● Do a “soft pull” (step a.) to remove remaining filament in the nozzle.
References
[xyz-ips snippet=”download-snippet”]


