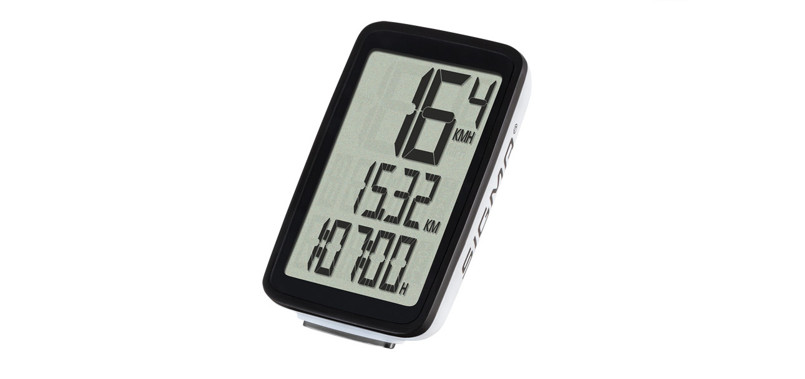
manualBike pedometerItem: 47981
Functions
Note: Computer functions refer to the packing details.Speedometer (SPD): 0~99.9 km/h or M/hAverage Speed (AVS): 0~99.9 km/h or M/hMaximum Speed (MXS): 0~99.9 km/h or M/hSpeed Tendency ![]() or
or ![]() Speed Comparator (+ or-)KM & M SelectableOdometer (ODO) – 0~9999.9 km or MOdometer Save FunctionTrip meter (DST) – 0~999.9 km or MTrip Timer (TM) – 9:59:59Digital Clock- 12 / 24 hour selectableAuto ScanAuto Power OffAuto Start / StopCaloriesFat BurnedFreeze Frame Memory (TM and AVS)°C & °F selectableMaintenance programEL Backlight
Speed Comparator (+ or-)KM & M SelectableOdometer (ODO) – 0~9999.9 km or MOdometer Save FunctionTrip meter (DST) – 0~999.9 km or MTrip Timer (TM) – 9:59:59Digital Clock- 12 / 24 hour selectableAuto ScanAuto Power OffAuto Start / StopCaloriesFat BurnedFreeze Frame Memory (TM and AVS)°C & °F selectableMaintenance programEL Backlight
Specifications
| Product material | ABS acrylic |
| Size | 75x50x15 mm |
| Batteries | 2x CR2032 |
| Transmission distance | ≥ 70 cm |
| Waterproof grade | IP65 |
| Magnetic induction distance Signal transmission | ≤ 3 mm |
| Product material | 110 kHz wireless transmission |
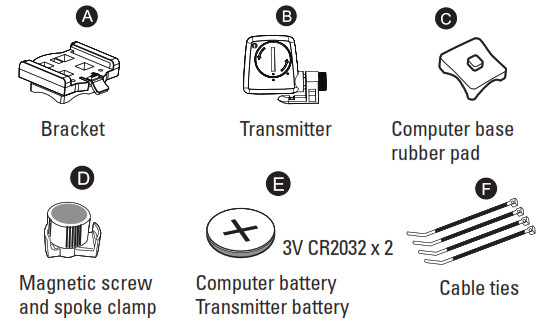
Accessories
Battery installation
ComputerRemove the battery cover from the bottom of the computer using a flat blade screwdriver or a coin. Insert the battery with the positive (+) polefacing the cover and put the cover back on. (Fig. 1).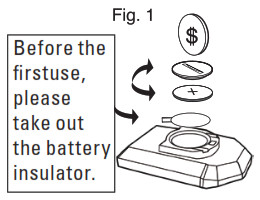 TransmitterInstall the battery with the positive (+) pole facing the battery cover. Put the cover back on with a flat blade screwdriver or coin. (Fig. 2).
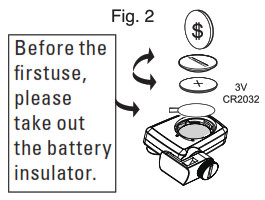
Installation of the magnet & transmitter
Remove the magnetic screw from the spoke clamp. Place the clamp on the spoke. You can use the clamp on both a flat and a round spoke. Screw on the magnetic screw to the clamp until it is snug, do not overtighten. (Fig. 3).
Attach the transmitter to the front bicycle fork using two cable ties. Make sure the magnet cycles past the transmitter as the wheel turns. As the magnet passes the transmitter, it should pass within 3 mm of the transmitter, but not be able to touch it (Fig. 4).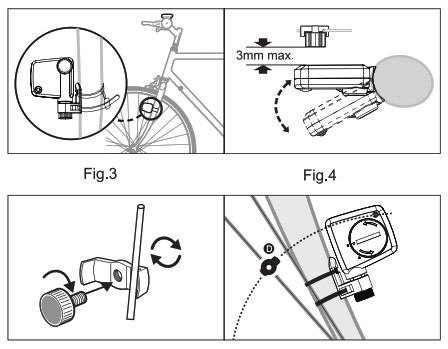
Mounting bracket
Place the mounting bracket on a desired area of the handlebar (Fig. 5).Wrap cable ties around the bar and thread through the opening of the bracket tab. Secure by pulling the ends of the strap down until locked.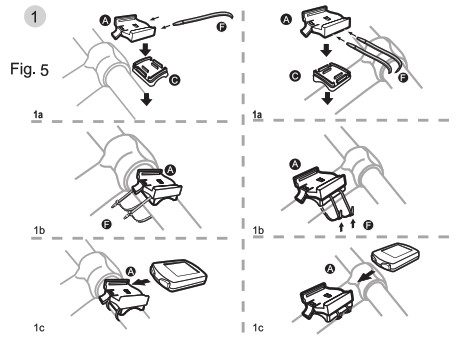
Computer
To attach the computer onto the mounting bracket, slide the computer on the mounting bracket until it snaps firmly into position (fig. 6).To remove the computer from the mounting bracket, press the release button on the front of the bracket. Push the computer forward with your thumb (fig. 7).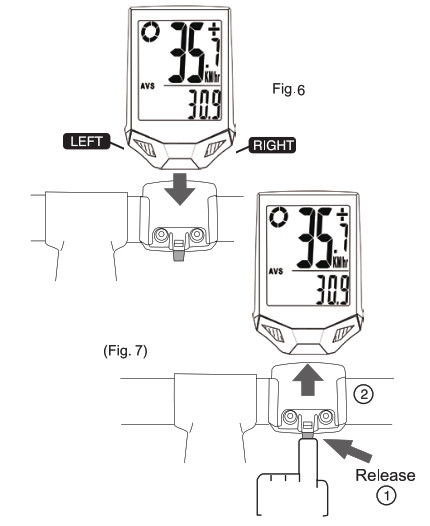 Go to the computer setting mode by:a) Insert the batteryb) Hold two buttons for 3 secondsPress right button to select or adjust, press left button to confirm the setting.
Set the wheel sizeSet the wheel size, factor C, into the computer by multiply the wheel diameter in millimeter by 3.1416. For convenience, please refer to the chart below.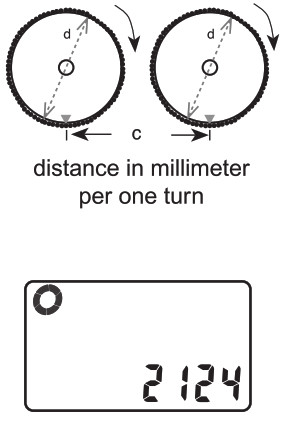
| Wheel Diameter d | Wheel Factor c |
| 700B | 2237 |
| 700C X 38MM | 2180 |
| 700C X 35MM | 2168 |
| 700C X 32MM | 2155 |
| 700C X 30MM | 2145 |
| 700C X 28MM | 2136 |
| 700C X 25MM | 2124 |
| 700C X 23MM | 2105 |
| 700C X 20MM | 2074 |
| 700C Tubulari | 2130 |
| 650C X 23MM | 1990 |
| 650C X 20MM | 1945 |
| 27″ X 1-1/4″ | 2161 |
| 27″ X 1-1/8″ | 2155 |
| 26″ X 2.3″ | 2135 |
| 26″ X 2.25″ | 2115 |
| 26″ X 2.1″ | 2095 |
| 26″ X 2.0″ | 2074 |
| 26″ X 1.9″/1.95″ | 2055 |
| 26″ X 1.75″ | 2035 |
| 26″ X 1.5″ | 1985 |
| 26″ X 1.25″ | 1953 |
| 26″ X 1.0″ | 1913 |
| 24″ X 1.9″/1.95″ | 1916 |
| 20″ X 1-1/4″ | 1618 |
| 16″ X 2.0″ | 1253 |
| 16″ X 1.95″ | 1257 |
| 16″ X 1.5″ | 1206 |
Selection of kilometres or mileAfter the wheel size is set, the following setting is the selection of kilometers or miles as the measurement for distance. Press the right button to choose between kilometer (km) or Mile (m) and press the left button to confirm.
Km or m selection
Age and weight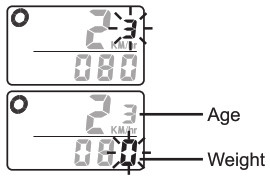 Set your age and weight. Weight will be put in kg or pound if km or mile is selected, respectively.
Service programThe bike computer has a service program to remind you to replace parts or lubricate the chains after a preset distance is reached. Right after the km/mile selection is done, the preset total distance of 600km (or miles) will flash. Press the right button to select between 200, 400, 600 & 800 km (or miles) and press left button to confirm your choice. For example, if 600 km is set, the spanner ( ![]() ) will start to flash whenever the total distance is reached; 600 / 1200 / 1800 etc. Press the left button to stop the spanner (
) will start to flash whenever the total distance is reached; 600 / 1200 / 1800 etc. Press the left button to stop the spanner (![]() ) from flashing.
) from flashing.
Set the service program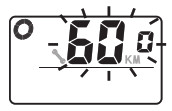
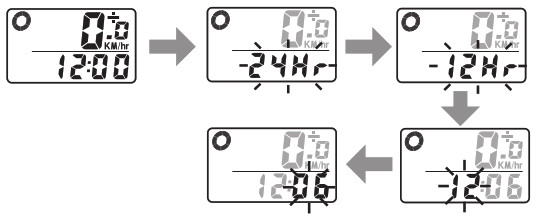
Clock and time settingPress the right button to enter the scan interface and press it again to enter the time mode. Press and hold the left button for 3 seconds to enter the clock settings where you can choose 12 / 24-hour format. Press the right button to select and the left button to confirm your choice. Continue with entering the hour and minute settings.
Selecting computer functionsa) Press the right button to go to another mode.b) Press the left button to enter the sub-function of this mode.c) By holding the left button, the computer will reset or go to the setting mode of the sub-function.
Speedometer (SPD)The current speed is indicated on the first row on the display. The range of measurement is from 0 to 99km/h [0 to 99m/h].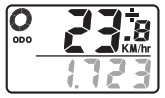 Average speed (AVS)The average speed will be reset when resetting the Trip information which can be found under the Trip distance mode.
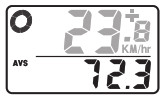 Maximum speed (MXS)Press and hold the left button for 3 seconds to clear the maximum speed.
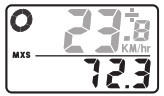 Speed tendency (acceleration & deceleration)A cyclist symbol appears to the left of the speed to indicate acceleration or deceleration. The wheel turns forward
 ![]() when accelerating and turns backward
when accelerating and turns backward ![]() when speed decreases.
when speed decreases.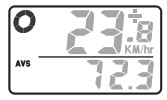 Speed comparatorA “+” or “-” sign may appear to the right of the speed. A “+” indicates that you are travelling faster than your average speed (AVS) and a “-” indicate that you are riding slower.
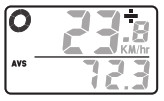 Odometer (ODO)The total distance travelled is indicated by ODO. Hold the left button for 3 seconds to goto odometer save function.
 Odometer save functionPress the right button until entering the ODO mode and press and hold the left button for 3 seconds until the last digit is flickering. Press the right button to select and press left button to confirm. Repeat above sequence to reach desired odometer value. Press the left button again to return to normal ODO mode.
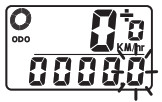 Trip distance (DST)To reset the Trip information, hold the left button for 3 seconds. This action resets the trip distance, trip timer and average speed.
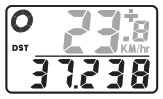 Trip time (TM)The trip timer will be reset when resetting the Trip information which can be found under Trip distance mode.
 TemperatureTo choose if temperature will show in °C or °F, hold the left button for 3 seconds to enter the degree selection. Press the right button to select and press the left button to confirm.
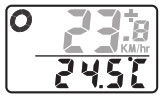 CaloriesHold the left button for 3 seconds to reset the calorie data.
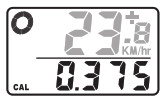 Fat burnedFat burnt is measured in grams. Hold the left button for 3 seconds to reset the data.
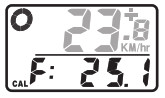 ScanPress the right button to enter SCAN mode. The trip distance, maximum speed, average speed and trip timer will be automatically displayed every 4 seconds.
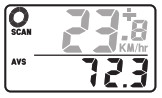 Freeze Frame MemoryFreeze Frame Memory can lock the display at the end of a ride segment. Press the left button to enter the mode. TM, DST, and AVS, which will beflashing, can be read at a later time by pressing the right button. To reset the memory, press the left button; the display will stop flashing. This function is particularly useful for example after a competition or when not having the time to analyze the data right away. Note: Computer must be in either DST, MXS, AVS, or TM mode for this function to work.
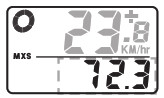 Start the computerPress any button to wake up the computer and display before cycling.
Auto power offIn order to save battery, the unit will go to sleep if no input is received for 5 minutes.
Computer resetThe computer will reset by either of the following cases.a) Battery Changeb) Holding both left and right button for 3 seconds will reset the computer.
Manual wake-upWake up the computer by pressing any button.
Auto wake-upYou can wake up the computer by simply riding the bike without pressing any button. If you bike within 2 hours after sleep, the computer will wake up within 10 seconds. If it has been more than 2 hours after sleep, it will wake up within 1 minute.
EL backlightTo turn on the EL backlight you have two alternatives:a) By holding the right button for 2 seconds, the EL light will be turned on for 8 seconds. The computer will then go to scan mode with trip distance, maximum speed, average speed and trip timer displayed.b) Press the left button to turn on the EL light for 4 seconds. The computer will go to the freeze-frame memory mode as well.
| Error | Problem/solution |
| Inaccurate maximum speed reading | Unknown atmospheric or RF interference |
| No speedometer reading | Improper magnet/ transmitter alignment. Check the battery and make sure it is inserted correctly. |
| The display is black | Temperature is too hot, or display has been exposed to direct sunlight for too long |
| No trip distance reading alignment | Check for correct sensor/ magnet alignment and check the battery and make sure it is inserted correctly. |
| Display shows irregular figures | Take out the computer battery and insert it again. |
www.rubicson.comBox 50435Malmö, SwedenVersion: 2021-03-08Rubicson®
References
[xyz-ips snippet=”download-snippet”]