
![]() Broadcast A/V DivisionCV420-30X-NDI30X NDI®|HX Camera
Broadcast A/V DivisionCV420-30X-NDI30X NDI®|HX Camera
 User Manual
Copyright InformationCopyrights © Marshall Electronics Incorporated. All rights reserved.Marshall Electronics is a trademark of Marshall Electronics incorporated copying, reproducing, or transmitting this file is not allowed if a license is not provided by Marshall Electronics Inc. unless copying this file is for the purpose of backup after purchasing this product.In order to keep improving the product, Marshall Electronics Inc. hereby reserves the right to make changes to product specifications without prior notice.The information in this file is subject to change without prior notice. To fully explain or describe how this product should be used, this manual may refer to names of other products or companies without any intention of infringement.Disclaimer of warranties: Marshall Electronics Inc. is neither responsible for any possible technological, editorial errors or omissions, nor responsible for any incidental or related damages arising from providing this file, using, or operating this product.
 Understanding Quick setup of CV420-30X-NDI with NDI®|HXThis section explains how to quickly configure the Marshall CV420-30X-NDI camera with NDI®|HX.It also explains how to update the device, and where you can find additional NDI software to extend my workflow. Complete NDI® Tools can be found here: https://www.ndi.tv/tools/ Here you will choose whether you will require NDI® Tools for Windows or Mac and download. After completing this short section, you will be all set to begin using your new NDI®|HX camera.OVERVIEW: Unlike typical cameras, CV420-30X-NDI leverages the easy plug-n-play benefits of the NDI-basic workflow supported by leading video software and hardware developers around the globe.GETTING READY: Your new CV420-30X-NDI uses the NDI®|HX protocol for audio/video transmission, amore.Your first step will be to install NDI|HX drivers if using a TriCaster, or Microsoft HEVC decode on noTriCaster systems, as appropriate for your computer platform or device.
- Navigate to ndi.tv/formats in your web browser and follow the relevant directions to download and install drivers for your computer platform. NOTE: The NDI|HX driver also installs NewTek’s NDI StuMonitor application, which will not only display the output of your camera but also provide ease to its settings. Also contains built-in PTZ controls.
- NDI Studio Monitor and other useful NDI tools can be found here: https://www.ndi.tv/tools/
- Then simply plug the Ethernet (NDI) port into the same Network your computer or Newtek equipment plugged into and off you go.
NOTE: The End User License Agreement under which you use the NDI|HX driver specifies that “you may up to five (5), and no more than five, copies on separate machines at one time.”OPTIONAL – for Microsoft Windows® users, downloading and installing the NewTek NDI® Tools available at no cost from ndi.tv/tools/, the download pack will provide learning tools and utilities to maximum NDI®|HX experience.FINAL NOTE – if you are experiencing any problems with the NDI® platform, NDI® software, NDI® drive please contacts Newtek for technical assistance or join the NDI community to review HOW-TO videos, media, forums, blogs: www.ndi.tv/communityIf you are having a hardware problem, and need assistance please contact Marshall Electronics. Marshall Customer Support Toll-Free: 800-800-6608 or 310-333-0606Email: [email protected]
Safety Instructions
- Operation1.1 Use camera in the recommended operating environments.1.2 Do not place the camera in a tilted position.1.3 Do not place the product on an unstable cart, stand, or table.1.4 Do not use this product near water, extreme humidity, or high heat.1.5 Use recommended ¼”-20 mounts and attachments.1.6 Use the power supply that is provided inbox.1.7 Always take the following precautions when handling the power plug. Failure to do so may result in sparks, shock, or fire:• Ensure the plug is free of dust before inserting it into a socket.•Ensure that the plug is inserted into the socket completely and securely.1.8Do, not overload wall sockets, use long extension cords, or plug the camera into multi-output power strips.1.9 Do not block vents on the camera body as they provide ventilation and prevent the product from overheating.1.10 Do not open or remove the camera body, camera warranty is void if opened.1.11 Unplug the product from the wall outlet and consult a licensed service technician when the following conditions arise:• If the power cords are damaged or frayed.• If the liquid is spilled into the product or the product has been exposed to rain or water.
- Installation2.1 For security consideration, please make sure any mounts that are used are standard UL or CE safety certified and installed by technician personnel.
- Storage3.1 Do not mount a camera where the power cord can be stepped on, as this may result in fraying or damage to the lead or the plug.3.2 Never allow debris or objects of any kind to penetrate the camera body. Never allow liquid of any kind to spill onto or into the camera body.3.3 Unplug this product during thunderstorms, during electrical surges, or if it is not going to be used for an extended period of time.3.4 Do not place cameras or accessories on top of vibrating equipment or heated objects.
- Cleaning4.1 Unplug all the cables before cleaning. Use a damp cloth for cleaning. Do not use liquid or aerosol cleaners or allow any liquids to enter the camera body.
PrecautionsWarning: To reduce the risk of fire or electric shock, do not expose this camera to rain, moisture, debris, or liquids.If the HD camera will not be used for an extended time, unplug it from the power socket.![]() Caution: To reduce the risk of electric shock, do not remove cover (or back). No user-serviceable parts inside. Refer servicing to licensed service personnel. Please do not open it by yourself
Caution: To reduce the risk of electric shock, do not remove cover (or back). No user-serviceable parts inside. Refer servicing to licensed service personnel. Please do not open it by yourself![]() This symbol indicates that this equipment may contain dangerous voltage which could cause electric shock.
This symbol indicates that this equipment may contain dangerous voltage which could cause electric shock.![]() This symbol indicates that there are important operating and maintenance instructions in this User Manual with this unit.
This symbol indicates that there are important operating and maintenance instructions in this User Manual with this unit.
FCC WarningThis product has been tested and found to comply with the limits for a Class B computing device, pursuant to Article 15-J of FCC Rules. These limits are designed to provide reasonable protection against harmful interference in a residential installation.This digital apparatus does not exceed the Class B limits for radio noise emissions from digital apparatus as set out in the interference-causing equipment standard entitled “Digital Apparatus” ICES-003 of Industry Canada.Cet appareil numerique especte les limites de bruits radioelectriques applicables aux appareils numeriques de Classe B prescrites dans la norme sur le material brouilleur: “Appareils Numeriques, ” NMB-003 edictee par l’Industrie.EN55032 (CE Radiation) WarningThe operation of this equipment in a residential environment could cause radio interference.
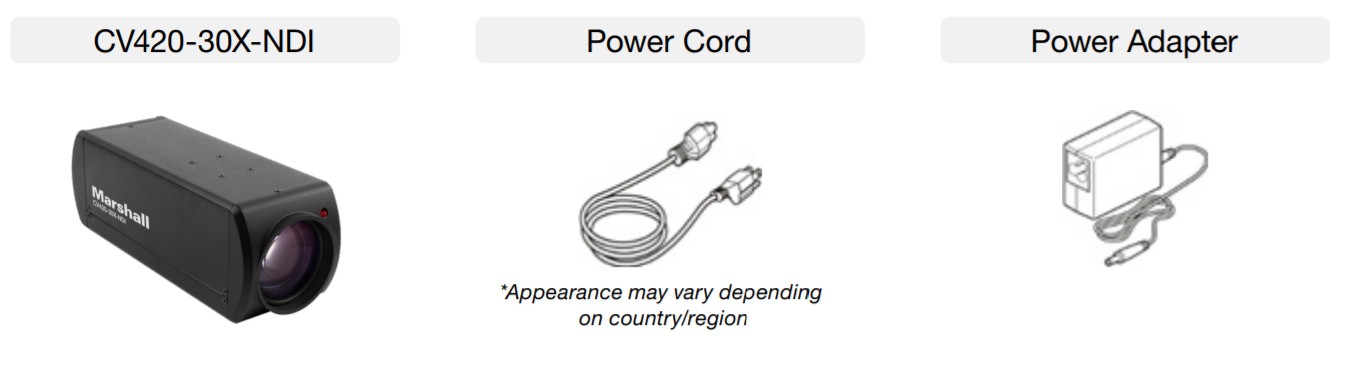
Package Contents
Function Introduction
I/O functions Introductions

|
No. |
Item. |
Function Descriptions |
| 1 | Lens | 30x HD/UHD camera lens |
| 2 | Tally indicator light | Tally light displays the status of the camera |
| 3 | Network port | Network port. Support routers or hubs (IEEE 802.3 af) with PoE power supply support |
| 4 | HDMI output | The factory output resolution is 4K/30. Please make sure that the connected display |
| 5 | Reset | the device supports 4K resolution |
| 6 | RS232 output | Push for factory default and IP address reset |
| 7 | RS232 input | RS232 output port. At most 7 cameras can be connected in a serial connection |
| 8 | DC 12 V power | RS232 input port. At most 7 cameras can be connected in a serial connection |
| 9 | connector | AC power supply connecting port |
| 10 | Power indicator light | After power is on, the indicator light will display in red |
| 11 | Audio input | 3.5mm Audio Input supports Line-level or Mic-level Stereo/Mono input |
| 12 | Audio output | Loop-through 3.5mm Output |
Tally Indicator Light Function Description
2.2.1 The tally indicator light function may be enabled through the control of the RS232 command. The setting method is as follows:
Tally Mode : 8x 01 7E 01 0A 01 0p FFp = 0 : OFFp = 4 : On (half-brightness)p = 5 : On (full-brightness)
Installation Instructions
Installation Basics
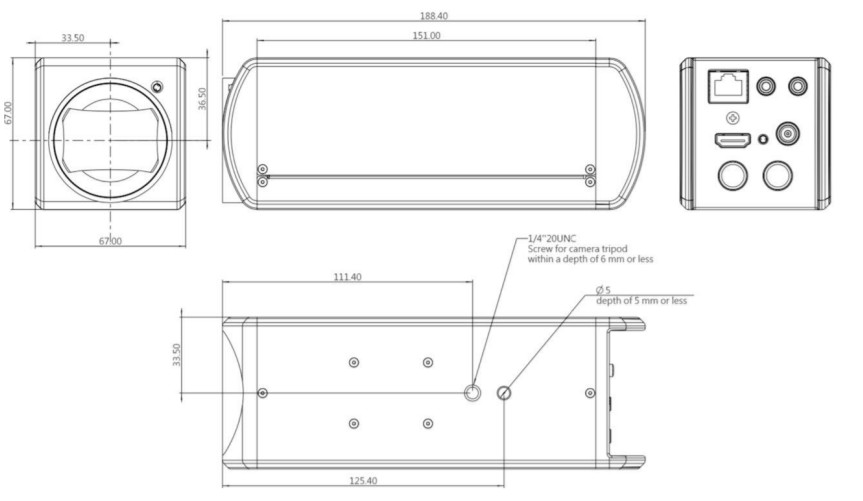
3.1.1 CV420-30X-NDI Dimensions
Connecting devices
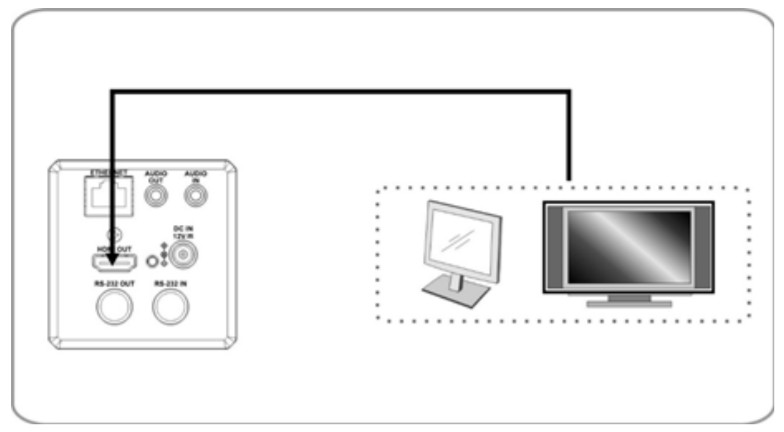
3.2.1 HDMI connection to TV/display screen
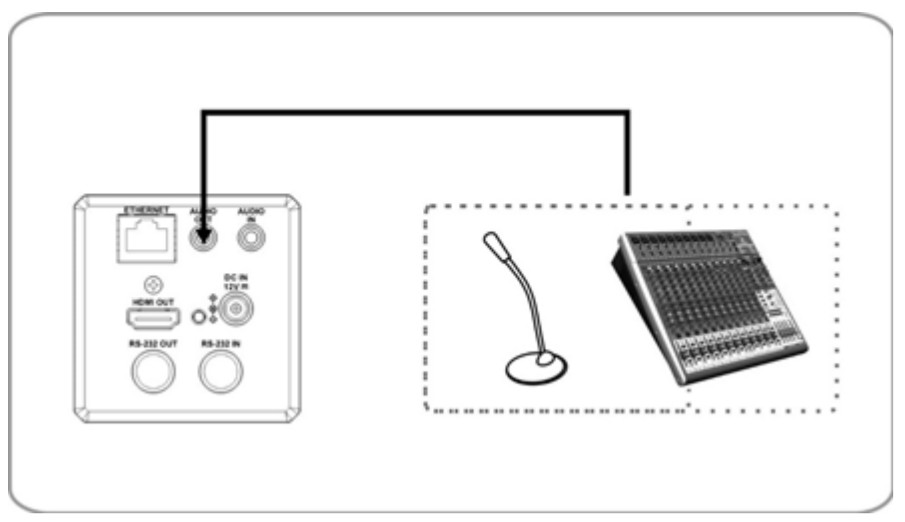
3.2.2 Connecting to the Internet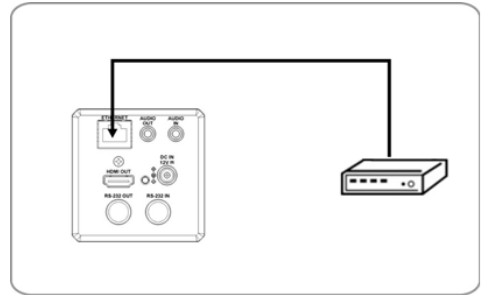 For details of web page connection setting and description, please refer to Chapter 5 NetworkFunction Settings Description.3.2.3 Connecting AUDIO IN
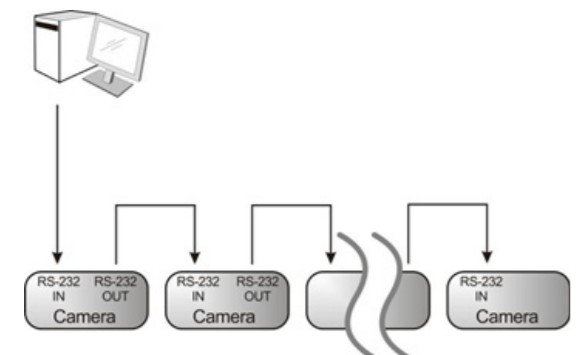
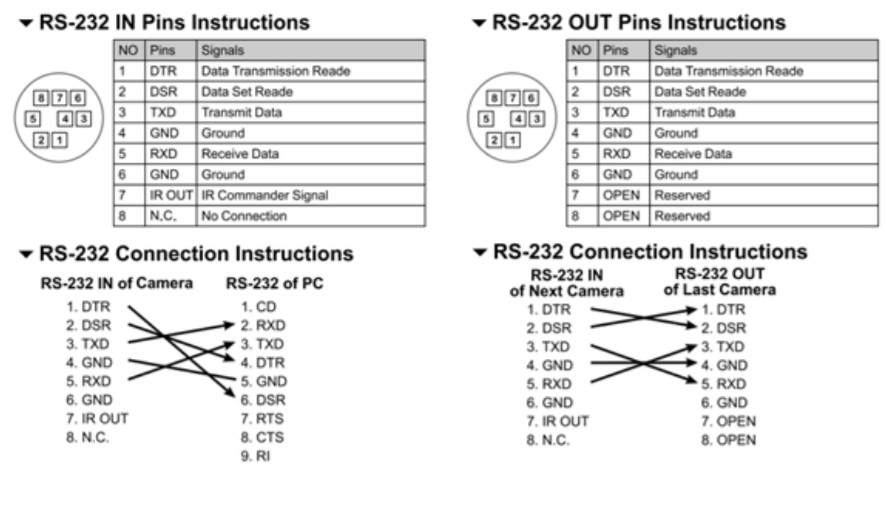
3.2.4 Connecting RS-232CV420 camera includes RS232 IN and OUT for Daisy Chain style connections or can be set up via home run using splitters (use CV620-CABLE-07 extenders to convert to CAT RJ45 cables for longer runs).
• RS-232 pin definition description
Network Function Settings
Web System Requirements
4.1.1 Web Browser :
- Internet Explorer 11 or above
- Firefox 66.0.3 or above
- Chrome 73 or above
- Edge 42.17134 or above
- Safari 12.1 or above
Connecting Camera to Network
4.2.1 Connecting to the InternetTwo common connection methods are shown below
- Connecting via switch or router
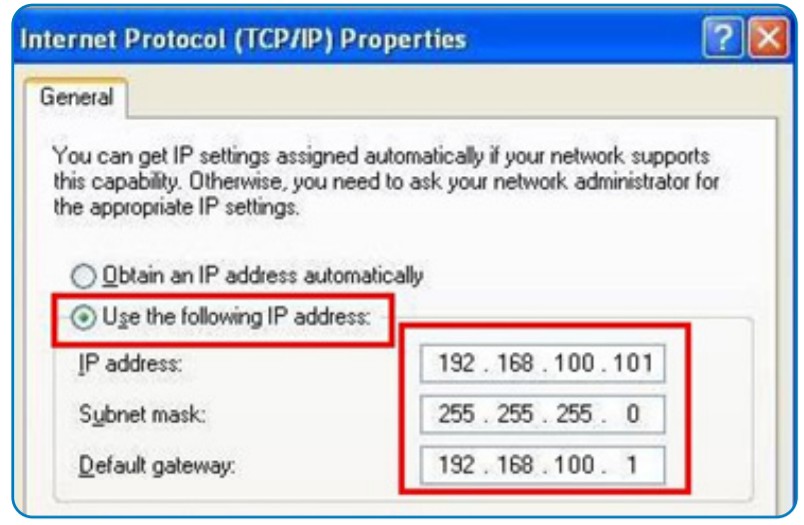
- If the camera is connected to the computer directly, the computer IP address must be modified to have the same network segment as the cameraFor example, the factory-preset default IP address of CV420-30X-NDI is 192.168.100.100. The computer IP address must be set with the same subnet, such as 192.168.100.101 so that the computer can be connected correctly to the camera• Connection Diagram• Change network settingsSuggested minimum system requirement for HEVC 4K60 IP Streaming:• Windows 10• CPU: Intel i5 (7th gen and above)• GPU: intel (7th gen and above) or Nvidia GTX 1050 and above• Memory: 8GB(64-bits) RAM• Ethernet: Gigabyte• 1GB Free Disk Space

 Suggested minimum system requirement for HEVC 4K60 IP Streaming:• Windows 10• CPU: Intel i5 (7th gen and above)• GPU: intel (7th gen and above) or Nvidia GTX 1050 and above• Memory: 8GB(64-bits) RAM• Ethernet: Gigabyte• 1GB Free Disk Space
4.2.2 Using the Browser to View the Images
- Open the browser, and enter the URL of CV420-30X-NDI in the IP address bar e.g.: http://192.168.100.100 (default IP address)
- Enter administrator’s account and passwordAccount: admin (Default)Password: 9999 (Default)
Web Page Function Description
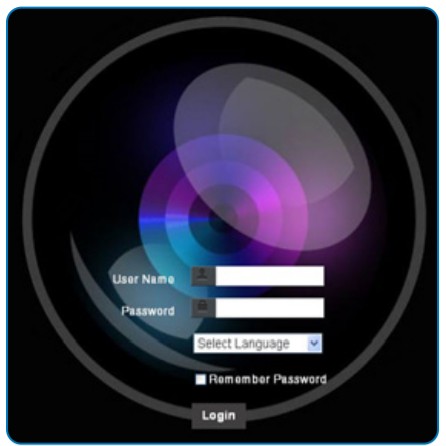
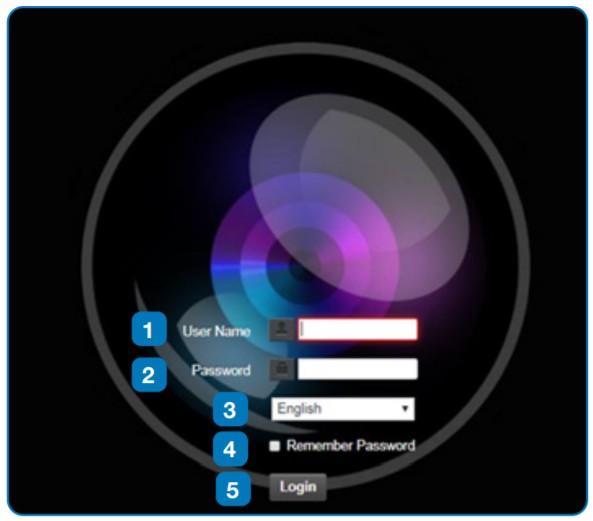
4.3.1 Login Screen
|
No. |
Item. |
Function Descriptions |
| 1 | Username | Enter a user account name (default: admin) |
| 2 | Password | Enter the user password (default: 9999) |
| 3 | Language selection | The system currently supports English, Traditional Chinese, and Simplified Chinese |
| 4 | Remember password | Saves user account name and password to the browser. |
| 5 | Login | Log in to the administrator screen on the website |
4.3.2 Viewing In Real-Time

|
No. |
Item. |
Function Descriptions |
| 1 | Preset setting | Select the number first and then select SAVE or LOAD |
| 2 | Zoom ratio | Adjust the zoom-in or zoom-out ratio via scroll bar |
| 3 | Power button | Turn on or turn off the camera power |
4.3.3 Account Management

|
No. |
Item. |
Function Descriptions |
|
| 1 | Add user account | Enter a username and password to add a new user | |
| 2 | Permission setting | Set the new account management permissions | |
| User Type | Admin | Operator | Viewer |
| View images | Y | Y | Y |
| Settings | Y | Y | N |
| Account | Y | N | N |
| 3 | Applying to set | Add the newly created user to the account list | |
| 4 | List of accounts | Edit: Modify the user password and permissions |
4.3.4 System Configurations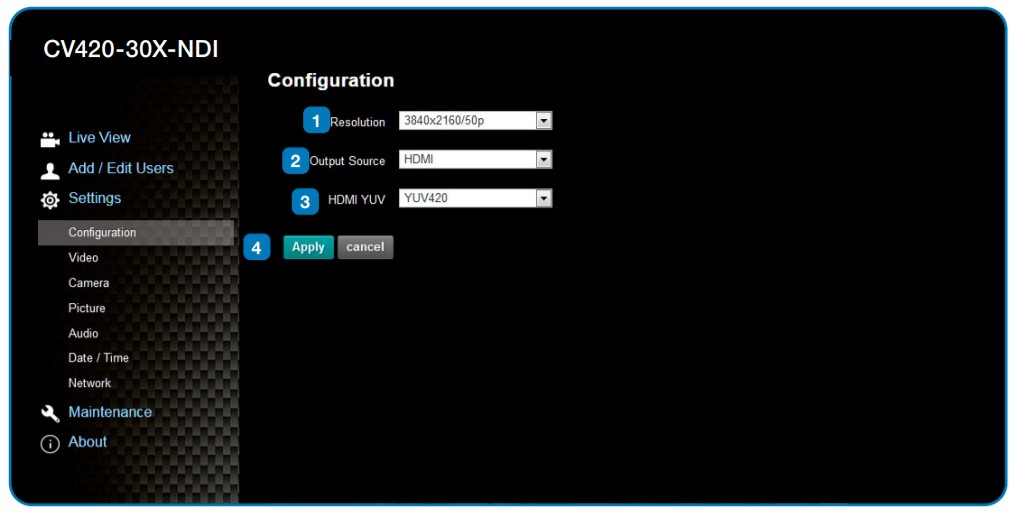
|
No. |
Item. |
Function Descriptions |
| 1 | Resolution | Set the resolution of the camera. Resolutions supported by the camera are as follows:3840x2160P 59.94/50/29.97 fps1080P 59.94/50/29.97/25 fps720P 59.94/50/29.97/25 fpsAfter switching to the resolution, the camera will restart. Please refresh the browser username and password to add a new user |
| 2 | Output signal | According to the output resolution, selections are available for HDMI output, streaming output, or HDMI + streaming output. For output signals supported by different resolutions, please refer to the following table: |
|
Resolution |
Available output modes |
|
| 3840×2160/59.94p | HDMI or streaming single output | |
| 3840×2160/50p | HDMI or streaming single output | |
| 3840×2160/29.97p | Simultaneous HDMI and streaming outputs | |
| 3840×2160/25p | ||
| 1080p/59.94 | ||
| 1080p/50 | ||
| 1080p/29.97 | ||
| 1080p/25 | ||
| 720p/59.94 | ||
| 720p/50 | ||
| 720p/29.97 | ||
| 720p/25 | ||
| 3 | HDMI YUV | Select YUV422 or YUV420 (This function is only available for these two resolutions, 3840×2160/59.94p and 3840×2160/50p, and remains in a display mode for all other resolutions) |
| 4 | Apply | After the setting has been modified, select this button to apply the setting |
4.3.5 Video Settings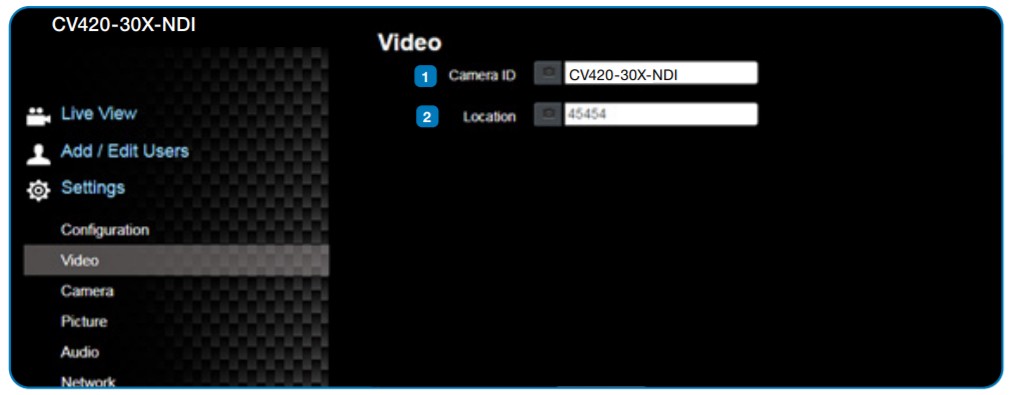
|
No. |
Item. |
Function Descriptions |
| 1 | Camera name | Modify the camera name• Camera names are limited to 1-12 characters• Please use a camera name by mixing uppercase and lowercase letters and numbers.Do not use “/” and “space” or special symbols |
| 2 | Camera location | Modify the location of the camera, such as Meeting Room 1• Camera locations are limited to 1-12 characters• Please use a camera name by mixing uppercase and lowercase letters and numbers.Do not use “/” and “space” or special symbols |
4.3.6 Camera Settings
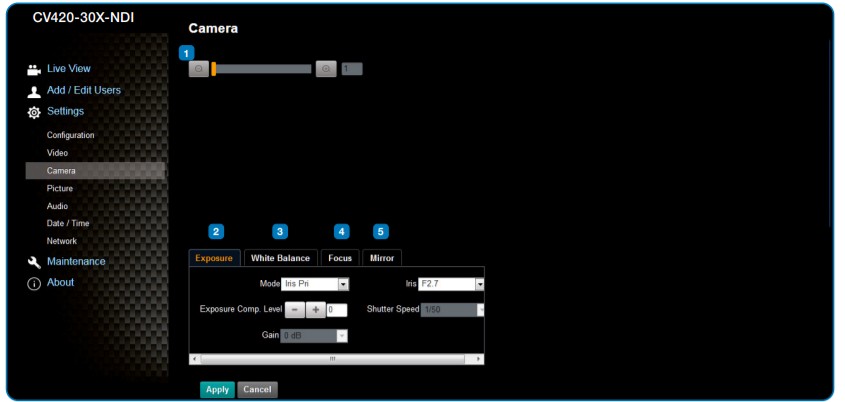
|
No. |
Item. |
Function Descriptions |
| 1 | Zoom ratio | Adjust the zoom-in or zoom-out ratio via scroll bar |
| 2 | Exposure |
|
| 3 | White balance |
|
| 4 | Focus |
|
| 5 | MIRROR |
|
4.3.7 Picture Settings
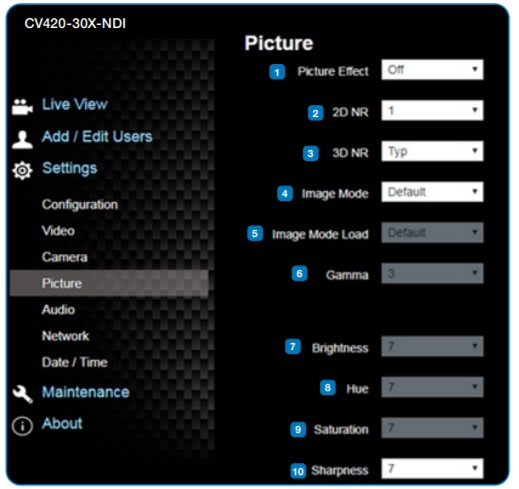
|
No |
Item |
Function Descriptions |
| 1 | Picture effect | Set picture effect, Off / Film / Black and White |
| 2 | 2D noise reduction settings |
|
| 3 | 3D noise reduction
settings |
|
| 4 | Image mode |
|
| 5 | Image mode load |
|
| 6 | Gamma |
|
| 7 | Brightness |
|
| 8 | Contrast |
|
| 9 | Saturation |
|
| 10 | Sharpness |
|
4.3.8 Camera Settings

|
No |
Item. |
Function Descriptions |
| 1 | Open audio | Turn on / off sound |
| 2 | Soundtrack effect setting | Set MIC In / Line In |
| 3 | Audio Volume | Adjust Volume |
| 4 | Encode sample rate | Set Encode sample rate
|
4.3.9 Time Settings
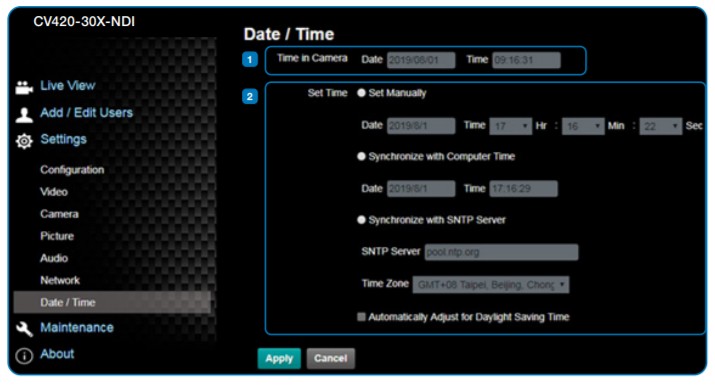
|
No |
Item. |
Function Descriptions |
| 1 | Camera Time | Display the date and time of the camera |
| 2 | Set the Time |
|
4.3.10 Network Settings
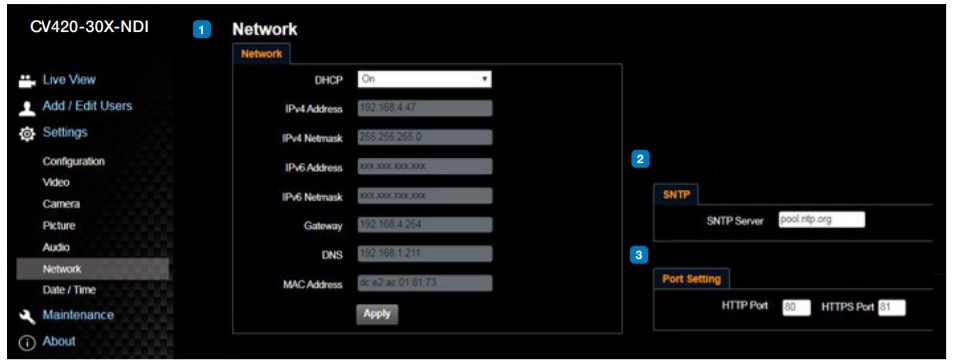
|
No |
Item. |
Function Descriptions |
| 1 | Network | Network setting of the camera. Change of setting is available only when the DHCP function is closed. |
| 2 | SNTP Setting | Set SNTP Server IP |
| 3 | Port Setting | Set HTTP and HTTPS ports. The default values are Port 80 and Port 81 respectively <Remark> Change of setting is available only when DHCP function of the camera is closed |
4.3.11 Maintenance and Updating Firmware

|
No |
Item. |
Function Descriptions |
| 1 | Firmware Update | The camera firmware may be upgraded via a web page. For the upgrade method, please download the FW upgrade manual from Marshall website |
4.3.12 Incident/Error Logs

|
No |
Item. |
Function Descriptions |
| 1 | Event Logs | If the camera encounters errors, an error code log will be established |
4.3.13 Additional Maintenance Settings
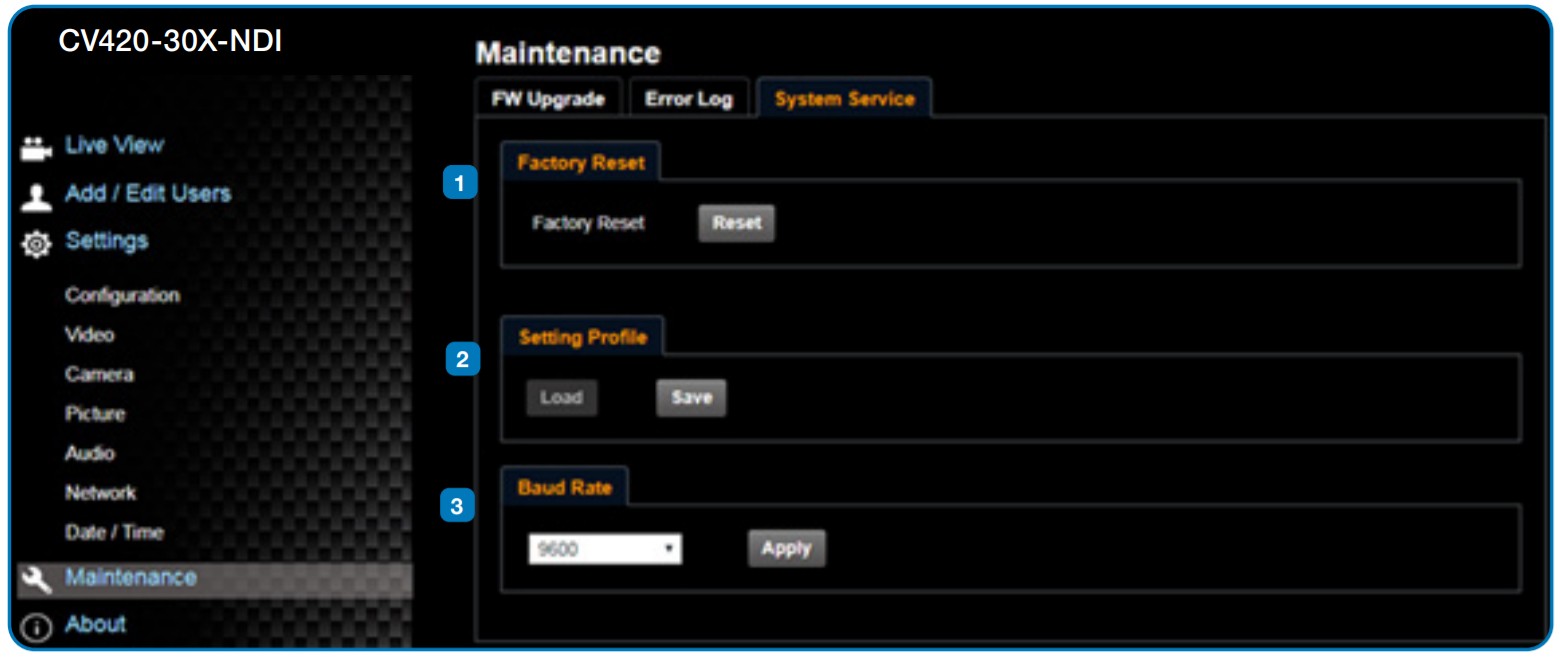
|
No |
Item. |
Function Descriptions |
| 1 | Reset to the default value | Select the reset button to resume the factory default setting as the web page setting |
| 2 | Setting File | The web page setting parameters can be exported from the computer and imported/applied to another camera |
| 3 | Baud Rate | Set the camera Baud Rate for the use of connecting RS-232 communication |
4.3.14 About
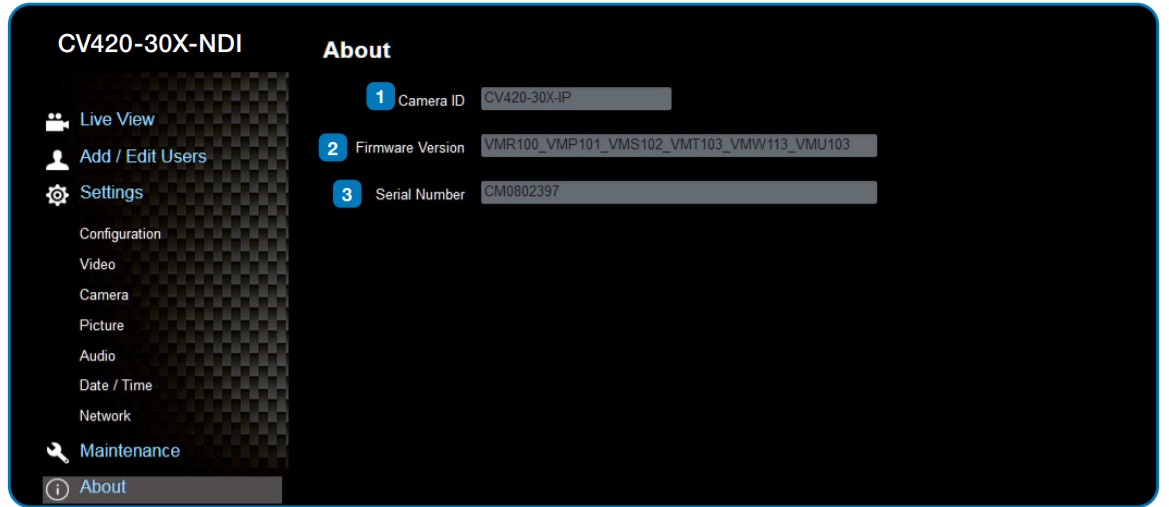
|
No |
Item. |
Function Descriptions |
| 1 | Camera ID | Display the camera name |
| 2 | Firmware Version | Display the firmware version of the camera |
| 3 | Serial Number | Display the camera serial No. |
Specifications
| Sensor | 1/2.5″ 8MP CMOS |
| Video Format | “Resolution: 3840x2160p (UHD), 1920x1080p (HD), 1280x720p |
| Frame-rate : 59.94/50/29.97/25 fps” | 30x |
| Optical Zoom | 30x |
| Focal Length | 4.6mm – 135mm |
| Angle-of-View (Horizontal) | 68° – 3.5° |
| Aperture | F1.5 – F3.4 |
| Shutter Speed | 1/1 – 1/10,000 sec |
| M minimum Object Distance | 1.5m (Wide/Tele) |
| Video S/N Ratio | > 50dB |
| Color | Color: 0.1 Lux, F1.6, 50 IRE, AGC on |
| Night | BW: 0.02 Lux, F1.6, 50 IRE, AGC on |
| Day and Night | Mechanical IR Cut Filter |
| Day and Night Control | Modes: Auto, Color, Black/White |
| Preset Points | 256 |
| Iris Control | Auto or Manual (remote control) |
| Lens Control | Autofocus: Auto, One-Push fast AF, Interval AF, Zoom Trigger AF, Zoom Tracking, ICR Compensation AF |
| Exposure Control | “Auto mode: |
| Manual mode: shutter speed 1/1-1/10000 Shutter-Priority mode: shutter speed 1/1-1/10000 | “AGC Manual gain” |
| IRIS Pri | “Auto (2500K-7500K)ATW (2000K-10000K)Manual WB (R/B gain, One-push WB)Indoor (3200K)Outdoor (5800K)” |
| Gain Control | “AGC |
| Manual gain” | Yes |
| White Balance | “Auto (2500K-7500K) ATW (2000K-10000K) |
| Manual WB (R/B gain, One-push WB) Indoor (3200K) | Yes |
| Outdoor (5800K)’ | Configurable |
| Backlight Compensation | On/Off |
| Defog | Yes |
| EV Compensation | Auto/IRIS Pri/Shutter-Priority Mode: -5-+5 |
| Gamma Correction | Yes |
| Sharpness | Configurable |
| Noise Reduction | 2D/3D NR |
| Dynamic Range | WDR |
| Video Orientation | OFF, Flip, Mirror, Both |
| Video Standard | HEVC, H.264 |
| Multiple Video Stream | Two streaming structure |
| HEVC 4K6Ofps + H.264 640×360 30fps | ONVIF profile S |
| Audio Compression Format | AAC |
| Protocols | DHCP, DNS, HTTP, HTTPS, IPv4, UDP, NDI |
| Internet Security | “IEEE 802.1X HTTPS” |
| Control Interface | RS-232 and NDI |
| HDMI Output | HDMI 2.0 |
| Audio Out | Line Out, 3.5mm (Stereo/Mono) |
| Audio in | Line In, 3.5mm (Stereo/Mono) |
| RS-232 In | 8 Pin Mini-Din |
| RS-232 Out | 8 Pin Mini-Din |
| DC In | 12V +/- 20% |
| PoE | 802.3 of |
| Power consumption | < 12W |
| Storage Temperatures | -20°C – 60°C (-4°F – 140°F) |
| Operating Temperatures | 0°C – 40°C (32°F – 104°F) |
| Weight | 1 kg |
| Dimension | 188.4mm (L) x 67mm (H) x 67 mm (W) |
Troubleshooting
This chapter describes problems you may encounter while using CV420-30X-NDI. If you have questions, please refer to related chapters and follow all the suggested solutions. If the problem remains, please contact your distributor or the service center.
| No. | Problem |
Solution |
| 1 | Boot without power signal |
|
| 2 | There is no image output from CW20-30X- NDI |
|
| 3 | CV420-30X-NDI image is severely delayed | Please use 41(. ICN3Op or 720p 60/50 Hz signals rather than 25/30 Hz signals. |
| 4 | RS-232 cannot be controlled |
|
| 5 | Whether the Internet can be used for the operation | Please reef to Chapter 5 Network Function Description for Internet usage or call marshal! tech support. |
Warranty
Marshall Electronics warranties to the first consumer that this device will, under normal use, be free from defects in workmanship and materials, when received in its original container, for a period of two years from the purchase date. This warranty is extended to the first consumer only, and proof of purchase is necessary to honor the warranty. If there is no proof of purchase provided with a warranty claim, Marshall Electronics reserves the right not to honor the warranty set forth above. Therefore, labor and parts may be charged to the consumer. This warranty does not apply to the product exterior or cosmetics. Misuse, abnormal handling, alterations, or modifications in design or construction void this warranty. No sales personnel of the seller or any other person is authorized to make any warranties other than those described above, or to extend the duration of any warranties on behalf of Marshall Electronics, beyond the time period described above.Due to constant effort to improve products and product features, specifications may change without notice.
![]() 20608 Madrona Avenue, Torrance, CA 90503Tel: (800) 800-6608 / (310) 333-0606 • Fax: 310-333-0688www.marshall-usa.com[email protected]www.marshall-usa.com
20608 Madrona Avenue, Torrance, CA 90503Tel: (800) 800-6608 / (310) 333-0606 • Fax: 310-333-0688www.marshall-usa.com[email protected]www.marshall-usa.com
References
[xyz-ips snippet=”download-snippet”]