![]()
Broadcast A/V DivisionVMV-402-SH4-Input 3G SDI Switcher with Quad Mode andEthernet Control
User Manual
Introduction
The Marshall VMV-402-SH is ideal for presentation systems, control rooms, and remote productions by providing seamless switching between four selectable inputs. Inputs can be a combination of mixed formats and frame rates. Simultaneous output is provided via 3G SDI and HDMI. The SDI output supports up to 1080p while the HDMI output may be scaled up to UHD. The Robust design makes the 402 at home on any rack-mount or “throw-down box” application.Inputs are automatically scaled / rate converted to match the selected output format. Mixed input formats and frame rates are easily accommodated. Output formats up to 1080p50/60 for SDI andUHD 50/60 (4:2:0 sampling) for HDMI are available.
Features
- Four 3G/HD/SD-SDI Inputs
- One 3G/HD/SD-SDI Output
- One HDMI Output
- Select each channel full screen or all four as a quad display
- Seamless switching between inputs
- Audio bar overlay in full-screen mode
- Tally function in quad mode
- Remote operation via Ethernet, IR, or USB
- Supports Static or DHCP addressing
- Firmware upgradeable via USB
Applications
- 4 x 1 switcher for remote productions or AV applications
- Format “fixer/converter”. Accepts mixed formats and conforms to a selected output format
- Monitor four sources in ‘quad’ mode. Take any quadrant “full” instantly.
- Use HDMI Output for local monitoring while SDI output transmits images up to 100 meters.
- Use as Mini Multi-viewer with active tallies. Tallies triggerable by GPI.
Package Contents
- 1x VMV-402-SH
- 2x 1U rack mounting-ears
- 1x 24V 5A power adapter
- 1x UL AC power cord
- 1x IR Remote Control
- 1x IR Receiver
Specifications
| Model Name | VMV-402-SH Quad-viewer/Switcher |
| Role of Usage | Quad-viewer or 4×1 Video Switcher |
| Video-Input Support | [3G] 1080p @50/59.94/60Hz (4:2:2)[HD] 720p @50/59.94/60Hz, 1080i @50/59.94/60Hz, 1080p@24/30/60Hz |
| Audio Pass-Through | Embedded surround sound (up to 7.1ch) or stereo digital audio |
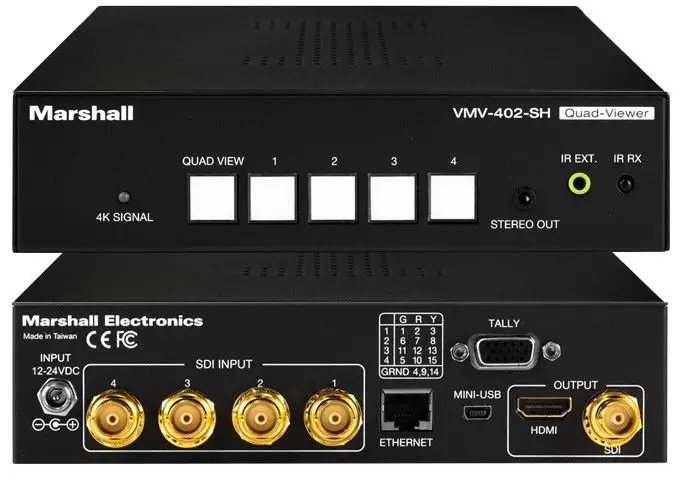
| Input | 4x BNC [SDI] |
| Program Output | 1x HDMI + 1x BNC(SDI) |
| HDMI connector | Type A [19-pin female] |
| RJ-45 connector | WE/SS 8P8C |
| ESD Protection | Human body model — ±12kV [air-gap discharge] & ±8kV[contact discharge] |
|
Mechanical |
|
| Housing | Metal enclosure |
| Mounting | 1U rack-mounting case with ears |
| Dimensions [L x W x H] | 8.25” X 7” X 1.75”209mm X 178mm X 44.5mm |
| Weight | 1Kg (2.2 lbs) with rack ears |
| Power supply | 12 – 24 Volts DC |
| Power consumption | 12 Watts nominal0.5 amp at 24 volts 1 amp at 12 volts |
| Operation Temperature | 0~40°C [32~104°F] |
| Storage Temperature | -20~60°C [-4~140°F] |
| Relative Humidity | 20~90% RH [no condensation] |
Panel Descriptions
|
Front Panel |
 |
|
Rear Panel |
 |
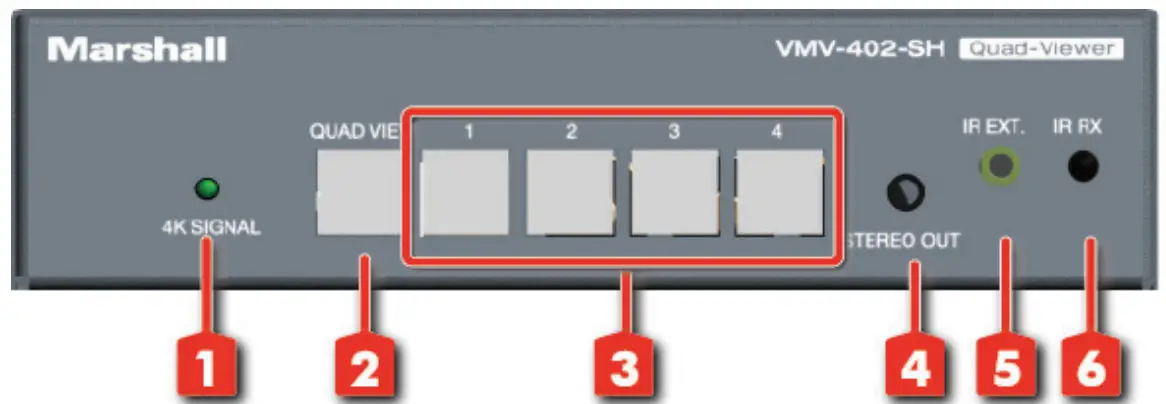
| 1. 4K Signal LED: Lighted when output is set for 4K when HDMI output is set to the UHD format(HDMI output).2. Quadview Button: Changes output to quad view mode.3. 3. Input Select Buttons: Selects between sources. The button will illuminate when the source is selected.4. Stereo out: Stereo audio output.5. IR Extension: 3.5mm jack for IR extension cable.6. IR Sensor: IR sensor for receiving commands from IR remote. | 7. DC 24V Input: Connects to the +12V or +24V DC power supply unit8. Source 1-4: 3G-SDI inputs.9. Ethernet: Ethernet control port10. Mini-USB Input: USB control / update port.11. HDMI Output: Program Out.12. SDI Output: Program Out.13. Tally GPI connector |
Hardware Installation
- Connect display, recorder, etc. to SDI or HDMI output of the VMV-402-SH
- Connect the SDI input sources to the inputs of VMV-402-SH
- Securely attach the provided supply unit to the locking power jack
- Use IR remote or computer software to switch between input channels
IR Remote Control
|
Button |
Function |
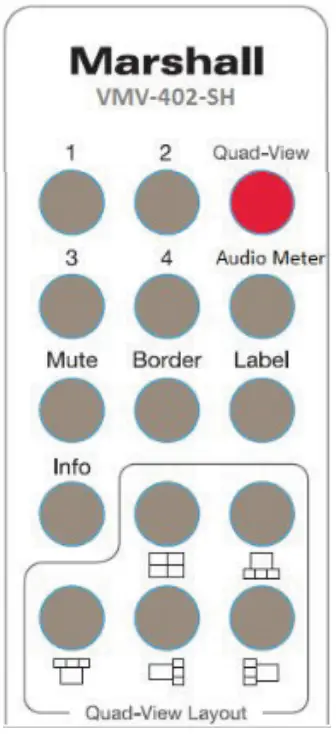
| 1 | SDI input 1 |
| 2 | SDI input 2 |
| 3 | SDI input 3 |
| 4 | SDI input 4 |
| Quad-View | Select quad mode output |
| Audio Meter | Toggles audio meters on/off (Not on quad output) |
| Mute | Toggles audio pass through on/off |
| Border | Toggles quad mode border on/off |
| Label | Toggles quad mode labels on/off |
| Info | Show current status on Quad output |
| Quad Layout 1 | |
| Quad Layout 2 | |
| Quad Layout 3 | |
| Quad Layout 4 | |
| Quad Layout 5 |
Configuration and Remote Operation
A control application is available for download from the Marshall-USA website at: http://www.marshall-usa.com/software/VMV-402-SH-V4_4.zipThis application runs under Windows OS and provides several functions:
- Firmware Update
- Setup and Configuration
- Remote Operation via USB
- Remote Operation via Ethernet
9.1 Installing the applicationPlease follow the steps in order below.
- Download the VMV-402 update file from the Marshall-USA website to a folder you can easily find on your computer. Unzip the file there.
- If there is a previous version of the VMV-204-SH Control App installed on this computer, please uninstall it before continuing.
- Connect a “USB type A to USB mini cable” between the computer and the switcher (USB micro cables will not fit)
- Double click on the file that was unzipped to begin the installation.Important: Make sure to check the box “Create a Desktop Icon” during the installation
9.2 Updating the FirmwareIt is strongly recommended that the firmware in the VMV-402-SH be updated before using the product.
- Double-click on the new desktop icon.

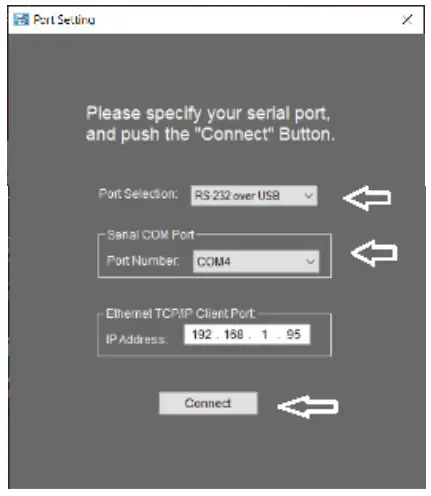
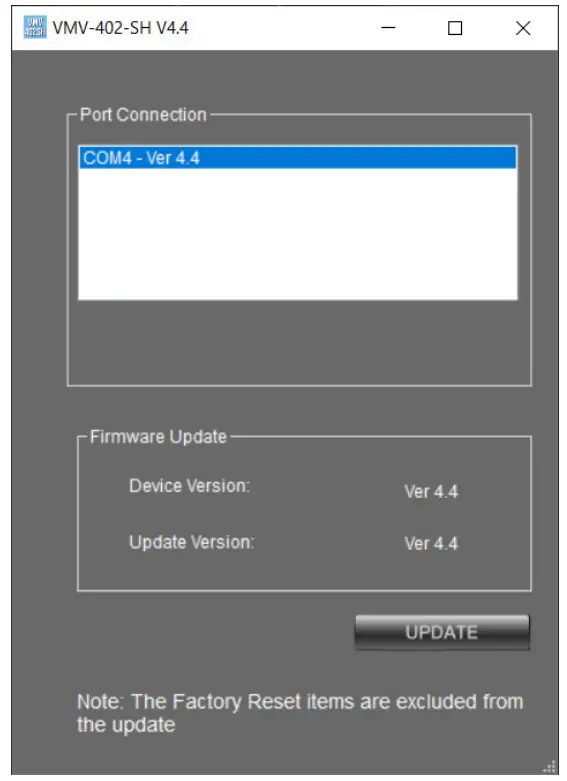
- The Port Setting page will appear.
- Check that “RS-232 over USB” is selected and that a COM Port number is available.
- If no COM Port appears, recheck the USB connection, close, and restart the Control App.
- When there are several COM Ports available, the one at the bottom of the list is the most likely one.
- Select the COM Port. Ignore the IP Address, it has no function in this process.
- Click on the Connect button.
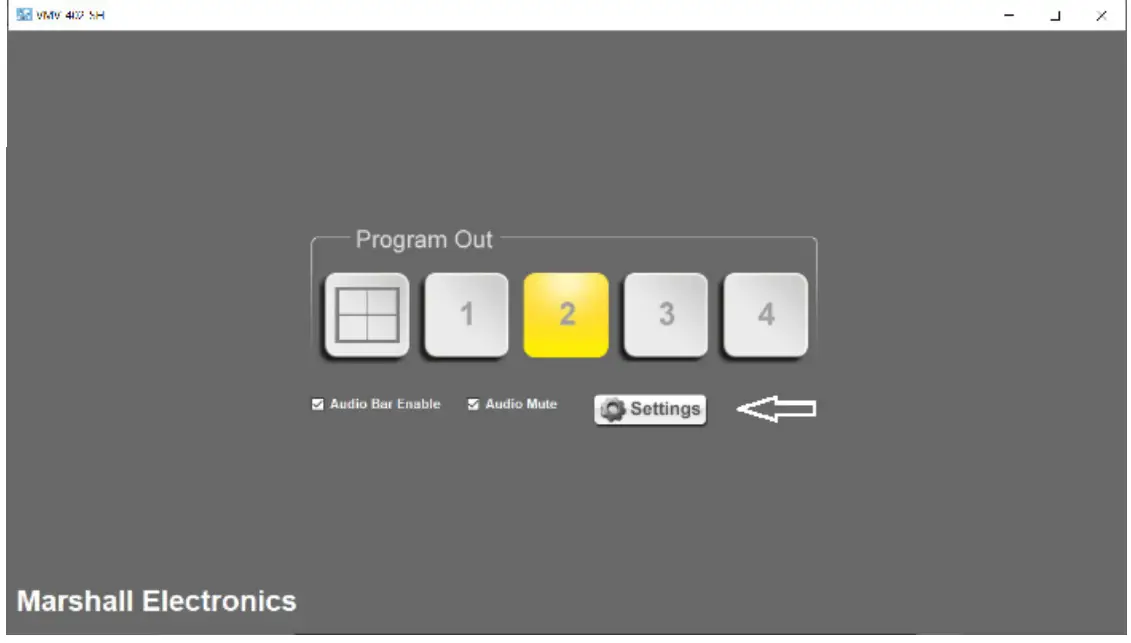
- The Main page will appear. Click the Settings button.
- Click on the Utilities Tab on the Settings page
- Then click on Firmware UpdateThe Update Page will appear.
- Please confirm that the Update Version is newer or the same as the existing Device Version
- Click on the Update button to begin the update process.
- A short countdown will appear.
The NOTE at the bottom of the page means that user preferences like IP address, Quad mode labels, etc. will not be changed during the update process.The Update process page will appear next
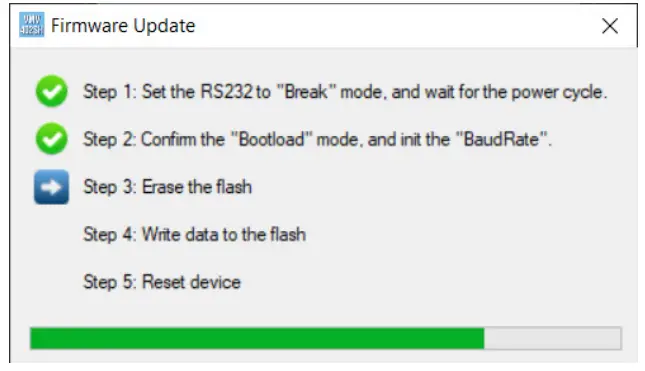
Important: The VMV-402-SH will restart at least twice during the update process.Please allow at least 3 minutes from the time the process starts until you use the switcher as background processes may still be completing.
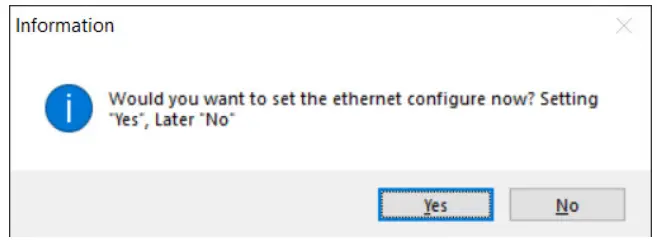
Select NO if this message appearsClose all windows and restart the Control App.
9.3 Setting Up the VMV-402-SH for the First TimeConfiguring the VMV-402-SH the first time is most easily done using the USB connection and running the control application by following the steps as described above. It is recommended to use this method of connection BEFORE attempting an Ethernet connection.
9.4 Most Common SettingsEasily the most important setting is to establish the system output video format and frame rate. From the main menu, click Settings.
9.5 Select the Outputs TabAt the bottom, click on the Output Resolution.pulldown window and select an output format and frame rate.
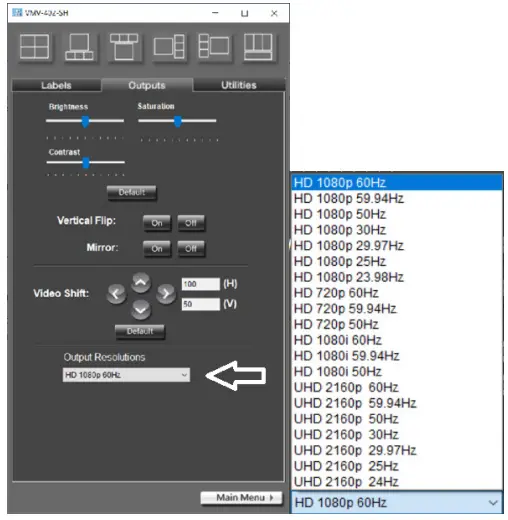
All incoming video sources will be converted to this choice.Special Note: When a UHD format is selected, it applies to the HDMI output only. The SDI output will be 1080p at the same frame rate.
9.6 Other Settings on this PageVertical Flip: Turn the picture upside downMirror: Reverse picture left & rightThese two settings affect the entire output frame including Quad mode.Video Shift: Move output image Up/Down and Left/Right Horizontal position may be moved in 200 increments. 100 is the default center.Vertical position may be moved 100 increments. 50 is the default center.Click the Default button to reset both horizontal and vertical positions.Brightness, Saturation, and Contrast: Adjust video settings to match a projector or other display.These settings affect the entire output image including Quad Mode. Click the Default button to set all three back to normal.
9.7 Quad Mode SettingsClicking on the Labels tab brings all settings for Quad Mode onto one page.The icons across the top of the page represent the 6 different available Quad Mode patterns. Simply click on one of these to change the Quad pattern.Each window in Quad Mode may have its own label. The labels may be independently set to one of six locations within the window.Labels may contain up to 14 characters, numbers, and symbols. To create a new label simply type over the existing label then click the Apply button.If it is desired to have a clean “quad split” effect, all labels may be turned off by using theLabel: On/Off buttons at the bottom of the page.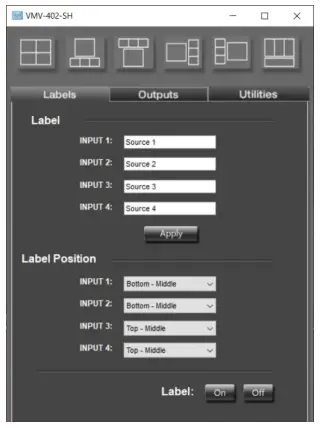
9.8 Using an Ethernet Connection with the Default AddressThe VMV-402-SH maybe be set up with a Static (fixed) IP address or an automatically assigned IP address using DHCP mode. To use the control app in DHCP mode it should be connected to the unit using a USB or Static Ethernet connection first. In this way, the app “learns” the specific MAC address of the unit and will be able to find it on a network.The unit ships in Static address mode with IP address 192.168.1.110.If no other device on the network has this address, it may be connected directly and accessed by the control application.From the utility tab, select Port Setting then select TCP/IP and confirm that the default address: 192.168.1.110 is displayed.Click the Connect button and the Main page should appear shortly.

9.9 Establishing a New Static IP addressTo change the Static address to a custom Static address, from the utility tab, first select IP Setting then fill out the fields for the new IP Address, Subnet Mask and Gateway. Confirm that DHCP Enable is NOT checked then click the Apply button.At this point, the VMV-402-SH will restart (indicated by all front panel buttons lighting). Close and restart the control app. Allow at least one full minute before attempting to connect using the new address using the method described above.The new address will need to be manually entered in the Port Setting windowNote: The Factory Reset function does not change the IP address. In other words, the new address is now the default address.
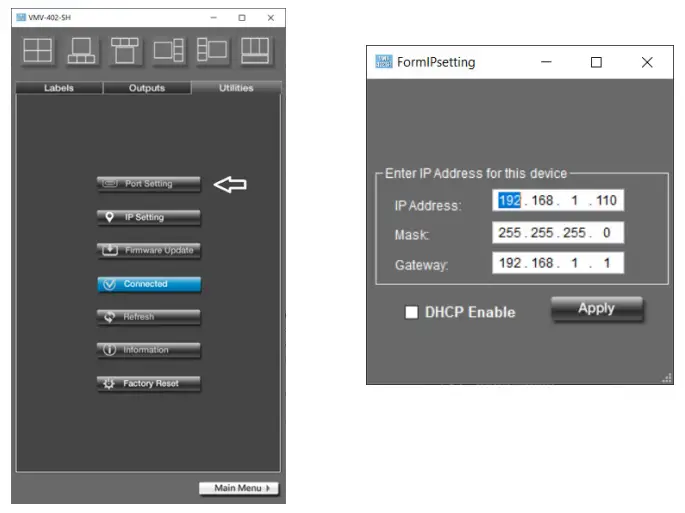
9.10 Setting DHCP ModeThe VMV-402-SH may be operated in DHCP mode. That is, the address is not Static but is, instead, set automatically by a router on the network. When DHCP mode is enabled, the current IP address may change. As mentioned in the sections above, it is best to connect to the unit first with a Static address.In this way, the control app learns the specific MAC address of this particular unit. Once it knows the MAC address, the control app will be able to find the device on a network even if the IP address has been changed by a router.The procedure to change to DHCP mode is the same as setting a Static address except that the DHCP Enable box must be checked before clicking the Apply button.At this point, the VMV-402-SH will restart (indicated by all front panel buttons lighting). Close and restart the control app. Allow at least one full minute for the mode change to complete.On the Port Setting page, change Port Selection to DHCP and click Connect. At this point, the IP Address shown is unrelated to the address that is actually in use, the window does not update automatically.

9.11 Using 3rd Party ControllersThe VMV-402-SH may be controlled remotely via Ethernet, USB or IR optical.Control codes and operational tips may be found on the Marshall-USA.com website at: http://www.marshall-usa.com/pdf/VMV-402-Remote-Control-Protocol.pdf
Warranty
Marshall Electronics warranties to the first consumer that this device will, under normal use, be free from defects in workmanship and materials, when received in its original container, for a period of two years from the purchase date. This warranty is extended to the first consumer only, and proof of purchase is necessary to honor the warranty. If there is no proof of purchase provided with a warranty claim, Marshall Electronics reserves the right not to honor the warranty set forth above. Therefore, labor and parts may be charged to the consumer. This warranty does not apply to the product exterior or cosmetics. Misuse, abnormal handling, alterations, or modifications in design or construction void this warranty. No sales personnel of the seller or any other person is authorized to make any warranties other than those described above or to extend the duration of any warranties on behalf of Marshall Electronics, beyond the time period described above.Due to constant effort to improve products and product features, specifications may change without notice.
 report this ad
![]()
20608 Madrona Avenue, Torrance, CA 90503Tel: (800) 800-6608 / (310) 333-0606 • Fax: 310-333-0688www.marshall-usa.com[email protected]
References
[xyz-ips snippet=”download-snippet”]