![]()
Broadcast A/V Division![]() VSC-100HDMI to USB 3.0 AV Consolidator Bridge User Manual
VSC-100HDMI to USB 3.0 AV Consolidator Bridge User Manual
Introduction
The Marshall VSC-100 AV Consolidator Bridge is a professional integration tool for effortlessly combining HDMI video with high-quality microphones for use with modern PC-based systems.
A single USB connection is all that is required for UCC applications, conferencing, video production, and recording. UVC protocol support allows the application to control video format, frame rate, and other settings independent of the original source format. In addition, HDMI audio can be extracted and routed to headphones or amplified speakers.
Select either one of two HDMI video sources with the push of a button. Active loop-through outputs keep sources available for other purposes such as feeding monitors, recorders, etc. External audio may be routed to the USB output or both the USB and HDMI outputs.
The VSC-100 becomes fully functional within seconds after it is powered.
NOTE: The analog audio input is designed as a REPLACEMENT for existing HDMI embedded audio If there is no audio in the incoming HDMI stream (such as HDMI converted from DVI) the analog audio input will be silent.
The input sampler receives its clock information from the HDMI audio stream.
Also, the USB audio output is sampled at 44.1 kHz only, there is no rate conversion from 48KHzsampled sources.
Features
- (2) HDMI 2.0 Inputs with active loop-through dual output
- Independent audio gain controls for dual audio input sources
- USB 3.0 computer interface with UVC control and scaling
- Plug-and-Play. Driver installation is not required for most applications
- Compatible with popular applications such as Zoom, Skype, OBS Studio, and many more.
Package Contents
- (1) VSC-100 Unit
- (1) USB 3.0 Type A-to-B Cable
- (1) 12-volt universal power supply (120 – 240volts, 50/60 Hz)
System Requirements
- Host computer with the recent operating system, preferably Windows 10 or Mac OS X
- Available USB 3.0 port (supports up to 1080p60 to host computer) or,
- Available USB 2.0 port (supports up to 720p60 to host computer)www.marshall-usa.com
Front Panel Features
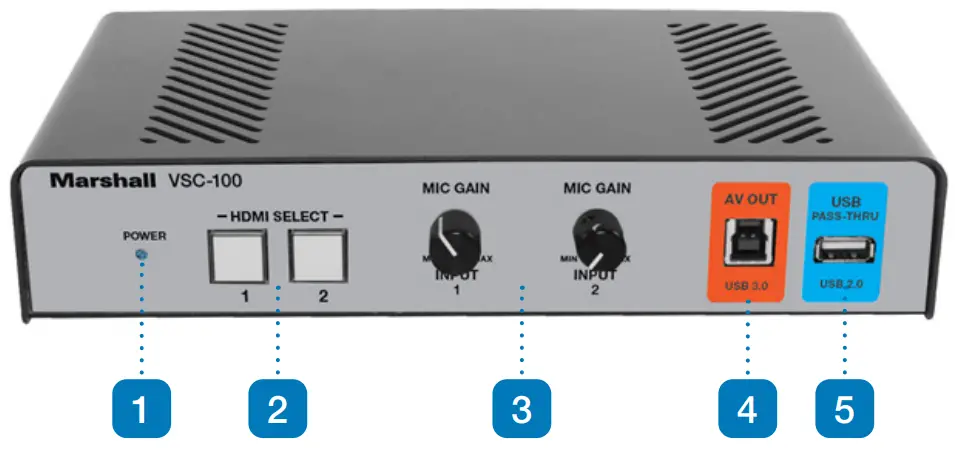
- Power Indicator LED
- HDMI Input Selector
- Audio Gain Controls
- USB 3.0 Output for Computer
- USB 2.0 Convenience Pass-Through
Rear Panel Features

6. Power Input Jack7. RS-232 over USB – Update and Control8. HDMI Inputs and Outputs9. USB 2.0 Convenience Pass-Through10. Two Audio Inputs11. 3.5mm Headphone / Line output jack12. Configuration DIP Switches
Quick Start
- The computer should be powered and operating. Power the VSC-100 using the supplied power adapter. Connect the VSC-100 to the host computer using the USB 3.0 cable provided. The first time the unit is used, please allow about one minute for the computer to identify the unit and set up the drivers.
- Open an application such as Zoom, Skype, OBS Studio, etc., and select the Video and Audio devices. The VSC-100 adapter will identify itself as “MEI VSC-100 Video Device”. Depending on the application used, the unit may appear in the application as a Camera or a Capture Device. It will also appear as “MEI VSC-100 Audio Device”.
- Connect an HDMI video source and select the appropriate front panel Select button. At this point, the VSC-100 is operating and ready to use as an HDMI to USB adapter. Control of the USB 3.0 output format and frame rate depends on the capabilities of the software being used for conferencing, recording, streaming, etc.Note: Most conferencing applications will automatically set the USB output format to 720p. This does not affect the HDMI loop-through outputs, they will be the same as the selected input.
Operations – Rear Panel Switches
The VSC-100 can be configured for a variety of applications by setting the DIP switches located on the back panel. These switches affect how audio is routed within the unit and can select between the audio from the incoming HDMI video or external audio amplified by the built-in high-fidelity dual-channel preamplifier.
There are four switches arranged like this. They are shown in their factory default positions, all up. In this arrangement, incoming audio from the video source will be passed to the USB and analog outputs. The HDMI output audio is muted.
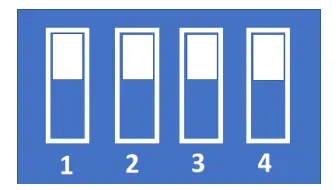
Switch 1UP – Incoming HDMI audio is passed through to USB 3.0 and HDMI OutputsDown – Incoming Analog audio is passed through to USB 3.0 and HDMI Outputs
Switch 2UP – Incoming HDMI audio is heard on rear panel Audio out jackDOWN – Incoming Analog audio is heard on rear panel Audio Out jack
Switch 3UP – HDMI Out audio is muted (to avoid feedback from the local monitor)DOWN – HDMI Out audio is unmuted (audio can be heard on local monitor)
Switch 4UP – Normal OperationDOWN – Firmware Update Mode
In this example, audio for both the HDMI output and the Analog headphone output are coming from the Analog Inputs.
In this example, audio incoming from HDMI be sent to the HDMI and USB outputs. The audio fromthe Analog inputs will be sent to the Analog output only.
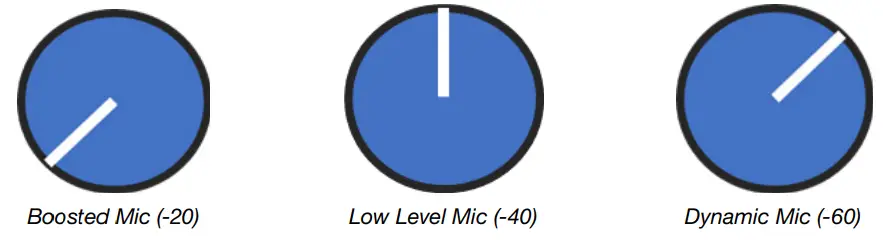
Operations – Front Panel Gain Controls
Two rotary knobs on the front panel control Gain for each analog input. These allow the VSC-100 to work with audio sources ranging from very low output microphones (-40db reference) to -20db boosted mics. Line-Level sources (-10db reference) will usually need to be padded or turned down at the source For a given setup, these should be considered as “set and forget” controls. The volume controls provided by the computer application should be used during normal operations.The suggested knob starting position for different source types. Adjust the Gain control until a normal level is achieved through the USB connection to the application in use. For example, Gain should be turned down for line-level sources like media players and turned up for low-level sources like dynamic microphones
Specifications
HDMI Input and Output
- Conforms to HDMI 2.0 standard
- HDCP 1.4 and 2.2 compliant
- Supports Video Frame Rates from 23.98 to 60.00
- Supports Video Formats from 480i/p, 576i/p up to 1080p60
USB 3.0 Output
- Up to 1080p50.60 with audio, 16-bit @ 44.1KHz to computer(Actual video format and frame rate dependent on UVC control command received from the host computer.)
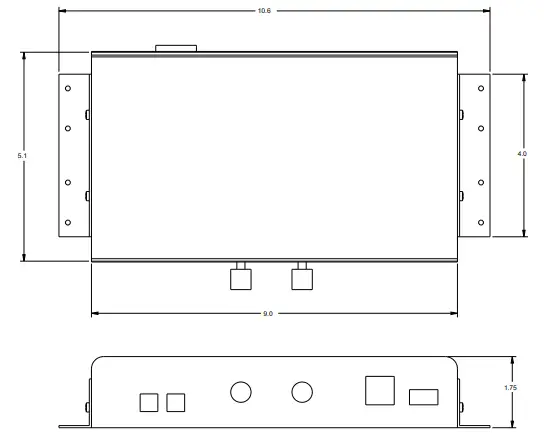
Size and Weight
- 5.1 x 9.0 x 1.75 in / 129.5 x 228.6 x 44.5 mm
- 1 lbs / 0.454 Kg

Power requirements
- 12 Volts DC – Recommended to use only supplied 12v Power Adapter
- 4.5 Watts Max Power Consumption
UNLESS OTHERWISE SPECIFIED
The USB audio is not clear.This may occur when the input audio sampling rate does not match the USB audio sampling rate of 44.1 KHz.Window 10 allows changing the default sample rate for incoming audio devices. Changing this rate can resolve many issues with buzzes, warbles, etc.
Follow these steps:
- Click on the Windows icon on the lower-left corner of the desktop
- Select the “gear” icon at the left edge of the window
- Click on System (upper left corner)
- Click on Sound (left column)
- Below Input heading, check that the MEI audio device has been selected
- Below that item, click on Device Properties
- In the upper right corner, click on Additional Device Properties
- The Microphone Properties pop up window will appear
- Click on the Advanced tab
- In the pulldown window, see the current audio format and sample rate. Select the one not
currently in use.
- – 2 Channel, 16-bit, 441000 Hz
- – 2 Channel, 16-bit, 48000 Hz
- Click Apply and Click OK.
- It will likely be necessary to reselect the audio device in the application.
- Confirm that the sound has improved.
I’m trying to use VLC to test the VSC-100 but the picture looks wrong and the video format is incorrect as well.
To connect with VLC, follow these steps:
- Select the MEDIA tab then select OPEN CAPTURE DEVICE
- In the window that appears, select MEI VSC-100 Video Capture Device for the Video DeviceName and MEI VSC-100 Audio Capture Device for the Audio Device Name, then click onADVANCED OPTIONS.
- In the next window, change Aspect Ratio to 16:9
- In the CHROMA FORMAT window type MJGP and click OK.
- Click Play at the bottom of the remaining window. The incoming video and audio will appear.
Remote Control App
A very simple remote control application is available for download from the Marshall-USA website at www.marshall-usa.com.
Connect a Windows computer to the port marked RS232 on the back panel using a USB “micro” cable.This is not a traditional RS-232 port. It is a USB 2.0 port that carries RS-232 type data. Also known as“RS-232 Over USB”.
Please do not connect RS-232 interfaces directly to this port. When a USB connection is made, the Device Manager in the host computer will indicate that there is now a COMM.
Download the remote app, unzip it and place it in a convenient folder. There should be two files in the same folder:
“VSC-100.EXE”, “jrdconnector.dll”
Double-click on the VSC-100.EXE file.The app will open and a screen similar to the one below will appear.
At least one choice should be available in the Com Port pulldown window.
If there is more than one Com Port number in the list, the highest number is the most likely choice as it represents the device that was connected most recently.
Click on that Com Port number and DO NOT click on the OPEN button. That button is for updates and will stop the control connection.
When the connection is successful, the firmware version will appear and one of the Input Selection buttons will be blue.
Simply click on the Input Selection button 1 or 2 to change the currently active HDMI input. “It may take up to 5 seconds for the output to resynchronize when switching. The video output will remain black during this period”
Warranty
Marshall Electronics warranties to the first consumer that this device will, under normal use, be free from defects in workmanship and materials, when received in its original container, for a period of two years from the purchase date. This warranty is extended to the first consumer only, and proof of purchase is necessary to honor the warranty. If there is no proof of purchase provided with a warranty claim, Marshall Electronics reserves the right not to honor the warranty set forth above. Therefore, labor and parts may be charged to the consumer. This warranty does not apply to the product exterior or cosmetics. Misuse, abnormal handling, alterations or modifications in design or construction void this warranty. No sales personnel of the seller or any other person is authorized to make any warranties other than those described above or to extend the duration of any warranties on behalf of Marshall Electronics, beyond the time period described above.Due to constant effort to improve products and product features, specifications may change without notice.
 report this ad
![]()
20608 Madrona Avenue, Torrance, CA 90503Tel: (800) 800-6608 / (310) 333-0606 · Fax: 310-333-0688www.marshall-usa.com[email protected]
NB05112020A
References
HDMI Licensing Administrator, Inc.
Marshall Electronics – Professional Broadcast Miniature/Compact/Indoor 4K/UHD/HD Cameras, 4K Rack Mount/Desktop Monitors, Hardware, and Accessories.
Marshall Electronics – Professional Broadcast Miniature/Compact/Indoor 4K/UHD/HD Cameras, 4K Rack Mount/Desktop Monitors, Hardware, and Accessories.
[xyz-ips snippet=”download-snippet”]