
 Masterbuilt 30″ Digital Electric Smoker User Manual
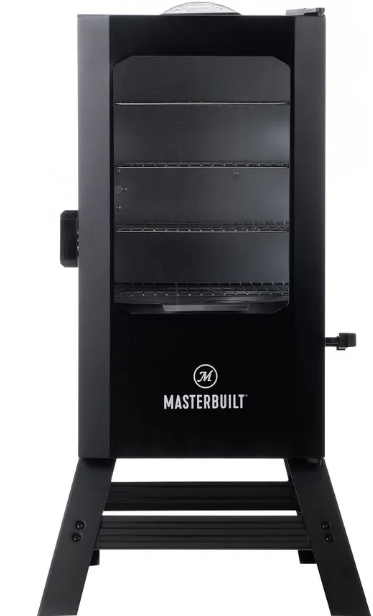
Masterbuilt 30″ Digital Electric Smoker User Manual
![]() WARNING
WARNING
This manual contains important information necessary for the proper assembly and safe use of the appliance.Read and follow all warnings and instructions before assembling and using the appliance.Follow all warnings and instructions when using the appliance.Keep this manual for future reference.
![]()
CARBON MONOXIDE HAZARD
Burning wood chips gives off carbon monoxide, which has no odor and can cause death.DO NOT burn wood chips inside homes, vehicles, tents, garages or any enclosed areas. Use only outdoors where it is well ventilated.
Failure to follow these instructions could result in fi re, explosion or burn hazard, which could cause property damage, personal injury or death.
![]()
WARNING
CALIFORNIA PROPOSITION 65
- Combustion by-products produced when using this product contain chemicals known to the State of California to cause cancer, birth defects, and other reproductive harm.
- This product contains chemicals known to the State of California to cause cancer, birth defects or other reproductive harm.
![]()
GENERAL WARNINGS AND SAFETY INFORMATION
READ ALL INSTRUCTIONS
- Unit is for OUTDOOR USE ONLY.
- Never use inside enclosed areas such as patios, garages, buildings or tents.
- Never use inside recreational vehicles or on boats.
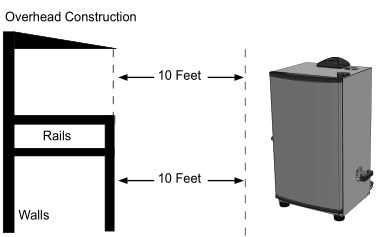
- Never operate unit under overhead construction such as roof coverings, carports, awnings, or overhangs.
- Never use unit as a heater (READ CARBON MONOXIDE HAZARD).
- Maintain a minimum distance of 10ft (3m) from overhead construction, walls, rails or other structures.
- Keep a minimum 10ft (3m) clearance of all combustible materials such as wood, dry plants, grass, brush, paper, or canvas.
- Keep appliance clear and free from combustible materials such as gasoline and other flammable vapors and liquids.
- Use unit on a level, non-combustible, stable surface such as dirt, concrete, brick or rock.
- Unit MUST be on the ground. Do not place unit on tables or counters. Do NOT move unit across uneven surfaces.
- Do not use unit on wooden or flammable surfaces.
- Do not leave unit unattended.
- Never use unit for anything other than its intended use. This unit is NOT for commercial use.
- Keep a fi re extinguisher accessible at all times while operating unit.
- Before each use check all nuts, screws and bolts to make sure they are tight and secure.
- Use of alcohol, prescription or non-prescription drugs may impair user’s ability to properly assemble or safely operate unit.
- Keep children and pets away from unit at all times. Do NOT allow children to use unit. Close supervision is necessary should children or pets be in area where unit is being used.
- Do NOT allow anyone to conduct activities around unit during or following its use until it has cooled.
- Avoid bumping or impacting unit.
- Never move unit when in use. Allow unit to cool completely (below 115°F (45°C)) before moving or storing.
- The unit is HOT while in use and will remain HOT for a period of time afterwards and during cooling process. Use CAUTION. Wear protective gloves/mitts.
- Do not touch HOT surfaces.
- Do not use wood pellets.
- Never use glass, plastic or ceramic cookware in unit. Never place empty cookware in unit while in use.
- Accessory attachments not supplied by Masterbuilt Manufacturing, Inc. are NOT recommended and may cause injury.
- Wood tray is HOT when unit is in use. Use caution when adding wood.
- Be careful when removing food from unit. All surfaces are HOT and may cause burns. Use protective gloves or long, sturdy cooking tools.
- Always use unit in accordance with all applicable local, state and federal fi re codes.
- Dispose of cold ashes by placing them in aluminum foil, soaking with water and discarding in a non-combustible container.
- Do not store unit with HOT ashes inside unit. Store only when all surfaces are cold.
- When using electrical appliances, basic safety precautions should always be followed including the following:
- Do not plug in electric smoker until fully assembled and ready for use.
- Use only approved grounded electrical outlet.
- Do not use during an electrical storm.
- Do not expose electric smoker to rain or water at anytime.
- To protect against electrical shock do not immerse cord, plug or control panel in water or other liquid.
- Do not operate any appliance with a damaged cord or plug, or after appliance malfunctions or has been damaged in any manner. Contact Masterbuilt Customer Service for assistance at 1-800-489-1581.
- Longer detachable power-supply cords or extension cords are available and may be used if care is exercised in their use.
- If a longer detachable power-supply cord or extension cord is used: 1. The marked electrical rating of the cord set or extension cord should be at least as great as the electrical rating of the appliance; and 2. The cord should be arranged so that it will not drape over the counter top or tabletop where it can be pulled by children or tripped over unintentionally.
- The extension cord must be a grounding -type 3-wire cord.
- Outdoor extension cords must be used with outdoor use products and are marked with suffix “W” and with the statement “Suitable for Use with Outdoor Appliances.”
- CAUTION – To reduce the risk of electric shock, keep extension cord connection dry and off the ground.
- Do not let cord hang on or touch hot surfaces.
- Do not place on or near a hot gas or electric burner, or in a heated oven.
- Fuel, such as charcoal briquettes or heat pellets, are not to be used in electric smoker.
- To disconnect, turn control panel “OFF” then remove plug from outlet.
- Unplug from outlet when not in use and before cleaning. Allow unit to cool completely before adding/removing racks, drip tray or water bowl.
- Drip tray is only for the bottom of electric smoker. Do not put drip tray on rack. This may damage electric smoker.
- Do not cover racks with metal foil. This will trap heat and cause severe damage to electric smoker.
- Do not clean this product with a water sprayer or the like.
SAVE THESE INSTRUCTIONS
STRUCTURAL PROXIMITY AND SAFETY USAGE RECOMMENDATIONS
REMINDER:NEVER OPERATE THIS SMOKER UNDER ANY OVERHEAD CONSTRUCTION. MAINTAIN A MINIMUM DISTANCE OF 10 FEET FROM OVERHEAD CONSTRUCTION, WALLS OR RAILS.
![]()
WARNING:ELECTRIC POWER CORD IS A TRIP HAZARD
LET’S GET STARTED!
- This is a slow smoker… allow sufficient time for cooking. Smoker is for OUTDOOR USE ONLY.
- “Pre-season” smoker prior to first use. See page 23.
- Pre-heat smoker for 30 to 45 minutes at max temperature before loading food.
- DO NOT cover racks with aluminum foil as this will not allow heat to circulate properly.
- Do not overload smoker with food. Extra large amounts of food may trap heat, extend cooking time and cause uneven cooking. Leave space between food on racks and smoker sides to ensure proper heat circulation. If utilizing cooking pans, place pans on center of rack to ensure even cooking. Never use glass, plastic or ceramic cookware in unit. Please see manual for more detail.
- Store smoker in a dry area after use.
- Extreme cold temperatures may extend cooking times.
- CLEAN AFTER EVERY USE. This will extend the life of your smoker and prevent mold and mildew.
Note: If wood chips do not smoke on low setting, increase temperature to 275°. After 8 to 10 minutes or when wood chips begin to smolder, reduce temperature to desired low setting.
ENJOY!
HOW TO CLEAN AND STORE SMOKER
Be sure to clean smoker after each use. Make sure your smoker is unplugged and completely cool.
For rack supports, racks, water bowl and drip pan use a mild dish detergent. Rinse and dry thoroughly.
For wood chip tray and wood chip loader, clean frequently to remove ash build up, residue and dust.
Dispose of cold ashes by placing them in aluminum foil, soaking with water and discarding in a non-combustible container.
For the interior, glass in door, and exterior of smoker, simply wipe down with a damp cloth. Do not use a cleaning agent.
Make sure to dry thoroughly.
After cleaning, store smoker in a covered and dry area.
When not in frequent use and using a cover, remember to check your smoker periodically to avoid possible rust and corrosion due to moisture buildup.
Watch a video with step by step instructions on how to clean your smoker at www.youtube.com/Masterbuilt
Electric Smokehouse: Cleaning and Storage.
ALWAYS MAKE SURE UNIT IS COOLTO THE TOUCH BEFORE CLEANING AND STORING.
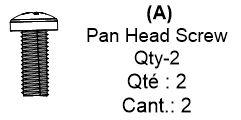
HARDWARE LIST
PARTS LIST

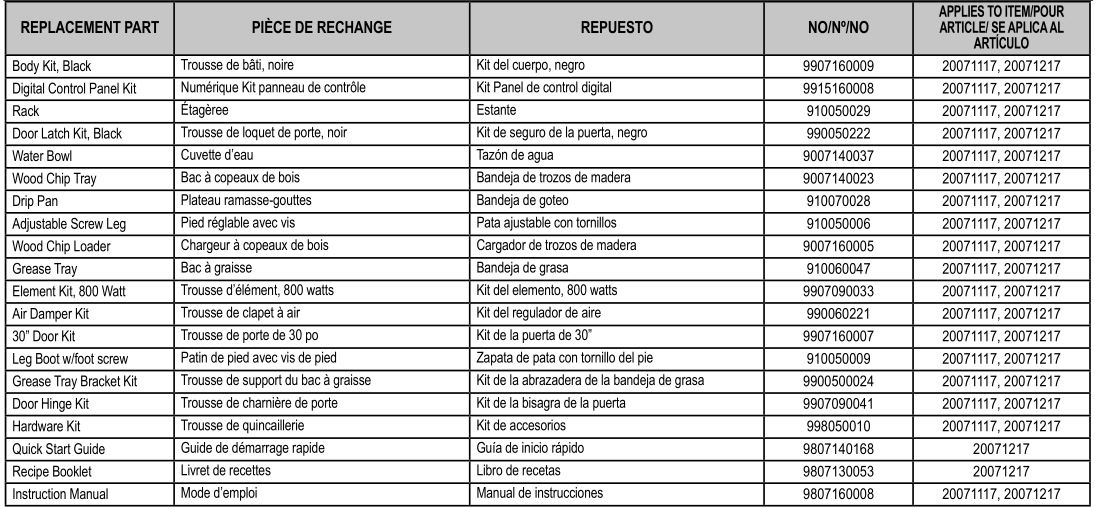
REPLACEMENT PARTS
STOP!DO NOT RETURN TO RETAILER For Assembly Assistance, Missing or Damaged PartsCall: MASTERBUILT Customer Service at 1-800-489-1581.Please have Model Number and Serial Number available when calling.These numbers are located on the silver label on the back of unit.
- BEFORE ASSEMBLY READ ALL INSTRUCTIONS CAREFULLY.
- ASSEMBLE UNIT ON A CLEAN, FLAT SURFACE.
- TOOLS NEEDED: Adjustable Wrench, Phillips Head Screwdriver** It is possible that some assembly steps have been completed in the factory. **
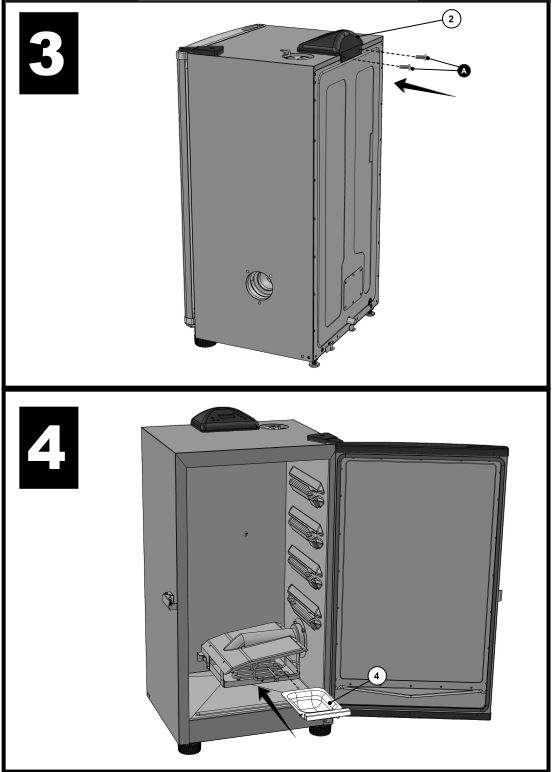
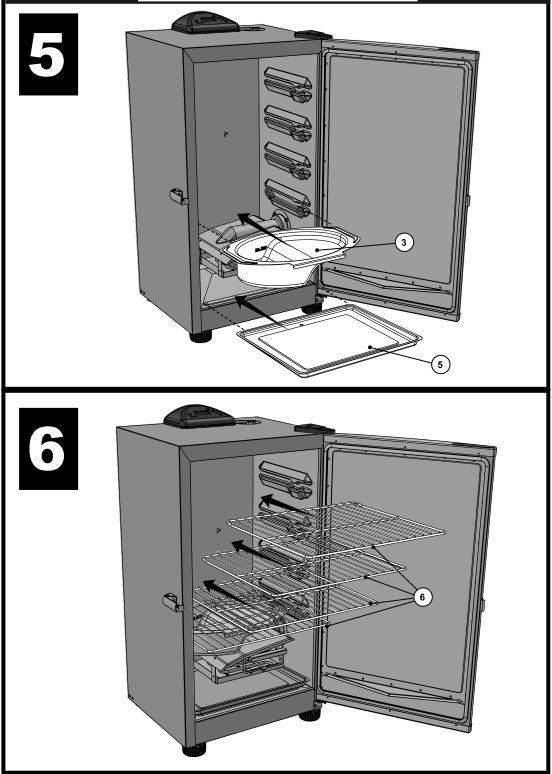
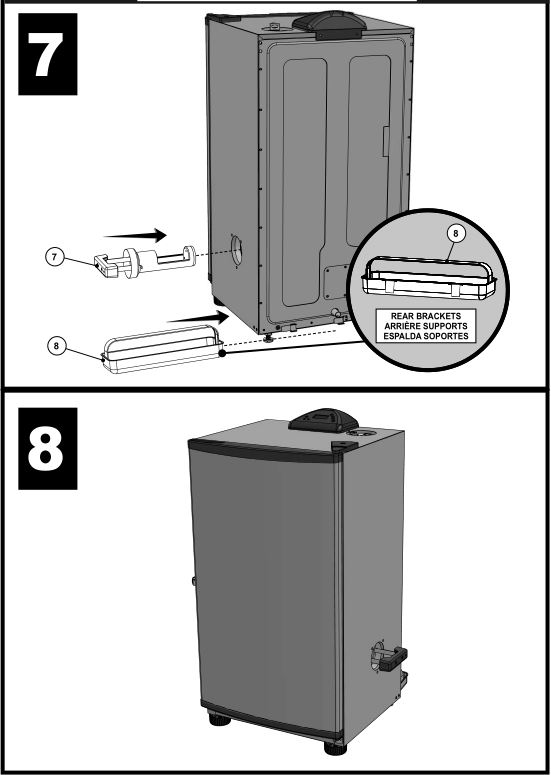
ASSEMBLY

HOW TO USE CONTROL PANEL
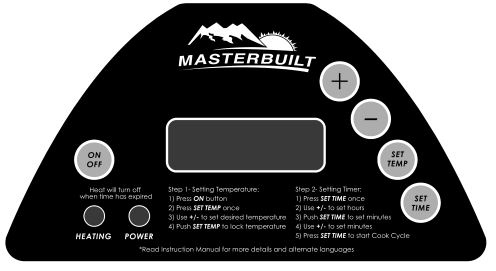
Note: Direct sunlight may interfere with ability to read LED display, block light if needed.
To set temperature:•Press ON button.•Press SET TEMP button once-LED display will blink.•Use +/- to set temperature.•Press SET TEMP button again to lock in temperature.Note: Heating will not begin until timer is set.
To set timer:•Press SET TIME button once-LED display for hours will blink.•Use +/- to set hours.•Press SET TIME button again to lock in hours. The minutes LED will start blinking.•Use +/- to set minutes.•Press SET TIME to lock in minutes and start cook cycle.
Heat will turn off when time has expired.
To RESET control panel:If control panel shows an error message, turn electric smoker off, unplug unit from outlet, wait ten seconds, plug unit back into outlet, then turn electric smoker on. This will reset control panel.
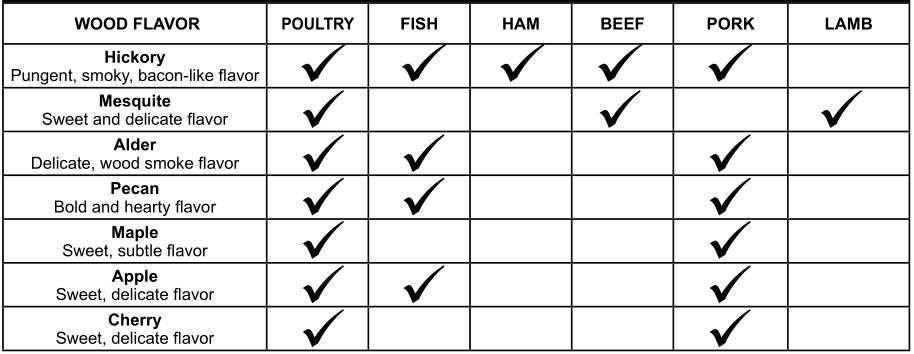
WOOD SMOKING GUIDE FOR MEATS
PRE-SEASON INSTRUCTIONS
PRE-SEASON SMOKER PRIOR TO FIRST USE.Some smoke may appear during this time, this is normal.
- Make sure water pan is in place with NO WATER.
- Set temperature to 275°F (135°C) and run unit for 3 hours.
- To complete pre-seasoning, during last 45 minutes, add ½ cup of wood chips in wood chip loader and unload wood chips into the wood chip tray. This amount is equal to the contents of a filled wood chip loader.
- Shut down and allow to cool.
NOTE: Never add more than ½ cup (1 filled chip loader) at a time. Additional chips should not be added until any previously added chips have ceased generating smoke.
HOW TO USE WOOD CHIP LOADER
How to use wood chip loader:
- Before starting unit, place ½ cup of wood chips in chip loader.
- Never use more than ½ cup of wood chips at a time. Never use wood chunks or wood pellets.
- Insert wood chip loader into smoker. Wood chips should be level with top rim of wood chip loader.
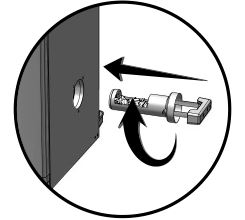
- Turn handle clockwise in direction of arrow mark on smoker to unload wood. Wood will drop into wood chip tray. Turn handle counterclockwise, to upright position, and leave wood chip loader in place.
- Check wood chip tray periodically to see if wood has burned down by removing wood chip loader and looking into smoker through hole. Add more chips as needed.
- Wood chip loader must be pulled out completely from smoker when checking wood chip level.
Adding more wood during smoking process:
- Pull wood chip loader from smoker.
- Place wood chips in wood chip loader and insert into smoker.
- Turn handle clockwise in direction of arrow mark on smoker to unload wood. Wood will drop into wood chip tray.
- Temperature may spike briefly after wood is added. It will stabilize after a short time. Do not adjust temperature setting.
 Caution:
- Keep smoker door closed when adding wood chips.
- Wood chip loader will be HOT even if handle is not.
- Never use wood pellets or wood chunks.
![]()
CAUTION
When door is opened a flare up may occur. Should wood chips flare up, immediately close door and vent, wait for wood chips to burn down, then open door again. Do not spray with water.
HOW TO USE WATER BOWL
How to use water bowl:
- Wait until smoker comes up to desired temperature.
- Fill water bowl to fill line with water or liquids like apple or pineapple juice instead of water.
- You can also add slices of fruit, onions or fresh dried herbs into the water to blend different subtle flavors into your smoked food.
Tip: For chicken or other foods high in moisture, little or no liquid is needed.
IMPORTANT FACTS ABOUT USING SMOKER
- Maximum temperature setting is 275°F (135°C).
- Do NOT move unit across uneven surfaces.
- Wood chip loader and wood chip tray MUST be in place when using smoker. This minimizes the chance of wood flare ups.
- Wood chips must be used in order to produce smoke and create the smoke flavor.
- Check grease tray often during cooking. Empty grease tray before it gets full. Grease tray may need to be emptied periodically during cooking.
- Do not open smoker door unless necessary. Opening smoker door causes heat to escape and may cause wood to flare up. Closing the door will re-stabilize the temperature and stop flare up.
- Do not leave old wood ashes in the wood chip tray. Once ashes are cold, empty tray. Tray should be cleaned out prior to, and after each use to prevent ash buildup.
- This is a smoker. There will be a lot of smoke produced when using wood chips. Smoke will escape through seams and turn the inside of smoker black. This is normal. To minimize smoke loss around door, door latch can be adjusted to further tighten door seal against body.
- Opening smoker door during cooking process may extend cooking time due to heat loss.
- When outside temperature is cooler than 65°F (18°C) and/or altitude is above 3,500 feet (1067m), additional cooking time may be required. To insure that meat is completely cooked use a meat thermometer to test internal temperature.
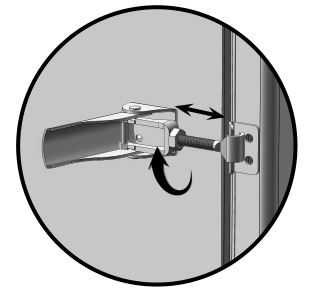
- To adjust door latch, loosen hex nut on door latch. Turn hook clockwise to tighten as shown. Secure hex nut firmly against door latch. (see diagram)
TROUBLESHOOTING GUIDE

LIMITED WARRANTY INFORMATION
Masterbuilt warrants its products to be free from defects in material and workmanship under proper assembly, normal use and recommended care for 90 days from the date of original retail purchase.
Masterbuilt warranty does not cover paint finish as it may burn off during normal use.
Masterbuilt warranty does not cover rust of the unit.
Masterbuilt requires reasonable proof of purchase for warranty claims and suggests that you keep your receipt. Upon the expiration of such warranty, all such liability shall terminate.
Within the stated warranty period, Masterbuilt, at its discretion, shall repair or replace defective components free of charge with owner being responsible for shipping. Should Masterbuilt require return of component(s) in question for inspection, Masterbuilt will be responsible for shipping charges to return requested item.
This warranty excludes property damage sustained due to misuse, abuse, accident, damage arising out of transportation, or damage incurred by commercial use of this product.
This expressed warranty is the sole warranty given by Masterbuilt and is in lieu of all other warranties, expressed or implied including implied warranty, merchantability, or fitness for a particular purpose.
Neither Masterbuilt nor the retail establishment selling this product, has authority to make any warranties or to promise remedies in addition to or inconsistent with those stated above.
Masterbuilt’s maximum liability, in any event, shall not exceed the purchase price of the product paid by the original consumer/ purchaser. Some states do not allow the exclusion or limitation of incidental or consequential damages. In such a case, the above limitations or exclusions may not be applicable.
California residents only: Not withstanding this limitation of warranty, the following specific restrictions apply; if service, repair, or replacement of the product is not commercially practical, the retailer selling the product or Masterbuilt will refund the purchase price paid for the product, less the amount directly attributable to use by the original buyer prior to the discovery of the nonconformity. Owner may take the product to the retail establishment selling this product in order to obtain performance under warranty.
This expressed warranty gives you specific legal rights, and you may also have other rights which vary from state to state.
![]()
THIS PRODUCT IS FOR OUTDOOR USE ONLY.ASSEMBLY, CARE & USE MANUAL WARNING & SAFETY INFORMATION
Tools needed for assembly: Adjustable Wrench and Phillips Head ScrewdriverApproximate assembly time: 25 minutes *Actual product may differ from picture shown
FAQS
How often do you add wood chips? And do you soak them?
Soaking chips is unnecessary…I think that is intended to make the chips last longer in a charcoal smoker. When smoking at 225F, which is where I smoke everything, chips last 2-3 hours. So for chicken wings, I add chips during preheat and not again, but with ribs, pork, brisket, etc, I add every couple hours.
Does it have a pan to add water/juice etc. during cooking?
Yes. Water pan is large enough to smoke a long time.
What is the temperature range?
Max temp it can be set for is 275 degrees,will hold temp within a few degrees.
What is the best wood chip to use?
Any type of wood can be used in this smoker, however we recommend using fruit woods such as apple, cherry or peach.
Can a 14” long brisket fit in there without touching sides?
Yes, it will fit in this smoker.
Can the controller be removed easily?
Yes, the top controller is attached with two cables. In fact, it ships detached.
Is this the model with a replaceable heating element?
Yes
where is it made
Yes, our products are manufactured in China.
Can you use this indoors?
No not without proper ventilation but this is not recommended for indoor use!
What is the best cover to use to protect it from outdoor elements??
They sell a cover for around $45 usd Mine is not in those conditions
Is there any real difference from this model to the Bluetooth one?
The bluetooth units and MB20071117 will have similar functionality. The bluetooth units may offer separate features such as legs, wheels, or windows.
What is the piece call that you load the wood chips into the smoker called
Wood chip loader
Can you substitute wood pellets for wood chips
The instructions for my 20071117 say not to use pellets, only chips.
Will not turn on
Check the connector under the control panel. Also check heating element connection.
Smoke issue
Best way to get continued smoke is to put small amount of fine dried wood chips in ad you start the pre heat. Also do not overload wood tray. I’ve been using for 6 years and this is what I’ve found to work best
What is the model for the replacement water pan/bowl? Mine has some leaks in it and I want to replace with a water pan that will bit this size smoker
Be careful when ordering parts,they changed the configuration and all parts do not fit.I ordered a new chip holder and it not even close.
Is the door reversible?
The door is not reversible on this unit.
Why does the picture show 4 shelves . It only comes with three?
The unit is offered at multiple retailers and has a as featured items that will include an extra rack.
What are the dimensions of the internal cooking racks, L X W?
approx 14 x 16
Instruction book?
Yes, there is an instruction book that comes with the smoker.
What is the temperature range?
The temperature range of this smoker is 100 degrees F to 275 degrees F.
Does it come fully assembled?
some assembly needed, very basic
Which stand will fit MB20071117 perfectly?
This smoker has its own feet. It doesn’t need a stand.
Clearance is about 5-6 inches, but you can remove racks for more space?
Clearance is about 5-6 inches, but you can remove racks for more space.
What is the voltage rating? 120v only, can it be used with 220v?
120v only.
The red power light doesn’t doesn’t come on. What can I do?
The red light is for heating and green indicates power. If you are not seeing the red heating light, please follow your setting temperature and time instructions.
What is the difference of mb and smokd hollow mb ?
Don’t know, but would NOT get anything from MB. They have NO customer service. If you can call a number for SH, try it and see. Otherwise they are the same, not good.
What stand fits this smoker?
It has adjustable feet and sits on the floor
What are the exact shipping dimensions?
20x20x33
How does do for cooking brisket ?
Good
VIDEO
Masterbuilt 30″ Digital Electric Smoker User Manual – Masterbuilt 30″ Digital Electric Smoker User Manual –
Masterbuilt Manufacturing, Inc.1 Masterbuilt Ct.Columbus, GA 31907Customer Service 1-800-489-1581![]() www.masterbuilt.com
www.masterbuilt.com
[xyz-ips snippet=”download-snippet”]