USER MANUAL
Masterbuilt Turkey Fryer With TimerMODEL NUMBERS20020107, 20020109, 20020209, 20020407, 20020507
FOLLOWING THESE INSTRUCTIONS WILL ALLOW YOU TO HAVE A SAFECOOKING EXPERIENCE.SEE PAGE 18 FOR INSTRUCTION ON HOW TO DEEP FRY A TURKEY.
POTS NOT INCLUDED ON ALL MODELS CHECK PACKAGING FOR DETAILS LP GAS CYLINDER NOT INCLUDED
- TOOLS NEEDED: ADJUSTABLE WRENCH, PHILLIPS HEAD SCREWDRIVER
- APPROXIMATE ASSEMBLY TIME: 30 MINUTES
WARNING:
- THIS INSTRUCTION MANUAL CONTAINS IMPORTANT INFORMATION NECESSARY FOR THE PROPER ASSEMBLY AND SAFE USE OF THE APPLIANCE.
- READ AND FOLLOW ALL WARNINGS AND INSTRUCTIONS BEFORE SSEMBLING AND USING THE APPLIANCE.
- FOLLOW ALL WARNINGS AND INSTRUCTIONS WHEN USING THE APPLIANCE. KEEP THIS MANUAL FOR FUTURE REFERENCE.
DANGER
If you smell gas:
- Shut off gas to the appliance.
- Extinguish any open flame.
- Open Lid.
- If odor continues, keep away from the appliance and immediately call your fire department.
Failure to follow these instructions could result in fire or explosion, which could cause property damage, personal injury or death.
DANGER
- Never operate this appliance unattended.
- Never operate this appliance within 10 ft (3m) of any structure, combustible material or other gas cylinder.
- Never operate this appliance within 25 ft (7.5 m) of flammable liquid.
- Do not fill cooking vessel beyond maximum fill line.
- Never allow the oil or grease to get hotter than 400°F (200°C). If the temperature exceeds 400°F (200°C) or if oil begins to smoke, immediately turn the burner or gas supply OFF.
- Heated liquids remain at scalding temperatures long after the cooking process. Never touch cooking appliance until liquids have cooled to 115ºF (45ºC) or less.
- If a fire should occur, keep away from appliance and immediately call your fire department.
- Do not attempt to extinguish an oil or grease fire with water.
Failure to follow these instructions could result in fire, explosion, or burn hazard, which could cause property damage, personal injury or death.
WARNING
- Even when burner is set at a low flame, never leave the appliance unattended. Oil will heat up quickly and ignite at 550°F (287°C) to 700° F (371°C).
- Tripping over the appliance hose may result in the tipping of the appliance and spilling of HOT oil or water causing personal injury and property damage.
Cooking with Oil or Grease:
- Failure to completely thaw and dry foods may cause oil or grease to overflow. When frying with oil or grease, all food products MUST be completely thawed and towel dried to remove excess water. If ice is present on the food, it means the thawing process is not complete and may cause a boil over when placed into HOT oil causing a fire.
- Never overfill the cooking pot with oil/grease or water. Follow instructions in this manual for establishing proper oil/grease or water levels.
- If oil temperature exceeds 400ºF (200ºC) or if oil begins to smoke, immediately turn the burner or gas supply OFF and wait for the temperature to decrease to less than 350ºF (175ºC) before relighting burner. If there is a lid (cover), do not remove the lid.
- When cooking with oil/grease, the thermometer provided must be used. Follow instructions in this manual for proper installation and use of the thermometer.
- This is an ATTENDED appliance. DO NOT leave appliance unattended while heating oil/grease or water, cooking food or after it’s use. The appliance remains at scalding temperatures long after cooking has ended. Allow to cool below 115ºF (45ºC) before cleaning and storing.
- Use caution when placing food in cooking vessel while appliance is in operation.
- When cooking with oil/grease, have a BC or ABC type fire extinguisher readily accessible.
- In the event of rain, snow, hail, sleet or other form of precipitation while cooking with oil, cover the cooking vessel & Immediately turn off the burner and gas supply. DO NOT MOVE turkey fryer stand or pot.
If a grease or oil fire occursIn the event of an oil/grease fire, do not attempt to extinguish with water. Immediately call the Fire Department. A Type BC or ABC dry chemical fire extinguisher may in some cases contain the fire.
If a fire occurs inside the pot follow these steps.
- Turn off gas supply.
- Wearing a protective glove cover the pot with a lid.
If a fire occurs outside the pot follow these steps.
- Call the Fire Department.
- Attempt to extinguish using fire extinguisher specified.
- Turn off gas supply if possible.
COMBUSTION BY-PRODUCT PRODUCED WHEN USING THIS PRODUCT CONTAINS CHEMICALS KNOWN TO THE STATE OF CALIFORNIA TO CAUSE BIRTH DEFECTS, OTHER REPRODUCTIVE HARM, OR CANCER.
CALIFORNIA PROP 65WARNING: THIS PRODUCT CONTAINS CHEMICALS, INCLUDING LEAD, KNOWN TO THE STATE OF CALIFORNIA TO CAUSE BIRTH DEFECTS OR OTHER REPRODUCTIVE HARM. WASH HANDS AFTER HANDLING.
- This Outdoor Gas appliance is for outdoor use only and shall not be used in a building, garage, tent or any other enclosed area.
- Never use or operate this appliance on or under any overhead roof covering (car port), awning, overhang, apartment or condominium balcony or deck.
- Never use in or on recreational vehicles and/or boats.
- This appliance is not intended for or should never be used as a heater.
- Keep a minimum clearance of 10 ft (3m) from overhead construction, walls, rails, structure or combustible material.
- Keep area clear and free of any combustible material, gasoline and other flammable vapors and liquid.
- Use this appliance only on a level, stable non-combustible surface such as brick, concrete or dirt. Do not use appliance on or around any surface that will burn or melt such as wood decks, dry grass, leaves, wood rails, vinyl, or plastic. An asphalt surface (black top) may not be acceptable.
- Never use this product for anything other than its intended purpose. This appliance is not intended for commercial use.
- Keep children and pets away from appliance at all time. Do not leave appliance unattended.
- This appliance is for outdoor use only.
- Never move appliance when in use. Allow appliance to cool below 115ºF (45ºC) before moving or storing it.
- Always wear shoes during operation of this appliance.
- Avoid touching hot surfaces. This appliance will be hot during and after use. Always wear insulated gloves or mitts when removing, lid or basket from the cooking vessel.
- Accessory attachments and cookware not manufactured or supplied by Masterbuilt are not recommended for use.
- Never place an empty cooking vessel on the appliance while in operation. This may damage the cooking vessel. Use caution when placing anything in cooking vessel while appliance is in operation.
- Keep fuel supply hose away from the appliance while in operation.

WARNING
- Always perform soapy water test every time you use this appliance.
- Avoid bumping or impact to the appliance to prevent spillage or splashing of hot liquid.
- Always disconnect gas cylinder from appliance when not in use.
- Keep hands, hair and face away from burner flame. Do not lean over the fryer stand when lighting burner. This appliance has an open flame. Be careful of loose hair and clothing during operation. They could catch fire.
- Never attach a gas cylinder, move or alter fittings when fryer is hot or in use.
- Do not attempt to disconnect any gas fitting while fryer is in operation.
- Never use a gas cylinder if it shows signs of: dents, gouges, bulges, fire damage, erosion, leakage, excessive rust, or other forms of visible external damage. The cylinder may be hazardous and should be checked by a liquid propane supplier.
- When lighting your appliance, remove all parts from fryer stand to prevent an explosion from gas build up.
- If burner does not ignite, turn off the regulator control valve and gas and wait 5 minutes before trying to light again. If burner goes out during operation, first turn regulator OFF, then turn gas cylinder OFF.
- Do not allow anyone to conduct activities around your fryer during or following its use until the unit has cooled. The fryer is hot during operation and remains hot for a period of time following its use.
- Always allow the hot water or oil in the pot to cool below 115º F (45ºC) before moving to avoid the possibility of severe burns.
- Never drop food or accessories into hot liquids. Lower food and accessories into cooking liquid in order to prevent splashing or overflow. Be careful when removing food from oil or water. It is hot and could Cause burns.
- When using this appliance, use caution when removing the basket from the pot to avoid pulling the pot off of fryer stand.
- Never use glassware, plastic, or ceramic cookware on this appliance.
- When fryer use is complete, always turn the regulator control valve OFF first, then turn the gas cylinder valve OFF.
Do not use a cooking pot or vessel larger than 30 Quarts (28.4L). Cooking Pot or vessel must fit inside the security ring of the fryer.

WARNING
- The use of alcohol, prescription or non prescription drugs may impair the consumer’s ability to properly assemble or safely operate the appliance.
- Do not obstruct flow of combustion and ventilation. Keep ventilation opening(s) of the cylinder enclosure free and clear of debris.
- The installation of this appliance must conform with local codes or, in the absence of local codes, with the National Fuel Gas Code, ANSI Z223.1/ NFPA 54, Storage and Handling of Liquefied Petroleum Gases, ANSI/NFPA 58, Natural Gas and Propane Installation Code, CSA B149.1, Propane Storage and Handling, CSA B149.2, or the Standard for Recreational Vehicles, ANSI A119.2/NFPA 1192 and the Recreational Vehicle Code, CSA Z240 RV Series.
- The LP-gas cylinder being used must be constructed and marked in accordance with the specifications for LP-gas cylinders of the U.S. Department of Transportation (DOT) CFR 49 or the National Standardsnof Canada, CAN/CSA-B339, Cylinders, Spheres and Tubes for the Transportation of Dangerous Goods.
DANGER
Gas Cylinder Storage, Placement and Filling:
- Do not store a spare LP-gas cylinder under or near appliance.
- Never fill the cylinder beyond 80 percent full. Over filled cylinders can release gas.The gas cylinder safety relief valve may overheat, allowing gas to release causing an intense fire with risk of death or serious injury.
- If you smell, hear or see gas escaping, immediately get away from gas cylinder and call the fire department. A fire causing death or serious injury may occur.
- Place a dust cap on cylinder valve outlet whenever the cylinder is not in use. Only install dust cap on cylinder valve outlet that is provided with the cylinder. Other caps or plugs may cause leaks.
Failure to follow these instructions could result in fire, explosion, or burn hazard, which could cause property damage, personal injury or death.
For Your Safety
Gas Cylinder Storage and Appliance Check:
- Cylinders must be stored outdoors out of reach of children and must not be stored in a building, garage, or any other enclosed area.
- Before each use check all nuts and bolts to be sure that they are tight and secure.
- Before each use inspect gas hose for any signs of damage.
- Before each use preform soapy water test.
ASSEMBLY INSTRUCTIONS
READ ALL INSTRUCTIONS AND WARNINGS CAREFULLY BEFORE ASSEMBLY OR OPERATION OF YOUR TURKEY FRYER.
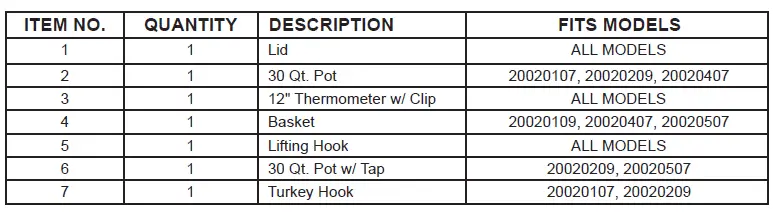
PARTS LIST
HARDWARE LIST
STEP 1 Burner Assembly
Remove nut (B) from bottom of burner. Place burner onto burner mount bar with burner bolt sticking down through hole in center of burner mount bar.
STEP 2 Mounting Hose & Regulator to the Burner
NOTE: Do not over tighten. Threads should line up, do not damage threads by forcing hose into burner.
Place air shutter (5) onto burner venturi as shown. Slide small end of spring (6) onto end of hose. Thread end of hose into burner, turn clockwise to tighten by hand.
STEP 3 Mounting Legs
NOTE: Do not tighten hardware.
Place leg (2) inside windshield. Attach leg to windshield using screw (A) and nut (C) as shown. Repeat with other legs. Secure lower ring (3) to each leg using screw (A) and nut (C).
Tighten all hardware at this time.
COOKWARE PARTS LIST
WARNING
- If oil starts to smoke TURN BURNER OFF. This means the oil has exceeded 400ºF (200°C) and could catch fire. Allow oil to cool to 350ºF (175°C) before relighting burner. When cooking with oil ALWAYS turn off burner before lowering food into oil. Relight after food is submerged in the oil.
- DO NOT TURN BURNER TO A LOW SETTING TO KEEP OIL/GREASE HOT FOR LATER USE. THE TEMPERATURE OF THE OIL/GREASE WILL CONTINUE TO RISE AND CATCH FIRE.
INSTALLING THERMOMETER
- Insert stem of thermometer through hole in lid as shown.
- If lid is not being used, slide clip onto thermometer stem.
- Clip thermometer to the side of the cooking pot as shown.
Note: Do not allow thermometer to pierce into food. This will give a false reading. See below for thermometer safety check.
CAUTION
Thermometer Safety Check:
- Before each use place the thermometer stem in boiling water and ensure that it registers approximately 212ºF +/- 20ºF (100ºC +/-10ºC). If it does not, contact Masterbuilt to order a replacement.
- When thermometer is lowered into HOT oil, do not allow it to pierce into the turkey or food. This will give a false reading.
- When the thermometer is in place the dial will continue to rise. Keep a constant check on the dial to ensure the dial indictor does not stop before reaching 350ºF (177ºC).
- If the oil starts to smoke and the thermometer dial stops before reaching 350ºF (177ºC) turn burner off and STOP COOKING IMMEDIATELY. A new thermometer is needed. If the thermometer supplied with the appliance is lost or damaged call Masterbuilt to order a replacement at 1-800-489-1581.Model DF12 – 12” Thermometer for 30qt pots.
WARNING
Extinguish all open flames before connecting the regulator to the gas cylinder. Turn the gas OFF after each use.
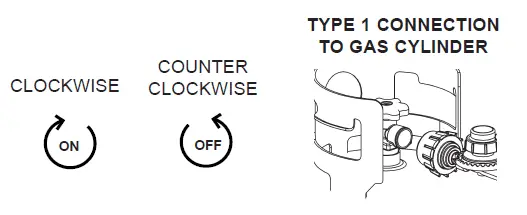
REGULATOR TO GAS CYLINDER VALVE CONNECTION
Inspect the hose before each use. If there are signs of wear, cuts or leaks replace turkey fryer hose & regulator with part 903070006.
REGULATOR CONTROL VALVE OPERATIONS
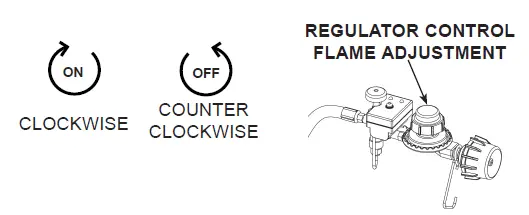
The regulator control valve is used to adjust the burner flame. Turning the control knob clockwise slowly will increase the burner flame and counter clockwise to decrease and shut the burner flame off.
Adjust air shutter to the burner until the burner flame is as blue as possible.
Type 1 Regulators will have a hook as shown.
The Regulator Hook is used to keep the regulator off the ground when removed from the LP cylinder. Attach to appliance as shown.
BURNER LIGHTING INSTRUCTIONS
- Check the regulator to be certain it is in the OFF position before connecting to the gas cylinder.
- Perform soapy water test before each use.
- Open tank cylinder valve.
- To start timer operation, push POWER button; both lights will blink once.
- Press START button; green light will remain on, allowing 15 minutes of gas flow.
- Turn regulator on.
- Place a lit match to the burner from under the wind shield as shown below.
- Slowly turn regulator control knob clockwise until the burner lights.
- Timer will run 15 minutes before shutting gas flow off.
- At 5 minutes remaining, gas flow light will blink slowly. At 2 minutes remaining gas flow light will blink quickly.
- If burner does not light within 5 seconds, turn regulator control valve OFF, then turn gas cylinder valve OFF. Wait 5 minutes for fumes to diminish, turn timer knob clockwise until its stops before relighting.
- If the flame is blown out wait 5 minutes for fumes to diminish before resetting timer and relighting.
- After the burner is lit, open the regulator valve until the flame increases. Use the air shutter on the burner to adjust the flame until it turns blue. Reduce flame.
- Fill Pot with water or oil. DO NOT fill pot more than 1/3 the pots full capacity. This will help avoid dangerous boil-overs. Note: DO NOT place your empty pot over the open flame. This will damage pot.
- Bring water or oil to the desired temperature by adjusting regulator control valve. Oil should never exceed 400°F (204°C). Oil will ignite at 550°F (287°C) to 700°F (371°C).
- Always use a thermometer when frying.
- After each use, first turn the regulator control valve OFF, then turn the gas cylinder OFF. Always allow fryer stand and pot with water or oil to cool completely before touching, moving, or storing.
BATTERY INSTALLATION
Replace batteries when low-battery light is on. Disconnect regulator from tank before installation or replacement.
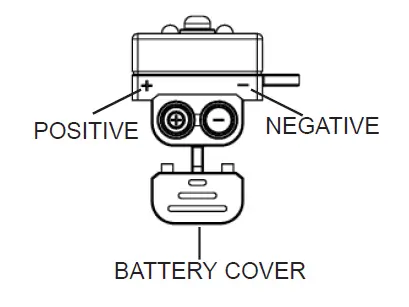
- Locate battery cover on timer.
- Press and slide battery cover off as shown.
- Install 2 “AAA” Alkaline batteries. Check positive (+) and negative (-) symbols, on the case and battery, to insure proper installation.
- Replace the battery cover.
- For battery removal and replacement repeat this procedure.
CAUTION
- Keep batteries away from small children. If battery is swallowed consult a physician immediately.
- Be sure to insert batteries correctly. Improper installation may result in leaks and/or possible explosion.
- Do not dispose of batteries in fire.
SAFE STORAGE & MAINTENANCE
- Before each use of the appliance, check and clean the burner/venturi tubes for insects and insect nests. A clogged tube can lead to a fire inside or behind the burner or beneath the appliance.
- Check the regulator, hose, and burner parts, air shutter and venturi section carefully before and after each use for any sign of wear.
- ALWAYS turn gas OFF at the gas cylinder valve prior to inspecting parts.
- DO NOT obstruct flow of combustion and ventilation. Keep the ventilation opening(s) of the cylinder enclosure clear of debris. The cylinder supply system must be arranged for vapor withdrawal. Keep the appliance area clear and free from combustible materials, gasoline and other flammable vapors and liquids.
- Coat fryer stand with cooking oil after unit has cooled to prevent rust.
- ALWAYS allow your appliance to cool completely before handling.
- When appliance is not in use, gas must be turned off at the supply cylinder.
- ALWAYS disconnect gas cylinder after using appliance.
- Clean appliance with cleaning agents.
- ALWAYS cover and store appliance in a protected area.
- Cylinders must be stored outdoors out of the reach of children and must not be stored in a building, garage or any other enclosed area.
- Always store gas cylinder upright and in areas where temperatures won’t exceed 125°F (51°C), and Do Not store a spare cylinder on, or near, fryer stand, or place connected gas cylinder under fryer stand. Always keep gas cylinder 20 inches (50cm) away from fryer stand.
- Indoor storage of appliance is permissible only if the cylinder is disconnected and removed.
- If any rusting occurs, use steel wool to clean or buff the affected area.
- The exterior of your appliance may be touched up by using a high temperature-resistant paint.
TROUBLESHOOTING GUIDE
Soapy Water Test Warning and Procedures
- The Soapy Water Test must be performed each time gas cylinder is connected to appliance or each time the appliance is used.
- The Soapy Water Test must be performed outdoors in a well-ventilated area.
- When performing the Soapy Water Test, always keep fryer away from open flames, sparks, or lit cigarettes.
- This Outdoor Gas Turkey Fryer is designed to operate with propane gas only. This product will not operate with natural gas.
- Never use an open flame to test for gas leaks.
- Always remove any cookware from turkey fryer stand when performing the Soapy Water Test.
PROCEDURE:
- Remove any cookware from your fryer stand.
- Turn regulator to OFF position, and turn the gas cylinder valve to the OFFposition.

- Prepare your soapy water solution by combining (1) one part dish washing liquid with (3) three parts water to test for the possibility of any gas leaks in the hose or connections to regulator and the regulator connection to gas cylinder. Apply soapy water solution to the gas cylinder valve, regulator and along the hose to the burner.
- Turn gas cylinder valve ON (regulator control valve should be in the OFF position) and observe gas cylinder valve for bubbles. DO NOT LEAVE GAS ON FOR MORE THAN 12 SECONDS. If bubbles appear, stop, turn gas cylinder OFF, and retighten the fitting. Repeat test.
- When the gas cylinder has been tested, follow timer operation instructions on page 10. DO NOT LIGHT BURNER. Open the regulator control valve one full turn and check for bubbles at regulator control valve, along the entire length of hose and at the connection to the burner . DO NOT LEAVE GAS ON FOR MORE THAN 12 SECONDS. If soapy mixture starts bubbling, gas is leaking through the connection or hose. Turn the regulator valve OFF and then the gas cylinder OFF and retighten the connection that is leaking gas. After test is complete, and there are no leaks, wait a minimum of 5 minutes for gas fumes to diminish before lighting fryer.
- Once testing is complete, press power button on timer to stop gas flow.
DURING ANY PORTION OF THE SOAPY WATER TEST, IF BUBBLES CONTINUE TO APPEAR, STOP, DO NOT USE THE APPLIANCE AND CONTACT YOUR LOCAL PROPANE
DEALER OR MASTERBUILT AT 1-800-489-1581.
NOTE: USE A 20 LB (9KG) CYLINDER WITH A PROTECTIVE COLLAR WITH THIS APPLIANCE. ONLY CYLINDERS MARKED “PROPANE” MUST BE USED.
REPLACEMENT PARTS LIST

STOP!
DO NOT RETURN TO RETAILERFor Assembly Assistance, Missing or Damaged PartsCall: MASTERBUILT Customer Service at 1-800-489-1581
Asked Question
When the cast iron burner burns yellow or not at all, what should I do?If your burner does not burn, blows out, burns yellow, or there’s a flame inside the venturi, you need to check the burner venturi for any obstructions. Dirt dobbers, spiders and other insects will build a nest inside the burner venturi blocking air and gas flow.KEEP AIR SHUTTER CLOSED AFTER EACH USE.
HOW TO CLEAN
- Remove the hose from the burner using a 7/16” wrench.
- Insert a small rod in the hole that the hose was removed from.
- Hold the burner up to a light looking into the hole that the hose was removed from to see any obstructions.
- If burner has not cleared, flush with water.
- Once the burner has been cleared, reassemble the burner (air shutter, spring, hose.)
When a flame occurs inside the venturi this is caused by a blockage and could cause damage to the hose assembly.
REMEMBER TO ADD WASHERS WHEN REASSEMBLING THE BURNER
Using Pot with Drain Valve:Units are sold with and without drain valves:
- Valve must be in the OFF position before adding oil or water.
- Secure valve cap onto drain valve.
- Oil or water must be below 100ºF (37ºC) before draining.
CAUTION: Do not drain oil or water until the temperature of the liquid is below 100ºF (37ºC). Hot water or oil can cause serious burns and injury.
Using the Pot with the Drain Hook Basket:
Do not overfill pot with oil or water. A fill line is marked on the larger frying and boiling pots. Smaller fry pans may not be marked.

- Place seasoned food into basket.
- Slowly lower basket into oil or water using lifting hook. (Wear Protective Gloves) Stay away from hot steam.
- Cover with lid.
- When food is ready to remove, turn the burner to OFF position. Remove lid and use the lifting hook to pull basket up slowly. (Wear Protective Gloves) Stay away from hot steam.
- Hook basket to the side of the pot with the drain hook, allowing the food to drain and cool.
Using the Pot with the Turkey Hook:
Do not overfill pot with oil or water. A fill line is marked on the larger frying and boiling pots. Smaller fry pans may not be marked.
- Position turkey hook on side.
- Slowly slide turkey onto hook, breast cavity first, as shown below.
- Lower turkey hook into oil or water using lifting hook. (Wear Protective Gloves) Stay away from hot steam.
- Cover with lid.
- When food is ready to remove, turn the burner to OFF position. Remove lid and use the lifting hook to pull turkey hook up slowly. (Wear Protective Gloves) Stay away from hot steam.
- Allow the food to drain and cool.
COOKING INSTRUCTIONS FOR VESSELS WITHOUT FILL LINES
- STEP 1 – Place food product (turkey) on or in the holder (basket).
- STEP 2 – Place food product and holder into the empty cooking vessel.
- STEP 3 – Fill the cooking vessel with water just until the food product is completely submerged. For large pots only, there must be 3 in (8cm) between this level & the top of the vessel.
- STEP 4 – Remove food product from the cooking vessel and either mark the water level on the side of the cooking vessel or measure the amount of water in the cooking vessel.
- STEP 5 – Remove water and completely dry cooking vessel and food product.
- STEP 6 – This is the amount of cooking oil the cooking vessel needs to be filled with to cook your food product.
DANGERIF THE INFORMATION IN ITEMS 1-6 ABOVE IS NOTFOLLOWED EXACTLY, OIL OVERFLOW MAY OCCUR RESULTING IN DEATH, SERIOUS INJURY, OR PROPERTYDAMAGE.
FOR YOUR SAFETY FOLLOW THESE STEPS ON HOW TO PROPERLY DEEP FRY A TURKEY
- STEP 1 – If a fill line is stamped on the pot then STEP 1 is not needed. Fill the pot with oil to the fill line and go to STEP 2. If there is no stamped line, place thawed turkey, up to 18 lbs (8kg) MAX size, into basket and lower turkey into empty pot. Fill pot with water until the butt of the turkey is covered. There must be 3 in (8cm) between this water level & the top of the pot. Remove the turkey from the pot allowing all water to drain from the turkey. Once turkey has been removed, mark the waterline. Empty the water from the pot and fill with oil up to the marked line.
- STEP 2 – Insure that turkey is completely thawed and free of excess water and ice. Inject turkey with a marinade of your choice. Cover the outside of turkey with cajun dry rub reasoning. Replace the turkey in basket with legs pointing up. Ignite burner (see page 9) and bring oil temperature to 350°F (177°C).
Turn the burner off before placing the turkey into oil. Wearing cooking gloves, and being sure to stay away from hot steam, lower the turkey into the oil very slowly and cover with lid. Re-light the burner. Using the thermometer keep the oil temperature at 350°F (177°C). Cook turkey for 3 minutes per pound and then add 5 minutes to total cooking time. Turkey may float before cooking time is complete. Continue cooking turkey for the total amount of time calculated. When cooking is complete, turn burner OFF and remove food slowly.
HOW TO DEEP FRY STEAKS
- Choose steaks to your desired thickness.
- Season the outside of steaks with Southern Secrets Sizzlin’ Steak Dry Rub Seasoning.
- 2 gallons of oil in a 30 qt (28.4L) pot.STEP 1 – Place steaks on steak rack.STEP 2 – Bring oil temperature to 350°F (177°C). It is important to maintain a 350°F (177°C) temperature while cooking. Place rack in basket and slowly lower basket into oil (Wear Protective Gloves).
Cook steaks for total amount of cooking time using the chart below:
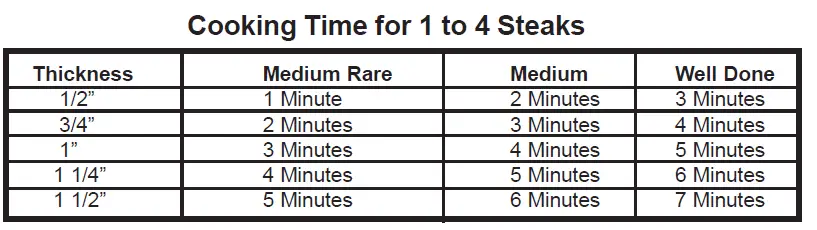
STEP 3 – When cooking is complete, turn fryer OFF and remove food slowly.
HOW TO DEEP FRY CORNISH HENS
- 1 to 4 completely thawed cornish hens.
- Inject each hen with Southern Secrets Marinade of you choice. Season the outside of the hens with Southern Secrets Dry Rub Seasoning.
- 2 gallons of oil in a 30 qt (28.4L) pot.Cooking Time for 4 Cornish Hens:3 minutes per pound plus 5 minutes equals total cooking time.Example: Use the weight of the heaviest hen.1 hen = 1.87 lbs (0.8kg)3 minutes x 1.87 = 5.615.61 minutes + 5 = 10.61Total cooking time: 11 MinutesWhen cooking is complete, turn burner OFF and remove food slowly.
WARNING
- Do not allow oil to get hotter than 400°F (200°C). One gallon of oil can reach 350°F (175°C) in 7 to 10 minutes. Use thermometer to check temperature, or if oil begins to smoke, IMMEDIATELY turn burner OFF.
- When in use, do not leave fryer unattended. Oil will heat up quickly and ignite at 550°F (287°C) to 700°F (371°C).
- Failure to completely thaw and dry foods may cause oil or grease to overflow. When frying with oil or grease, all food products MUST be completely thawed and towel dried to remove excess water. If ice is present on food, this means the thawing process is not complete and may cause a boil over when placed into HOT oil causing a fire.
- Do not leave oil/grease unattended while in use.
FRIED FISH, HOT WINGS & BOILED SEAFOOD
HOT WINGS
- 1 gallon vegetable oil
- 24 chicken wings
- 1 small bottle of hot sauce (your choice)
- 1/2 teaspoon of salt
- 1/4 teaspoon of pepper
- 1/4 cup butter or margarine, melted
- 1 teaspoon white vinegar
- Pinch of garlic salt
- Celery sticks (Optional Side Dishes)
- Blue cheese dressing
- Thaw wings if frozen and place into basket. Pour 1 gallon of oil into a 10 1/2-quart pot and bring temperature to 350°F(177°C). Turn off burner. Wearing protective gloves, slowly place basket of wings into oil and re-light burner. Cook for 8 to 12 minutes. Turn off burner. Remove and drain wings; pour into bowl. Mix hot sauce with remaining ingredients. Pour over wings, mix well, and serve.
CAJUN-FRIED FISH
- 1 Gallon of Oil
- 4 catfish or red snapper fillets, 1/2- to 3/4-inch thick (1 to 1 1/4 lbs.)
- 1/4 cup all-purpose flour
- 1/4 cup yellow cornmeal
- 1 teaspoon dried basil, crushed
- 1 teaspoon onion powder
- 1/2 to 1 teaspoon ground red pepper
- 1/2 teaspoon garlic salt
- 1/2 teaspoon ground white pepper
- 1/2 teaspoon dried thyme, crushed
- 1/4 to 1/2 teaspoon black pepper
- 1/4 teaspoon ground sage
- 1/4 cup margarine or butter
Thaw fish if frozen. In a mixing bowl, combine flour, cornmeal, basil, onion powder, red pepper, garlic salt, white pepper, thyme, black pepper, sage and butter. Coat both sides of the fish with the flour mixture. Bring 1 gallon of oil to 350°F(177°C) and deep fry for 3 to 4 minutes.
LOW COUNTRY BOIL
- 1 lb. shrimp
- 1 lb. craw fish
- 1 lb. smoked sausage
- 8 pieces of short ear corn
- 2 bags of crab boil mix
- 2 lbs. of whole new potatoes
Use a 30qt pot and bailing basket. Add 2-3 gallons and 2 bags of crab boil mix to the pot and bring water to a boil. Allow water to boil for 15 minutes and add sausage (cut sausage in 1/4-inch thick slices). After 3 minutes, add potatoes; 3 minutes later, add corn; 3 minutes later, add shrimp and craw fish together; 3 minutes later, remove and serve.
For a Cajun flare, pour on top of newspaper in the middle of your table and enjoy.
DEEP FRIED ONION
- 4 Med. Onions
- Cajun Seasoning
- 1 Gallon of Oil
Peel the outer skin off the onions. Next cut about a 1/4” off one end of the onions creating a flat top. Cut from the flat part of the onion down but not all the way through (1/4” from the bottom). Repeat this step 3 to 4 more times in a pie shape. Loosen up the onion with your fingers and season the outside and inside of the onion. Fry the onion for 3 to 4 minutes flat side down in 350°F(177°C) cooking oil.
Send us your recipe.Marketing Dept.Masterbuilt Mfg. Inc.1 Masterbuilt CourtColumbus, GA 31907
LIMITED WARRANTY INFORMATION
Masterbuilt warrants its products to be free from defects in material and workmanship under proper assembly, normal use and recommended care for 90 days from the date of original retail purchase. Masterbuilt warranty does not cover paint finish as it may burn off during normal use.Masterbuilt warranty does not cover rust of the unit. Masterbuilt requires reasonable proof of purchase for warranty claims and suggests that you keep your receipt. Upon the expiration of such warranty, all such liability shall terminate. Within the stated warranty period, Masterbuilt, at its discretion, shall repair or replace defective components free of charge with owner being responsible for shipping. Should Masterbuilt require return of component(s) in question for inspection Masterbuilt will be responsible for shipping charges to return requested item.
This warranty excludes property damage sustained due to misuse, abuse, accident, damage arising out of transportation, or damage incurred by commercial use of this product.This expressed warranty is the sole warranty given by Masterbuilt and is in lieu of all other warranties, expressed or implied including implied warranty, merchantability, or fitness for a particular purpose.
Neither Masterbuilt nor the retail establishment selling this product, has authority to make any warranties or to promise remedies in addition to or inconsistent with those stated above.Masterbuilt’s maximum liability, in any event, shall not exceed the purchase price of the product paid by the original consumer/ purchaser. Some states do not allow the exclusion or limitation of incidental or consequential damages. In such a case, the above limitations or exclusions may not be applicable. California residents only: Not withstanding this limitation of warranty, the following specific restrictions apply; if service, repair, or replacement of the product is not commercially practical, the retailer selling the product or Masterbuilt will refund the purchase price paid for the product, less the amount directly attributable to use by the original buyer prior to the discovery of the nonconformity. Owner may take the product to the retail establishment selling this product in order to obtain performance under warranty.
This expressed warranty gives you specific legal rights, and you may also have other rights which vary from state to state.
OPTIONAL ACCESSORIES
Read More About this Manual…..
report this adQuestions about your Manual? Post in the comments!
[xyz-ips snippet=”download-snippet”]