
![]()
52” Chest and CabinetModel no. 058-6551-6058-6552-4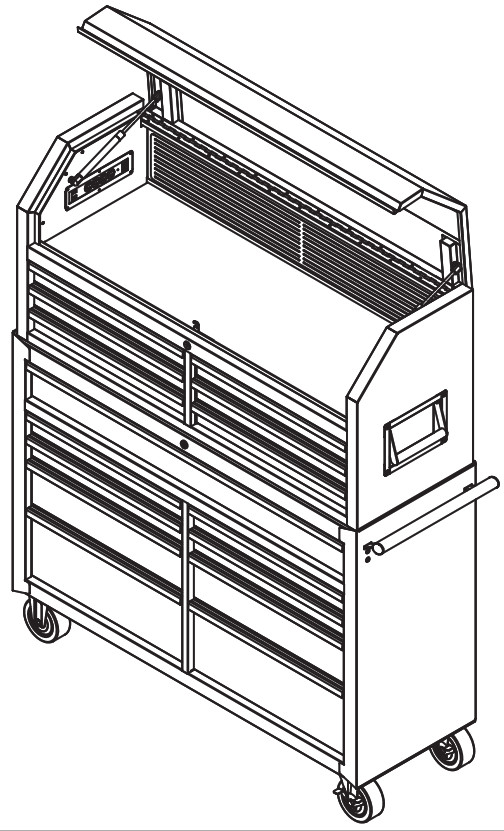
INTRUCTION MANUAL
IMPORTANT:Please read this manual carefully before installing this cabinet and save it for reference.
NOTE:If any parts are missing or damaged, or if you have any questions, please call our toll-free helpline at 1-800-689-9928. Have the product number, cash register receipt, and the date of purchase available when you call. DO NOT SHIP YOUR PRODUCT BACK TO THE STORE UNLESS WE SEND YOU WRITTEN INSTRUCTIONS FOR RETURN.
 SAVE THESE INSTRUCTIONSThis manual contains important safety and operating instructions. Read all instructions and follow them carefully with the use of this product.
Model no. 058-6551-6, 058-6552-4 I contact us at 1-800-689-9928This manual contains information that relates to PROTECTING PERSONAL SAFETY and PREVENTING EQUIPMENT PROBLEMS. It is very important to read this manual carefully and understand it thoroughly before using the tool chest and cabinet.
- The maximum weight for each drawer should be no more than 77 lb (35 kg). DO NOT OVERLOAD DRAWERS.
- The maximum product weight, including contents, should be no more than 1000 lb (454 kg) for roller cabinets.
- DO NOT attempt to lift the chest using chains, ropes, or other lifting devices if two persons cannot lift the chest by the side handles. Use a forklift placed under the bottom of the chest if this situation occurs. The side handles may continuation tabs notes fail, which may cause personal injury or damage to the product.
- DO NOT stand on this product. You may fall, which may cause personal injury.
- WEAR SAFETY GLASSES when removing or repositioning the slides.
- When moving this product, do not pull it. Push the product to prevent personal injury.
- Handle and swivel castors must be attached on the same side of the product.
- USE THE BRAKES when not moving this product. This will prevent the product from rolling, which may cause personal injury or product damage.
- DO NOT open more than one drawer at a time. The product may become unstable and tip, which may cause personal injury or product damage.
- DO NOT mount this product on a truck bed or any other moving object. This may cause personal injury or product damage.
- Secure this product properly before moving it with a forklift.
- DO NOT tow with other power equipment. The product could tip, which may cause personal injury or product damage.
- DO NOT alter this product in any manner. For example, do not weld external lock bars or attach other electrical equipment. This may cause product damage or personal injury.
- Keep the product on level surfaces. The product may become unstable and tip if stored or moved on an uneven surface, which may cause personal injury or warnings of product damage.
- When the cover is open, be sure the gas lifts are in good condition. This will prevent accidental closure and personal injury.
- BE CAREFUL when closing the cover. Remove hands before the cover closes completely to prevent personal injury.
- Close the cover and lock the drawers before moving this product. The drawers could come open and make the product unstable and tip, which may cause personal injury or product damage.
- Remove the worktop from the roller cabinet, if necessary, before installing the chest. Otherwise, the chest could slip, be damaged, and cause injuries.
- When locking a chest, close the drawers before closing the cover for lock bars to work properly.
- IMPORTANT: Do not attach or mount this product to a vehicle. Mounting this continuation tabs notes product to any vehicle in any manner will void the warranty.
 • Before assembling and using this product, carefully read this instruction manual and all of the labels affixed to the product. Failure to follow all warnings and instructions may result in product damage or personal injury.• Save all warnings and instructions for future reference.
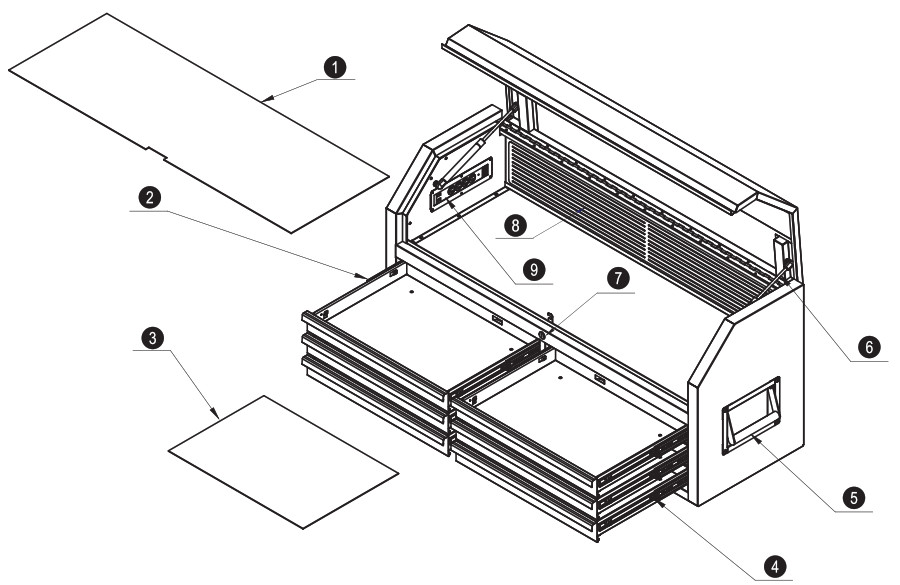
TOOL CHEST 058-6551-6
PARTS LIST
| NO | Description | Part No. | Qty |
| 1 | Topliner | 02-6016703-01 | 1 |
| 2 | Slide (L) | 02-100102A-4 | 6 |
| 3 | Drawer liner | 02-6016703-02 | 6 |
| 4 | Slide (R) | 02-100102A-3 | 6 |
| 5 | Handle | 02-460311-11 | 2 |
| 6 | Gas lift | 02-460422 | 2 |
| 7 | Lock assembly (601-610) | 02-460901 | 1 |
| 8 | Magnetic backing | 02-470001 | 1 |
| 9 | Power bar with USB outlets | 02-470002 | 2 |
![]() The keys for the tool chest are taped to the right strut of the chest.
The keys for the tool chest are taped to the right strut of the chest.
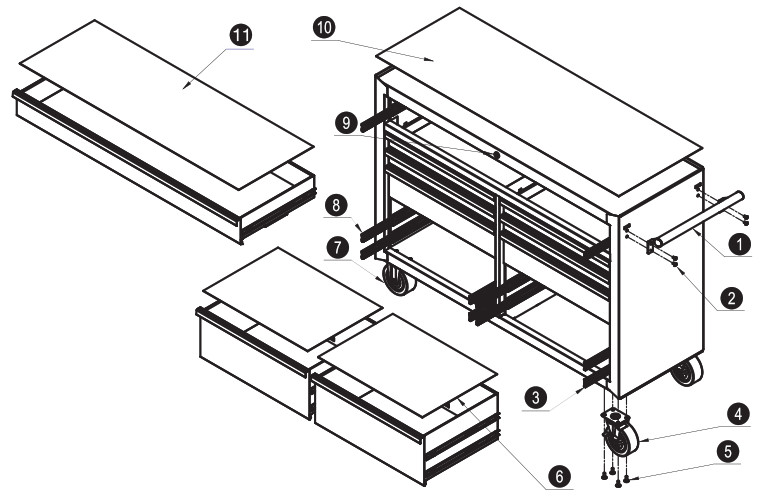
TOOL CABINET 058-6552-4PARTS LIST
| NO | Description | Part No. | Qty |
| 1 | Handle | 02-460311-07 | 1 |
| 2 | M6x12 screw | 02-471605 | 4 |
| 3 | Slide (R) | 02-100102A-3 | 11 |
| 4 | Swivel castors | 02-200112-1 | 2 |
| 5 | M8x20 hex bolts | 02-471105 | 16 |
| 6 | Drawer liner | 02-6016709-03 | 8 |
| 7 | Rigid castors | 02-200112-3 | 2 |
| 8 | Slide (L) | 02-100102A-4 | 11 |
| 9 | Lock assembly (601-610) | 02-460904 | 1 |
| 10 | Top liner | 02-6016709-01 | 1 |
| 11 | Big drawer liner | 02-6016709-02 | 1 |
![]() The keys are taped to the top of the castor carton, which is placed in the bottom drawer of the cabinet.
The keys are taped to the top of the castor carton, which is placed in the bottom drawer of the cabinet.
NOTE:Replacement keys may be ordered using the required code which appears on the face of the lock. Give this information for spare parts: part number, and quantity. Not all parts are covered under warranty. Those parts not covered can be purchased.
ASSEMBLY INSTRUCTIONS
- Remove all items from the box and ensure that all parts listed on the key parts diagram are present.
- Inspect the product carefully to make sure no breakage or damage occurred during shipping.
- Do not discard the carton or any packaging material until all parts have been examined.
TOOLS REQUIRED FOR ASSEMBLY
- Cross-head screwdriver for cross-head screws.
- 12 mm wrench for M8 hex nuts.
SIDE HANDLE ATTACHMENT
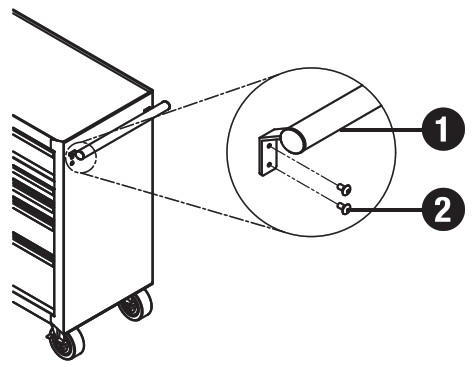
NOTE: The holes in the cabinet are tapped and therefore require no nuts for installation. Position the cabinet handle (1) over the holes and attach to the M6 x 12 bolts (2). Tighten securely.
CASTOR INSTALLATION
NOTE: You may require the assistance of another person for this step.Carefully lay down the cabinet on its back with a soft mat underneath to protect the finish. Position the two rigid castors (7) on the bottom of the cabinet on the left side. Insert the M8 x 20 hex bolts (5) through the castors and into the bottom of the cabinet.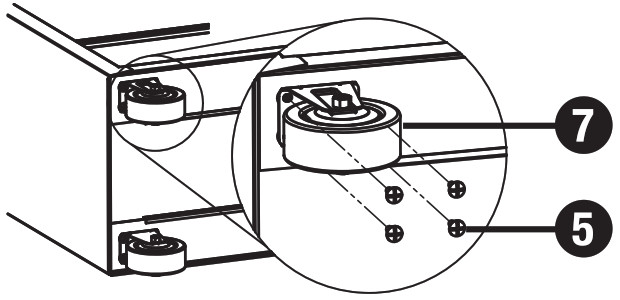 Tighten securely.Repeat for the two swivel castors (4) on the other side. The handle must be mounted on the same side of the cabinet as the swivel castors. Wrench tighten all screws. Return the cabinet to its upright position.
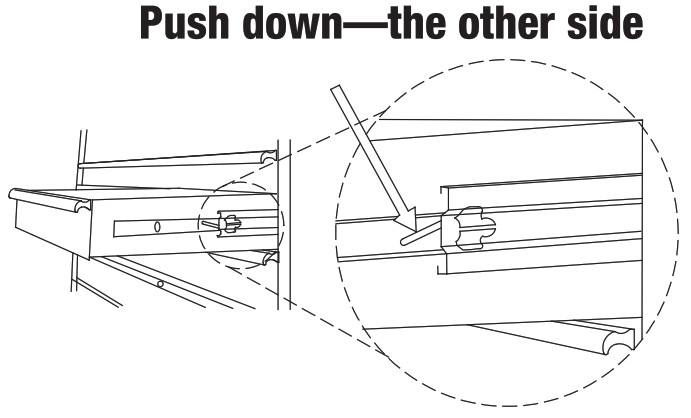
Empty the drawers. Pull the drawer out so it is almost fully extended. Push up on one side black release lever, while pushing down on the other side black release lever. While holding the levers in the positions as instructed above, pull the drawer outward until it is released from the drawer slides.
DRAWER REPLACEMENT
 Extend the drawer slides from the tool chest. Insert the brackets on each side of the drawer into the slots in the slide and ensure that they are properly in position. Once properly inserted, completely close the drawer to set the slides in their proper positions.
GENERAL MAINTENANCE
- For castors, use high-quality bearing grease (annually/yearly).
- Lubricate the slides (twice a year) with a spray lubricant or light-duty oil.
- The drawer fronts, drawer trims, and other surfaces should be cleaned periodically with mild detergent and water
- Grease and oil can be removed with most standard cleaning fluids.
1-year Warranty
This Mastercraft product is guaranteed for a period of one (1) year from the date of original retail purchase against defects in materials and workmanship.
Subject to the conditions and limitations described below, this product, if returned to us with proof of purchase within the stated warranty period and if covered under this warranty, will be repaired or replaced (with the same model, or one of equal value or specification), at our option. We will bear the cost of any repair or replacement and any costs of labour relating thereto.
This warranty is subject to the following conditions and limitations:
- a bill of sale verifying the purchase and purchase date must be provided;
- this warranty will not apply to any product or part thereof which is worn or broken or which has become inoperative due to abuse, misuse, accidental damage, neglect or lack of proper installation, operation or maintenance (as outlined in the applicable owner’s manual or operating instructions) or which is being used for industrial, professional, commercial or rental purposes;
- this warranty will not apply to normal wear and tear or to expendable parts or accessories that may be supplied with the product which are expected to become inoperative or unusable after a reasonable period of use;
- this warranty will not apply to routine maintenance and consumable items such as, but not limited to, fuel, lubricants, vacuum bags, blades, belts, sandpaper, bits, fluids, tune-ups or adjustments;
- this warranty will not apply where damage is caused by repairs made or attempted by others (i.e., persons not authorized by the manufacturer);
- this warranty will not apply to any product that was sold to the original purchaser as a reconditioned or refurbished product (unless otherwise specified in writing);
- this warranty will not apply to any product or part thereof if any part from another manufacturer is installed therein or any repairs or alterations have been made or attempted by unauthorized persons;
- this warranty will not apply to normal deterioration of the exterior finish, such as, but not limited to, scratches, dents, paint chips, or to any corrosion or discoloring by heat, abrasive and chemical cleaners; and
- i) this warranty will not apply to component parts sold by and identified as the product of another company, which shall be covered under the product manufacturer’s warranty if any.
Additional Limitations
This warranty applies only to the original purchaser and may not be transferred. Neither the retailer nor the manufacturer shall be liable for any other expense, loss, or damage, including, without limitation, any indirect, incidental, consequential, or exemplary damages arising in connection with the sale, use, or inability to use this product.
Notice to Consumer
This warranty gives you specific legal rights, and you may have other rights, which may vary from province to province. The provisions contained in this warranty are not intended to limit, modify, take away from, disclaim or exclude any statutory warranties set forth in any applicable provincial or federal legislation.
Made in ChinaImported byMastercraft CanadaToronto, ON, Canada M4S 2B8
[xyz-ips snippet=”download-snippet”]