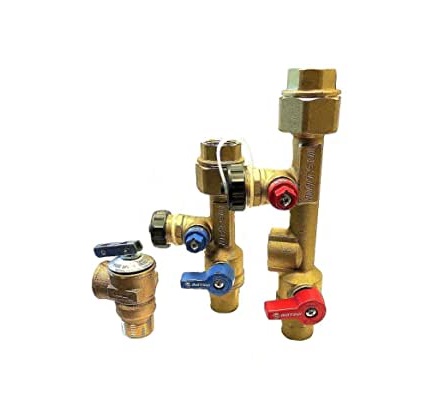
MATSUI TANKLESS ISOLATION VALVE KIT
Installation Instructions
Refer to the tankless water heater manufacture’s installation instructions before install this valve kit.
![]() DANGER To prevent personal injury
DANGER To prevent personal injury
OVER THIGHTENING ANY OF THE VALVES OR UNION FITTINGS CAN CAUSE CRACKING AND/OR OTHER DAMAGE TO THE PRODUCT. AS A RESULT, HOT WATER COULD SPRAY OUT AND CAUSE SEVERE BURN OR SCALDING RESULTING IN PERMANENT INJURY OR DEATH.
ATTENTION: It was not designed for installations exposed to subfreezing conditions; please keep this in mind when choosing a location to install your tankless water heater. Drain valves should remain closed during normal operation. Do not rely on the drain cap to stop the water from draining. When draining, always remove drain caps slowly to insure that no pressure exists.
INSTALLATION INSTRUCTIONS
1. Identify the appropriate location and orientation for each valve.2. Install the PRV(pressure relief valve) to the HOT WATER VALVE
– DO NOT OVERTIGHTEN –a. Apply thread sealant or 5 wraps of PTFE thread tape to the exposed threads.b. Hand tighten the PRV to the 3/4″ port on the slide of the HOT WATER VALVEc. With a wrench, tighten the PRV until the discharge port is positioned downward.d. Do not tight more than 2 turns pass hand tight.
NOTE: Install PRV per local codes and ANSI Z21.22.
4. Wrap the HOT water outlet with at least 5 wraps of PTFE thread tape, then connect union fitting with the HOT water outlet. You don’t need to remove the union nut, then tighten the union nut with the lower part of HOT water valve.5. Align the direction of the HOT water drain to the desired position.6. Tighten the union assembly to the HOT water valve using approximately 15 foot lbs of torque.7. Repeat steps 4-6 for the COLD water valve. (BLUE drain handle) for connection to the COLD water inlet on the tankless water heater.8. Connect the INLET on the COLD water valve to the MAIN SOURCE of the water supply.9. Connect the OUTLET on the HOT water valve to the HOT WATER plumbing system.10. Ensure that both drain valve lever handles are in the closed position (perpendicular to the drain portion of the body).
START UP PROCEDURES
- Close the HOT and COLD valve handles.
- Ensure the DRAIN CAPS are hand tight.
- With 1/2″ wrench, 1/2″ socket or adjustable wrench, ensure the HOT and COLD water drain valves are in the “OFF” position
- Refer to the water heater manufacturer’s installation instructions to commission the water heater.
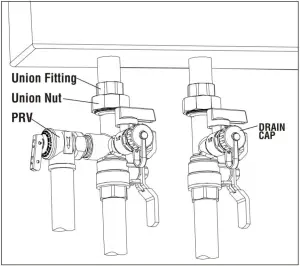
PRESSSURE RELIEF VALVE (PRV)
Installation Instructions
The PRV must be connected by the threaded connection opposite the wing handle on the hot water valve (designated by the RED drain handle) or the threaded connection on the side of the relocation fitting above the hot water valve. Installation must maintain a 3/4″ port size with no shut off valve or line restriction in-between the appliance and the PRV. The discharge line from the PRV should pitch downward and terminate 6″ above drains where discharge will be clearly visible. The discharge end of the line shall be plain (unthreaded) and a minimum of 3/4″ in diameter. The discharge line material must be suitable for water at least 180° Fahrenheit.. The discharge line shall be as short and straight as possible such that the arrangement does not reduce the relieving capacity of the pressure relief valve. No valve of any type may be installed in the discharge line of the pressure relief valve.
PRV Maintenance Instructions
For proper care of this approved pressure relief valve, it is recommended that the valve is manually operated once a year. In doing so, it will be necessary to take precautions with regard to the discharge of potentially scalding hot water under pressure. Ensure discharge has a place to flow. Contact with your body or other property may cause damage or harm.Please note that only the PRV in this package is certified by CSA International as an approved item.
CLEANING AND FLUSHING INSTRUCTIONS
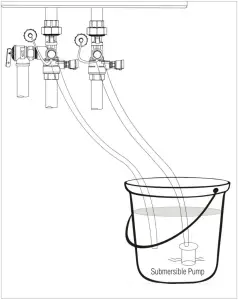
Check with the manufacturer of your tankless water heater for specific guidelines for the unit installed. Pump, hoses, pail & solution (not included).
- Disconnect power to the tankless water heater and/or shut off the gas valve.
- Close both the HOT & COLD water valves by turning the main valve wing handles 90 degrees. (Handles will now be perpendicular to the main valve body.)
- Ensure that both drain valve handles are closed. (Handles perpendicular to the drain spout)
- Slowly remove the drain caps. Be sure to retain rubber washer inside of the cap.
- Connect the pump outlet hose to the COLD water drain outlet of the valve. (BLUE drain handle)
- Connect a drain hose to the HOT water drain outlet of the valve. (RED drain handle)
- Pour 3 to 5 gallons of flushing/de-scaling solution into a pail (virgin food grade white vinegar or citric acid recommended).
- Place both the pump inlet hose and the HOT valve drain outlet hose into the pail.
- Open both the HOT & COLD drain valves by turning the handles clockwise 90°.
- Turn on the pump and allow the solution to circulate for 20 to 45 minutes, depending on the amount of scale in the appliance.
- Turn off the pump and close the COLD water drain valve.
- Remove the hose from the COLD water drain valve; replace cap & washer securely onto the drain valve outlet.
- Remove the pump and hose from the pail; dispose of the cleansing solution safely & properly.
- Put the HOT water drain Hose end back into the empty pail or sink drain and open the main water valve on the COLD valve. This procedure will flush out the tankless water heater with fresh cold water; flush with at least 20 gallons. You will have to empty the pail several times.
- Close the main water valve & clean the inline filter of your tankless water heater if required by the manufacturer.
- Close the drain valve on both HOT and COLD valve, the remove the drain hose, replace cap & washer securely onto the drain valve outlet.
- Ensure that both the HOT & COLD drain valve handles are CLOSED. (Perpendicular to the drain portion of the body
- Open the main water valves on both the COLD & HOT valves. (Handles parallel to the main valve body)
- Restore power to the tankless water heater and turn on the gas valve.
INSTALLER: Leave these installation instruction with the appliance.
CONSUMER: Retain these installation instruction for future reference.
CAUTION : Before installing the valves, check the black gasket inside of the thread, if the gasket missing, Please call our service center, or text us.
Limited Warranty and Disclaimers
Matsui USA,Inc and Matsui Co.,Ltd. (together, MATSUI) hereby provide a lifetime limited warranty to the original purchaser that each product or original part thereof is free from defects in material and workmanship under normal use, service and maintenance with original installation and subject to the limitations set forth herein.LIMITATIONS OF WARRANTY. This warranty shall be effective only if;The product was installed in accordance with supplied instructions, common installation or use practices and existing building and plumbing codes;The product has not been subjected to misuse or abuse;The product was at all times used in a manner consistent with intended use;The product was never modified, altered, or repaired by anyone other than Matsui;The product was properly subjected to and passed applicable testing methods immediately after the product’s installation;The product was not damaged by freezing, corrosion or UV degradation;andThe product was never damaged or materially changed by an uncontrollable outside influence or natural phenomenon.EXCLUSIONS OF WARRANTIES. This warranty excludes all costs arising from routine maintenance, including the replacement of any parts required by or otherwise in connection with such maintenance and the replacement of parts required by normal wear and tear.This warranty does not obligate Matsui to bear any transportation, removal or installation charges in connection with the inspection, repair or replacement of defective parts, other than the cost or cost-equivalent of the defective Matsui-manufactured parts.Matsui also reserves the right to modify, alter or improve it’s product, or parts thereof, at any time without incurring an obligation to notify or modify, alter, improve or replace any product, or parts thereof, already on the market or previously sold.THE LIMITED WARRANTY PRINTED ABOVE IS THE ONLY WARRANTY APPLICABLE TO THIS PURCHASE, IS ONLY APPLICABLE TO THE PURCHASER, AND IS ONLY ANY EXPRESS WARRANTY NOT PROVIDED HEREIN, AND ANY REMEDY WHICH BUT FOR THE WARRANTY CONTAINED HEREIN MIGHT ARISE BY IMPLICATION OR OPERATION OF LAW, IS HEREBY EXCLUDED AND DISCLAIMED INCLUDING THE IMPLIED WARRANTIES OF MERCHANTABILITY AND OF Fitness FOR A PARTICULAR PURPOSE. EXCEPT FOR THE LIMITED WARRANTY SPECIFICALLY SET FORTH HEREIN, THE PRODUCT AND ALL PARTS THEREOF ARE SOLD “AS IS.” IT IS UNDERSTOOD AND AGREED THAT MATSUI’S LIABILITY AND PURCHASER’S SOLE REMEDY, WHETHER IN CONTRACT UNDER ANY WARRANTY, OR IN TORT SHALL NOT EXCEED THE RETURN OF THE AMOUNT OF PURCHASE PRICE PAID BY THE PURCHASER, AND UNDER NO CIRCUMSTANCES SHALL MATSUI BE LIABLEFOR ANY SPECIAL, CONSEQUENTIAL, OR PUNITIVE DAMAGES.May be covered by one or more of the following United State Patents;
 DANGER To prevent personal injury
 report this ad
Hot water can be dangerous, especially for infrants, children, the elderly and the infirm. There is hot water scald potential if the thermostat is set to high.Water temperatures over 120°F (51°C) can cause severe burns or scalding resulting in permanent injury or death.Hot water can cause first degree burns with exposure for as little as:
3 seconds at 140°F (60°C)20 seconds at 130°F (54°C)8 minutes at 120°F (48°C)
[xyz-ips snippet=”download-snippet”]