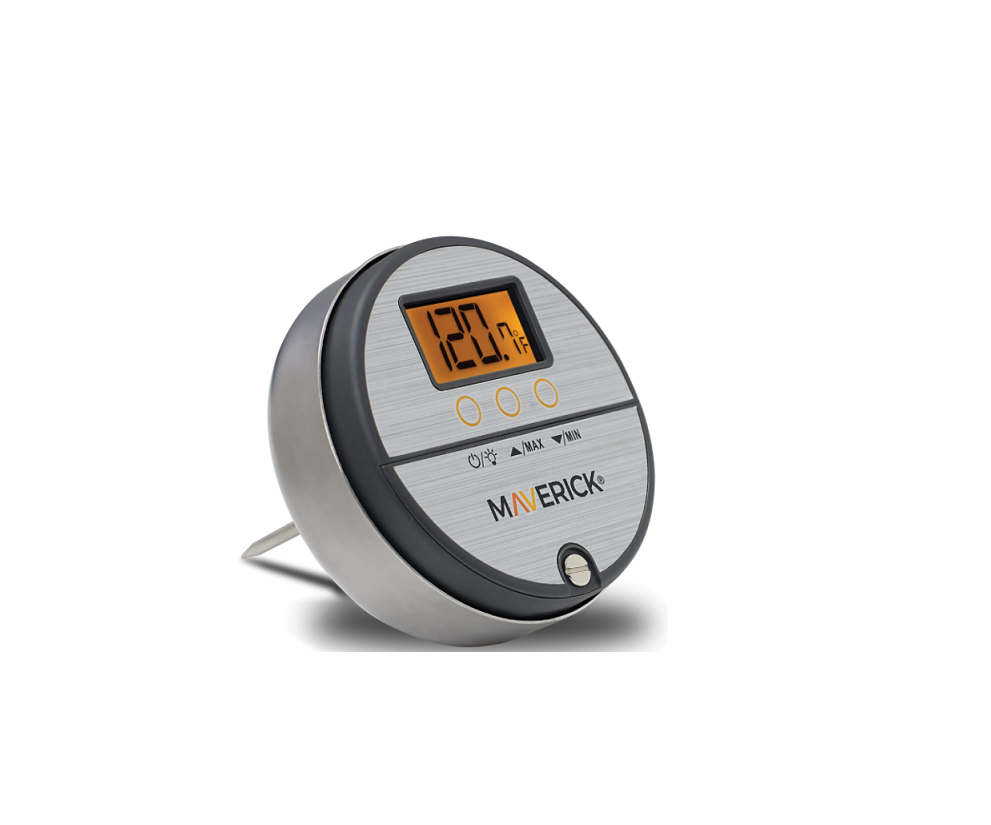
MAVERICK DGT-310 Digital Thermocouple Grill Thermometer User Guide![]()
Set Maximum Temperature –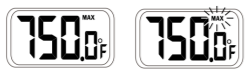
- Press MAX button to view the Maximum Alert Temperature
- While viewing the MAX temperature, Press and hold MAX button for 2 seconds. MAX will flash on the thermometer LCD
- While MAX is blinking on the thermometer LCD, use the UP & DOWN arrow buttons to raise or lower your MAX alert temperature (press and hold the arrow key buttons to raise/lower the temperature quickly)
- Not pressing any buttons for 10 seconds will lock these temperature settings
Set Minimum Temperature –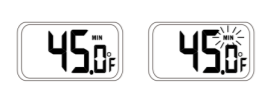
- Press MIN to view the Minimum Alert Temperature
- While viewing the MIN temperature, press and hold the MIN button for 2 seconds . MIN Will flash on the thermometer LCD
- While MIN is blinking on the thermometer LCD, use the UP & DOWN arrow buttons to raise or lower your MIN alert temperature (press and hold the arrow key buttons to raise/lower the temperature quickly)
- Not pressing any buttons for 10 seconds will lock these temperature settings
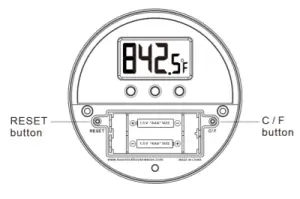
Digital Thermocouple Grill Thermometer Instructions
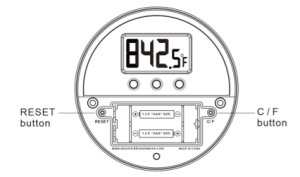
Model # DGT-310C/F & RESET buttons inside Battery Compartment Thermometer buttons
Thermometer buttons
- POWER On Off BACKLIGHT
- Up /M AX
- Down /MIN
- C / F (RE CALIBRATION)
- RESET
INSTALLING BATTERIES
Use a screwdriver to remove the screw of the battery door Insert two AAA batteries noting the polarity. The ( (–) side goes on the Install the battery cover and secure with screw. Do not over tighten. To keep your thermometer water resistant, make sure the rubber gasket is lined up with the battery compartment
Note: “The default temperature reading for this thermometer is in °F. Press the °C/°F button inside of the battery compartment to switch between temperature scales
Mounting the Thermometer on your grill coverThe stem diameter of this thermometer is .310”. The hole in your grill cover must be at least this large in diameter. Remove the analog thermometer that is currently in the cover. Remove the wing nut from the thermometer and carefully insert the threaded stem into the hole. Lift the cover slowly so you can access the thermometer stem from inside the grill. Thread the wing nut back onto the stem until finger tight making sure the thermometer LCD is horizontal .
USING THE THERMOMETER
Temperature ScaleSelec t the temperature reading in Fahrenheit or Celsius by pressing the C/F button inside the battery compartment. The unit will be set in Fahrenheit as default temperature scale when the batteries are inserted
Getting started#1. POWER ON/OFF , Backlight 
Press once to turn on the thermometer and show Current Temperature Pressing the power button while the unit is on will activate the backlight for 5 seconds
Press and hold 3 seconds to turn off the thermometer
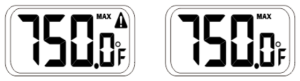
#2. UP /MAXIMUM TEMPER A TURE ALERT Memory Set (Set at the factory at 400

- Press MAX once to show Max imum Temperature Alert screen for 5 seconds and then it will go back to Current Temperature Screen.
- Within 5 seconds Press again to toggle Max Temp Alert & Current T emp erature screen.
- In Max Temp Alert Screen, p re ss and hold for 2 sec onds to enter the s et mode. The MAX icon will blink for 10 seconds (confirm this is while MAX is blinking use the same UP button to increase temp erature , use DOWN button to decrease temp erature setting .
- Press & hold the UP or DOWN button for 2 seconds to increase or decrease the setting faster.
- Maximum Temperature Alert will be automatically set after 10 seconds of not pressing any buttons
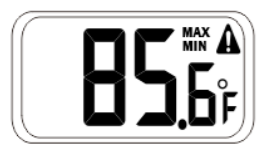
3 . DOWN /M IN IMUM TEMPER A TURE ALERT Memory Set (Set at the factory at 32 F)
- Press MIN once to show Minimum Temperature Alert screen for 5 seconds and then it will go back to Current Temperature Screen.
- Within 5 seconds Press again to toggle Min Temp Alert & Current Temperature screen.
- In Min Temp Alert Screen, p re ss and hold for 2 seconds to enter the set mode. The MIN icon will blink for 10 seconds while MIN is blinking use the same DOWN button to de crease temperature , use UP button to in crease temperature setting .
- Press & hold the UP or DOWN button for 2 seconds to increase or decrease the setting faster.
- Minimum Temperature Alert will be automatically set after 10 seconds of not pressing any buttons
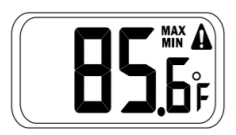
4 . TURN ON MAXIMUM, MINIMUM TEMPERATURE ALERT
- On Current Temperature screen, press & hold UP/MAX button for 2 seconds to turn on Maximum Temperature Alert. The
 icon will be shown. Press & hold the same button to turn off the Alert, the will be off.
 - On Current Temperature screen, press & hold DOWN /MIN button for 2 seconds to turn on M inimum Temperature Al ert. The icon will be
- shown. Press & hold the same button to turn off the Alert, the will be off.
NOTE :
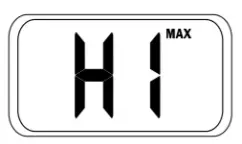
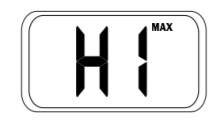
Make sure the thermometer is back to current temperature screen to activate the Temperature Alerts. The Thermometer is designed to measure grill temperature s from 32 °F 842 °F / 0 °C ~450 °C When current Temperature measure d is higher than 842 °F /45 0 °C t he display will show HI ’ and non stop beeping.
#5. USER Re Calibration of Thermometer
- Make ice bath with 3 parts ice and 1 part cold water
- Insert the probe tip into center of ice bath
- Press and h old the C/F button inside the battery compartment for 5 sec onds to enter CALIBRATION mode CAL
- The thermometer will start calibration range from 30 °F 1 °C to 34 °F /+1 °C to an accurate 32 °F 0 °C .
- The LCD shows blinking CAL
- When the calibration is finished the thermometer will display the curren t temperature.
#6. Power Saving Feature
- The Thermometer will automatically turn off if no buttons are pressed for 30 minutes and when the temperature measured is below 150°F /65.5°C Press Power button once to turn on LCD.
7 . RESETPress RESET button inside the batter y compartment of the unit when abnormal operation occurs such as the unit continues to beep despite turning off the alerts. If abhor mal operation persists, remove the batteries and re insert.
#8. “ HI” Temperature Warning
- The Thermometer will beep continuously when the temperature of the grill exceeds 842°F / 450°C for 10 Sec.
- The LCD will show a blinking “HI” as a warning to lower the Grill Temperature to protect the thermometer.
- Press & hold Power button for 2 seconds to turn off the unit to let it cool down for next safe operation.
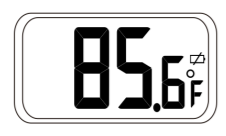
- For temperature measurement below 32°F/0°C the LCD will show “Lo”
#9. “ LOW BATTERY” INDICATOR
SPECIFICATIONS
 SPECIFICATIONS
Operating Range : 32 °F to 842 °F / 0°C to 45 0°CDisplay Range : 32 °F to 842 °F / 0°C to + 45 0°CPower: 2 x AAA batteries (included)
CARE OF YOUR PRODUCT
- Don’t touch the probe tip with bare fingers after use, to avoid burning fingers. Although this thermometer is water resistance, do not submerge the unit into water. Do not wash in dishwasher.
- Don’t put the thermometer housing inside the grill. Always properly mount the thermometer on the outside of the grill lid .
- The thermometer probe is made of food grade stainless steel and is designed for instant measurement only ..(Carson can you explain this
- Don’t use the thermometer continuously over 66 2°F 350 °C for 6 hours. Doing so will drain the battery and may cause permanent probe damage.
- Don ’t use the thermometer above 84 2°F 45 0°C . The thermometer LCD will show “HI” warning. Using it at this temperature will cause permanent probe damage.
- Never place the thermometer probe in the fire.
- Don’t subject the thermometer to extreme temperat ures, humidity or severe shock such as dropping it.
- Don’t clean the case with any corrosive materials such as perfume, alcohol or cleaning agent or abrasives.
- Keep the batteries and stainless steel probe away from children (Carson what is this
- To protect the thermometer from the elements when no t using the grill cover the face of the thermometer with silicone storage cover.
DISPOSAL OF YOUR OLD PRODUCTYour product is designed and manufactured with high quality materials and components, which can be recycled and reused. When the crossed out whe eled bin symbol is attached to a product it means that the product is covered by the European Directive 2002/96/EC. Please inform yourself about the local separate collection system for electrical and electronic products. Please act according to your local rules and do not dispose of your old products with your normal household waste. The correct disposal of your old product will help prevent potential negative consequences for the environment and human health.
DISPOSAL OF FLAT BATTERIES/ACCUMULATORSYou , as the end user, are legally obliged (Battery Ordinance) to return all flat batteries and rechargeable batteries. Disposal in the household waste is prohibited. “European Directive 2006/66/EC” Batteries, including rechargeable batteries, which contain ha zardous substances are marked by symbols, which indicate the prohibition of disposal in the household, waste. The designations for the heavy metals concerned are as follows: Cd = cadmium, Hg = mercury, Pb = lead. You can return flat batteries / rechargeable batteries free of charge to the collection points in your community or anywhere where batteries / rechargeable batteries are sold. You thus fulfill your statutory obligations and help protect the environment.
 report this ad
MAVERICK LIMITED 1 YEAR WARRANTYMaverick Industries Inc. warrants this product to be free of defects in parts, materials and workmanship for a period of 1 year, from date of purchase. Should any repairs or servicing under this warranty be required, contact Maverick Customer Service by e mail or phone for instructions on how to pack and ship the product to Maverick’s National Service Center located as follows: Maverick Customer Service 94 Mayfield Ave. Edison NJ 08837Telephone: 1800 526 0954Email: Hours: Weekdays 8:30 AM4:30 PMDo not send any parts or product to Maverick without obtaining a Return Authorization Number and instructions. This warranty is VOID if instructions for use are not followed; for accidental damage; for commercial use; for damage incurred while in transit; or if the product has been tampered with. This warranty gives you specific legal rights and you may also have other rights which vary from state to state / province to province. www.maverickthermometers.com
Read More About This Manual & Download PDF:
References
[xyz-ips snippet=”download-snippet”]