![]()
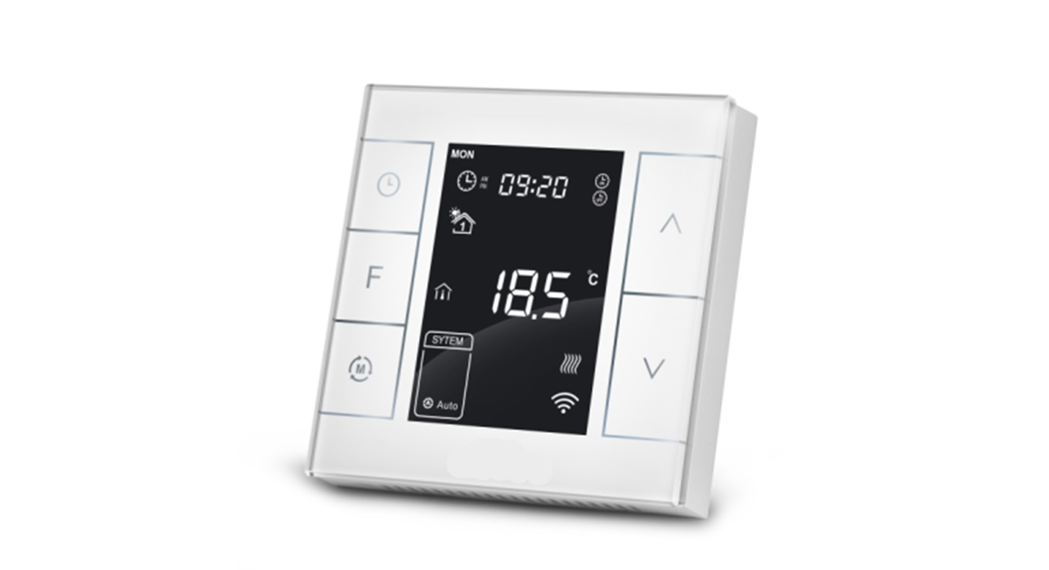
Water /Electrical Heating Thermostat MHTH-WH/ MH7H-EH
MCOHome Water I Electrical Heating Thermostat is a Z-Wave Plus-enabled device for indoor temperature control. MH7H-WH is mainly applied to control the wall-mounted boiler, water valve/pump, etc., while MH7H-EH is for the electrical heating systems. The device is of high reliability and practicability, which can be included and operated in any Z-Wave network with other Z-Wave certified devices from any other manufacturers.
Features:
- Capacitive touch buttons
- Tempered glass panel, PC alloy enclosure
- Precise temperature calibration function
- Attractive appearance
- Clear display, easy to operate
Specification
- Power Supply: AC85-260V, 50/60Hz
- Output: MH7TH-WH <5A; MH7H-EH< 16A
- Self Consumption: <1W
- External Temp. Sensor(optional): NTC R25 C=15K0 B25 C/50C=3550K
- Working Environment: 0-50C; 0-90% RH (Non-condensation)
- Temperature Setting: 5-37 C (41-99 F) (Adjustable)
- Dimension: 86 8615mm
- Hole Pitch : 60-61 mm
- Z-Wave Frequency: Operating frequency range, defined by the regulatory bodies (for Z-wave in Europe: 868.0868.6 MHz, 869.7-870.0 MHz)
- Maximum transmitting power: + 3dBm
- Active element: Relay switch µ
- Overcurrent protection: Required external I OA circuit breaker
 • Declaration of Conformity
| Hereby, MCOHome declares that the device is in compliance with the essential requirements and other relevant provisions of Directive 2014/53/EU. |
• WEEE Directive Compliance
 |
The device marked with this symbol should not be disposed of with household waste. It is the user’s responsibility to deliver the used appliance to a designated recycling point. |
• Z- Wave Compliance
 |
MCOHome thermostat is a fully compatible Z-Wave Plus device. |
Important Safety Instruction
 |
Read the instructions before starting up the unit! |
|
This product is not a toy. Keep out of reach of children and animals! |
|
Do not expose the device to moisture, water, or other liquids. Do not place liquids near or on the device! |
|
Do not attempt to disassemble, repair or modify the device yourself! |
|
his product is for indoor use only. Do not use outdoors! |
CAUTIONS!
Flush-mount only into a UL/ETUCE certified plastic junction box. The minimum size should be 65*65*45mm, minimum Volume is I90cm7. Use Copper Conductors Only.
CAUTIONS!Risk of Electric Shock – More than one disconnect switch may be required to de-energize the equipment before servicing.
Installation
Location:The device is suggested to be installed indoors, a place around me. Sm height above the floor where represents the average room temperature. It should be away from direct sunlight, any cover, or any heat source, to avoid false signals for temperature control.
CAUTION: Cut off power supply at circuit breaker or fuse before installation to avoid fire, shock or death!
.
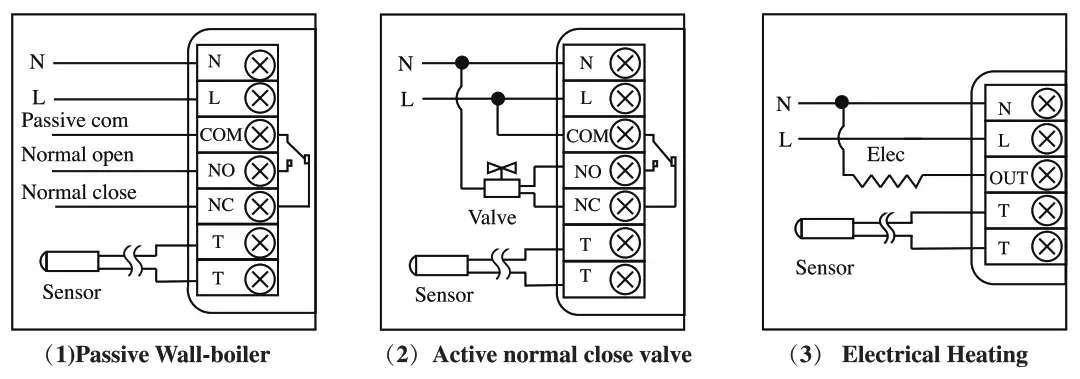
Step 1:Separate the device into two parts: the display panel and the bottom.Step 2: Insert all wires into the right terminals and tighten screws. Wiring diagrams are shown below.Step 3:Push the bottom into the junction box and secure it with two screws, and then mount the touch panel back.Step 4:Confirm the device is well mounted, power on and it is ready to operate.
|
Model |
Terminal | Control Device | Wiring Instruction |
Contact Capacity |
| MH7H-WH | N. 1_,• COM,NO NC | Thermostatic valve/ electric ball valve/pump | 1.For passive control, follow the wiring diagram2. For active control, follow the wiring diagram | SA |
| MH7H-EH | N. 1_,• OUTT, T | The heating film, electric radiator, heating cable | TT terminal is to be connected with an external sensor with high-temperature protection function | 1 6A |
Operation
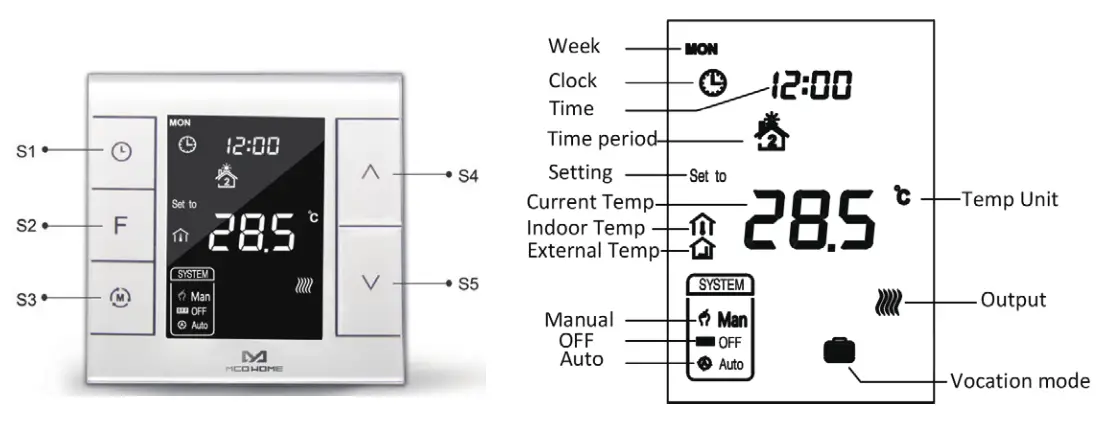
On/Off OperationWhen power is on, the device displays “OFF”, all outputs are forced off. Touch the S3 button to switch (manual/off/auto) mode, then press S2 to confirm and proceed with the power on/offsetting. After power on, the device displays the current week, local time, working mode, current temperature, output status, etc.
Note: After the backlit goes out, please press the button to light up the backlit first, and then press the button again for the corresponding operation.
Temperature SettingIn normal working status, pressing the S4 or S5 button will enter into the temperature setting interface. The setting range is 5-37 C (41-99F). Then press S4 or S5 can adjust the value. Press S3 or wait 25 seconds without any key the operation will save the setting and return back to the normal operation interface.
Auto Mode: The changed value is only valid in the current time period for this time, and the device will not affect the preset time period value.Manual Mode: The changed value will be valid until the next setting.Vacation Mode: The changed value will be valid until the next setting.
Key Lock FunctionIn normal operating interface, long press SI +S4 button, ![]() ft-icon appears that indicates the button is locked, at this time all buttons are disabled; When long press SI +S4 button again,
ft-icon appears that indicates the button is locked, at this time all buttons are disabled; When long press SI +S4 button again, ![]() icon disappear that indicates the button is unlocked, all buttons back to normal work.
icon disappear that indicates the button is unlocked, all buttons back to normal work.
Control Specification
MHTH-WH► Detection temperature < setting temperature – 0.5C, output turns on, and output icon displays.►Detection temperature setting temperature + 0.5 C, output turns off, and output icon disappears.
MHTH-EH► Detection temperature < setting temperature – 1.5C, output turns on, and output icon displays.► Detection temperature?: setting temperature, output turns off, and output icon
Manual / Auto Mode SettingIn a normal display interface, the touch SJ button can switch between Manual and Auto mode. Choose the mode you may need and press the S2 button to save the setting.Auto Mode: Device will follow the preset time periods and temperature to control the heating system automatically.Manual Mode: Device will follow the manual setting temperature to control the heating system.
Vacation Mode SettingIn normal working interface, if vocation mode is not activated, long-press S2 button to enter vacation mode temperature setting. The default temperature is 10 C, and the setting range is 5.37 C (41-98 F). Press S4 or S5 to adjust the value, then press S3 or wait 25 seconds to save the setting and return to the normal working interface. In this time vacation mode icon displays and the device will follow the setting. Long press S2 again will end vacation mode and resume to normal work, vacation mode icon will be disappeared.
Local Time SettingIn a normal working interface, long press SI to enter into local time setting interface.
In the local time setting interface, press S4 or S5 button to set the “week, hour & minute” parameter, and press the SI button can switch among the “week, hour & minute”.After finish, the local time setting, press SI or wait 25 seconds without any key operation will save the setting and return to the normal display.
Auto Mode Time Periods Parameter SettingIn a normal working interface, short press SI to enter into time periods set. Four-time periods can be set for each day of the whole week.Press S2 can switch among “Hours, Minutes, Temperature value”. Press S4 or S5 can change thevalue.After finishing the setting of 4 time periods on Monday, press S 1 and follow the same way to set periods of the next days.After all, periods are set, press S 1 /S2 or wait 25 seconds without any key operation will save the setting and return to the normal display. The device will operate in accordance with the new setting.
The default setting is as follow:
|
Week\Periods |
Period 1 | Period 2 | Period 3 |
Period 4 |
||||
| Mon—Fri | 5:00 | 28 C | 7:00 | 24 C | 17:00 | 28 ‘C | 22:00 | 24 C |
| Sat—Sun | 5:00 | 28 C | 9:00 | 24 C | 17:00 | 28 C | 22:00 | 24 C |
High-Temperature Protection (For MH7H-EH Electrical Heating ONLY)When the external temperature sensor detects the temperature value>55 C, the device will open high- emperature protection, electric heating will be forced off, and the high-temperature protection icon displays.When the external temperature sensor detects the temperature value< 50 C, the device will return to normal work, high-temperature protection icon disappears.
Anti-Freeze Protection Function: (Optional)
In shutdown interface:When the built-in temperature sensor detects the temperature value<5C, the device will open anti-freeze protection, electric heating will be forced open, and the anti-freeze protection icon displays.When the built-in temperature sensor detects the temperature value> 8C, the device will turn off anti-freeze protection and return to normal work, the anti-freeze icon disappears.Note: If the device does not connect with an external temperature sensor, it will only display the indoor temperature icon; If the device connects with an external temperature sensor, it will display the indoor temperature and high-temperature protection icon; When it is under high-temperature protection, high-temperature protection icon flickers.
Humidity Display OperationIn normal working interface, long press SI +S5 buttons and enter into humidity display interface when press SI +S5 buttons again, it will back to the normal interface.
Z-Wave Operation
• Including & Excluding of Z-Wave network
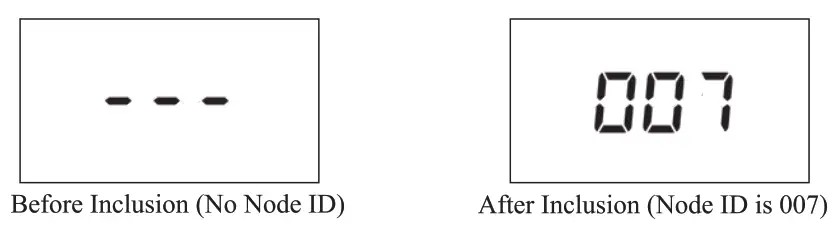
In a normal working interface, press & hold S4 to enter interface for inclusion or exclusion of-Wave network. Before the device is included in the network,”– will display on the screen. Then press S4 once, the device will enter learning mode to get a node ID. If inclusion is successful, a node ID will display on the screen in a few secondsA node ID can always inform us whether the device is in the network or not.
 Note: Follow the same steps to exclude the device from the network. When removed, the device will restore its Z-Wave factory setting.After inclusion, tum off the device and then tum it on. Now the device is ready to be operated by controller/ gateway in the Z-Wave network.
• Association Group
|
AG Identifier |
Max Node ID | Command Class |
‘Digger Situation |
| I | I | COMMAND CLASS_DEVICE RESET_LOCALLY, DEVICE_RESET LOCALLY NOTIFICATION | 255 parameter setting value 85 |
| COMMAND CLASS_SENSOR MULTILEVEL V5, SENSOR MULTILEVEL_FtEPORT_V5 | I. When parameter set to me, the amount of temperature change is greater than the parameter setting the value of No. 2, or the humidity change is greater than the parameter setting the value of No. S
2. When the parameter is set to 2, the time interval is greater than the setting value of parameter No. 4. 3. When the parameter is set to 3, the temperature change amount is greater than the parameter sets the value of No. 2, or the humidity change is greater than the parameter sets the value of No. 5, or the time interval is greater than the setting value of parameter No. 4. |
||
| COMMAND CLASS_THEFLMOSTAT MODE V2, THERMOSTAT_MODE_REPORT | Device mode change | ||
| COMMAND CLASSTHERMOSTAT OPERATING_STATE, THERMOSTAT OPERATING_STATE_REPORT | Device status change | ||
| COMMAND CLASS_THERMOSTAT SETPOINT V2, THERMOSTAT_SETPOINT_REPORT_V2 | Device mode setpoint change | ||
| 2 | 5 | COMMAND CLASS_BASIC,13ASIC_SET | Device status change |
| 3 | 5 | COMMAND CLASS_BASIC,BASIC_SET | Device status change |
• Command Class supported by the device:
| COMMAND_CLASS_ZWAVEPLUS_INFO,COMMAND_ CLASS _POWERLEVEL,COMMAND_ CLASS_ VERSION;COMMAND_CLASS_DEVICE_RESET_LOCALLY,COMMAND_ CLASS_ MANUFACTURER_ SPECIFIC,COMMAND_ CLASS_ BASIC;COMMAND_ CLASS_ THERMOSTAT_ SETPOINT;COMMAND_ CLASS_ THERMOSTAT_ MODE;COMMAND_ CLASS_ THERMOSTAT_ OPERATING_ STATE; | COMMAND_ CLASS_ SENSOR_ MULTILEVEL;COMMAND_ CLASS_ TIME,COMMAND_ CLASS_ TIME _PARAMETERS,COMMAND_CLASS_ASSOCIATION;COMMAND_ CLASS_ ASSOCIATION_ GRP INFO,COMMAND_ CLASS_ MANUFACTURER_ SPECIFICCOMMAND_CLASS_CONFIGURATION,COMMAND_ CLASS _FIRMWARE_ UPDATE_ MD_ V2, |
• Parameter Setting:
|
Number (Hex) |
Function | Size(Byte) | Description | Default (Hex) |
Possible Values(Hex) |
| 1 | Automatic Temp Scale Reporting | 1 | 0: Celsius 1:Fahrenheit2:Follow the main display | 0 | 0-2 |
| 2 | Automatic Temperature & Humidity Reporting | 1 | 0: OFF1:Report the difference value only2:Regular reporting only3:Difference reporting +Interval reporting | 3 | 0-3 |
| 3 | Automatic Temperature Difference Reporting | 2 | Base on 0.1 C unit:=N*0.1 C | 5 | 3-1000 |
| 4 | Time Interval Regularly Reporting | 2 | Base on Is unit, it suggests being set above the 30s | 30 | 10-32768 |
| 5 | Automatic Humidity Difference Reporting | I | When the detection humidity value differs from the last percentage value, reporting activated | 3 | 2-99 |
| 255 | Factory setting | 1 | 85: Restore the factory setting(write only)Z-Wave parameters setting back to the default value, association groups deleted | 0 | 85 |
In the shutdown state, long press S3+S5 synchronically can enter into the secret menu, press S4 to choose the number, and press S3 to switch among the number (code is 1234). After the screen displays 1234, then press S2 to enter the parameter setting interface. Press S4 or S5 can adjust the current parameter setting, then press S2 to switch among the Item P-value. Following are the parameters which can be set:
|
Item |
Function | Default | Range |
Remark |
| P01 | Temp. Sending Upper Limit | 37.0C (99 P) | 00993C (32-211 7 ) | Always eager the upper limit > bottom limit |
| P02 | Temp. Setting axiom Limit | SC (41 1) | 00-993C (32-211 7 | |
| P03 | Slave Address | I 96 | 1-64 12-376 | Reserved |
| PO4 | Time Room | 24 | 12/24 | ha us |
| P05 | EH Negatisw Hysteresis | liC (3 1) | 0.0-10.0C (0-18 11 ) | |
| MI Negative Hysteresis | 0.5C (IT) | 0.0-10.0C (0-151) | ||
| PO6 | EH Positive Hysteresis | 0.0C (001 ) | ao-io.oc (0-181 | |
| Wil Positive Hysteresis | DEC (IT) | 0.0-10.0C (0-151) | ||
| P07 | Ami-Freese Temperature Setting | SC (41 P) | 030C (32-86 1 ) | |
| pyg | Proration TanPerame | SEC (131 T) | 25-95 C (77-203 1 1 OFF | MH7H-Ell |
| OFF | M14711-EN-WF IS | |||
| P09 | Pont– On Stale After Power Failure | OFF | OfF/OPN/ PRO | – OFF device turn to OFF state. – OPN device turn to ON SUM. – PRIJ device mum to the last state |
| PIO | The Time Of Temperature Change | 2 | 099 | 2•305-Imin |
| P11 | Indoor Temperature Calibration | 0.0C(001) | -9.5-9.5C (-16-16 1 ) | |
| P12 | Box Volume | 3 | OF70-9 | |
| P13 | Backlit Level | 2 | 1-8/024/011 | |
| P14 | Outdoor Temperature Calibration | 0.0C(00 T ) | -93-9.SC (-16-16 T ) | |
| PIS | Control Basal On External Temperature | OFF | ON/OFF | MH7H-WH. h1117H-EN |
| ON | ON/OFF | MH7H-WH-11/T15, h1H7H-EH-WTI3 | ||
| PI6 | Display Based On External Temperature | OFF | ON/OFF | M147H-WH, h1H7H-Ell |
| ON | ONA3FF | h111711-W11.WTIE /111711.WHAT IS | ||
| P17 | Tamp. Fauna | OC | OC/OF | =0C. Celsius; =OF, Fahrenheit |
| PIS | Restore Emory Setting | Display:53 Password: 55 | 00-99 | Change 53 to 55. and pews S3 to confirm. |
| P19 | High Temp.Protection Hysteresis Swag | SC(4I 1 ) | 1-IOC (2-18T) |
 report this ad
After power failure:0 indicates the device will be in shutdown state (“OFF”) when power on again;1 indicates the device will be in the working interface when power on again;2 (default) indicates the device will stay the status before power failure when power is on again.
1-Year Limited Warranty
We warrant this product to be free from defects in material and workmanship under normal and proper use for one year from the purchase date of the original purchaser. We will, at its option, either repair or replace any part of its products that prove defective by reason of improper workmanship or materials. THIS LIMITED WARRANTY DOES NOT COVER ANY DAMAGE TO THIS PRODUCT THAT RESULTS FROM IMPROPER INSTALLATION, ACCIDENT, ABUSE, MISUSE, NATURAL DISASTER, INSUFFICIENT OR EXCESSIVE ELECTRICAL SUPPLY, ABNORMAL MECHANICAL OR ENVIRONMENTAL CONDITIONS, OR ANY UNAUTHORIZED DISASSEMBLY, REPAIR, OR MODIFICATION. This limited warranty shall not apply if: (i) the product was not used in accordance with any accompanying instructions, or (ii) the product was not used for its intended function. This limited warranty also does not apply to any product on which the original identification information has been altered, obliterated, or removed, that has not been handled or packaged correctly, that has been sold as second-hand or that has been resold contrary to Country and other applicable export regulations.
[xyz-ips snippet=”download-snippet”]