MEDION Ultra HD TV User Guide
1. Package contents
Please check your purchase to ensure that all items are included. If anything is missing, contact us within 14 days of purchase.
The following items are supplied with your product:
- Ultra HD-TV
- Remote control (RC1244) including 2 batteries (1.5 V AAA)
- YUV adaptor
- AV adaptor
- Stands including screws
- Documentation
![]() DANGER!Risk of choking and suffocation!Packaging film can be swallowed or used improperly, creating a risk of suffocation! Keep packaging material such as plastic film or plastic bags away from children.
DANGER!Risk of choking and suffocation!Packaging film can be swallowed or used improperly, creating a risk of suffocation! Keep packaging material such as plastic film or plastic bags away from children.
2. Device overview
2.1. Front
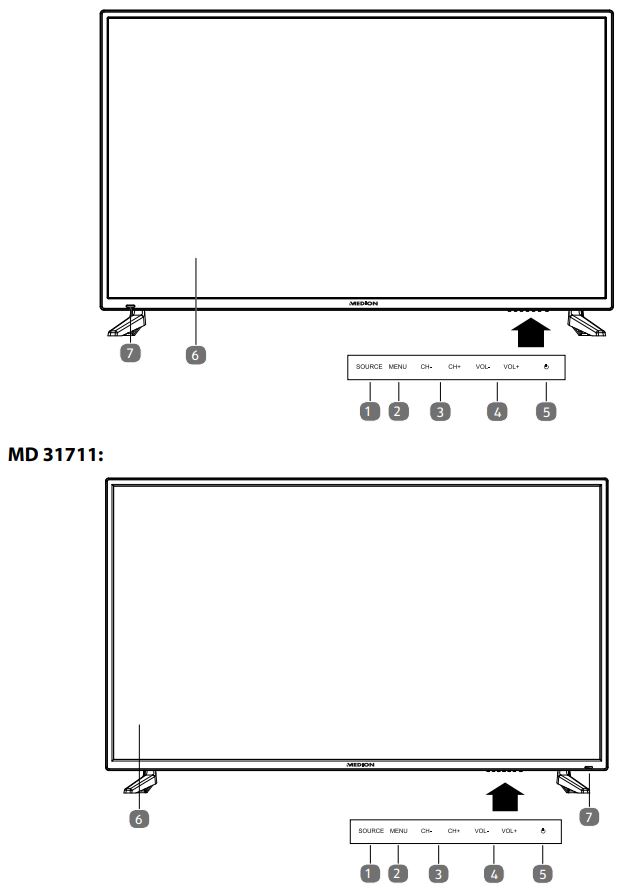
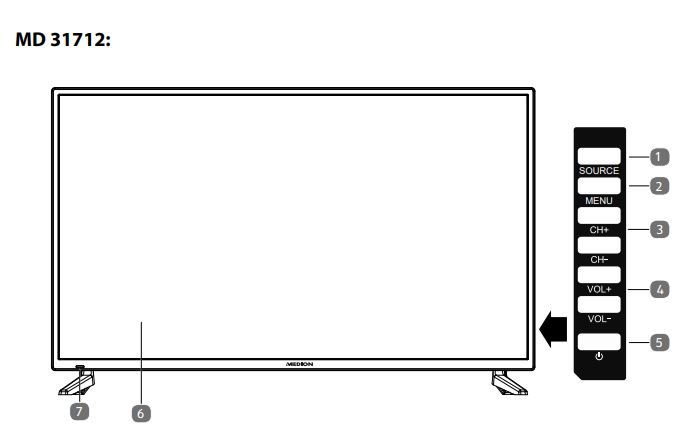
- SOURCE: Change the input source
- MENU: Call up the on-screen menu to make settings on your device
- CH+/CH: Select a program or navigate in the menu
- VOL+/VOL: Set the volume or navigate in the menu
 Standby button: Switch the device on or into standby mode
- LCD screen
- Operating light: Shines red when the device is in standby mode. Shines blue when the device is switched on.Infrared sensor: Reception field for the infrared remote control signals.
2.2. Rear

- USB2.0 DC 5V =, Max. 500mA: USB port for connecting an external storage medium for playing back media/PVR recording.
- COMMON INTERFACE (CI+): Card slot for connecting pay TV cards
- MINI YPBPR: YPBPR components input (via the supplied cinch adaptor)
- MINI AV: Audio/video input (via the supplied cinch adaptor)
- RF: Antenna connection (DVB-T/DVB-T2 HD/DVB-C/analogue)
- LNB IN DC 13V/18V= 400mA Max.: For connecting the antenna (satellite)
- HDMI3 CEC: HDMI port for devices with HDMI output (HDMI 3 can be used for CEC)
- SCART: SCART socket (input)
- HEADPHONE OUT: For connecting headphones with 3.5 mm jack
- HDMI2 ARC/CEC: HDMI port for devices with HDMI output (HDMI 2 can be used for ARC/CEC)
- HDMI1 CEC: HDMI port for devices with HDMI output (HDMI 1 can be used for CEC)
- SPDIF COAX OUT: Digital audio output (coaxial)
- Fixing holes for a wall mount1 P15010 (MD 31710): Vasa standard, hole spacing 400 x 200 mm P15511 (MD 31711): Vesa standard, hole spacing 400 x 200 mm P16512 (MD 31712): Vesa standard, hole spacing 400 x 400 mm
![]() The wall mounting of the TV device must not exceed a height of 2 m. The device need to be mounted on rigid surfaces such as cement or concrete.
The wall mounting of the TV device must not exceed a height of 2 m. The device need to be mounted on rigid surfaces such as cement or concrete.
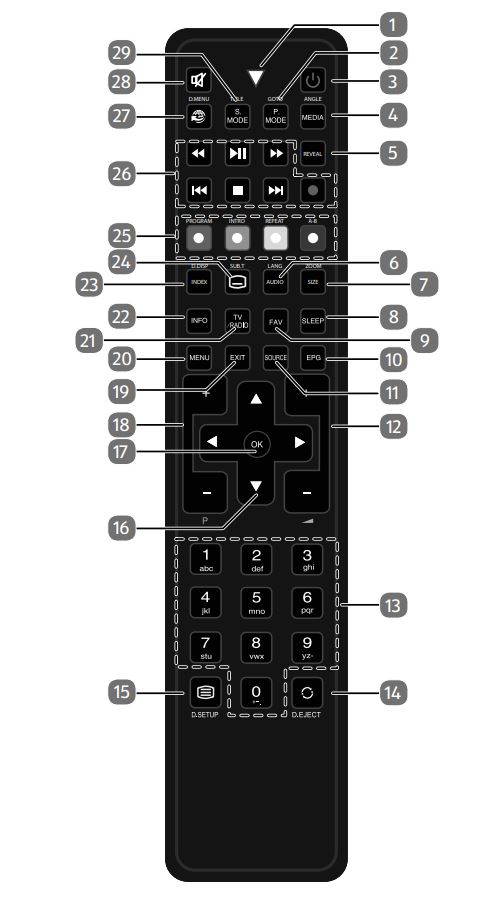
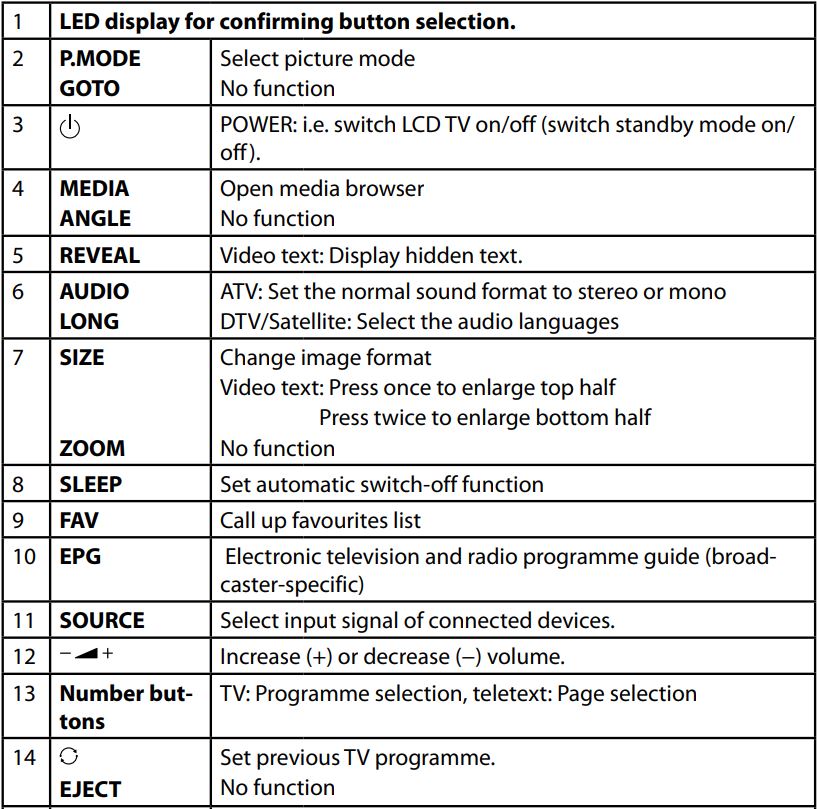
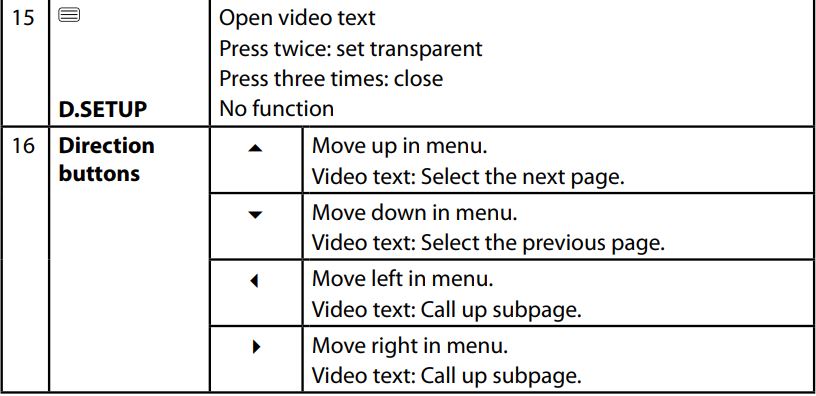
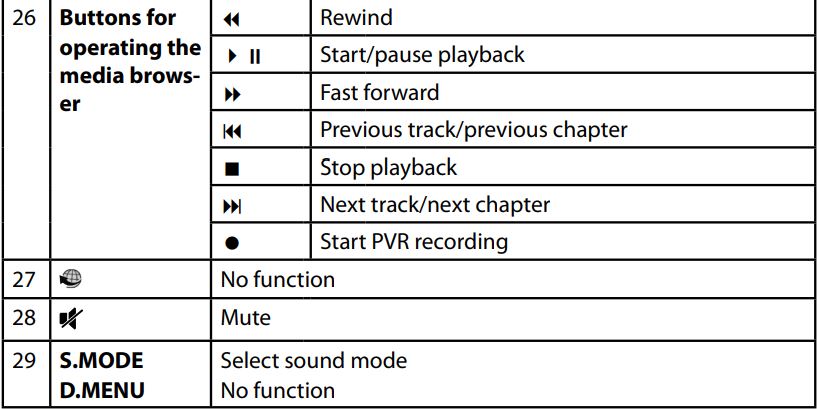
2.3. Remote control
1 Wall mount not supplied. When mounting the device, make sure that you use M6 screws. The length of the screws corresponds to the thickness of the wall mount plus 10 mm

3. Getting started
Before using for the first time, ensure you read the “Safety instructions” section.
3.1. Unpacking
- Select a suitable place for setting up the device before unpacking.
- Open the box very carefully, to avoid damaging the device. The device might get damaged if you use a knife with a long blade to open the box.
- Completely remove the packaging material.
- The box contains a number of small items (including batteries). Keep these out of the reach of children, as they represent a choking hazard.
- Store the packaging material in a safe place. Only use this box to transport the TV.
![]() DANGER!Risk of choking and suffocation!Packaging film can be swallowed or used improperly, creating a risk of suffocation! Keep packaging material such as plastic film or plastic bags away from children.
DANGER!Risk of choking and suffocation!Packaging film can be swallowed or used improperly, creating a risk of suffocation! Keep packaging material such as plastic film or plastic bags away from children.
3.2. Mounting
Attach the stand as shown in the illustration. Carry out this step before connecting the LCD TV.

3.3. Inserting the batteries in the remote control
- Remove the battery compartment cover on the back of the remote control.
- Insert two LR03 (AAA) 1.5 V batteries in the battery compartment of the remote control. Check the battery polarity (see label on the bottom of the battery compartment).
- Close the battery compartment.
![]() PLEASE NOTE!Risk of damage!
PLEASE NOTE!Risk of damage!
The remote control can be damaged by leaking batteries if not used for a long period of time!Remove the batteries from the remote control if the device is not going to be used for a long period.
3.4. Connecting the antenna
Your LCD TV supports different antenna signals. You can input the following image signals to the television through the socket labelled RF:
- Via analogue cable/an analogue house aerial
- Via a DVB-T/DVB-T22 antenna or
- Via a DVB-C1 connection
Insert the antenna cable either from the house aerial/analogue cable connection, a DVB-T antenna or the DVB-C connection in the antenna socket on the LCD TV. You also have the option of connecting a digital satellite system to the socket labelled LNB IN.Screw a coaxial antenna cable’s F connector onto the connector on the LCD TV.![]() If you want to watch encrypted channels, or subscription channels, you must use a suitable card. Insert a CAM module (available in specialist shops) in the slot provided for this purpose on the left-hand side of the device (COMMON INTERFACE). You can then insert your provider’s card in the CAM module.
If you want to watch encrypted channels, or subscription channels, you must use a suitable card. Insert a CAM module (available in specialist shops) in the slot provided for this purpose on the left-hand side of the device (COMMON INTERFACE). You can then insert your provider’s card in the CAM module.
This service must be available in your region
3.5. Common Interface (CI)
If you want to watch subscription channels, you must first register with the relevant provider. You will receive a Conditional Access Module (CAM module) and a special card from your provider after registration. You will find information about the settings in the documentation supplied with the module. Install the CI components on your television in the following way:
- First insert the CAM module in the slot on the side of the LCD TV. Then insert the card.
- Connect the television to the power supply, switch it on, and wait for a moment until the card is recognized.
![]() Please note that you can only insert or remove the CI module when the device is in STANDBY mode, or has been disconnected from the mains power. The CAM module must be inserted correctly: it cannot be inserted if it is the wrong way round. The CAM module or the television could be damaged if you attempt to insert the CAM module by force.
Please note that you can only insert or remove the CI module when the device is in STANDBY mode, or has been disconnected from the mains power. The CAM module must be inserted correctly: it cannot be inserted if it is the wrong way round. The CAM module or the television could be damaged if you attempt to insert the CAM module by force.
3.6. Connecting the power supply
Connect the mains plug on the device to an easily accessible 220 – 240 V ~ 50 Hz mains socket.
3.7. Switching the LCD TV on and off
- The device will be in standby mode as soon as you have connected the mains plug to the mains socket.
- To switch on the device, press one of these– on the remote control: The Standby/On button .– On the device: The button.
- Use the Standby/On button on the remote control to switch the device back into standby mode. The device will be switched off, but will continue to use power.
![]() If the device is not receiving an input signal, it will automatically switch to standby mode after five minutes. A countdown timer will be displayed on the screen until this time. This function is not available for all sources.
If the device is not receiving an input signal, it will automatically switch to standby mode after five minutes. A countdown timer will be displayed on the screen until this time. This function is not available for all sources.
3.8. Channel search after switching on for the first time
You will be guided through the FIRST TIME INSTALLATION after you switch on the device for the first time.
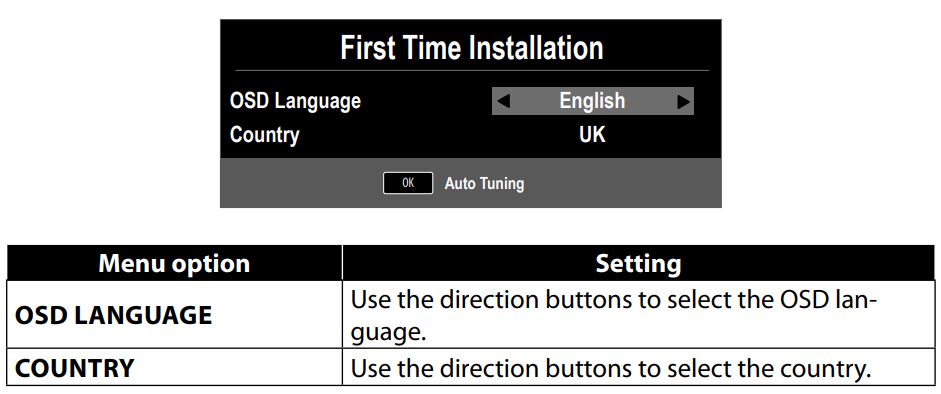
After you have configured all the settings, press OK.
3.8.1. Cable and antenna
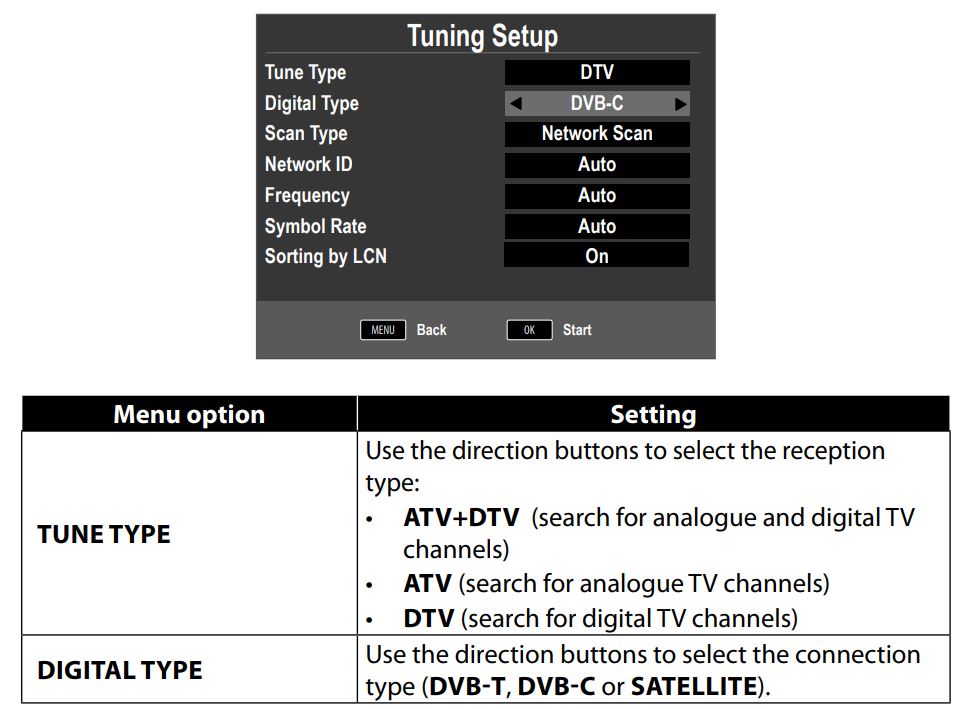

After you have configured all the settings, press OK. The channel search will then start.
3.8.2. Satellite
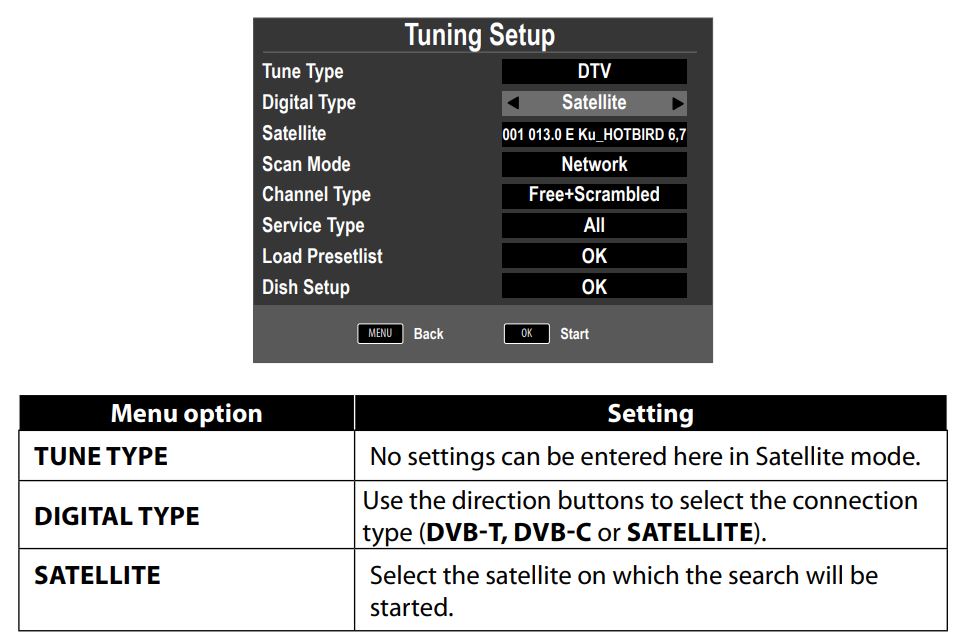
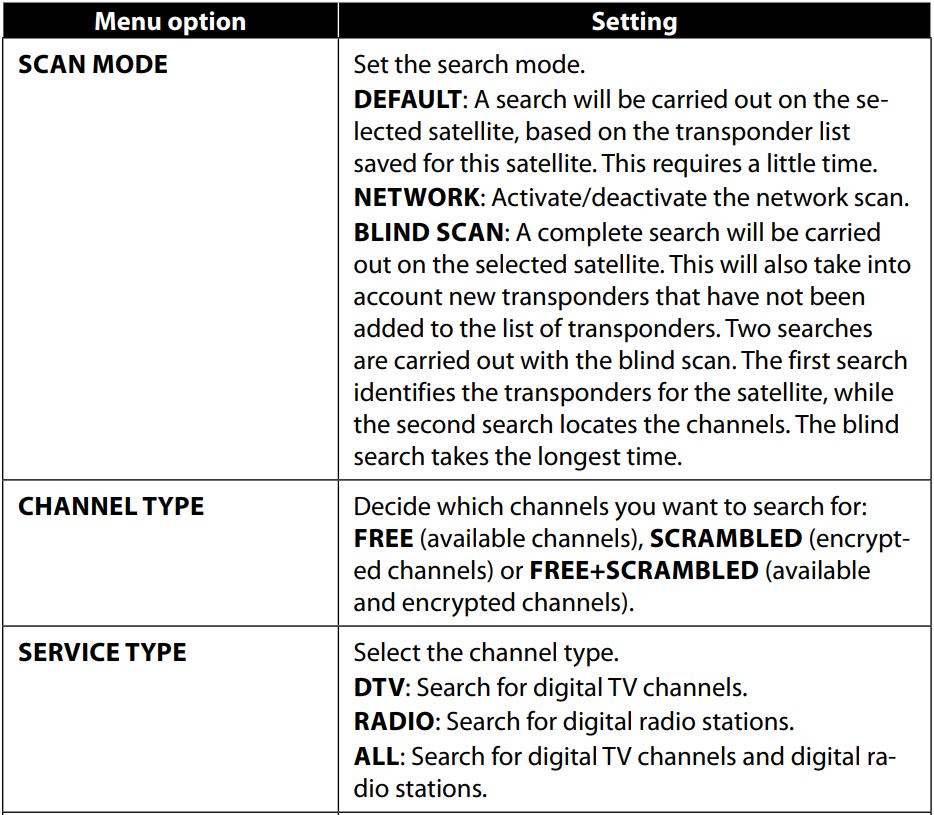

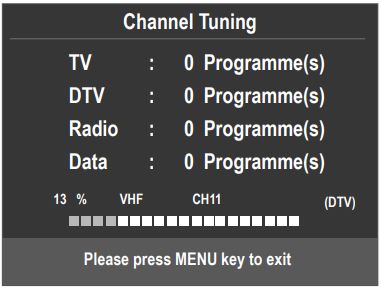
The device will now search for the different types of channels in sequence. Wait for it to finish. You can quit the search process prematurely by pressing the MENU button.
![]() The initial installation described here corresponds to the FIRST TIME IN STALLATION option in the OPTION menu.
The initial installation described here corresponds to the FIRST TIME IN STALLATION option in the OPTION menu.
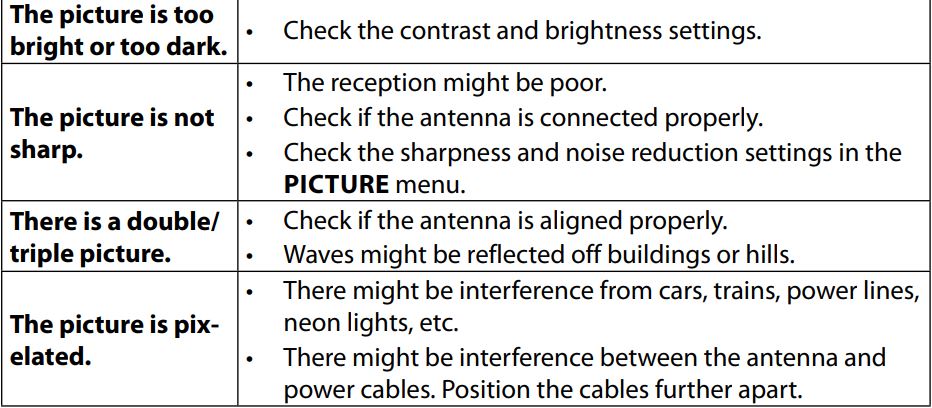
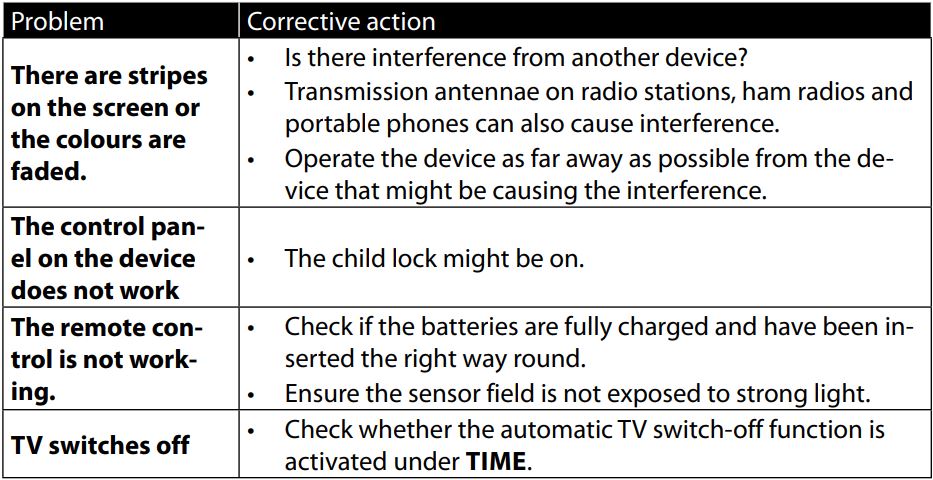
4. Troubleshooting
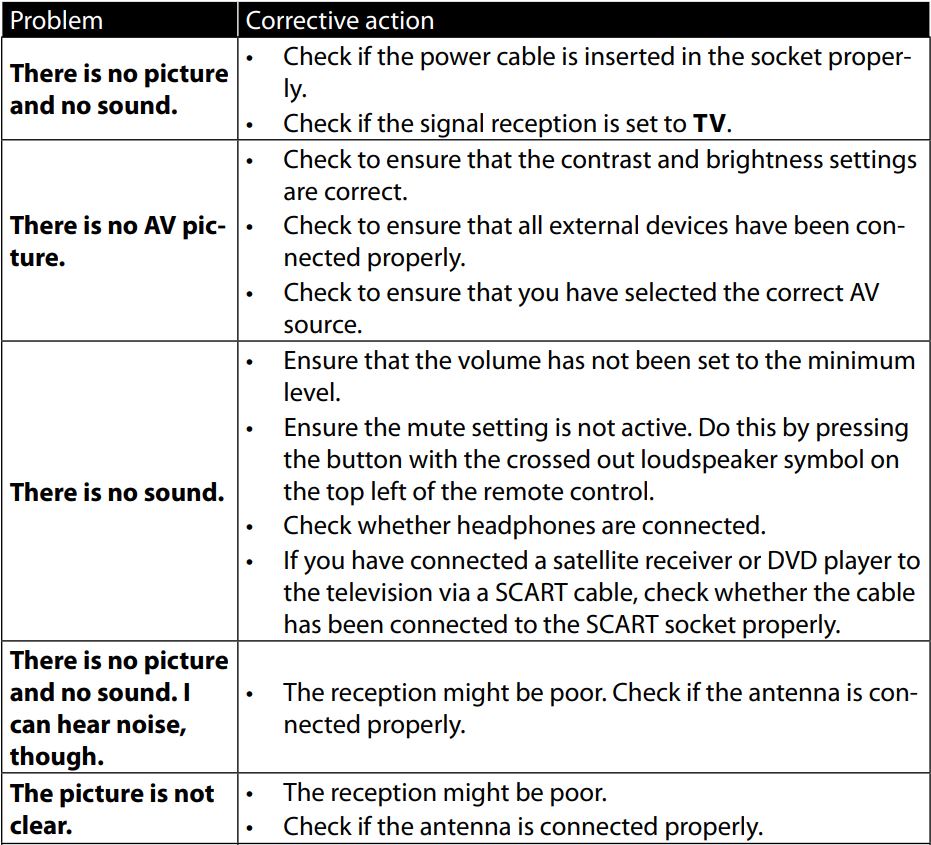
Do you need more help?If the suggestions in the previous sections did not solve your problem, please contact us. To make it easier for us to help you, please have the following information to hand:
- What external devices are connected?
- What messages appear on the screen?
- When operating the device, at which step did the problem occur?
- If you have a PC connected to the device:– How is your computer configured?– What software were you using when the problem occurred?
- What steps have you already taken to try and rectify the problem?
- Please provide us with your customer number if you have one.
5. Product data sheet
![]() Scan the QR code shown on the energy label to download the product data sheet.
Scan the QR code shown on the energy label to download the product data sheet.
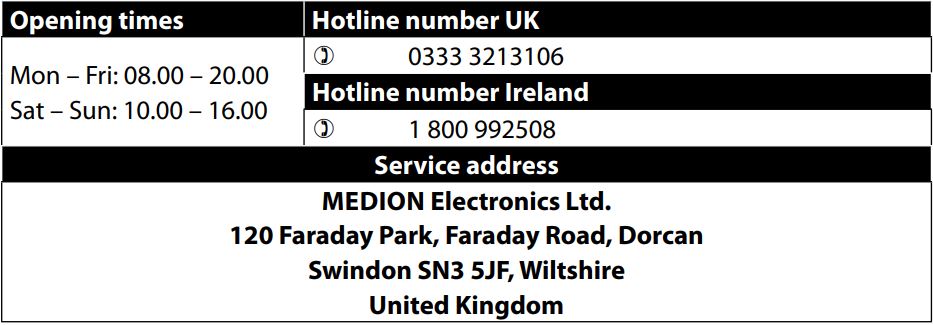
6. Service information
Please contact our Customer Service team if your device ever stops working the way you want or expect it to. There are several ways for you to contact us:
- In our Service Community, you can meet other users, as well as our staff, and you can exchange your experiences and pass on your knowledge there. You will find our Service Community at http://community.medion.com.
- Alternatively, use our contact form at www.medion.com/contact.
- You can also contact our Service team via our hotline or by post.
 You can download this and many other sets of operating instructions from our service portal at www.medion.com/gb/service/start/.You will also find drivers and other software for a wide range of devices there.You can also scan the QR code on the side of the screen, to download the operating instructions onto your mobile device from the service portal.
7. Legal notice & operating instructions download
Copyright © 2021Date: 26. February 2021All rights reserved.These operating instructions are protected by copyright. Mechanical, electronic and any other forms of reproduction are prohibited without the written permission of the manufacturer. Copyright is owned by the company:
Medion AGAm Zehnthof 7745307 EssenGermany
Subject to technical and optical changes as well as printing errors. The operating instructions can be downloaded from the service portal.![]() On the service portal, use the device’s MSN device to look for the associated instructions. You will find the MSN on the device’s type plate or in the “Product Data Sheet” section.
On the service portal, use the device’s MSN device to look for the associated instructions. You will find the MSN on the device’s type plate or in the “Product Data Sheet” section.
[xyz-ips snippet=”download-snippet”]