
![]()
 Model2953Wca
THANK YOU FOR CHOOSING MEDITUB WALK-IN BATTUBS®
Our mission is to help you maintain independence over essential bathing needs and improve the quality of life! Meditub Walk-Inbathtubs® has designed the most accessible, most comfortable walk-in bathtub on the market today! Until recently, if you have difficulty getting in and out of a bathtub, it was almost impossible for you to take a bath. Meditub Walk-In bathtubs®specializes in accessibility and security. Safe transfers in and out of the bathtub are the most critical part of bathing safely. Meditub Walk-Inbathtubs® is committed to providing a complete bathing experience for the elderly and mobility-impaired.THANK YOU FOR YOUR PURCHASE!
PRODUCT REGISTRATION*
* To ensure that your warranty is registered with Meditub Walk-In Bathtubs™, complete, sign, and return this registration card within 30 days of the purchase.NOTE: Your warranty will not be recognized by Meditub Walk-In Bathtubs™ unless this card is fully completed and returned to: Meditub Walk-In Bathtubs™ – 5701 NW 35th Ave, Miami, FL 33142IMPORTANTTo ensure that your warranty is registered and confined with the manufacturer, please take a few moments to complete, sign and return the Product Registration Card (below) Wahl) 30 days.WARRANTY CONFIRMATIONBy returning this Product Registration Card we confirm the date of purchase for your new product This confirmation will allow Ifietlitub Walk-In Bathtubs”‘ to process any warranty claims.PURCHASE REGISTRATIONThe situation provided on the Product Registration Card (found on page 23) will be kept on file with MEDITUB WALK-IN BATHTUBS“‘ as an official Purchase Registration. The completed card should be mailed to :
MEDITUB WALK-IN BATHTUBS5701 NW 35 AvenueMiami, FL 33142Phone 866-633-4882Fax 866-560-1060infoemeditub.comhttp://www.meditub.com
SAVE THIS MANUAL
SAVE THIS MANUAL!
GENERAL INFORMATIONREAD THESE INSTRUCTIONS COMPLETELY BEFORE INSTALLING THE PRODUCTS. FAILURE TO DO SO COULD RESULT IN AN IMPROPER INSTALLATION AND COULD VOID THE WARRANTY.RESPONSIBILITY OF THE INSTALLERTHE INSTALLER MUST INSPECT AND WATER-TEST THE PRODUCT PRIOR TO INSTALLATION TO ENSURE THE UNIT IS FREE OF DEFECT OR DAMAGE. IN THE EVENT OF A PROBLEM, THE UNIT MUST NOT BE INSTALLED. IF THE CRATE OR THE PRODUCT HAS BEEN DAMAGED DURING SHIPPING, PLEASE CALL US IMMEDIATELY.THIS PRODUCT MUST BE INSTALLED BY A LICENSED/CERTIFIED CONTRACTORLICENSED PLUMBERS AND ELECTRICIANS SHOULD BE EMPLOYED TO ENSURE PROPER INSTALLATION. INSTALLERS ASSUME ALL LIABILITY FOR THE CORRECT INSTALLATION PROCEDURES. ONLY ACCESSORIES AUTHORIZED BY THE MANUFACTURER SHOULD BE USED WITH THIS PRODUCT.IMPORTANT SAFETY INSTRUCTIONSWARNING! WHEN USING THIS PRODUCT, BASIC PRECAUTIONS SHOULD ALWAYS BE FOLLOWED. READ AND FOLLOW ALL INSTRUCTIONS PERTAINING TO THE RISK OF FIRE, ELECTRICAL SHOCK, AND/ OR OTHER INJURIES.
UNPACKING
UNPACKING THE UNIT
INSPECTING THE PACKAGINGInspect the carton. If any damages are noted, photograph the damaged area(s) and notify the deliverer/carrier.LIFTING / TRANSPORTINGNever lift the walk-in bathtub by the plumbing. Doing so may result in damaging the plumbing and causing a leak.INSPECTING THE UNITImmediately inspect the unit for damage even if there is no carton damage. Once the unit is installed surface damages will be assumed to be installation-related if not reported at this point.PLACING THE UNITPlease note that an installer(s) assumes full liability for damages to the walk-in bathtub after the unit is installed in the “cradle”/ niche.
SAFETY
PRE-INSTALLATION*
* All Walk-In Bath Tubs are 100% water tested at the factory certified to be free of leaks. Transportation and mishandling may cause leaks. It is necessary to test the bathtub while there is access to all sides of the bathtub.READ AND FOLLOW ALL INSTRUCTIONS
- Place the tub on a completely flat surface in an area where it may be drained after testing.
- Close the drain and fill the tub until it is above the highest jet. If it’s a soaker fill up to normal water height level.
- Allow the water to stand in the tub for 30 minutes and then inspect all plumbing and seals for leaks.
- If the tub is jetted, supply electricity to the unit and run for 10 minutes and inspect for leaks. Inspect the unions around the pump; if leaks persist from the unions after tightening; loosen the unions and ensure the O-ring is seated properly.
NOTE: IF THE PUMPS DO NOT OPERATE, CHECK THE BREAKER TO ENSURE POWER IS ON AND THE CABLE CONNECTING THE CONTROLS TO THE PUMP IS ATTACHED.WARNING! DO NOT RUN ANY PUMPS UNLESS THE TUB IS FILLED WITH WATER TO THE PROPER LEVEL. DAMAGE DUE TO DRY RUNNING PUMPS IS NOT COVERED UNDER WARRANTY. FAILURE TO PERFORM THESE TESTS BEFORE INSTALLATION WILL MAKE THE INSTALLER LIABLE FOR FUTURE REPAIR COSTS.
OPERATING INSTRUCTIONS
INSTALLATION PREPARATION
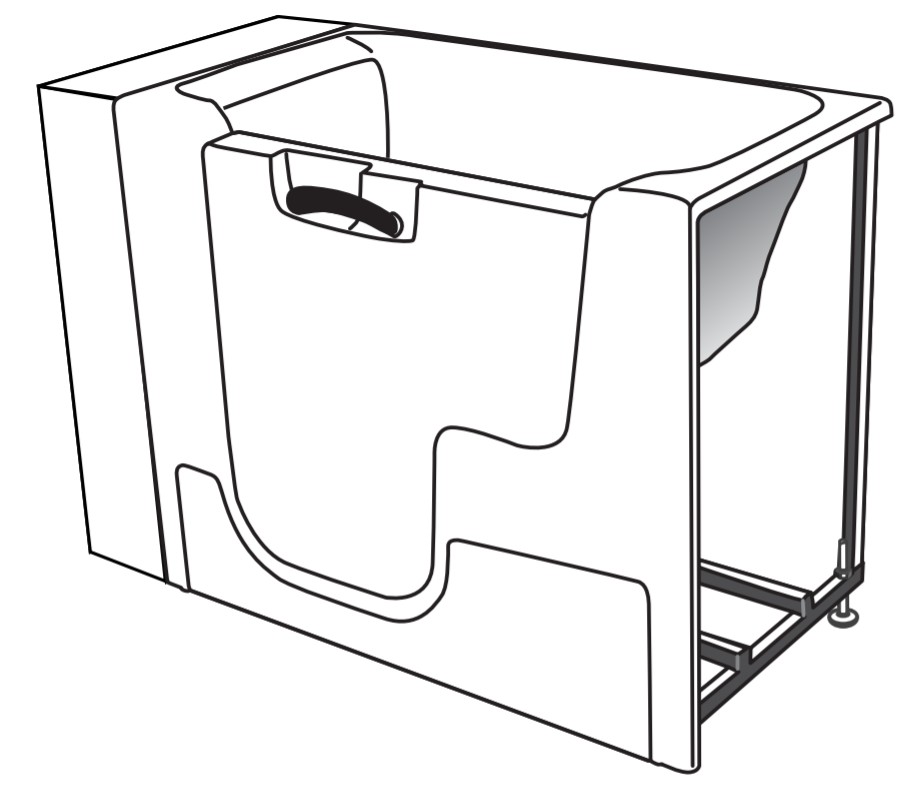
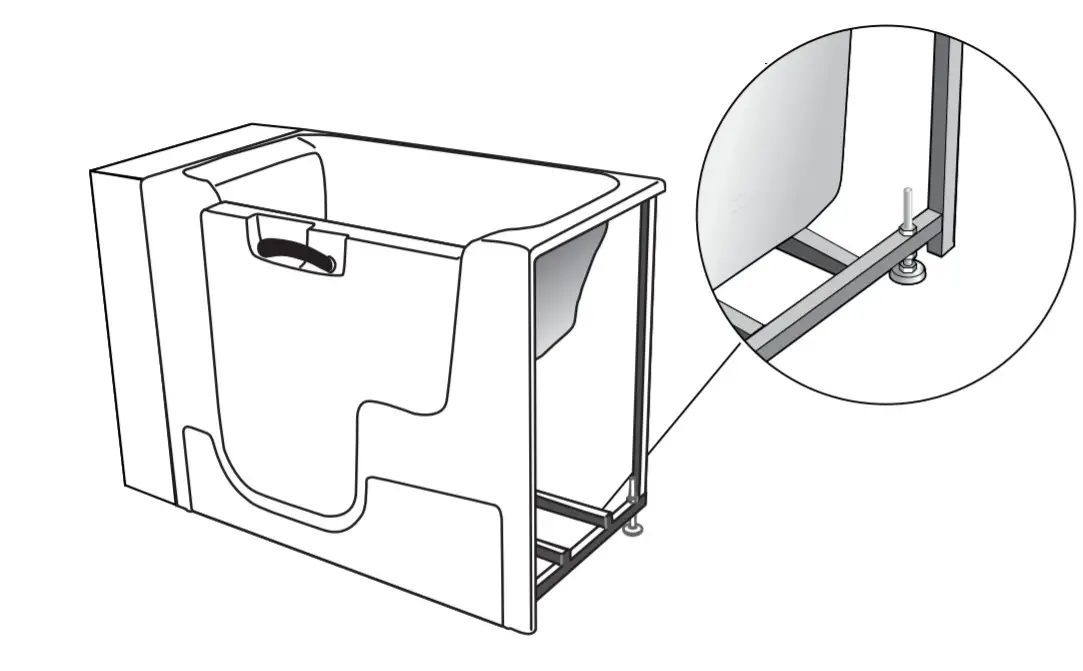
- Check the floor area where the tub is to be installed.• a. Clean area of any debris or trash.• b. Use a 5 or 6-foot level and determine if the floor is level. If the floor is not level, adjust all 5 leveling feet to perfectly level the tub.• NOTE: IT IS IMPORTANT THAT ALL LEVELING FEET ARE COMPLETELY TOUCHING THE FLOOR AND LEVEL FOR THE DOOR SYSTEM TO WORK PROPERLY.
- Check to ensure that the drain piping has been “roughed-in” at the proper location.

- Ensure that the proper electrical service has been installed at the pump location. See electrical requirements in the manual (on the following page).
ELECTRICAL PREPARATION
All electrical wiring must be installed in accordance with the National Electrical Code and with all local codes. All wiring shall be done by a qualified electrician. Run one, two, or three branch circuits (as required) from the main electrical service panel to the pump area of the framing structure to provide power to the unit.Electrical components have specific wiring requirements. Refer to the matrix below for the electrical supply requirements for the jet massage bathtub and factory-installed components.Branch circuits must be rated for 110 120 volts. Use 12 Gauge, 3 conductor cables for the circuits. If the long run exceeds 100 feet check with local codes for requirements. Install moisture-proof junction box(s) 6″ above the floor at the pump end of the framing for each circuit.NOTE: DO NOT INSTALL THE JUNCTION BOX(S) WHERE IT CAN BE REACHED WHILE SITTING OR STANDING IN THE TUB OR TOUCHING THE FAUCETS.AUTO DRAIN, LIGHTS, WHIRLPOOL, AIR SPA, COMBO & HEATER ELECTRICAL REQUIREMENTSThis section lists the factory-installed components of the Jet Massage and/or Air Massage Systems.
|
Systems |
Electrical RatinCircuit 1 |
DedicatedCircuit |
| Soaker w / Auto Drain™ | 15 Amp GFCI | |
| Soaker w / Light | 15 Amp GFCI | |
| Soaker w / Auto Drain™ w / Light | 15 Amp GFCI | |
| Jet Massage Or Air Massage | 15 Amp GFCI | |
| Jet Massage Or Air Massage w / Light | 15 Amp GFCI | |
| Jet Massage Or Air Massage w/ Auto Drain™ | 15 Amp GFCI | |
| Jet Massage Or Air Massage w/ Light & Auto Drain™ | 15 Amp GFCI | |
| Jet Massage & Air Massage (Dual) | 20 Amp GFCI | |
| Jet Massage & Air Massage (Dual) w/ Light | 20 Amp GFCI | |
| Jet Massage & Air Massage (Dual) w/ Auto Drain™ | 20 Amp GFCI | |
| Jet Massage & Air Massage (Dual) w/ Light & Auto Drain™ | 20 Amp GFCI | |
| Whirlpool Inline Heater – Dedicated 15 Amp Circuit | 15 Amp GFCI |
All electrical connections must be carried out by a certified electrician in accordance with local electrical requirements and codes.
INSTALLATION PROCEDURES
WARNING! WHEN INSTALLING A JET MASSAGE BATH, THE FOLLOWING BASIC PRECAUTIONS SHOULD BE FOLLOWED.DANGER! RISK OF ELECTRIC SHOCK. CONNECT ONLY TO SEPARATE CIRCUITS PROTECTED BY A GROUND FAULT CIRCUIT INTERRUPTER (GFCI) ON PLUG-IN UNITS.NOTE: INSTALLATION MUST PROVIDE ACCESS FOR SERVICING PUMP/MOTOR (ALL TUBS COME WITH AN ACCESS PANEL FOR THE PUMP/MOTOR).GENERAL GUIDE-THROUGH
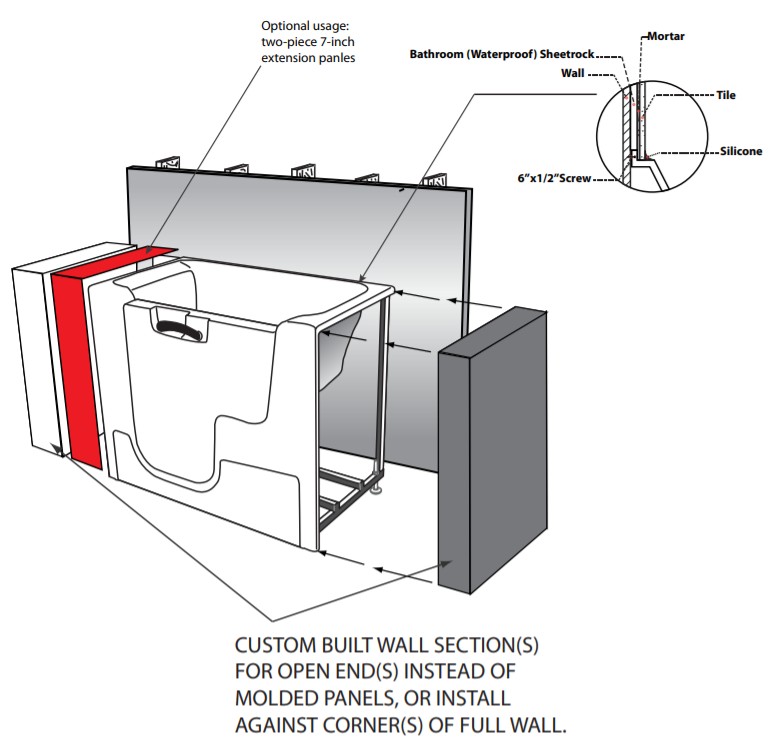
- Install tub waste/overflow according to instructions (see page 10).
- Standard installation – After framing is complete (see attached diagrams), set the product in place to make certain that the tub can be properly leveled. (Caution: If a walk-in bathtub is not resting on all leveling feet, water will not drain properly and may cause the door to leak) (see page 7).
- Verify the product’s level by checking the tub’s deck surface and ensure all leveling feet are touching the ground (see page 7). ·
- The electrical connection is made pre-instruction on specified models.
- After plumbing and electrical connections have been made, the tub should be cleaned of dirt and debris.
- Installation is not complete until the tub has been tested in place.
OPERATING INSTRUCTIONS
DRAIN CONNECTION
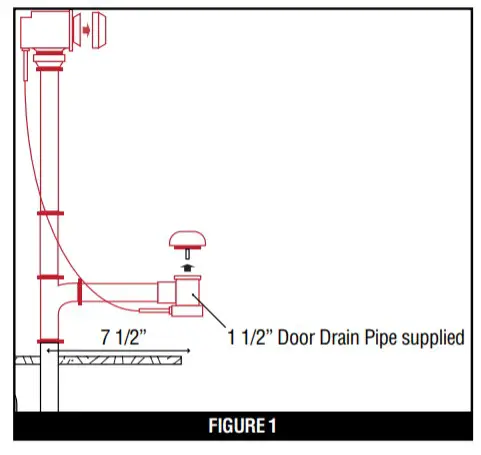
To ensure safe transit for your walk-in tub, the overflow drain components are not connected to the unit during the process of production. The following in- instructions are provided for installation purposes: Your walk-in tub is supplied with a 1 ½” drain pipe overflow. The open and close valve with the turn knob should be attached to the unit at the 1 ½” pre-drilled opening in the wall of the unit from the outside. The opposite end of the overflow should be attached to a 7 1/2″ 1 1/2″ Door Drain Pipe supplied the 1 ½” pre-drilled opening in the footwell of the unit from the underside. The FIGURE 1 chrome turn knob and the drain cover should be attached to the appropriate ends of the overflow drain from the inside of the unit. Place the chrome cap with stem into the floor drain to close off the opening. The cable attached to the turn knob of the overflow is also connected to a lever inside the floor drain which allows the drain to be opened or closed. Once the components of the overflow are secured into place, turn the overflow knob to the open and closed position to ensure proper function. The cap and stem will move up and down, opening and closing the drain (Figure 1).

Your walk-in tub also has a door drain to remove excess water from the door after each use. From the underside of the unit, a hose is connected to the door drain with a check valve. This hose and valve are to provide a one-way flow from the door drain to the main drain pipe. The check valve will constrict the water flow away from the door. Insert the opposite end of the hose into the port on the main drain. Be sure the port is open before attaching the hose. Secure the hose with clamps or ties. Once Incorrect FIGURE 2 the hose is in place, close the door on the unit, place the handle in the locked posi-Correct tion, and fill a tub with at least 12″ of water to test the connection. Once the completion of the drain components are installed and have been tested for proper function, the unit can be leveled and give a final water test before the installation of the unit (Figure 2).
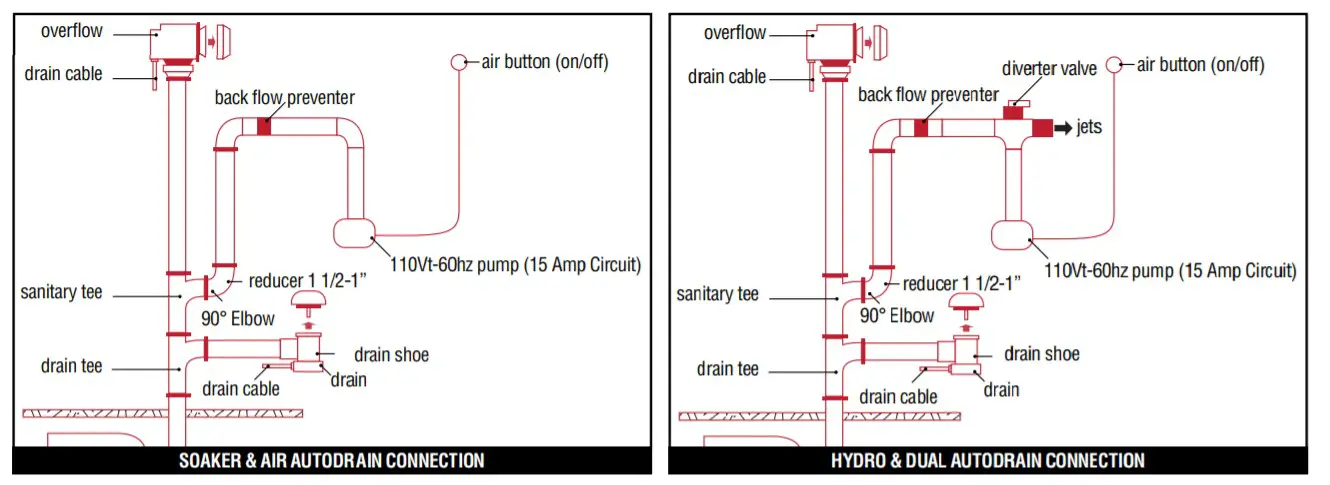
CONNECTING THE AUTO DRAIN
HIGH-SPEED AUTO DRAIN FOR SOAKING TUB AND/OR AIR SYSTEM
- Drain System requires the connection to a minimum 1 ½ sanitary drain line.
- Use UPC Approved PVC Glue, primer, and Schedule 40 1 ½ ‘ pipe.
- Do not change or modify the location and or piping of the Back Flow Preventer.
- The sanitary tee is installed directly above the drain tee with clearance not greater than 1”.
- Dry fit the drain overflow assembly to the sanitary drainage pipe and check for proper fit.
- Glue the High-Speed Auto drain Fittings, pipe, and drain overflow assembly to the sanitary drainage pipe.
NOTE: WATER-TIGHT INSTALLATION OF THE WASTE/ OVERFLOW IS THE INSTALLER’S RESPONSIBILITY. DRAIN LEAKAGE ISEXCLUDED FROM MEDITUB WARRANTY OF THIS PRODUCT.
NOTE: WE HAVE TAKEN RESPONSIBLE PRECAUTIONS TO ENSURE THE HIGH-SPEED AUTO DRAIN IS SUITABLE FOR RESIDENTIAL PLUMBING. IT IS THE RESPONSIBILITY OF THE INSTALLER TO ENSURE THE SANITARY SYSTEM IS ACCEPTABLE FOR THE USE OF THE HIGH-SPEED AUTO DRAIN. WE DO NOT ACCEPT RESPONSIBILITY FOR DAMAGE ARISING FROM THE USE OF THE HIGH-SPEED AUTODRAIN.**-Ensure compliance with local plumbing codes.
OPERATING INSTRUCTIONS
ASSEMBLY & PLACEMENTVerify access to the unit’s system from one of the side enclosures
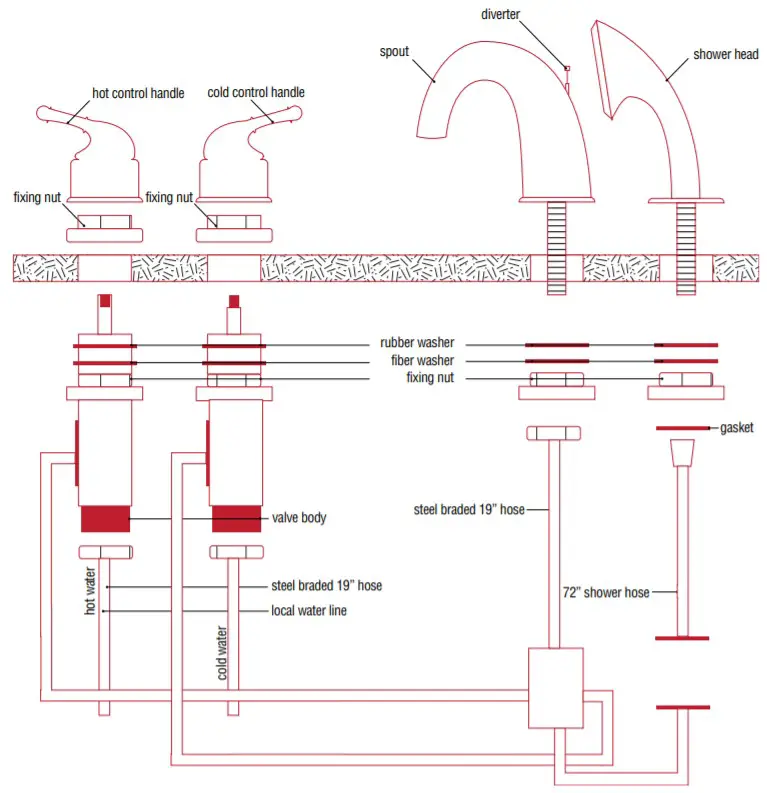
FAUCET INSTALLATION
OPERATING SAFETY INSTRUCTIONS
INSTRUCTIONS PERTAINING TO RISK OF FIRE, ELECTRICAL SHOCK, OR INJURY TO PERSON WARNING! RISK OF PERSONAL INJURY:
- Use this unit for its intended use as described in this manual. DO NOT use attachments not recommended by the manufacturer.
- To avoid injury, exercise caution when entering or exiting your walk-in tub.
- To reduce the risk of injury, do not permit children or persons with infirmities to use this product unless they are closelysupervised at all times.
- The maximum recommended temperature is 102 F° (38.8 C °). Fifteen minutes per soak is the recommended maximum time at 102 F°, which may induce Hyperthermia which is an increase in body temperature. This can be a serious medical condition and all bath users are cautioned against lengthy immersion at high water temperatures. Should you become light-headed, dizzy, or nauseous, immediately get out of the bath and cool off.
- Risk of electric shock; do not permit electric appliances (such as a hairdryer, lamp, telephone, radio, or television) within four feet of this bathtub. · Never drop or insert any objects into any openings.
- Do not operate this unit without the guard over the suction fittings.
WARNING! RISK OF HYPERTHERMIA AND POSSIBLE DROWNING. People using medications, herbal remedies, sleep aids, and /or having adverse medical history should consult a physician before using this product.WARNING! NO FOOD OR ALCOHOLIC BEVERAGES. Use of your bathtub immediately after meals is not recommended. Avoid alcohol consumption before or during bathing. Alcoholic beverages can cause drowsiness or hyperthermia resulting in loss of consciousness or even drowning.The unit must be connected only to a supply circuit that is protected by a ground-fault circuit-interrupter (GFCI). Such a GFCI should be provided by the installer and should be tested on a routine basis. To test the GFCI, push the test button. The GFCI should interrupt power. Push the reset button. Power should be restored. If the GFCI fails to operate in this manner, there may be a ground current flowing, indicating the possibility of an electric shock. Do not use this massage bathtub. Disconnect the jet massage bathtub and have the problem corrected by a qualified service representative before using it.To reduce the risk of electrical shock, the dedicated electrical supply circuit(s) must be grounded. To do this, connect the third leg of the 3-conductor wiring cable to the grounding terminal of the electrical service panel and run continuously to the green grounding screw on the GFCI or electrical receptacle in the wiring compartment.
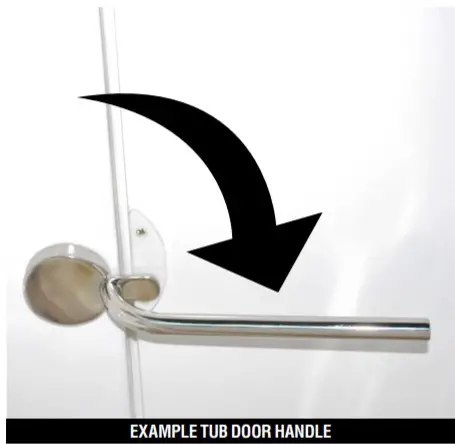 When entering a Meditub walk-in tub, be sure to close the door, placing the handle in the down position.Before activating any of the jetting controls, you must first fill the bath to a water level at least 2 inches above the highest jet placement. Do not put weight on the door when entering and exiting the tub. It is recommended to leave the door in an open position when the tub is not in use.The pump is operated by the hydro control button, which starts the water flow.The blower is operated by the air control button which starts the airflow (see page 18)Adjust the direction and rate of flow of the jets by moving the nozzle for direction. Turn either the outside ring or the nozzle clockwise or counterclockwise for flow (some jets adjust the flow with the outside ring and some with the nozzle). Adjust the air pressure flow of all water jets by using the air volume control (see page 18), which controls the air-water mixture.Meditub walk-in tubs equipped with the chromotherapy lights (ordered separately) feature a dedicated on/off switch. Pressing the switch off and back on will change the color of the light (see page 18).PURGE CYCLEAll air blowers are equipped with a purge cycle to remove residual water from the lines. The cycle will begin approximately 30 minutes after the unit is turned off and will continue for 1 – 2 minutes.WARNING: DO NOT PUSH THE BUTTON ONCE THE CYCLE BEGINS. DOING SO WILL CAUSETHE BLOWER IS TO RESTART ONCE THE PURGE CYCLE ENDS.IN-LINE HEATERSIf your bathtub is equipped with an in-line heater, it will operate only when the pump is on.NOTE: THE IN-LINE HEATER IS DESIGNED TO KEEP YOUR WATER WARMER LONGER, BUT IS NOT DESIGNED TO INCREASE THE WATER TEMPERATURE. HEAT SETTINGS ARE NOT ADJUSTABLE.
TUB CONTROLS

- HYDRO CONTROL (PUMP)Used to turn the water jets ON and OFF.
- AIR CONTROL (BLOWER)Used to control the air jets on the system. 1st Press: Blower starts at MAX speed 2nd Press: Blower at MED speed 3rd Press: Blower at MIN speed 4th Press: Blower turns OFF
- CHROMO CONTROL (LIGHT)Used to turn the chromotherapy lights ON and OFF. Pressing the button repeatedly will cycle through different color modes.
- AIR PRESSURE CONTROLUsed to increase or decrease air pressure flowing through the water jets.
- AROMA CONTAINERUnscrew to place or replace the aroma canister.
- AROMA CANISTERPlaced inside the aroma container. Check frequently and replace as needed.
CLEANING AND MAINTENANCE
Pump and pipe circulation systems should be flushed before first use and on a monthly basis when the product is under normal use.Below are the recommended procedures for cleaning:
- Do not run whirlpool dry. Fill the tub with hot water 2-3 inches above the jets and add 2-3 teaspoons of low foaming detergent such as dishwashing machine detergent
- Turn on the whirlpool system and run for 10 minutes
- Drain tub completely
- Fill the tub with cold water above jets
- Turn on the whirlpool system and run for 15 minutes
- Drain tub completely
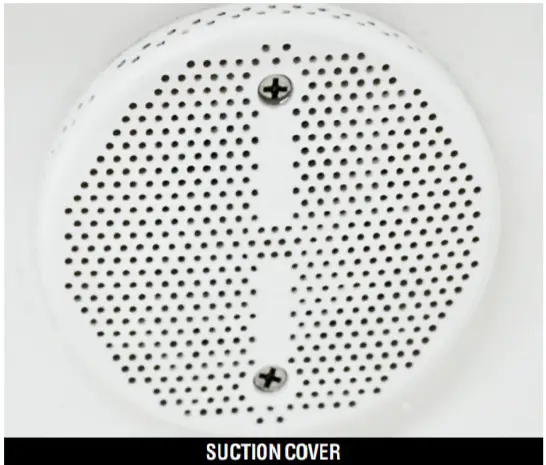
- Cleaning the suction cover: Clean and remove any hair or lint from the suction cover (see image below). On a monthly basis, unscrew the suction cover and clean away any hair, lint, or debris from the cover and housing, then remount the cover in place. Some suctions are not designed to be removed; only suctions that have screws on the cover, visible from the inside of the tub, can be removed.
WARNING! NEVER OPERATE THE UNIT WITH THE SAFETY SUCTION COVER OFF.
WARRANTY
This 10-year bathtub warranty is extended to the first user, to be free from defects in workmanship and material under normal use and conditions, for a period of 10 years from the date of the original purchase. This warranty relates to the bathtub shell, frame, and finish. The finish’s warranty does not apply to fading, cracking, delaminating or blistering due to excessive wear, sun fading or scouring due to cleaning. Different warranty periods apply. The tub and all its components including motors, electronic controls, waste and overflow, fittings, and all plated finishes are covered by a limited one-year warranty, subject to verification of the defect or malfunction. All labor and repair-related services are covered within the first 90 days of purchase. This warranty is non-transferable and applies only to the original owner as stated on the original purchase order. Notification must be sent via certified mail to 5701 NW 35 Avenue Miami, FL 33142. The manufacturer will not be responsible for any water damage to any structures or any property for any reason (including but not limited to manufacturer defects or improper installation). The manufacturer will assume no responsibility for the loss of the system, inconvenience due to loss, damage to real or personal property, or any other consequential damage. The manufacturer will not be liable for any incidental expenses or material charges in connection with the removal or replacement of the purchased part or any part or parts of the system. This warranty shall not apply to any type of failure resulting from negligence, abuse, misuse, misapplication, improper installation, alteration or modification, chemical corrosion, or improper maintenance. Every walk-in tub must be installed by a licensed plumber, electrician, and/or contractor; Failure to do so will hereby void the warranty. There will be a charge for replacement parts or the replacement of the entire electrical unit if the defective unit is returned for any of the reasons listed above.NOTE: WITHIN THE LIMITED ONE-YEAR WARRANTY, THERE WILL BE A PRORATED CHARGE FOR ANY ELECTRICAL AND PLATED REPLACEMENTS PARTS, INCLUDING SHIPPING AND HANDLING CHARGES. The manufacturer reserves the sole authority to make any type of warranty changes at any time. The manufacturer will not be responsible for any warranty information that is being misrepresented by outside sources including dealers, retailers, distributors, or contractors. The manufacturer does not warranty the installation, plumbing, or electrical-related connections, of any of our products including Walk-In Baths, shower pans, or shower stalls. Improper or negligent installation of the product or other components, alterations, or medications to the system, may cause the product or the system to malfunction. Such problems are not covered by a warranty. The manufacturer warrants the door seal for the life of the unit under normal use and conditions. This warranty shall not apply to any failure resulting from negligence, abuse, misuse, misapplication, alteration, or medication, or improper maintenance. The replacement door seal will be issued to the end-user and it will be the responsibility of the end-user to determine the means of installation. The manufacturer will not be liable for any incidental expenses or material charges in connection with the removal or replacement of the door seal.NOTE: TO THE EXTEND PERMITTED BY LAW, ALL IMPLIED WARRANTIES INCLUDING THOSE OF MERCHANTABILITY AND FITNESS FOR A PARTICULAR PURPOSE ARE HEREBY DISCLAIMED. Meditub Walk-In Bathtubs AND SELLER HEREBY DISCLAIM ANY LIABILITY FOR SPECIAL, INCIDENTAL, OR CONSEQUENTIAL DAMAGES.Some states/provinces do not allow limitations on how long an implied warranty lasts, or the exclusion or limitation of special, incidental, or consequential damages, so these limitations and exclusions may not apply to you. This warranty gives you specific legal rights. You may have other rights, which vary by state/province. All lawsuits must be filed in Florida. Tub units are for residential use only.
RETURN POLICYMeditub Walk-In Bathtubs® is committed to providing premium customer service. In the event that a product must be returned due to reasons other than defects, as mentioned in the warranty, the following procedures apply:Requests for returns and/or exchanges must be made within 30 days of receipt of the product. The product must be in its original packaging and received at Meditub Walk-In Bathtubs® in saleable condition. All returns will receive a 15% restocking fee plus all freight costs of the original shipment and return shipment to Meditub Walk-In Bathtubs®.All requests for return must first be approved by Meditub Walk-In Bathtubs® and have an assigned Returned Merchandise Authorization number (RMA#).
PRODUCT REGISTRATION
PRODUCT REGISTRATION CARD
The completed card should be cut out or copied, completed, and mailed to:MEDITUB WALK-IN BATHTUBS5701 NW 35 AvenueMiami, FL 33142Meditub Walk-In Bathtubs™ Product Registration CardName ………………………………….. AddressCity ……………………………………….. State ……………………… Zip ………………………… Phone……………….Date of Purchase……………………. Dealer ………………….. Address……………….Installed by …………………………….. Address …………………State……………….Phone ……………………………………… State……………………… Zip……………….I have read the Meditub Walk-In Bathtubs™ Owner’s Manual carefully and understand and agree that any installation, operation, or maintenance of the walk-in bathtub must be done strictly in accordance with instructions and guidelines contained in the Meditub Walk-In Bathtubs™ owner’s manual and installation guide.Signature____________Date____________
References
[xyz-ips snippet=”download-snippet”]