
![]()
QUICK START GUIDEAUTOMATIC DIGITAL BLOODPRESSURE MONITOR
PLEASE READ BEFORE USING UNIT
Please watch the following User Video on your computer by typing in the link https://www.medline.com/go/MDS4001
![]() MDS4001
MDS4001
HELPFUL TIPS
- Genetics, age, sex, altitude, physical activity, stress, muscular development, certain medications, or even time of day can influence blood pressure.
- Avoid continuous readings – Wait for a minimum of 1 to 1.5 minutes between readings to allow blood flow in the arm to return to normal. At least 15 minutes between blood pressure measurements is ideal.
- Home blood pressure measurement may vary as much as 10-20 points from ones taken at your doctor’s office.
GETTING STARTED
Setting Date and Time
- Make sure that the unit is powered off
- Press and hold the SET button for 5 seconds until the year begins to flash, then release.
- Press the MEM button repeatedly until the desired year is displayed.
- Then press the SET button to set the correct month. The month value will begin to flash. Press the MEM button repeatedly until the correct day is displayed.
- Press the SET button to now set the day. The day value will begin to flash. Repeatedly press the MEM button until the correct day has been selected.
- Then press the SET button to set the time. The hour value will begin to flash. Press the MEM button repeatedly until the desired hour has been selected. Please note that time can only be set in Military time (hours 0-24). For example, a time of 1:00 PM would be 13:00.
- Press the SET button to change the minute value. The minute value will begin to flash. Repeatedly press the MEM button until the desired minute value has been selected.
- Press the SET button to exit the date and time setting adjustment.
See the enclosed Manual for further details and instructions.The cuff plugs in on the LEFT side of the machine. The port on the RIGHT is for use with an A/C adapter (sold separately).
IMPORTANT!You can stop the inflation or deflation of the cuff at any time by pressing the START button.Please read the Manual for this monitor prior to using it. If you have any questions or are experiencing difficulties, please call the Medline Service Center at 1-800-MEDLINE (1-800-633-5463). RL17CN1
CUFF PLACEMENT
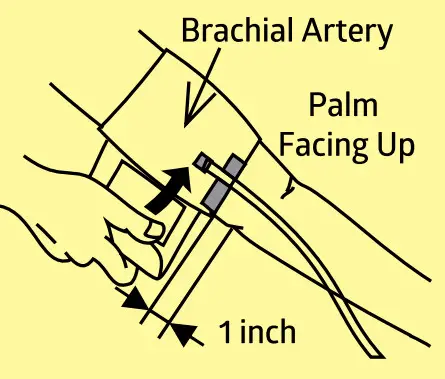
- Place cuff on your left arm at the same level as your heart, about 1-2 centimeters above the elbow joint.
- Position the tube in the middle of your arm, in line with your middle finger.
- The cuff should be snug but comfortable.
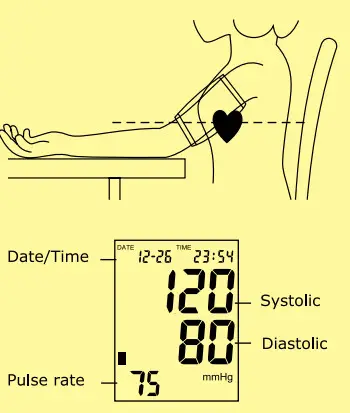
BODY PLACEMENT FOR MEASUREMENT
- Seated – Place arm, palm-up, on a flat surface. Feet flat on the floor. Cuff level with the heart.
Press START/STOP to turn the monitor on. After the display shows “00”, blood pressure measurement will begin automatically. To turn off the monitor when the measurement is complete, press START again or wait 1 minute for automatic shutoff.
TIPS FOR TAKING YOUR BLOOD PRESSURE
| 1. The right size cuff should not feel too loose or tight. Place cuff on arm with the tubing lined up with your middle finger. | 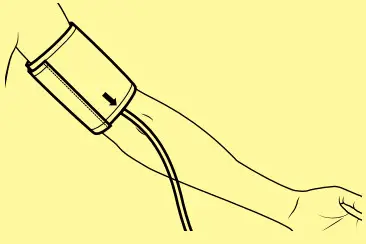 |
| 2. Secure the cuff snugly with hook & loop closures, allowing room for no more than two fingers. | 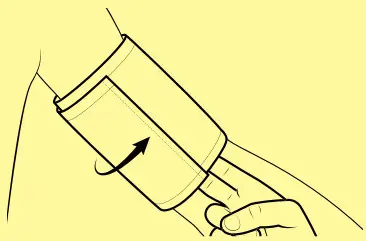 |
| 3. Sit quietly for five minutes before testing. Support the back and let feet rest on floor, keeping legs uncrossed. | 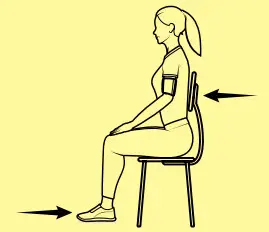 |
| 4. Keep the arm and body still and avoid talking during the measurement process. |  |
| 5. Keep the arm being tested at heart level and let the other arm relax in a comfortable position. | 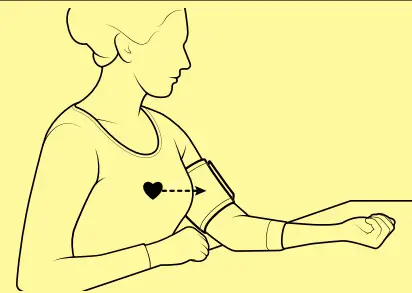 |
[xyz-ips snippet=”download-snippet”]