VDB720P-V2Smart Wi-Fi HD Video DoorbellItem ref: 350.026UKUser Manual
Bring safety and security to your home with a wireless video doorbell. Our new and improved version features a smaller unit size and sleek, glossy finish, providing the ideal, smart addition to your home security. Answer the door, wherever you are, by receiving crystal clear images and enabling 2-way audio straight to your smart device via the App. The handy motion detector feature sends alerts to your device when someone’s near the front door. For additional security, day and night mode automatically switches, and images are clearly visible even in darkness. With a quick and convenient setup, install the App and connect the doorbell to your home Wi-Fi network in minutes, and be assured with the confidence of knowing who’s at the door, whether you’re at home or out.
Features:
- New improved version with a sleek appearance and smaller unit size
- HD Video: Receive and record crystal clear images directly to your smart device
- Two-Way Audio: Answer the door wherever you are, then see and converse with your visitors directly from your smart device
- Night Vision Mode: Automatically enabled in the hours of darkness
- Motion Detection: Sends alerts to your smart device when someone is in close the proximity of the unit
- Quick and Easy Setup: Connects to your 2.4Ghz home Wi-Fi network in minutes
- Easy to use app compatible with iOS and Android devices
- Comes complete with rechargeable batteries and a wall fixing kit
Specifications:
| Video resolution | 1280 x 720 |
| Viewing angle | 166° |
| Audio format | Two-way audio with noise-canceling |
| Transmission frequency | IEEE 802 11 begin (2.4Ghz only) |
| Storage capacity | Up to 32GB SD card (not supplied) |
| IP rating | IP55 |
| Batteries | 2x 18650 batteries (total 4000mAh) |
| Power consumption | 200uA in standby, 170mA in use |
| Dimensions | 134 x 52 x 34mm |
| Weight | 122g (without batteries) |
Pack contents:
1pc Smart video doorbell2pcs 18650 Rechargeable batteries3pcs Electric door lock connecting wires (NO/NC door locks only)1pc Wall fixing kit including self-adhesive pad, screws and wall plugs User manual.
Unit features:
| 1. PIR2. Camera3. IR LED4. MIC | 5. Call button6. Indicator7. Speaker |
 report this ad
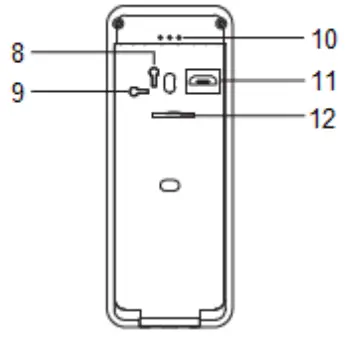
| 8. Reset button9. Tamper switch10. NO NC COM | 11. Micro USB12. SD card slot |
Installation guide:
- Disconnect the mounting plate from the main unit by sliding the unit upwards while holding the plate.
- Using the fixing screws and plugs provided, fix the plate to the wall in the desired location. Alternatively, use the self-adhesive pad provided if fixing to a PVC doorframe.NOTE: It is advisable to test the video quality of the doorbell before installation to ensure it’s receiving a strong enough signal from your wireless network.
- To insert the rechargeable batteries into the main unit, slide the silver cover at the bottom of the unit downwards to reveal the battery compartment cover. Remove the cover and insert the 2 batteries into the 2 compartments ensuring they are in the correct direction.
- Press the reset button (8) for around 5 seconds until the indicator LEDs (6) blink slowly in blue to show that the unit is ready to use.
- Replace the 2 covers, slot the main unit back into the mounting plate and fix securely with the security screw provided.
- If connecting to a NO or NC door lock use the connecting wires supplied in the box and connect to the terminals (10) on the back of the unit.
Device Setup:
- To pair the doorbell with your smart device you first need to install the App. To find the app you can either search for “XSH Cam” in the relevant App store or scan the following QR codes straight into your smart device:
 https://play.google.com/store/apps/details?id=cn.ubia.xshcamhttps://itunes.apple.com/cn/app/xsh-cam/id1343116797?mt=8http://maxapro.com/xshcam.apk
 - Before you start, ensure that your smart device is connected to a 2.4GHz Wi-Fi network.NOTE: This device won’t work on faster 5Ghz networks!
- Launch the XSH Cam App on your smart device and tap the “Add a device” button, followed by “Setup device”.
- Power up the smart doorbell and you should hear a voice prompt saying the device is ready to begin pairing. If you don’t hear this prompt, press and hold the reset button (8) on the back of the unit for around 5 seconds to reset the device. Once in pairing mode, the LED indicator on the front of the doorbell will flash blue.
- The App will automatically connect to the same Wi-Fi network as your smart device and fill in the name. Enter the correct password for your wireless network and press the “Next” button at the bottom of the screen.
- Your smart device will now begin searching for the doorbell. To ensure they connect with each other, make sure they are within a 30cm distance and that the volume on your smart device is raised to an audible level so that you can hear the pairing tone (see right).
- Once paired you will see the confirmation screen where you need to enter a name for your device (if necessary) and password (of at least 8 characters). Select Non-Chinese Mainland at the bottom and press the “Finish” button.
- Setup is now complete, and the doorbell will appear as a new device on the top of your device list. To view a live feed at any time, press the small screen within your device list (see right).
- With live feed running you can enter the features and settings of the camera by clicking on the settings button on the bottom right-hand corner. This now gives you the option to amend and adjust various settings on the device to suit your environment including; poor light, PIR detection level, and whether you want to record video and images to an internal SD card (not supplied).
- Also, in this section is a share QR code, which when selected can be sent to other family and friends who also want to share the doorbell video feed.
Wi-Fi Doorbell Features:
- There are control buttons on the live video screen to assist you in recording, muting, zooming, and making live voice calls, please see the diagram below for full information.
- When a visitor presses the doorbell, a chime sound will be heard on all connected smart devices and a notification message will appear on the screens. To view your visitor either press the notification directly or open the App and press anywhere on the live video feed screen (3).
- To hold a conversation with your visitor, press the Live speech button (5). You can also record video footage of the conversation and your visitors’ movements by pressing the Video record button (6).
- To view the video feed in full-screen mode, rotate your smart device into the landscape position. Zoom in and out by using the pinching method on the screen, commonly used on most touch screen devices.
- The doorbell is fitted with a PIR sensor that detects movements around the unit and sends you an audible and visible notification when triggered. The sensitivity of this can be adjusted in the settings screen. There are 4 options to choose from: Disabled, which turns off the PIR function; Low, which only sends a notification after 7 seconds of continued movements near the unit; Medium, sends a notification after 4 seconds of movement and High, which sends a notification after only 1-2 seconds of movement. When using an internal SD card with the doorbell, the PIR alert function will also begin recording live video for around 30 seconds directly to the unit when triggered.Note: When using in a busy or crowded location, it is recommended to disable the PIR function to avoid continuous alerts.
Cloud Storage:
- With the device in a sleep state when either the PIR is triggered or the doorbell is pressed, the device will automatically upload 8 seconds of video to the storage cloud. Each device can record 20 events per day and provide a week of loop recording space and Traffic for users.
- To first enable and then view the cloud storage, in the settings menu choose SD Card then turn on the Cloud video toggle switch (circled above). Once enabled the Switch icon at the bottom of the videoscreen becomes the “Cloud Storage” button and can be pressed to view all recordings. These will be in a list view unless you press the calendar icon at the top to change to the calendar view (circled above).
Useful Reminders:
- The device is powered by 2 x 18650 rechargeable lithium batteries. When fully charged, they will provide the unit with up to 6 months of usage (av. 10 calls each day of 30-sec duration). When the batteries are running low on power (5% or below) a warning message will appear on all connected smart devices. At this point, recharge the batteries as soon as possible to avoid the unit powering down and providing no protection.
- Try to keep the doorbell in good reach of your wireless router’s coverage and try to avoid any blockages by thick walls, ceilings, and doors. Permanent mounting of the device should only be undertaken once a video stream has been viewed and confirmed of acceptable quality.
- This device is a low-power, intelligent product that supports remote wake-up from connected devices, PIR human detection, and activation by doorbell press. After any ofthese functions, the unit will only remain in a live state for a maximum of 30 seconds, before returning to its resting standby state.
- Never connect the doorbell to an AC 220V mains power supply otherwise, it will damage the circuitry of the device.
- There is also an additional plug-in chime available (350.030UK), which can be connected to the same network as the doorbell and smart devices. The chime will be triggered when the doorbell press is activated and can be useful if there are no connected smart devices within the environment at any time.
Troubleshooting:
| The smart devices won’t connect to the doorbell | Ensure both devices are within 30cm of each other. Ensure you are using a 2.4Ghz network.Ensure the volume level on your smart device is audible. |
| No audio on a smart device | Ensure the volume is turned up.Ensure the voice mute button isn’t selected. |
| PIR detection is being triggered too often | Ensure the PIR on the doorbell is clean and free of obstructions.Adjust the sensitivity of the PIR in the settings mode to suit the environment. |
| PIR detection isn’t working | Ensure the PIR on the doorbell is clean and free of obstructions.Ensure the PIR settings on your device are set to the correct level. |
| My visitor cannot hear me outside, but I can hear them | Ensure you have pressed the 2-way talk button on your smart device. |
| The video feed quality is poor or lagging | Ensure the doorbell is located within a reasonable distance to your wireless router. Check your smart device has a good data connection. |
Warnings:
- For reasons of electrical safety never clean the unit with water or other liquids or immerse in water. Always clean the lens of the camera and unit with a dry and soft lint-free cloth.
- Try to keep the unit out of direct sunlight and as much as possible away from heavy rainfall and moisture.
- Please do not use this device if you find that it is damaged in any way.
- Do not attempt to repair this device or take it apart under any circumstances, as this will invalidate your warranty.
 This product is classed as Electrical or Electronic equipment and should not be disposed of with other household or commercial waste at the end of its useful life. The goods must be disposed of according to your local council guidelines.Errors and omissions excepted.Copyright© 2020 AVSL Group Ltd.350.026UK User Manual
[xyz-ips snippet=”download-snippet”]