
Merece Wireless Weather Statiom User Manual

PACKING LIST
1 X Temperature Transmitter1 X Temperature Station1 X Adaptor 1X USB Cable1 X User Manual
PART 1 : Functions and Specitications
- Time display: 12hr/24hr
- Calendar (date, week, year:2000-2050)
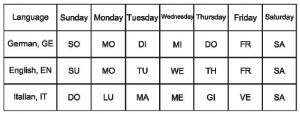
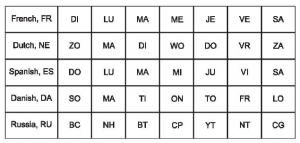
- Day of week in 8 languages (English, German, French, Spanish, Italian, Dutch, Danish, Russian)
- Dual alarm settings
- Snooze (5-30 minutes)
- Weather forecast and Moon Phase
- Comfort Level indicate function
- Indoor thermometer (0 C to 50 C or 32 F to 122 F )
- Indoor hygrometer (20% to 95%)
- RF outdoor thermometer (-20°C to +70°C or -4 F to 158 F )
- RF outdoor hygrometer (20% to 95%)
- Accuracy for hygro-thermometer: ±1 C / ±5%
- )Operation frequency: Receiver is 32.768KHz ; Transmitter is 32.768KHz
- Temperature Transmitter Transmission frequency: 433MHz
- Max support channels: 3 channels
- Lower battery display function
- Transmitter battery: AAA x 2(Excluded)
- Local machine battery: AAAX3 (Excluded) or AC 5V adaptor (Excluded)
- Indoor and outdoor Temperature and humidity checking interval: every 30 seconds
- Outdoor Temperature and humidity reception: every 60 seconds
- The valid distance for the transmitter and local machine is 50M.
- Transmitter Senso waterproof level: IP 54 ( Dust-protected and splash-proof)
NOTE:
- The weather station will keep light up when power by the adaptor.
- .1f the weather station only device with battery but not device with adaptor, the weather station will still work but not light unless you press SNZ key)
PART 2 SETTING UP
- (Please read this carefully before you use the weather/temperature station.) 1.First install the batteries into the Temperature Station (see “How to install and replace batteries In the Temperature Station” below). And connect the AC 5V adaptor and supply power. CI Once the batteries are in place, all segments of the LCD will light up briefly and a short signal tone will sound. Then the indoor temperature, Time: 0: 00: 00 with 24hrs; Date: 1/1,2004, Thu. Then at channel 1, the weather is slightly cloudy, the moon is semi-circle. It will detect the temperature, humidity, automatically. 0 Then the second is flashing, means the product is working, after that enter RF receiving mode for 3 minutes. © If the indoor temperature is not displayed after a few seconds, remove the batter-ies and wait for at least 10 seconds before reinserting them. Once the indoor data is displayed proceed to step 2.
- Second, Within 3 minutes of activating the Temperature Station, place the batteries into the Temperature Transmitter (see “How to install the batteries and select the channels of Temperature Transmitter’ below). Temperature Transmitter” below).
- Third, Click “CH” to choose the corresponding transmitter channel you want. ( make sure the Transmitter is working ) After inserting the batteries into the transmitter, the Temperature Station will start receiving transmissions from the transmitter. The outdoor temperature should be displayed on the Temperature Station_ If this does not happen within 15 minutes, the batteries will need to be removed from both units and reset from step 1_
- Fourth, The temperature station can take up to 3 remote transmitters. Please Ensure that you leave 10 seconds between each transmitter channel setting / receiving. The Temperature Station will show the corresponding transmitter channel you settled in the transmitter. Please make sure you have choose different channels for each remote transmitters.
- Fifth, Testing period: When all the transmitters are set up, there Is a testing period, during which the display switches quickly between all the received transmitters at random, according to which random transmission it receives. Pressing any key will stop this process and the display will show the temperature for the first transmit-ter. The process also stops automatically if no keys are pressed for a few minutes.
PART 3: The Outdoor Temperature Transmitter
IMPORTANT: The temperature is measured and transmitted to the Temperature Station approximately every 60 seconds. (1)The range of the Temperature Transmitter may be affected by the temperature. At cold temperatures the transmitting distance may be decreased. Please bear this in mind when positioning the transmitter. Also the batteries may be reduced in power. (2)You can put the outdoor transmitter in garage, on outdoor wall or window or indoor living room or in garden. The valid distance for the transmitter and receiver is up to 50M in an open area.
Remote transmission of outdoor temperature by 433MHz
- Support attached to wall or placed on the table. – Transmission frequency: 433Hz
- Transmission range: 50m in opening area – IP54 waterproof for using on outdoor wall/window or indoor, in garage, living room or in the garden. – Accuracy for Temperature: ±0.1 t / ±1%
- Accuracy for hygrometer ±1 C / ±5%
2.Tran:smitler LCD display details
Note:when battery symbol show on the LCD , it means need to change battery.3.Ttransmitter Key function guide for transmitter “TEST” — at normal mode, press” TEST” can send the current data to the receiver one time. “`C/°F” — Press “C/F” key to change the C or T . “CHtf,2,3″— There are three channels: CH1, CH2, CH3, you can set any one as you
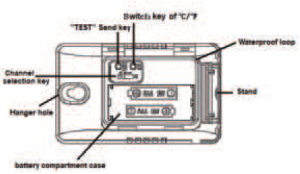
4.How to install the batteries and select the channels of Temperature Transmitter A.Install the batteries:(uses 2 x AAA, IEC LR03, 1.5V batteries)
- Remove the cover.(Please open the battery compartment cover from the right side, as above picture.)
- Insert the batteries, observing the correct polarity (see marking).

B.CHANNELS SETTING
- After insert the battery, select the channel you need. (If there are more than 1 pc transmitter, please choose the different channel. )
- Closed the battery compartment cover and lock again.
Note: In the event of changing batteries in any of the units, all units need to be reset by following the setting up procedures. This is because a random security code is assigned by the transmitter at start-up and this code must be received and stored by the Tempera-ture station in the first 3 minutes of power being supplied to it.
Note: In the event of changing batteries in any of the units, all units need to be reset by following the setting up procedures. This is because a random security code is assigned by the transmitter at start-up and this code must be received and stored by the Tempera-ture station in the first 3 minutes of power being supplied to it.
5.Positioning the outdoor Temperature Transmitter

The Temperature Transmitter is supplied with a holder that may be attached to a wall. It also could be placed on the table. To attach to the wall, please follow the steps below:
- Mark the wall using a pen through the holes in the holder to obtain the exact drilling position.
- Drill holes in the wall at the points marked.
- Screw holder onto wall.
6.TOGGLING AND RESETTING THE OUTDOOR RECORDINGS:
- To toggle between transmitters, press the CH key: Once to show transmitter
- Twice to show transmitter
- Three times to return to transmit-ter 1
PART 4: Weather Station/Temperature Station
How To Install and Replace Batteries in the Temperature Station Main unit: The Temperature Station uses 3 x AAA, IEC LR03, 1.5V batteries. When batteries need to be replaced, the battery symbol will appear on the LCD. To install and replace the batteries, please follow the steps below: 1.Insert finger or other solid object in the space at the bottom center of the battery com-partment and lift up to remove the cover. 2.Insert batteries observing the correct polarity (see marking). 3.Restore compartment cover.
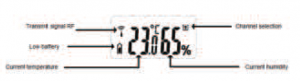
Description off ha Display Icons:
NO. |
Function |
| 1 | Date |
| 2 | Month |
| 3 | Time |
| 4 | Snooze |
| 5 | Alarm |
| 6 | Day of week |
| 7 | Outdoor temperature trend |
| 8 | Outdoor temperature |
| 9 | Outdoor temperature alert (N/A) |
| 10 | Channel signal |
| 11 | Channel |
| 12 | Outdoor humidity |
| 13 | Outdoor humidity trend |
| 14 | Weather Forecast |
| 15 | Comfortable level indicate |
| 16 | Moon phase |
| 17 | Indoor humidity trend |
| 18 | Indoor humidity |
| 19 | Indoor temperature alert (N/A) |
| 20 | Indoor temperature |
| 21 | Indoor temperature trend |
Key function guide for weather station
| MODE | Press for around 3 seconds to enter setting mode |
| UP | (1) Switch alarm ON or OFF. (2) Press for 3 seconds to change Year and Day of Week display. |
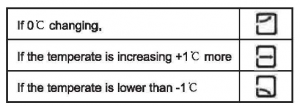
| DOWN | (2) Switch between .0 and -1? display. (3) To adjust data in any setting mode. |
| CH | (1) To switch between 3 channels for outdoor Transmitter. (2) Press for 3 seconds to remove the current outdoor data and enter receiving mode again. |
| ALM | (1) Press once to enter to Alarm 1, press twice to enter to Alarm 2 (2) Press 3 seconds to enter into alarm setting. |
| SNZ | (1) Activate the snooze function for the alarm and backlight for 5 seconds (2) Press 3 seconds to enter into snooze time setting mode. |
Note: At setting mode, if you do not touch any key for 9 seconds, it’ll back to the time mode.
FUNCTION SETTINGS:
1.Time & date setting (1)After power on or at normal mode, please hold the SET key 3 seconds and with a “BI” sound enter into time setting mode; The setting program is flashing with 1 HZ frequency. (2)First to adjust the year. Press UPIDONW key to adjust; press SET key confirm the setting. (3)The order of setting is year > month> date > eight national weekday languages >hour> minute>exit. Re: eight languages: English> German> Italian > French >Dutch > Spanish >Danish >Russia
(4) After date setting, the Week will be automatically set.(5) At normal mode, press UP key for 3 seconds to change Year and Day of Week display.(6) If you do not operate within 9 seconds, it would retum to normal mode.
2.Alarm setting
(1)At normal condition, press the ALM key once to enter Alarm 1 setting, then press and hold 3 seconds and with a “Br sound to enter the alarm 1 setting mode, press UPFDONW to adjust, and press ALM key to confirm. (2)Press ALM key again to confirm the setting and enter to Alarm 2 setting, same setting as Alarm 1. (3)At normal condition, press UP key to turn ON or OFF alarm. When alarm ON, the or will appear.
3.SNOOZE
(1) When alarm on, press “SNZ” key to active the snooze function. 5 minutes later the snooze work. (2) When snooze work, press any key to stop the snooze. (3) Press and hold “SNZ” key for 3 seconds to enter to Snooze time setting. (5-30 minutes) (4) If this product has a back light, then press “SNZ” key and the light will last for 5 seconds.
4.Thermometer and Hygrometer
(1)When power on, the temperature and humidity is the present value. (2)At standard mode, press the DOWN key to change the temperature unit: C / F .
(4) If CH temperature does not receive effective signal within 60 minutes, the CH temperature will display “—. “. When it receives the signal again, it would renew the temperature display.(5) The indoor humidity trend: A.If the humidity is lower than 40%, it is dry then ” ” appears in the right of the humidi-ty, B.If the humidity is more than 70%, it’s wet then ” 1 “1 “WET” appears. C.If the temperature is between 20°C-28°C and the humidity is between 40%-70% it shows ” “/ “GOOD”. D.If the temperature is outside 20°C-28°C and the humidity is between 40%–70%,
Comfort Index Display

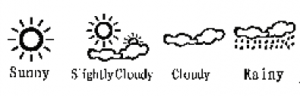
Weather forecast mode;(1) Weather forecast It would be sunny > slightly cloudy >cloudy > rainy
(2) Moon phase: Moon phase will be automatically set base on the date setting
Positioning the Temperature Station:
The Temperature station comes attached with a removable table stand, which provides the option of table standing or wall mounting the unit. Before wall mounting, please check that the outdoor temperature(s) can be received from the desired location(s).To wall mount:1. Fix a screw (not supplied) into the desired wall, leaving the head extended out the by about 5mm.2. Remove the stand from the Temperature station by pulling it away from the base and hang the station onto the screw. Remember to ensure that it locks into place before releasing.
PART 5: 433 RECEPTION CHECK
The Temperature station will receive the temperature data within 3 minutes when power on it. If the temperature data is not being received 3 minutes after setting up (the display shows “- – -“), then please check the following points: 1. The distance of the Temperature Station or transmitter should be at least 1.5 to 2 meters away from any interfering sources such as computer monitors or TV sets. 2. Avoid placing the receiver onto or in the immediate proximity of metal window frames. 3. Using other electrical products such as headphones or speakers operating on the same signal frequency (433 MHz) may prevent correct signal transmission and reception.
4. Neighbors using electrical devices operating on the 433 MHz signal frequency can also cause interference. proximity of metal window frames.Note: When the 433MHz signal is received correctly, do not re-open the battery cover of either the transmitter or Temperature Station, as the batteries may spring free from the contacts and force a false reset. Should this happen accidentally then reset all units (see Setting up 182 above) otherwise transmission problems may occur. The transmission range is around 25-50m from the transmitter to the Temperature station (in open space). However, this depends on the surrounding environment and interference levels. If no reception is possible despite the observation of these factors, all system units have to be reset (see Setting up 1842 ).
PART 6: IMPORTANT USING TIPS
(Please read carefully when operate this device)
- For better work, use dual energy supply, connect power adaptor while using the battery to supply power to the weather station. Because if the power is interrupted, all data will be lost.
- When it encounters an unexpected power outage, it takes at least an hour to get accurate temperature and humidity data. The weather forecast is +12 hours in the future. I hope you understand.
- Please do not put your wireless outside sensor in direct sunlight or rain to affect its accurate.
- When powered by batteries, to save power, backlight only lights up a few seconds(Power saving mode).Touch the “Snooze” button to wake up the backlight.
- About the alarm: When the alarm goes off, the default snooze time is 5 minutes (you can adjust the snooze time by setting). To cancel the resound, press any button on the back of the screen.
- About the alarm: When the temperature alarm sounds, you want to stop the alarm and press any key (but the corresponding temperature and alarm symbols will still flash.)
- Merece weather station comes with only 1 wireless remote sensor/Temperature Transmitter. Please make sure your indoor station is at the same channel with remote sensor.
- The weather station gets the weather from the transmitter. And one temperature station support take up to 3 remote transmitters. But please make sure you have named the transmitters in different number.
PART 7: Care and Maintenance
- Extreme temperatures, vibration and shock should be avoided as these may cause damage to the units and give inaccurate forecasts and readings.
- When cleaning the displays and casings, use a soft damp cloth only. Do not use solvents or scouring agents as they may mark the LCD and casing.
- Do not submerge the units in water. Immediately remove all low powered batteries to avoid leakage and damage. Replace only with new batteries of the recommended type. Do not expose the units to extreme and sudden temperature changes, as this may lead to rapid changes in forecasts and readings and thereby reduce their accuracy.
Read More About This Manual & Download PDF:
[xyz-ips snippet=”download-snippet”]