
METER ECRN-50 Low Resolution Rain Gauge Installation Instructions
Preparation
Inspect and verify that ECRN-50 components are intact. Installation will require a mounting pole and mounting supplies (e.g., zip ties, wire). Most accurate rain gauge measurements are obtained through installations close to the ground or plant canopy and with a wind shield around the rain gauge to minimize rainfall under-catch from wind blowing across the rain gauge intake. However, this is not always practical, especially if objects above the rain gauge could shield it from receiving representative rainfall.
Set up and test the system (sensors and data loggers) in a lab or office. Ensure the data loggers are using up-to-date firmware and software. Check the following locations for firmware and software updates:
ZL6 metergroup.com/zl6-supportOther metergroup.com/environment/articles/buy-browse-meter-legacy-data-loggers
Read the ECRN-50 specifications at metergroup.com/ecrn-50.
| Resolution | Volume Per Tip | Rainfall Per Tip |
| 1 tip | 5.0 ml/tip | 1 mm |
Installation
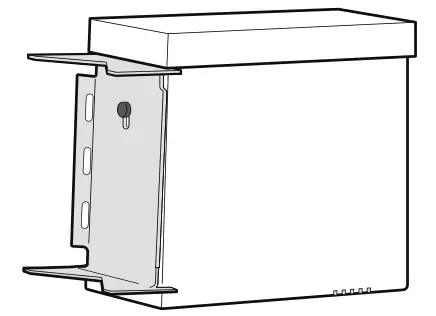
Mount the ECRN-50 so the metal back is vertical against a mounting pole at the desired height and ensure the rain gauge is level. Plug the sensor cable into the data logger. Use data logger software to apply appropriate settings to the sensors plugged into each data logger port. Gather and secure the cables to the mounting pole in one or more places to relieve strain on the connections.
METER Group, Inc. USA2365 NE Hopkins Court, Pullman, WA 99163T +1.509.332.2756 F +1.509.332.5158E [email protected] W metergroup.com
NORTH AMERICAE [email protected]T +1.509.332.5600
EUROPEE [email protected]T +49 89 12 66 52 0
References
METER Legacy Data Loggers | METER chat
ECRN-50 low resolution rain gauge | METER Environment chat
Data Logger for Research| ZL6 Advanced Cloud Data Logger | METER Environment chat
METER Legacy Data Loggers | METER chat
Data Logger for Research| ZL6 Advanced Cloud Data Logger | METER Environment chat
METER Legacy Data Loggers | METER chat
METER Legacy Data Loggers | METER chat
ECRN-50 low resolution rain gauge | METER Environment chat
[xyz-ips snippet=”download-snippet”]