Metra 95-6511 ISO DDIN radio provision
KIT FEATURES
95-6511
- ISO DDIN radio provision
- Textured
99-6511
- DIN radio provision with pocket
- ISO DIN radio provision with pocket
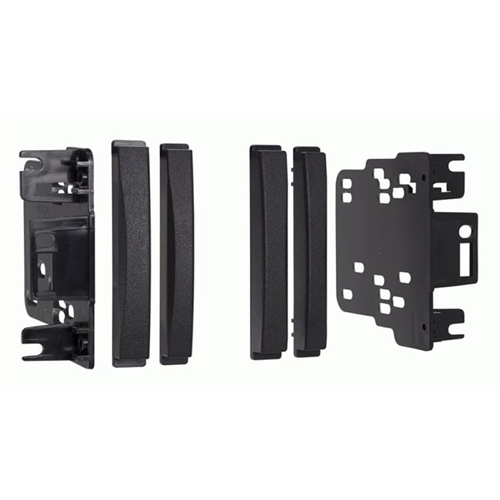
KIT COMPONENTS
95-6511
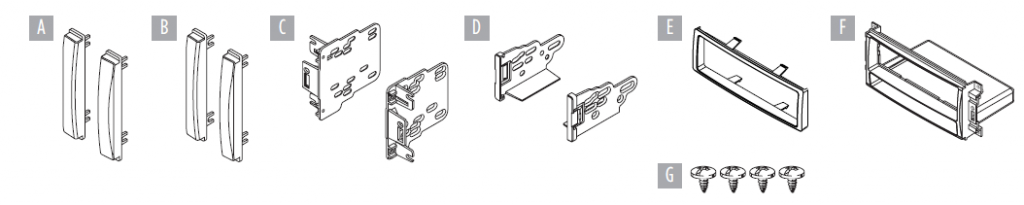
- A) “Long nose” (wide) DDIN trim panels
- B) “Short nose” (narrow) DDIN trim panels
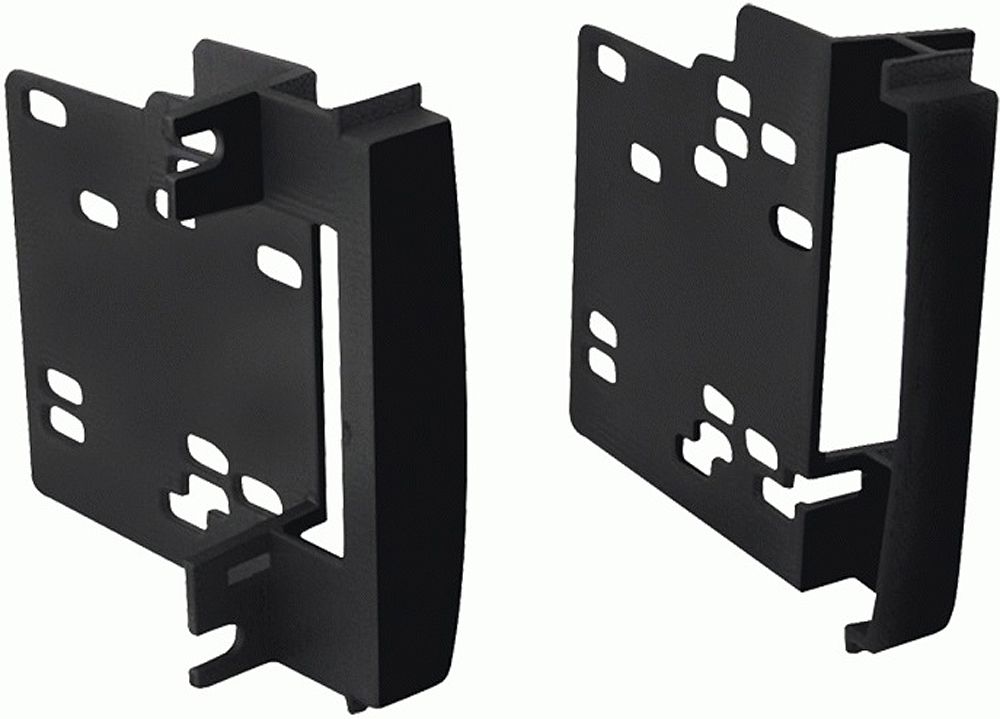
- C) ISO DDIN radio brackets
99-6511
- D) ISO radio brackets
- E) ISO trim plate
- F) Radio housing with pocket
- G) (4) #8 x 1 /4” Phillips screws
WIRING & ANTENNA CONNECTIONS (sold separately)Wiring Harness: XSVI-6522-NAV CHTO-03Antenna Adapter: 40-EU10
TOOLS REQUIRED
- Panel removal tool
- Phillips screwdriver
- Socket set
- Cutting tool (sub-dash modifications required for most 95-6511 ISO DDIN applications)
CAUTION! All accessories, switches, climate controls panels, and especially air bag indicator lights must be connected before cycling the ignition. Also, do not remove the factory radio with the key in the on position, or while the vehicle is running.
DASH DISASSEMBLY
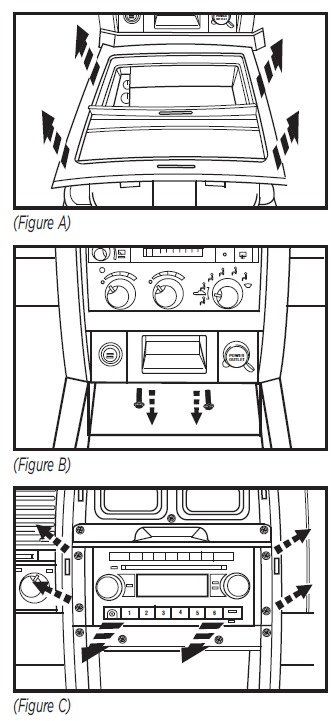
Chrysler Aspen 2008-2009Dodge Durango 2008-2009
- Unsnap and remove storage cup holder assembly. (Figure A)
- Remove (2) screws from bottom edge of center dash trim panel. Unsnap and remove the panel. (Figure B)
- Remove (4) screws securing the radio. Unplug and remove radio. (Figure C) Continue to Kit Assembly.
Chrysler Sebring 2007-2010
- Unclip entire panel surrounding radio including A/C vents and clock. Unplug and remove panel. (Figure A)
- Remove (4) 7mm screws securing radio. Unplug and remove radio. (Figure B) Continue to Kit Assembly.
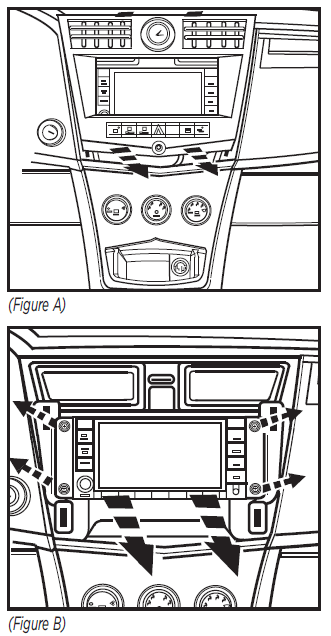
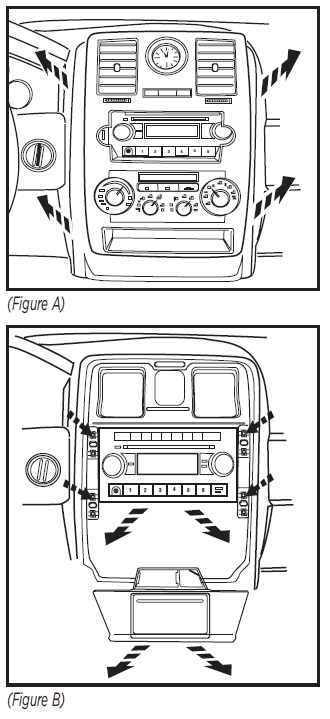
Chrysler Town & Country 2008-2010Dodge Caravan/Grand Caravan 2008-2010
- Remove (2) screw covers facing up above radio then remove the (2) Phillips screws exposed. (Figure A)
- Lift up on panel above radio then remove (2) Phillips screws exposed at front edge of radio trim panel. (Figure B)
- Remove (3) plastic push pins per side of bottom trim panel then slide panel toward rear of van to access (2) screws on bottom of radio trim panel. (Figure C)
- Remove (2) Phillips screws exposed at bottom edge radio trim panel. (Figure D)
- Unclip and remove entire panel surrounding radio including climate controls, vents and clock. (Figure E)
- Remove (4) Phillips screws securing radio. (Figure F) Continue to Kit Assembly
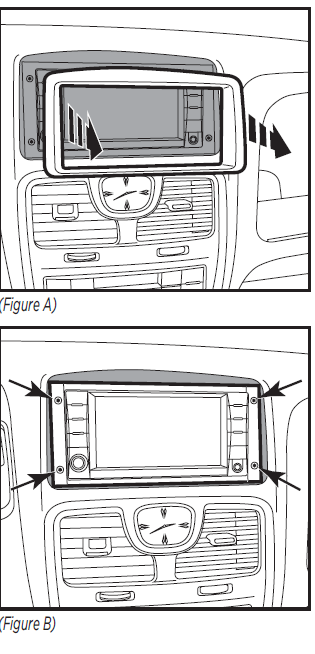
Chrysler Town & Country 2011-2017 Dodge Caravan/Grand Caravan 2011-2020 Volkswagen Routan 2009-2013
- Unclip and remove the radio trim panel. (Figure A)
- Remove (4) Torx securing the radio. (Figure B) Continue to Kit Assembly
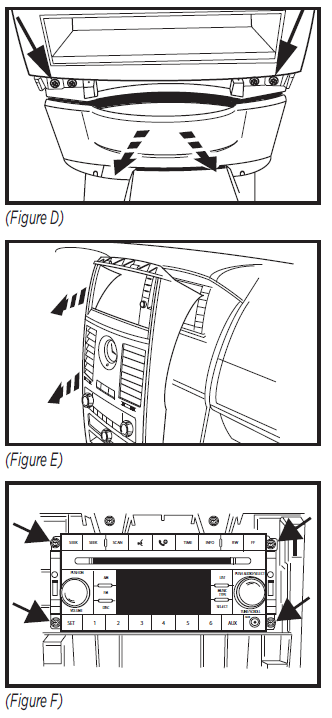
Chrysler 200 2011-2014
- Unclip and remove the radio trim panel. (Figure A)
- Remove (4) Torx securing the radio. (Figure B) Continue to Kit Assembly
Chrysler 300/300C 2008-2010 Dodge Magnum/Charger 2008-2010
- Unsnap and remove center dash trim panel. (Figure A)
- Remove (4) screws securing the radio. Disconnect and remove the radio. (Figure B) Continue to Kit Assembly.
Dodge Avenger 2008-2014
- Unclip and remove the center console trim panel. (Figure A)
- Unclip the center dash trim panel. (Figure B)
- Remove (4) screws securing the radio. Disconnect and remove the radio. (Figure C)
- Remove (3) screws securing the radio rear support bracket and remove the bracket. (Figure D) Continue to Kit Assembly.

Dodge Dakota 2008-2011
- Unclip and remove the trim panel surrounding the radio. (Figure A)
- Remove (4) Phillips screws securing the radio. (Figure B) Continue to Kit Assembly.
Dodge Nitro 2007-2011Jeep Liberty 2008-2012
- Unclip entire panel surrounding radio and climate controls, including A/C vents. Unplug and remove panel. (Figure A)
- Remove (4) 7mm screws securing radio. Unplug and remove radio. (Figure B) Continue to Kit Assembly
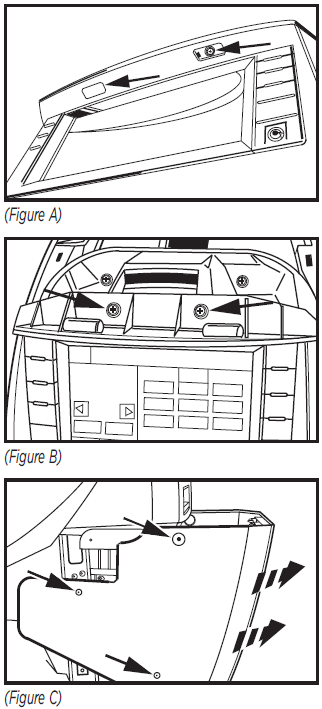
Dodge Journey 2009-2010
- Unclip and remove the entire factory radio trim panel including the A/C controls. (Figure A)Tip: Open the compartment door at the top of the radio trim panel.
- Remove (4) 7mm screws securing radio to dash to remove. (Figure B)Note: The top of the metal bracket in the sub dash will need to be cut to allow for the clearance of the Double DIN radio’s chassis. (Figure C) Continue to Kit Assembly

Dodge Caliber 2009-2012Dodge Challenger 2008-2014Jeep Compass 2009-2017.5Jeep Patriot 2009-2017
- Unsnap and move shifter trim to the side. (Figure A)
- Unsnap center dash trim panel (do not remove until climate controls are removed). (Figure A)
- Remove (4) Phillips screws holding climate control panel to backside of the center dash panel.
- Remove (4) 7mm screws securing radio. Unplug and remove radio.
- The metal bracket in the sub-dash will need to be removed for the aftermarket Double DIN radio’s depth. Continue to Kit Assembly

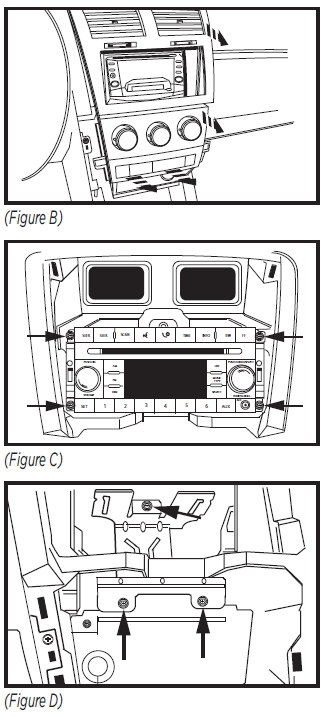
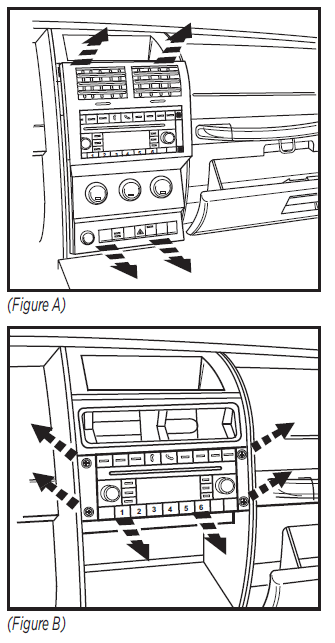
Dodge Ram 1500 2009-2011Dodge Ram 2500/3500 2010-2011Dodge Ram Chassis Cab 2011Ram 1500/2500/3500 2012Ram Chassis Cab 3500/4500/5500 2012
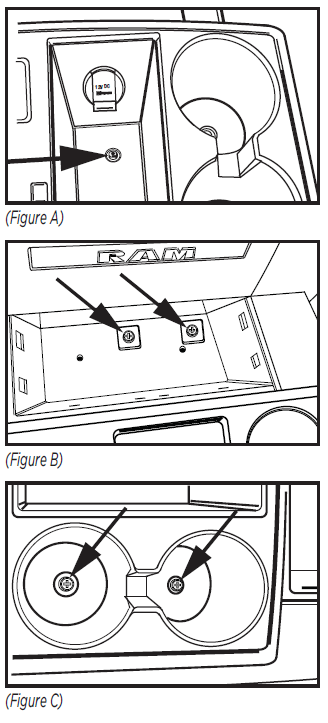
- Remove (1) T-25 Torx screw in the compartment next to the cup holders. (Figure A)
- Remove (2) Phillips screws in the pocket below the climate control in the front of the center console. (Figure B)
- Remove (2) 9/32” screws in the cup holders. (Figure C)
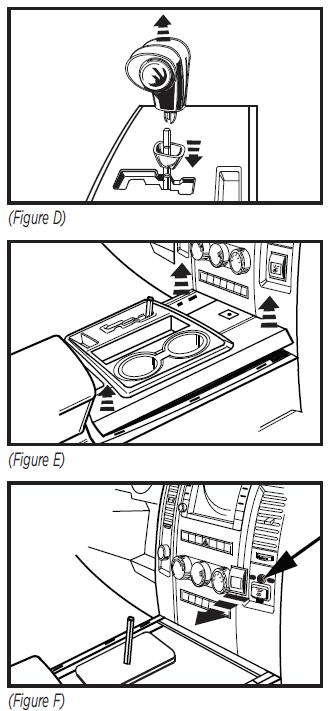
- Push down on the collar below the shifter then pull the shifter straight up to remove. (Figure D)
- Unclip and remove the top of the center console including the cup holders. (Figure E)
- Unclip and remove the trim panel from the accessory socket on the radio trim panel, then remove (1) T-25 Torx screw. (Figure F) Continued on the next page
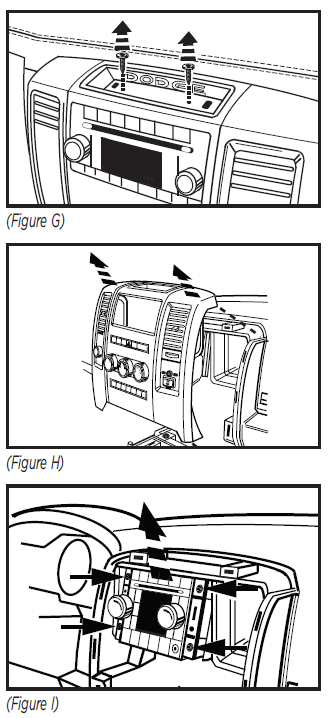
- Remove (2) T25 Torx screws from the top of the radio trim panel. (Figure G)
- Unclip and remove the entire radio trim panel including the climate controls. (Figure H)
- Remove (4) 9/32” screws securing the radio. (Figure I) Continue to Kit Assembly
Ram C/V Tradesman 2012-2015
- Remove the radio trim bezel. (Figure A)
- Remove (4) screws securing the radio to the dash. (Figure B) Continue to Kit Assembly.

Jeep Commander/Grand Cherokee 2008-2010
- Unsnap and remove the small trim around the console shifter. (Figure A)
- Unsnap and remove the larger trim around the console shifter. (Figure B)
- Remove (1) Phillips screw from inside the small storage pocket in the lower dash, between the power outlets. (Figure C)
- Unsnap and remove the dash panel from around the radio (including climate controls). (Figure D)
- Remove (4) Phillips screws securing the radio. Unplug and remove radio. Continue to Kit Assembly

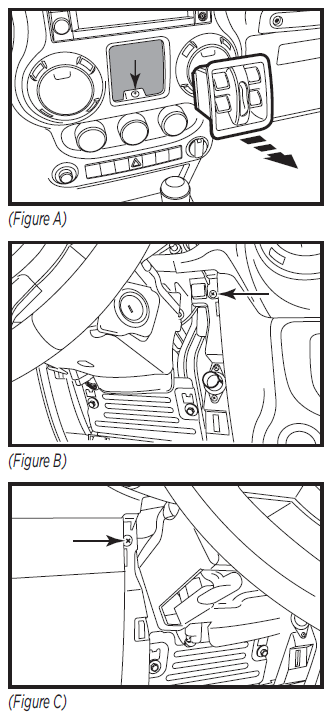
Jeep Wrangler 2007-2010 (modifications to radio cavity required)
- Unclip and remove the lower center trim below A/C controls. (Figure A)
- Remove (2) Phillips screws exposed behind lower center panel. (Figure A)
- Unclip and remove the upper center trim starting towards the rear of the panel. (Figure A)
- Remove (2) Phillips screws exposed behind upper center panel. (Figure A)
- Unclip and remove entire panel surrounding radio and climate controls, including A/C vents.
- Remove (4) 7mm screws securing radio. Unplug and remove radio. (Figure B)Note: The top of the metal bracket in the sub dash will need to be cut to allow for the clearance of the Double DIN radio’s chassis. Continue to Kit Assembly
 Note: The top of the metal bracket in the sub dash will need to be cut to allow for the clearance of the Double DIN radio’s chassis. Continue to Kit Assembly
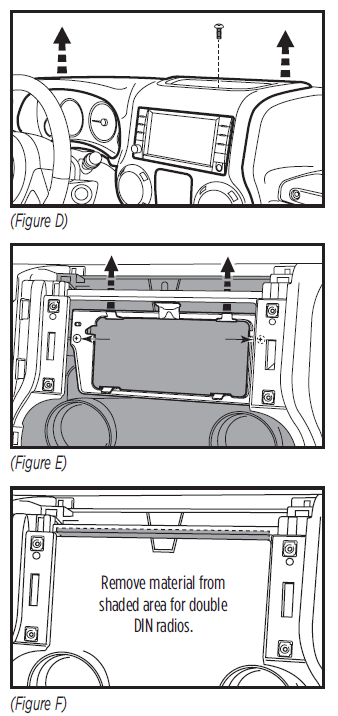
Jeep Wrangler 2011-2018 (modifications to radio cavity required)
- Unclip and remove the power window switches then remove (1) 9/32” screw from underneath. (Figure A)
- Unclip and remove the panel below the steering column.
- Remove (2) 9/32” screws from the bottom edge of the radio/instrument cluster trim panel on either side of the steering column. (Figure B, C) Continued on the next page
- Remove pad in pocket on top center of dash then remove (1) 9/32” screw underneath. Remove dash panel from around radio and instrument cluster. (Figure D)
- Remove (4) 9/32” screws securing the radio. Unplug and remove radio.
- Remove (2) 9/32” screws securing the metal bracket inside of the dash cavity and remove it for depth. (Figure E)
- A small cut in the plastic at the top of the radio cavity will be required for most double DIN radios. (Figure F) Continue to Kit Assembly
Mitsubishi Raider 2008-2009
- Unsnap and remove center dash panel. (Figure A)
- Remove (4) 7mm screws securing the radio. Unplug and remove radio. Continue to Kit Assembly

KIT ASSEMBLY
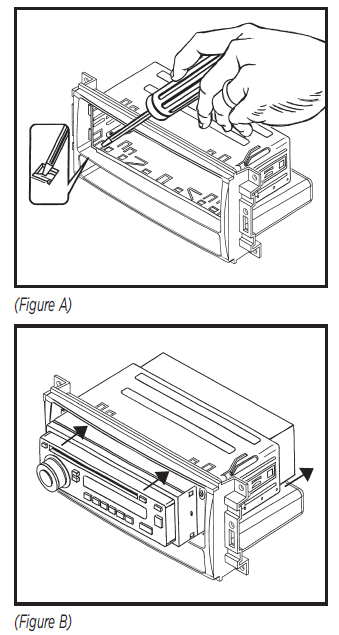
DIN radio provision with pocket
- Remove the metal DIN sleeve from the aftermarket radio.
- Slide the sleeve into the radio housing with pocket and secure by bending the metal locking tabs outward. (Figure A)
- Slide the radio into the sleeve until it clicks in. (Figure B)
- Locate the factory wiring harness and antenna connector in the dash. Metra recommends using the proper mating adapter from Metra or AXXESS. Test the radio for proper operation.
- Reassemble the dash in reverse order of disassembly.
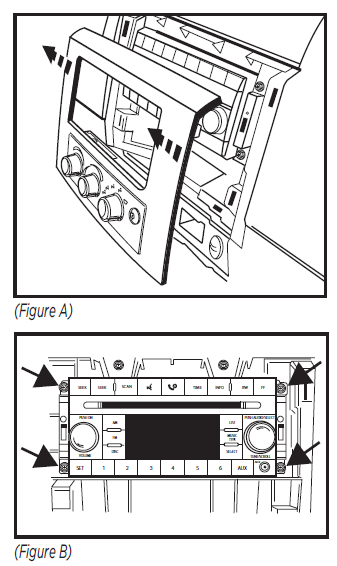
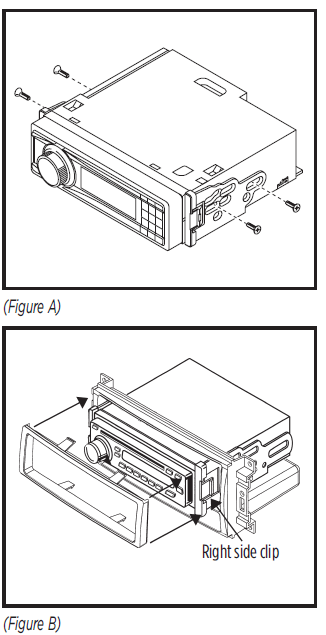
ISO DIN radio provision with pocket
- Remove the metal DIN sleeve and trim ring from the aftermarket radio.
- Secure the ISO brackets to the radio using the screws supplied with the radio. (Figure A)
- Slide the radio into the radio housing with pocket until it snaps into place. (Figure B)
- Snap the ISO trim plate onto the front of the completed assembly. (Figure B)
- Locate the factory wiring harness and antenna connector in the dash. Metra recommends using the proper mating adapter from Metra or AXXESS. Test the unit for proper operation.
- Reassemble the dash in reverse order of disassembly.
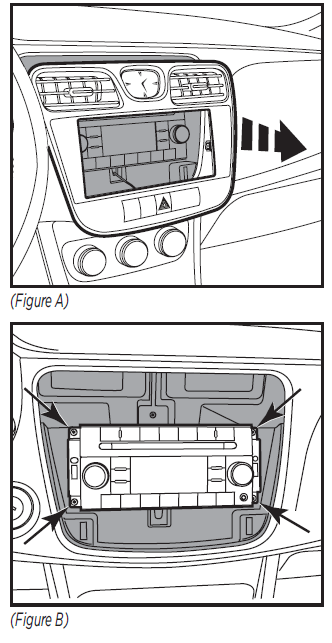
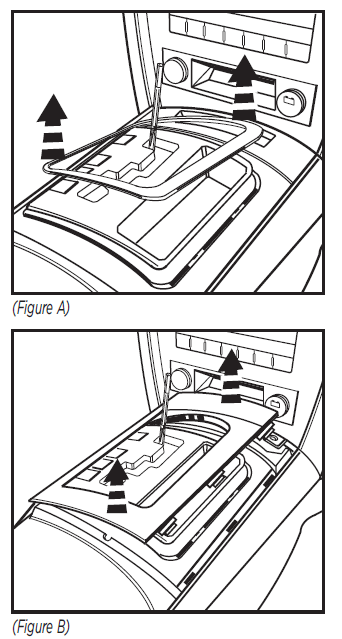
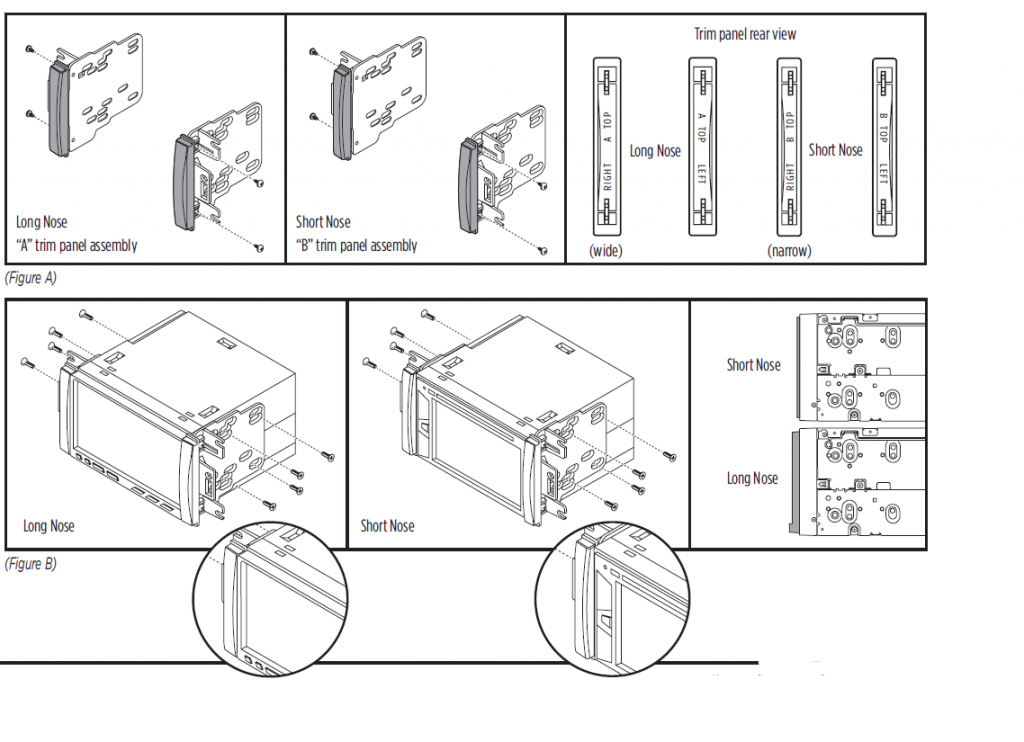
ISO DDIN radio provision
- Depending on the style of radio to be installed, secure either the “A” “Long nose” (wide) DDIN trim panels, or “B” “Short nose” (narrow) DDIN trim panels, to the ISO DDIN radio brackets using (4) #8 x 1/4” Phillips screws provided. (Figure A) Note: The trim panels are stamped on the back indicating the top and which style of radio the trim panel should be used for. “A” for long nose radios, “B” for short nose radios.
- Secure the completed bracket assembly to the radio using the screws supplied with the radio. (Figure B)
- Locate the factory wiring harness and antenna connector in the dash. Metra recommends using the proper mating adapter from Metra or AXXESS. Test the unit for proper operation.
- Reassemble the dash in reverse order of disassembly.
IMPORTANTIf you are having difficulties with the installation of this product, please call our Tech Support line at 1-386-257-1187. Before doing so, look over the instructions a second time, and make sure the installation was performed exactly as the instructions are stated. Please have the vehicle apart and ready to perform troubleshooting steps before calling.
Metra. The World’s Best Kits.® 1-386-257-1187 MetraOnline.com© COPYRIGHT 2021 METRA ELECTRONICS CORPORATION![]()
References
[xyz-ips snippet=”download-snippet”]