Metra Acura Honda Isuzu 1990-2006 99-7898

KIT FEATURES
- DIN radio provision with pocket
- ISO DIN radio provision with pocket
- Pocket holds (2) jewel cases
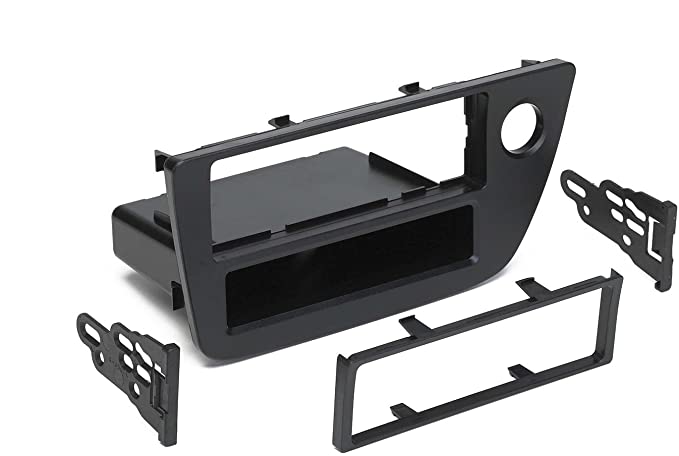
KIT COMPONENTS
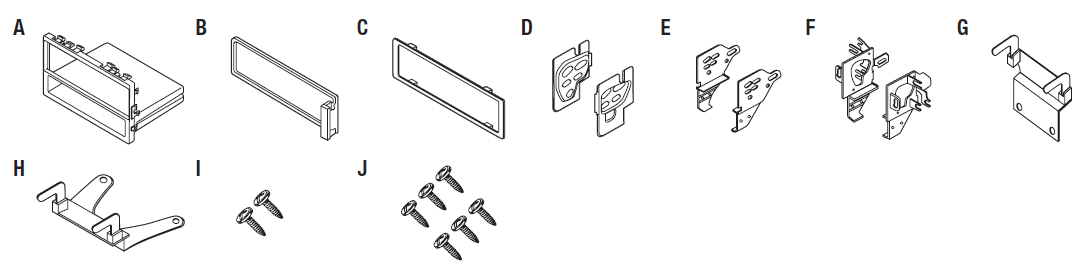
- A) Radio housing
- B) Faceplate
- C) ISO trimming
- D) ISO spacers
- E) ISO brackets
- F) Mounting brackets
- G) Rear support bracket (R1)
- H) Rear support bracket (R2)
- I) (2) #8 x 3/4” Phillips screws
- J) (6) #8 x 3/8” Phillips screws
WIRING & ANTENNA CONNECTIONS (sold separately)
Wiring Harness:
- 70-1720
- 70-1721
Antenna Adapter: Not required
TOOLS REQUIRED
- Phillips screwdriver
- Cutting tool
CAUTION! Metra recommends disconnecting the negative battery terminal before beginning any installation, unless the vehicle manufacturer recommends against so. Please check with your local Dealership for more information. All accessories, switches, climate controls panels, and especially air bag indicator lights must be connected before reconnecting the battery or cycling the ignition. Also, do not remove the factory radio with the key in the on position, or the vehicle running. It would be best to remove the key from the ignition and then wait a few seconds before removing the factory radio.
Dash Disassembly
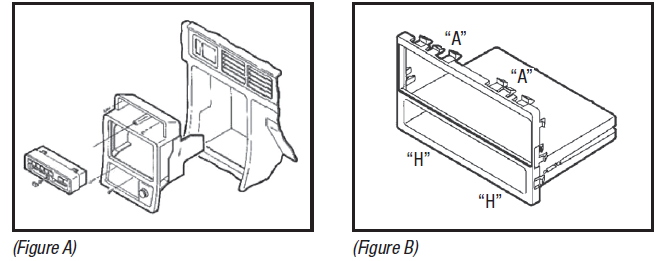
Acura CL 1997-1999
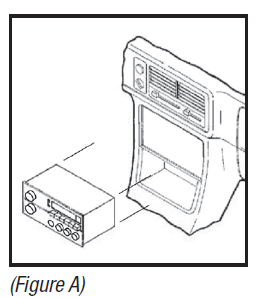
- Unclip the radio trim bezel and disconnect the clock and climate control wiring. (Figure A)
- Remove (2) 8mm hex head screws securing the factory radio and disconnect the wiring.
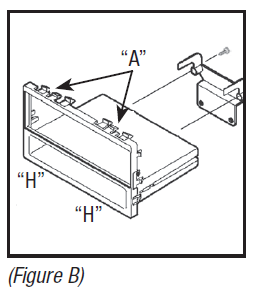
- Cut and remove all of the mounting clips on the radio housing EXCEPT clips “A” and “H” (the clips can be identified by the stamped letter on the back of the housing, near each clip). (Figure B)
- Mount the rear support bracket (R1) to the back of the radio housing with (2) #8 x 3/8” Phillips pan head screws supplied. (Figure B) Continue to kit assembly.

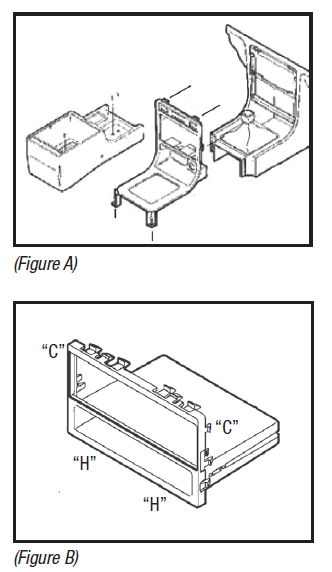
Acura Integra 1990-1993
- Remove (3) screws from each side of the center console and remove the console.
- Remove (2) screws securing the factory radio to the sub-dash support bracket. Slide the radio/pocket assembly out and disconnect the wiring. (Figure A)
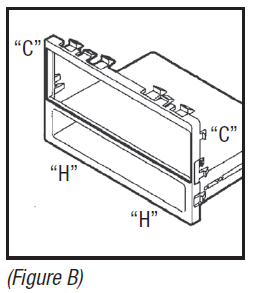
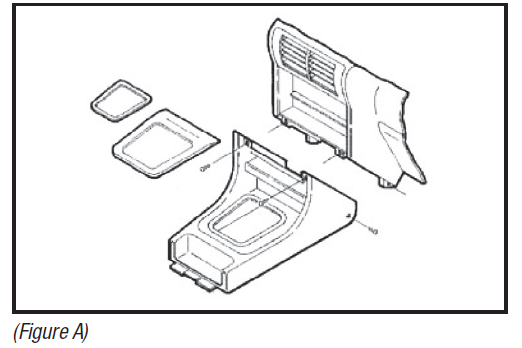
- Cut and remove all of the mounting clips on the radio housing EXCEPT clips “C” and “H” (the clips can be identified by the stamped letter on the back of the housing, near each clip). (Figure B) Continue to kit assembly
Acura Integra 1994-2001
- Remove the cover cap located under the emergency brake and remove (2) screws exposed.
- Remove (2) screws from the rear corners of the lower dash trim bezel and remove.
- Remove the ashtray and (2) screws exposed.
- Unsnap the ashtray housing and disconnect the cigarette lighter harness.
- Remove the gear shifter knob and unsnap the shifter trim.
- Remove (2) screws below the radio opening and remove the upper dash trim bezel. (Figure A)
- Remove (2) 8mm screws securing the factory radio and disconnect the wiring.
- Cut and remove all of the mounting clips on the radio housing EXCEPT clips “C” and “H” (the clips can be identified by the stamped letter on the back of the housing, near each clip). (Figure B)
Acura Legend 1990-1995
- Remove (2) screws below the ashtray. (Figure A)
- Unclip the dash trim bezel.
- Disconnect the cigarette lighter wiring and remove the bezel.
- Remove (2) bolts securing the rear of the factory radio and disconnect the wiring.
- Cut and remove all of the mounting clips on the radio housing EXCEPT clips “E” and “J” (the clips can be identified by the stamped letter near each clip). (Figure B)

Acura RSX 2002-2006 (except “S” model)
- Unclip the lower dash panel (containing the power outlet) and remove the panel.
- Reach into the opening and remove (2) Phillips screws from the base of the factory radio.
- Slide the factory radio (with bracket assembly) from the dash and disconnect the wiring. (Figure A)
- Remove (4) Phillips screws securing the factory radio to the bracket assembly and remove the radio (if a factory pocket is present, remove (4) Phillips screws securing the pocket to the bracket assembly and remove). (Figure A)
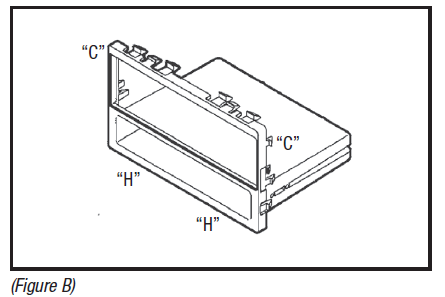
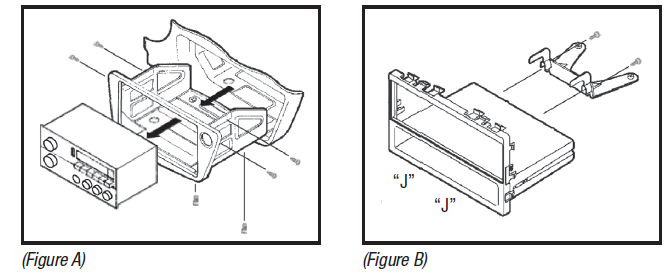
- Cut and remove the all mounting clips on the radio housing EXCEPT clips “J” (the clips can be identified by the stamped letter near each clip). (Figure B)
- Mount the rear support bracket (R2) to the back of the radio housing with (2) #8 x 3/8” Phillips pan head screws supplied. Continue to kit assembly
Acura TL 1996-1998
- Using a small screwdriver, unclip the perimeter of the radio trim bezel. (Figure A)
- Disconnect the climate control and rear defroster wiring and remove the bezel.
- Remove (4) Phillips screws securing the factory radio/trim bezel assembly. (Figure A)
- Loosen (2) Phillips screws securing the back of the radio to the metal housing and slide the radio out (it is not necessary to remove the screws securing the metal).
- Disconnect the wiring.
- Cut and remove all of the mounting clips on the radio housing EXCEPT clips “B” and “K” (the clips can be identified by the stamped letter near each clip). (Figure B) Continue to kit assembly

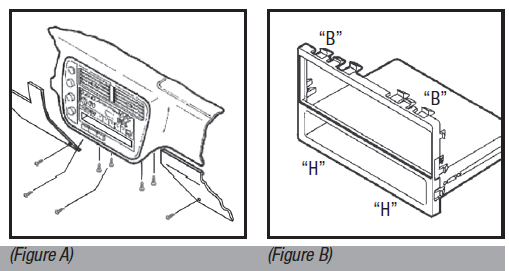
Acura Vigor 1992-1994
- Remove the access cap from the climate control cluster and (1) screw exposed. (Figure A)
- Unclip the cluster and remove (2) screws exposed. (Figure A)
- Remove the ashtray and (2) Phillips screws exposed.
- Remove the cover caps from each front corner of the center console and the screws exposed.
- Open the storage compartment, lift up the carpet and remove (2) screws exposed.
- Lift up on the center console and remove. Unclip the radio trim bezel and disconnect the wiring.
- Remove (2) bolts from the back of the factory radio and disconnect the wiring.
- Cut and remove all of the mounting clips on the radio housing EXCEPT clips “A” and “H” (the clips can be identified by the stamped letter on the back of the housing, near each clip). (Figure B) Continue to kit assembly
Honda Accord 1990-1993
- Remove (4) screws from the lower portion of the center console. (Figure A)
- Remove the gear shifter knob and lift the console out. Remove the ashtray and ashtray bracket.
- Remove (2) screws from the bottom of the radio support, slide the radio out and disconnect the wiring.
- Cut and remove all of the mounting clips on the radio housing EXCEPT clips “C” and “H” (the clips can be identified by the stamped letter on the back of the housing, near each clip). (Figure B) Continue to kit assembly
Honda Accord 1994-1997
- Remove the ashtray and (1) 3/4” #8 Phillips screw exposed. Open the storage compartment and remove (2) #8 Phillips screws exposed.
- Remove the cup holder tray and (3) #8 Phillips screws inside.
- Lift the center console out and remove (2) Phillips screws exposed at the base of the dash trim bezel.
- Unclip the bezel and remove.
- Remove (2) hex head screws securing the factory radio and disconnect the wiring. (Figure A)
- Cut and remove all of the mounting clips on the radio housing EXCEPT clips “A” and “H” (the clips can be identified by the stamped letter on the back of the housing, near each clip). (Figure B)
- Mount the rear support bracket (R1) to the back of the radio housing with (2) #8 x 3/8” Phillips pan head screws supplied. Continue to kit assembly.

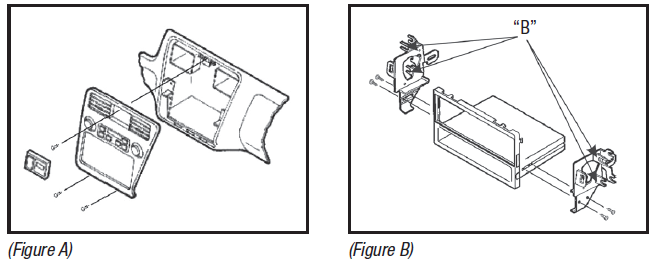
Honda Accord 1998-2002
- Unsnap the clock panel, disconnect the wiring and remove. (Figure A)
- Remove (1) Phillips screw exposed in the clock cavity.
- Remove (2) Phillips screws below the factory radio.
- Unclip the radio trim bezel and disconnect the wiring. (Figure A)
- Remove (4) Phillips screws securing the factory radio assembly and disconnect the wiring.
- Remove (2) screws securing the factory pocket to the assembly.
- Cut and remove the mounting clips from the radio housing.
- From the mounting brackets cut and remove tabs “B” (the clips can be identified by the stamped letter on the back of the housing, near each clip). (Figure B)
- Secure the brackets to the housing with (4) #8 x 3/8” Phillips pan head screws. Continue to kit assembly.
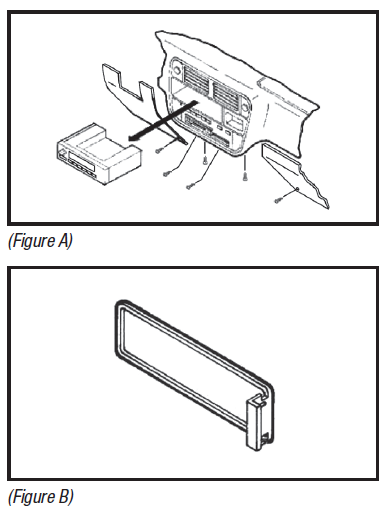
Honda Civic 1996-1998
- Remove (2) Phillips screws from the bottom edge of the glove box door and remove the door.
- Remove (3) Phillips screws from the lower steering column panel.
- Pull straight down on the lower steering column panel and remove the panel.
- Remove (2) Phillips screws under the climate control panel. (Figure A)
- Remove (4) Phillips screws from the lower dash location.
- Remove (2) 8mm hex head screws securing the bottom-rear of the factory radio and disconnect the wiring.
- Locate the faceplate. (Figure B) Continue to kit assembly
Honda Civic 1999-2000
- .Remove (2) Phillips screws from the bottom edge of the glove box door and remove the door.
- Remove (3) Phillips screws from the lower steering column panel.
- Pull straight down on the lower steering column panel and remove the panel.
- Remove (2) Phillips screws under the climate controls.
- Remove (4) Phillips screws from the lower dash location. (Figure A)
- Remove (4) Phillips screws securing the bottom of the dash trim bezel/radio assembly and pull the assembly out as far as possible.
- Cut the zip ties securing the radio and climate control wires, slide the dash trim bezel/radio assembly from the dash cavity and disconnect the wiring.
- Cut and remove all of the mounting clips on the radio housing EXCEPT clips “B” and “H” (the clips can be identified by the stamped letter on the back of the housing, near each clip). (Figure B) Continue to kit assembly
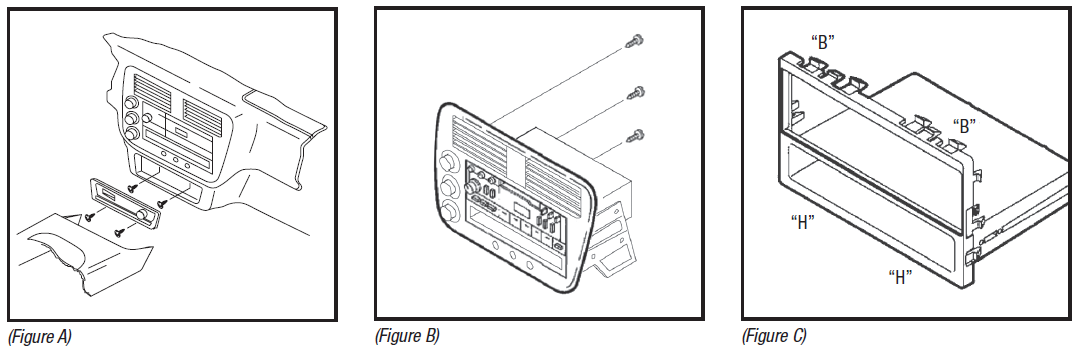
Honda Civic SE 2005 (only)
- Unsnap and remove the trim ring from around floor shifter.
- Unsnap and remove larger trim around floor console shifter.
- Remove (2) Phillips screws from in between cup holder and shifter. (Figure A)
- Unsnap sides of console (2 snaps per side) and remove with power outlet assembly.
- Remove (2) Phillips screws from under radio assembly, facing up. (Figure A)
- Remove (3) screws securing the climate control pod to the back of the dash trim bezel and remove the pod. (Figure B)
- Remove (4) Phillips screws from each side securing the factory head radio to the bracket assembly and remove the radio.
- Cut and remove all mounting clips on the radio housing, EXCEPT clips “B” and “H” (the clips can be identified by the stamped letter on the back of the housing, near each clip). (Figure C) Continue to kit assembly
Honda CR-V 1997-2001
- Open the glove box, squeeze the retaining clips and remove the stoppers.
- Lower the glove box and remove (2) Phillips screws from the left edge.
- Remove (2) Phillips screws from the lower steering column panel and remove.
- Unclip the lower console cover (below the ashtray and pocket) and remove.
- Remove (2) Phillips screws from the base of the center console, open the console pocket and remove the (4) outer screws exposed.
- Unclip the center console and remove.
- Remove (2) Phillips screws securing the radio trim bezel, disconnect the wiring, and remove the trim bezel/ radio assembly. (Figure A)
- Remove (4) Phillips screws securing the radio to the bezel and remove.
- Cut and remove all of the mounting clips on the radio housing EXCEPT clips “B” and “H” (the clips can be identified by the stamped letter on the back of the housing, near each clip). (Figure B) Continue to kit assembly
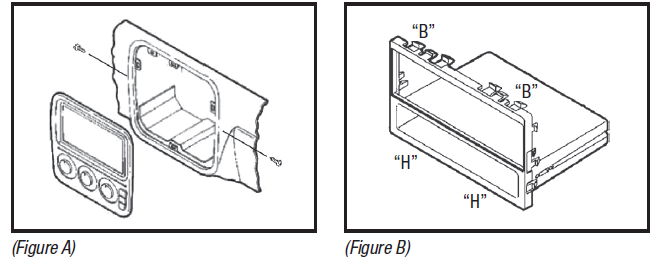
Honda CR-V 2002-2006
- Remove (2) Phillips screws from the bottom edge of the radio trim bezel. (Figure A)
- Unclip the trim bezel and remove.
- Remove (4) Phillips screws securing the factory radio and disconnect the wiring.
- Cut and remove all of the mounting clips on the radio housing EXCEPT clips “A” and “H” (the clips can be identified by the stamped letter on the back of the housing, near each clip). (Figure B) Continue to kit assembly
Honda Odyssey 1995-1998 Isuzu Oasis 1996-1999
- Lower the glove box assembly.
- Remove (2) Phillips screws exposed on the right side of the underdash.
- Remove (2) Phillips screws from the driver’s side knee bolster and (1) Phillips screw in the coin pocket.
- Remove (5) Phillips screws from the underdash panel and remove the panel. (Figure A)
- Remove (4) Phillips screws from the cupholder assembly and remove.
- Remove (2) Phillips screws securing the factory radio and disconnect the wiring.
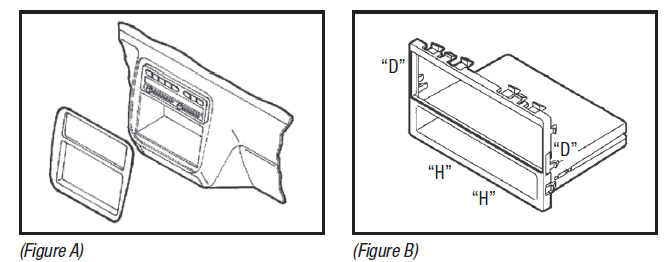
- Cut and remove all of the mounting clips on the radio housing EXCEPT clips “D” and “H” (the clips can be identified by the stamped letter on the back of the housing, near each clip). (Figure B) Continue to kit assembly
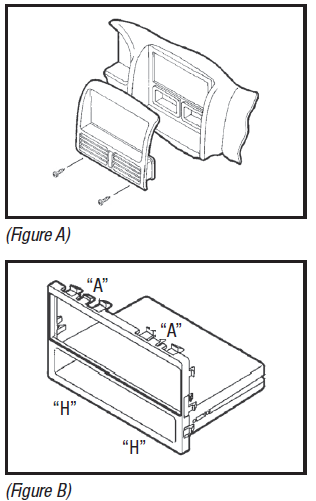
- Unclip the radio trim bezel (including the climate control panel and remove). (Figure A)
- Remove (4) Phillips screws securing the factory radio and disconnect the wiring.
- Cut and remove the mounting clips from the radio housing.
- From the mounting brackets cut and remove tabs “A” (the clips can be identified by the stamped letter on the back of the housing, near each clip). (Figure B)
- Secure the brackets to the housing with (4) #8 x 3/8” Phillips pan head screws. (Figure B) Continue to kit assembly

Honda Prelude 1989-1991
- Remove (2) Phillips screws located below the climate controls. (Figure A)
- Remove (1) Phillips screw from each side of the dash console and (2) Phillips screws from each side of the floor console. (Figure A)
- Remove the plastic dummy cap from the end of the dash console and (2) Phillips screws exposed. (Figure A)
- Pull the floor console out and gently remove the dash console.
- Remove (6) Phillips screws securing the factory radio and disconnect the wiring.
- Cut and remove all of the mounting clips on the radio housing EXCEPT clips “A” and “C” (the clips can be identified by the stamped letter on the back of the housing, near each clip). (Figure B) Continue to kit assembly

Honda Prelude 1992-1996
- Remove (2) screws from the top of the console trim bezel.
- Slide the front seats back and remove (4) Phillips screws from each side of the bezel. (Figure A)
- Pull up on the console trim bezel and remove.
- Using an angled screwdriver, remove (2) screws securing the gear shifter bracket to the bezel.
- Remove (4) screws from the radio trim bezel, remove the factory radio assembly and disconnect the wiring. (Figure A)
- Cut and remove all of the mounting clips on the radio housing EXCEPT clips “F” and “H” (the clips can be identified by the stamped letter on the back of the housing, near each clip). (Figure B) Continue to kit assembly

Honda Prelude 1997-2001
- Using a panel removal tool, unclip the radio trim bezel and remove (some force may be required). (Figure A)
- Remove (4) Phillips screws securing the factory radio/bracket housing assembly and disconnect the wiring.
- Remove (4) Phillips screws securing the factory radio to the bracket housing and remove.
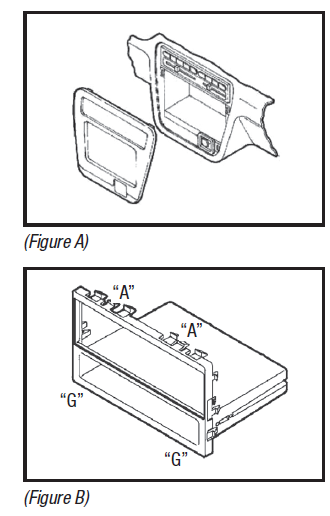
- Cut and remove all of the mounting clips on the radio housing EXCEPT clips “A” and “G” (the clips can be identified by the stamped letter on the back of the housing, near each clip). (Figure B) Continue to kit assembly
Kit Assembly DIN radio provision
Honda Civic 1996-1998:
- Remove the metal DIN sleeve from the aftermarket radio.
- Position the faceplate in the radio opening by inserting the locating pins on the housing into the holes in the sub-dash. (Figure A)Note: if a radio dummy plate was removed during the dash disassembly, cut and remove the locating pins on the radio housing.
- Slide the sleeve into the kit and secure by bending the metal locking tabs down. (Figure A)
- Slide the radio into the sleeve until secure. (Figure A)
- Locate the factory wiring harness and antenna connector in the dash. Metra recommends using the proper mating adapter from Metra or AXXESS. Reconnect the negative battery terminal and test the radio for proper operation.
- Reassemble the dash in reverse order of disassembly.

Accord 1990-1997, Civic 1999-2000, CL 1997-1999, CRV 1997-2002, Integra 1990-2001, Legend 1990- 1996, Oasis 1996-1999, Odyssey 1995-1998, Prelude 1989-2001, RSX 2002-2006, TL 1996-1998, Vigor 1992-1994:
- Remove the metal DIN sleeve from the aftermarket radio.
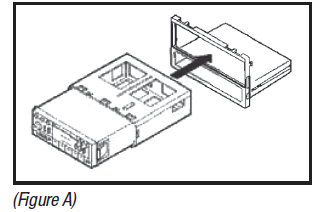
- Slide the sleeve into the radio housing and secure by bending the metal locking tabs down. (Figure A)
- Slide the radio into the sleeve until secure. (Figure A)
- Locate the factory wiring harness and antenna connector in the dash. Metra recommends using the proper mating adapter from Metra or AXXESS. Re-connect the negative battery terminal and test the radio for proper operation.
- Reassemble the dash in reverse order of disassembly.
- For Honda Accord 1994-1997 and CL 1997-1999: Mount the rear support bracket to the rear support provision with (2) bolts previously removed in the dash disassembly.
- For Honda RSX 2002-2006: Mount the rear support bracket to the rear support provision with (2) #8 x ¾” Phillips screws included.
Accord 1998-2002, Odyssey 1999-2004:
- Remove the metal DIN sleeve from the aftermarket radio.
- Slide the sleeve into the radio housing and secure by bending the metal locking tabs down. (Figure A)
- Slide the radio into the sleeve until secure. (Figure A)
- Locate the factory wiring harness and antenna connector in the dash. Metra recommends using the proper mating adapter from Metra or AXXESS. Re-connect the negative battery terminal and test the radio for proper operation.
- Reassemble the dash in reverse order of disassembly.

ISO DIN radio provision with pocket
Accord 1990-1997, Civic 1999-2000, CL 1997-1999, CRV 1997-2002, Integra 1990- 2001, Legend 1990-1996, Oasis 1996-1999, Odyssey 1995-1998, Prelude 1989-2001, RSX 2002-2006, TL 1996-1998, Vigor 1992-1994:
- Snap the ISO trim ring into the radio housing. (Figure A)
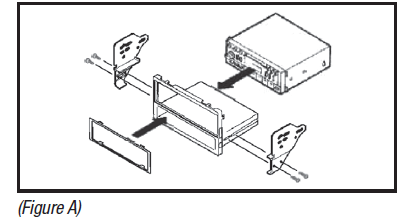
- Mount the ISO brackets to the radio housing with (4) #8 x 3/8” screws supplied. (Figure A)
- Remove the metal DIN sleeve and trim ring from the aftermarket radio.
- Slide the radio into the completed assembly, align the holes in the radio with the holes in the brackets, and then mount with the screws supplied with the radio. (Figure A)
- Locate the factory wiring harness and antenna connector in the dash. Metra recommends using the proper mating adapter from Metra or AXXESS. Re-connect the negative battery terminal and test the radio for proper operation.
- Reassemble the dash in reverse order of disassembly.
- For Honda Accord 1994-1997 and CL 1997-1999: Mount the rear support bracket to the rear support provision with (2) bolts previously removed in the dash disassembly.
- For Honda RSX 2002-2006: Mount the rear support bracket to the rear support provision with (2) #8 x ¾” Phillips screws included.
Accord 1998-2002, Odyssey 1999-2004:
- Attach the ISO spacers onto the sides of the radio brackets, and then snap the ISO trim ring into the radio housing. (Figure A)
- Remove the metal DIN sleeve and trim ring from the aftermarket radio.
- Slide the radio into the completed assembly, align the holes in the radio with the holes in the ISO spacers, and then mount with the screws supplied with the radio. (Figure A)
- Locate the factory wiring harness and antenna connector in the dash. Metra recommends using the proper mating adapter from Metra or AXXESS. Reconnect the negative battery terminal and test the radio for proper operation.
- Reassemble the dash in reverse order of disassembly.

IMPORTANTIf you are having difficulties with the installation of this product, please call our Tech Support line at 1-800-253-TECH. Before doing so, look over the instructions a second time, and make sure the installation was performed exactly as the instructions are stated. Please have the vehicle apart and ready to perform troubleshooting steps before calling.
METRA. The World’s best kits.™metraonline.com© COPYRIGHT 2004-2015 METRA ELECTRONICS CORPORATION![]()
References
[xyz-ips snippet=”download-snippet”]