
Operating ManualDrum ComputerMFB-301 Pro
General
The MFB-301 Pro is a technically advanced reissue of the model MFB-301, expanded by the claps of model MFB-401. This analog drum computer is programmable and storable. The patterns can be programmed step by step with their corresponding parameters. In addition, the unit is fully controllable by MIDI. To avoid a faulty operation, please follow the described key combinations to carry out specific functions in the exact sequence as described.
Setup
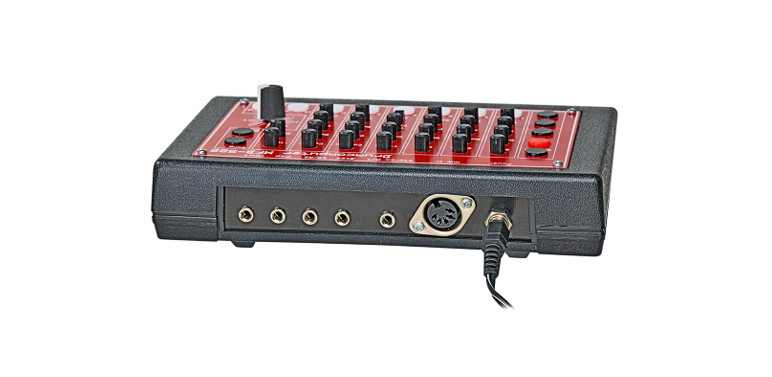
Plug the connector of the supplied power adapter into the mini-USB socket of the unit. Alternatively, the unit can be supplied with power from a computer or from a power bank with at least 100 mA current.Connect the input MIDI Into a keyboard or sequencer.The unit provides stereo as well as headphone outputs.SoundsAvailable are eight analog instruments, being editable in the following parameters:
| BD | Bassdrum | Pitch, Decay, Tone, Level |
| SD | Snare drum | Pitch, Decay, Noise Level, Level |
| CP | Clap | Decay, Attack, Level |
| TT | Tom | Pitch, Decay, Attack, Level |
| BO | Bongo | Pitch, Decay, Attack, Level |
| CL | Claves | Pitch, Decay, Attack, Level |
| CY | Cymbal | Pitch, Decay, Mix Noise/Metal, Level |
| HH | Hihat | Pitch, Decay, Mix Noise/Metal, Level |
Sequencer
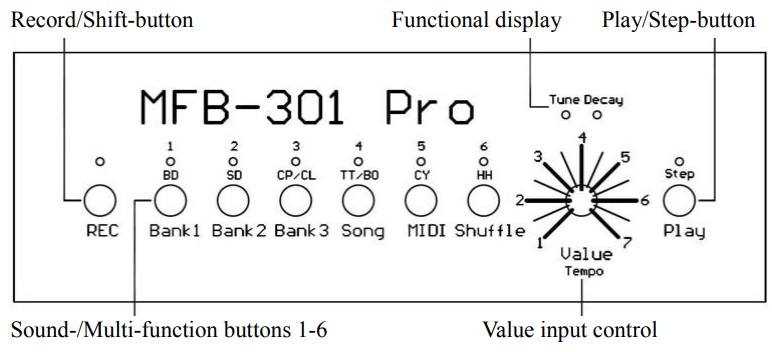
Push Play to start and stop the sequencer. Use the Value control to adjust the sequencer tempo, given that the LEDs (Tune/Decay) above are not lit. Apart from that, the Value control serves to adjust values for the sound parameters.Loading, saving, and deleting patternsThe MFB-301 Pro offers three banks with 36 patterns each. A pattern is loaded by pressing Bank 1/2/3 (LED above lit). Release the button and subsequently press two buttons 1-6 to select the memory location (11-66). Saving patterns follows the same scheme: Here, press and additionally hold REC after pressing Bank first.Now release both buttons and select the memory location by a combination of 1- 6. A pattern is deleted by pressing and subsequently releasing the buttons REC and Play.
Hint: It is only possible to load and save patterns with both LEDs above the Value control turned off. In addition, patterns can only be stored with the sequencer being stopped.
Programming Patterns Step Record Mode
In this mode, a pattern is programmed by sequentially entering up to 16 steps using the buttons REC and Play.
- Press REC followed by an instrument button (e.g. BD).
- Now release both buttons (both LEDs lit)
- Use REC to set steps (instrument sounding), while Playsets rests
- After setting a step on 16, complete the operation by pressing Play.
Example:Press REC once, then 7 x Play, then REC once more and Play another 7 times.The result is: o— —- o— —-Hint: It is only possible to enter a complete track. Upon erroneous inputs, you may abort the operation by pressing the instrument button. Restart programming from scratch afterward. Alternatively, you may as well press REC for a while todelete a track.By using the Value control’s push-function, you may circle through the following parameters and individually adjust their values per step by using the control:
- Pitch (Tune LED lit)
- Length (Decay LED lit)
- Extra function (both LEDs lit)
The extra functions are:
- Attack for BD, CP, TT, BO, and CL
- Noise for SD
- Noise/Metal-mix for CY and HH.
Parameter changes are carried out using the Value control. These are displayed by the LEDs 1-6. By this, you can program high and low toms or closed and open hi-hats. Any changed value also applies to successive steps in case no new values are being entered here. Bear this in mind for hi-hats especially!Example:
- Press REC and HH, then release both buttons.
- Press REC to program the first hi-hat.
- Press the button of the Value control until the right LED is lit, Then turn to set the desired length (e.g. Open Hi-hat).
- Continue programming by pressing Play (Pause) or REC to add a second hi-hat.
- Now, turn the Value control again to create a closed hi-hat by setting a short value for the note length (example).
- Subsequently, program the rest of the pattern.
- Complete the procedure by pressing the corresponding instrument button.
Hint: You only need to turn the Value control in case you want to change the parameter value for this step.
CL and BO are programmed by first pressing REC followed by a double click onCP/CL respectively TT/BO. Next, release both buttons. For example: (REC +CP/CL + CP/CL).
Pattern LengthIn case you want a pattern with less than 16 steps, end programming at any time by pressing the corresponding instrument button. The last programmed track sets the overall pattern length.Example:BD-track, press REC once, 5 x Play, REC once, 5 x Play, and finally BD to complete programming. As a result, you did program 12 steps, equaling a 3/4 bar.
Real-Time ModeStart the sequencer and press REC (You will hear the clave sound CL in a 4/4 beat). You can now set the steps in real-time by pressing the corresponding instrument buttons or by using MIDI (see MIDI implementation list). By pressing and holding the instrument button, the track will be deleted.Use the Value control to change the pitch, length, or extras for the instrument that was programmed last.Programming of CL and BO is possible by pressing REC twice. In explanation: 1 x REC = CP and TT, once more REC = CL and BO. Pressing REC again will end the recording.The level of the instruments can be changed per pattern. Press Play followed by the Value control’s push function until the left LED is lit. Press the instrument button afterward, e.g. BD. Use the Value control to adjust the level of the BD track. CL and BO can be adjusted with the red LED are lit. (Press Value twice). The headphones level can be set with both LEDs being lit. Make sure to directly save the pattern. Else, the settings will be lost when switching the unit off.
Sound Parameters
It is possible to adjust the pitch, the note length, and the extra parameters upfront. This way, you can create a default setting that applies, e.g. when deleting a pattern. To do so, press the button of the Value control once (left LED lit). Next, press REC and e.g. BD, then release both buttons. Subsequently, the Value control can be used to adjust the pitch (Tune LED lit), the length (Decay LED lit), and the extra function (both LEDs lit) of the BD. To exit this mode, press BD. The same procedure can be used for the other instruments. BO and CL can be adjusted by pressing the buttons twice (REC + CP/CL + CP/CL, then release both buttons).In addition, it is possible to adjust the instruments’ level for the pattern. When deleting a pattern, this level will be used as the default level. To do so, press the button of the Value control once (left LED lit). Press for example BD subsequently and adjust the level of the BD by using the Value control. The same procedure can be used for the other instruments. The levels for BO and CL can be adjusted with the right LED of the Value control is lit.
Playing instruments directly
In order to trigger the individual instruments directly on the unit, press the button of the Value control (left LED-lit – press twice to select CL and BO, right LED lit). The instruments can now be triggered using the corresponding buttons.Programming SongsThis function allows chaining multiple patterns. Chained patterns are played consecutively in a pre-programmed sequence. Programming is carried out as follows. Note that the sequencer has to be stopped:Press and release Song (LED lit), then press and release REC (LED lit).Programming starts by selecting the first pattern.Example:Press and release Bank1, select a pattern by pressing two buttons 1-6 and confirm by pressing Play/Step. You have now saved the first pattern. The second pattern is created as follows: Press Bank1, press two buttons 1-6, and confirm by pressing Play/Step. Continue programming respectively until all patterns are stored. Then confirm the whole procedure by pressing REC.
Loading and saving songs
Songs are loaded just like patterns. Press Song and two buttons 1-6. To save a song, press Song, then REC. Release both buttons and press two buttons 1-6. In order to playback a song, press Song first, followed by Play. Else, the last pattern will be played.
ShuffleThe MFB-301 Pro offers five shuffle intensities. With the sequencer being stopped, press Shuffle followed by a button 1-6. 1 stand for no shuffling. LEDs 1-6 visualize the selected pattern. This setting applies globally.Hint: MIDI functions can only be adjusted with the sequencer being stopped.
MIDI ChannelUse the learn function to set the MIDI channel. While the sequencer is being stopped, press MIDI, followed by a note on your MIDI keyboard. As soon as the LED above the MIDI button turns off, the procedure is completed.MIDI Velocity
To enable the reception of velocity data, press MIDI followed by button 1.Velocity is enabled with LED 1 is lit. It is inactive with LED 1 being turned off.
MIDI CCThe unit can receive more than 20 MIDI-control commands (see MIDI implementation list). Press MIDI and button 2 to either enable reception ofcontrollers (LED 2 lit) or not (LED 2 off).
MIDI Clock/External Sync
With the MFB-301 Pro’s sequencer set to internal (LEDs above buttons 3 and 4 turned off), an incoming MIDI-clock or an analog sync signal will be ignored. To activate an external synchronization, press MIDI and button 3 for MIDI-clock or button 4 for an external analog clock (LED 3 respectively 4 lit).The external sync jack is a TRS-jack where the tip receives the clock signal and the ring receives the start and stop commands.
Sound Changes via MIDI
Received MIDI controller data will permanently change the sound settings.Should you wish to return to the last saved state, press MIDI followed by 5.
Hint: When using MIDI CCs to dynamically change sound parameters, it is recommended to use the drum kit on MIDI-notes 36 to 47. Higher notes already use MIDI CCs internally. See table MIDI implementation.
Saving Basic Settings
Sound-, MIDI- and shuffle settings can be saved, making them available when turning the unit back on. To do so, press MIDI, release the button, and press REC.
Loading and saving patterns using USB, USB-Firmware-UpdateGiven the appropriate driver has been installed and the MFB-301 Pro has been connected to a Windows computer using the USB connection, terminal software can be used to save and load patterns from and to the unit. To do so, press Bank 1, release the button, and press Play to initiate the transfer to the computer. Or, press Bank 1, release the button, press REC, release the button and then press Play to initiate the transfer to the MFB-301 Pro. More detailed descriptions, as well as information on how to carry out firmware updates, are soon to be found on our website.
Control Elements
MIDI-Implementation
| MIDI-Note | Instrument/Function | CC-Number | Function |
| Note # 36 (C) | BD | CC# 03 | BD Tune |
| Note # 37 (C#) | HH | CC# 11 | SD Tune |
| Note # 38 (D) | SD | CC# 19 | TT Tune |
| Note # 39 (D#) | CY | CC# 21 | BO Tune |
| Note # 40 (E) | CP | CC# 86 | CL Tune |
| CC# 84 | CY Tune | ||
| Note # 41 (F) | REC button | CC# 89 | HH Tune |
| Note # 42 (F#) | TT | ||
| Note # 43 (G) | LED TUNE On/Off | CC# 64 | BD Decay |
| Note # 44 (G#) | BO | CC# 67 | SD Decay |
| Note # 45 (A) | LED DECAY On/Off | CC# 75 | CP Decay |
| Note # 46 (A#) | CL | CC# 20 | TT Decay |
| Note # 47 (B) | Play button | CC# 78 | BO Decay |
| CC# 87 | CL Decay | ||
| Note # 48 (C) | BD + CC long Attack | CC# 85 | CY Decay |
| Note # 49 (C#) | SD + CC low | CC# 90 | HH Decay |
| Note # 50 (D | BD + CC medium | ||
| Note # 51 (D#) | SD + CC high | CC# 13 | SD Snappy |
| Note # 52 (E) | CP + CC long | ||
| Note # 53 (F) | CP + CC short | CC# 02 | BD Attack |
| Note # 54 (F# | TT + CC low | CC# 76 | CP Attack |
| Note # 55 (G) | TT + CC low Attack | CC# 79 | TT Attack |
| Note # 56 (G#) | TT + CC medium | CC# 82 | BO Attack |
| Note # 57 (A) | TT + CC medium Attack | CC# 53 | CL Attack |
| Note # 58 (A#) | TT + CC high | ||
| Note # 59 (B) | TT + CC high Attack | CC# 88 | CY Mix |
| Note # 60 (C) | BO + CC low Attack | CC# 93 | HH Mix |
| Note # 61 (C#) | BO + CC medium | ||
| Note # 62 (D) | BO + CC medium Attack | ||
| Note # 63 (D#) | BO + CC high | ||
| Note # 64 (E) | CL + CC low | ||
| Note # 65 (F) | CL + CC high | ||
| Note # 66 (F#) | CY + CC Metal | ||
| Note # 67 (G) | HH + CC short Mix | ||
| Note # 68 (G#) | CY + CC Mix | ||
| Note # 69 (A) | HH + CC long Mix | ||
| Note # 70 (A#) | CY + CC Noise | ||
| Note # 71 (B) | HH + CC short Noise | ||
| Note # 72 (C) | HH + CC long Noise |
Hint: The MFB-301 Pro’s MIDI implementation is compatible with the models MFB Tanzmaus and MFB Tanzbär Lite. You may use both units’ control elements to remote-control the MFB-301 Pro.
MFB-301-Pro USB-Data-TransferThe MFB-301 Pro can be connected to a computer running a recent Windows operating system. Given that the corresponding driver has been installed, terminal software can be used to load and save patterns and to request and update the firmware of the unit.
Driver Installation
The MFB-301 Pro uses the CY7C65213 chip by Cypress to convert USB to serial data and vice versa. To setup a connection to your computer, a driver needs to be installed. This driver can be found on the Cypress website: https://www.cypress.com/sdc
Navigate to the USB section and search for the entryDownload USB-Serial Driver – WindowsHint: Before being able to download the driver, you will need to register with the manufacturer and confirm this procedure by e-mail.
- Install the driver by double-clicking the .exe file.
- Next, connect your computer to the MFB-301 Pro by using a suitable USB cable and switch on both units.
- You may use the USB cable that comes with the power supply of the MFB-310 Pro.The MFB-301 Pro does not require a separate power supply.
- Wait until Windows recognizes the unit and displays it as usable.
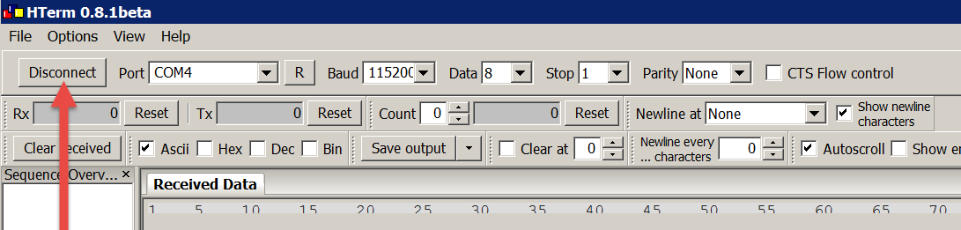
Terminal SoftwareIdeally, terminal software is used to communicate between the computer and the MFB-301 Pro. We recommend the free software HTerm.exe. HTML can be found here for an example:https://www.heise.de/download/product/hterm-53283
Connecting to HTerm
- Launch HTerm.exe by double click.
- The top left of the GUI will display the COM ports.
- Connect the MFB-301 Pro to your computer via USB. A COM number should appear after a short while. If not, you may need to click the R button once in the GUI.
- Next to the COM display, a few numbers are being shown. There is no need to edit any of these. The values are BAUD 115200, DATA 8, STOP1, Parity None.
- On the left side of the GUI, press Connect until the display entry reads Disconnect. Ready!

Hint: In case nothing happens, the driver has not been successfully installed.
Displaying the Firmware-Version
To request the firmware version of your MFB-301 Pro, make sure HTerm has recognized the unit.On the MFB-301 Pro, press and release Shuffle, then press Play.The software will now display the firmware-version under Received Data, e.g.MFB-301 Pro Version 1.0
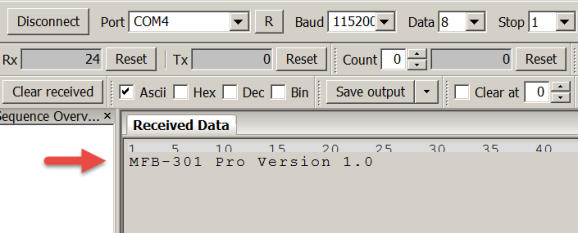
Hint: If this is not the case, please double-check whether the ASCI option in the software has been disabled (It needs to be enabled).
Transferring Patterns to a computer
To transfer a single pattern from your MFB-301 Pro’s RAM to the computer, carry out the following steps:
- Make sure, the MFB-301 Pro has successfully been connected to the computer via USB and has been detected by them.
- First, erase the Received Data view in HTerm by pressing Clear Received.
- Now, load a pattern into the MFB-301 Pro’s RAM, e.g. BANK 2, Pattern 11.
- Press Bank 1 on your MFB-301 Pro.
- Release the button.
- Press Play.
- The pattern data are being transferred. The file size is 256 Bytes.
![]()
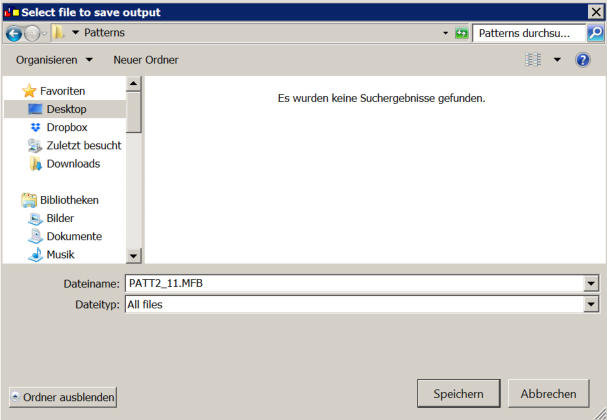
- By clicking Save Output in HTerm, these data can be saved anywhere on the computer under any name, such as PATT2_11.MFB.

Transferring Patterns to the MFB-301 ProTo transfer a single pattern to your MFB-301 Pro’s RAM, carry out the following steps:
- Make sure, the MFB-301 Pro has successfully been connected to the computer via USB and has been detected by them.
- Ideally, delete the current pattern by pressing Rec and Play on the MFB-301 Pro. This way, you will be able to hear the difference after the transfer.
- Click Send File in HTerm.

- Locate the desired pattern file on your computer, e.g. PATT2_11.MFB.
- Click Open in HTerm.
- Press Bank 1 on the MFB-301 Pro.
- Release the button.
- Press Rec.
- Release the button.
- Press Play.
- You now have approx. 30 seconds to initiate the transfer in HTerm by pressing Start.
![]()
- Now, save the pattern in your MFB-301 Pro.
Hint: Only the data of a single pattern are being transferred.
Carrying out a Firmware-Update
The MFB-301 Pro offers a built-in update function. To carry out a firmware update, you will need a corresponding .bin file, which will be supplied to you sporadically from MFB’s website or (whenever needed) by MFB’s support.
- Make sure, the MFB-301 Pro has successfully been connected to the computer via USB and has been detected by them.
- Click on Send File in HTerm.
- Locate the update file on your computer, e.g.: MFB-301P_VerX_X.bin, and click on Open.
- Switch off your MFB-301 Pro.
- Press Rec and Play on your MFB-301 Pro and switch the unit back on.
- Release both buttons.
- Double-check if the USB connection to your MFB-301 Pro is still present in them.
- Press Start in HTerm to initiate the data transfer.
- Switch the MFB-301 Pro off and back on afterward.
- You may double-check the current firmware version anytime.See Displaying the Firmware-Version

References
[xyz-ips snippet=”download-snippet”]